Duet3D Logo Duet3D
    • Tags
    • Documentation
    • Order
    • Register
    • Login

    How do I enable MESH leveling for the print?

    Scheduled Pinned Locked Moved
    General Discussion
    9
    25
    3.6k
    Loading More Posts
    • Oldest to Newest
    • Newest to Oldest
    • Most Votes
    Reply
    • Reply as topic
    Log in to reply
    This topic has been deleted. Only users with topic management privileges can see it.
    • jay_s_ukundefined
      jay_s_uk
      last edited by

      @Rat_Patrol said in How do I enable MESH leveling for the print?:

      === Move ===
      Hiccups: 0, FreeDm: 160, MinFreeDm: 130, MaxWait: 56660031ms
      Bed compensation in use: mesh, comp offset 0.073

      It shows as being active.

      Do you have a picture of your bed mesh?
      How many probe points do you have?
      Do you probe it hot or cold?

      Owns various duet boards and is the main wiki maintainer for the Teamgloomy LPC/STM32 port of RRF. Assume I'm running whatever the latest beta/stable build is

      1 Reply Last reply Reply Quote 0
      • Rat_Patrolundefined
        Rat_Patrol
        last edited by

        Pic of probing results:
        Bed points.jpg

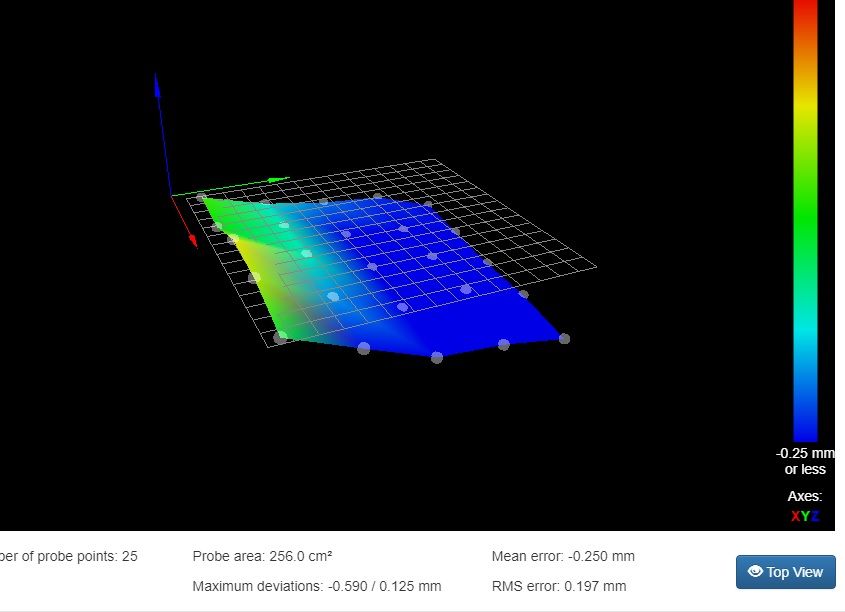
        Ran MESH at PETG temps.

        1 Reply Last reply Reply Quote 0
        • Rat_Patrolundefined
          Rat_Patrol
          last edited by

          My bed is very uneven at this point: I'm running a temporary Y carriage setup until I get some hardware in to manually level it out.

          Or until I cut up some soda cans 😄

          1 Reply Last reply Reply Quote 0
          • Rat_Patrolundefined
            Rat_Patrol
            last edited by Rat_Patrol

            Well, I re-sliced and uploaded, and MESH appears to be working now.

            Not doing a great job though, its like my nozzle-to-probe offset is wrong.

            I got the numbers for the offset from Fusion where I modeled all the parts, does my config look good?

            ; Configuration file for Duet Maestro (firmware version 2.03)
            ; executed by the firmware on start-up
            ;
            ; generated by RepRapFirmware Configuration Tool v2.1.5 on Thu Jan 09 2020 17:14:50 GMT-0600 (Central Standard Time)
            
            ; General preferences
            G90                                      ; send absolute coordinates...
            M83                                      ; ...but relative extruder moves
            M550 P"Robo R1++"                        ; set printer name
            M918 P1 E4 F2000000                      ; configure direct-connect display
            
            ; Network
            M551 P"xxxxx"                         ; set password
            M552 P0.0.0.0 S1                         ; enable network and acquire dynamic address via DHCP
            M586 P0 S1                               ; enable HTTP
            M586 P1 S0                               ; disable FTP
            M586 P2 S0                               ; disable Telnet
            
            ; Drives
            M569 P0 S1                               ; physical drive 0 goes forwards
            M569 P1 S1                               ; physical drive 1 goes forwards
            M569 P2 S1                               ; physical drive 2 goes forwards
            M569 P3 S1                               ; physical drive 3 goes forwards
            M584 X0 Y1 Z2 E3                         ; set drive mapping
            M350 X16 Y16 Z16 E16 I1                  ; configure microstepping with interpolation
            M92 X80.00 Y80.00 Z400.00 E813.65        ; set steps per mm
            M566 X100.00 Y100.00 Z100 E100      ; set maximum instantaneous speed changes (mm/min)
            M203 X9000.00 Y9000.00 Z720.00 E2100.00  ; set maximum speeds (mm/min)
            M201 X1100.00 Y1100.00 Z1100.00 E3000.00  ; set accelerations (mm/s^2)
            M906 X1500 Y1500 Z1000 E1500 I50          ; set motor currents (mA) and motor idle factor in per cent
            M84 S30                                  ; Set idle timeout
            
            ; Axis Limits
            M208 X0 Y0 Z0 S1                         ; set axis minima
            M208 X210 Y210 Z250 S0                   ; set axis maxima
            
            ; Endstops
            M574 X1 Y1 S1                            ; set active high endstops
            M574 Z1 S2                               ; set endstops controlled by probe
            
            ; Z-Probe
            M558 P9 H5 F300 T6000                   ; set Z probe type to bltouch and the dive height + speeds
            G31 P500 X-32.201 Y-26.389 Z3.00                ; set Z probe trigger value, offset and trigger height
            M557 X0:210 Y0:210 S40                   ; define mesh grid
            
            ; Heaters
            M305 P0 T100000 B4138 R2200              ; set thermistor + ADC parameters for heater 0
            M143 H0 S120                             ; set temperature limit for heater 0 to 120C
            M305 P1 T100000 B4725 C7.060000e-8 R2200 ; set thermistor + ADC parameters for heater 1
            M143 H1 S280                             ; set temperature limit for heater 1 to 280C
            
            ; Fans
            M106 P0 S0 I0 F500 H-1                   ; set fan 0 value, PWM signal inversion and frequency. Thermostatic control is turned off
            M106 P1 T45 S1 H1                  ; set fan 1 value, PWM signal inversion and frequency. Thermostatic control is turned on
            
            ; Tools
            M563 P0 S"Extruder" D0 H1 F0           ; define tool 0
            G10 P0 X0 Y0 Z0                          ; set tool 0 axis offsets
            G10 P0 R0 S0                             ; set initial tool 0 active and standby temperatures to 0C
            
            ; Custom settings are not defined


            devleonundefined Phaedruxundefined 2 Replies Last reply Reply Quote 0
            • PaulHewundefined
              PaulHew
              last edited by

              In my experience I manually level the bed using to 4 screws on my ender3.
              I try and make it as level as possible using paper gauge between nozzle and bed.
              Not teaching sucking eggs, I release the x/y steppers so I can move the gantry. Z is jogged down to grip paper, but stepper is engaged.

              The I run the mesh after heating the nozzle to 160 and bed to 60
              I also have 2 mirrors I use. I rename each heightmap to mirror 1 or 2 and call each mirror from cura’s start code.

              RailCore II - Duet Mini + 1LC, Voron V0.1 - Duet Mini
              Voron 2.4 disassembled..... Waiting for the RailCore Mini....

              1 Reply Last reply Reply Quote 0
              • devleonundefined
                devleon @Rat_Patrol
                last edited by devleon

                @Rat_Patrol

                I too had my offset from CAD, but turns out, it's not correct, since tolerances make things imperfect. Put a paper on the Heatbed, and slowly and manually run the nozzle into it, leaving a tiny mark, and also mark where your bed Probe is. Now measure everything and use that.

                I had the same issue of thinking that mesh bed leveling was doing a bad job, until I remeasured my offset and realized I was off my 10mm.

                1 Reply Last reply Reply Quote 0
                • Phaedruxundefined
                  Phaedrux Moderator @Rat_Patrol
                  last edited by

                  @Rat_Patrol said in How do I enable MESH leveling for the print?:

                  M558 P9 H5 F300 T6000 ; set Z probe type to bltouch and the dive height + speeds
                  G31 P500 X-32.201 Y-26.389 Z3.00

                  You can increase the accuracy and repeatability of the BLTouch by tweaking those settings a bit.

                  M558 P5 H5 F100 T6000 R0.5 A5
                  G31 P25

                  Then use this link to calibrate the trigger height and measure the X Y offset for the rest of G31.

                  https://duet3d.dozuki.com/Wiki/Test_and_calibrate_the_Z_probe#Section_Calibrate_the_Z_probe_trigger_height

                  Z-Bot CoreXY Build | Thingiverse Profile

                  droftartsundefined 1 Reply Last reply Reply Quote 0
                  • droftartsundefined
                    droftarts administrators @Phaedrux
                    last edited by

                    @Phaedrux said in How do I enable MESH leveling for the print?:

                    M558 P5 H5 F100 T6000 R0.5 A5
                    G31 P25

                    Don’t you mean M558 P9 H5 F100 T6000 R0.5 A5 ?

                    Ian

                    Bed-slinger - Mini5+ WiFi/1LC | RRP Fisher v1 - D2 WiFi | Polargraph - D2 WiFi | TronXY X5S - 6HC/Roto | CNC router - 6HC | Tractus3D T1250 - D2 Eth

                    Phaedruxundefined 1 Reply Last reply Reply Quote 1
                    • Phaedruxundefined
                      Phaedrux Moderator @droftarts
                      last edited by

                      @droftarts absolutely I did!

                      Z-Bot CoreXY Build | Thingiverse Profile

                      1 Reply Last reply Reply Quote 1
                      • Rat_Patrolundefined
                        Rat_Patrol
                        last edited by

                        Its not that the initial layer height is just wrong everywhere, some parts of the print have major squish and others are just fine.

                        1 Reply Last reply Reply Quote 0
                        • Rat_Patrolundefined
                          Rat_Patrol
                          last edited by

                          I did run through the BLTouch probe calibration procedure (ended up at 2.95mm IIRC). I designed my extruder carriage, so I just took the probe offset from the nozzle from Fusion, so it should be darned accurate.

                          Phaedruxundefined 1 Reply Last reply Reply Quote 0
                          • Phaedruxundefined
                            Phaedrux Moderator @Rat_Patrol
                            last edited by

                            @Rat_Patrol said in How do I enable MESH leveling for the print?:

                            so it should be darned accurate.

                            There was a post just yesterday of someone using the measurement from CAD and then measuring it physically and it was off enough to matter. So at least verify that it's accurate. A bad offset would give results similar to what you see.

                            The slower feed rate of the probe move helps to improve the consistency of the BLTouch and it's forced to have at least 2 probes match which helps reject off values. Again, a variation in probe trigger height could describe what you're seeing.

                            Z-Bot CoreXY Build | Thingiverse Profile

                            1 Reply Last reply Reply Quote 0
                            • Rat_Patrolundefined
                              Rat_Patrol
                              last edited by

                              Did I input my probe offset correctly in config.g?

                              Compared to X0 Y0, my probe is negative in both axis, so there is actually no way to measure the extreme right side of my bed with the probe.

                              I have the flu, but if I'm thinking properly, the probe offset should be negative, right?

                              Phaedruxundefined 1 Reply Last reply Reply Quote 0
                              • Phaedruxundefined
                                Phaedrux Moderator @Rat_Patrol
                                last edited by

                                @Rat_Patrol said in How do I enable MESH leveling for the print?:

                                the probe offset should be negative, right?

                                X would be negative based on your description, but I'm not sure about your Y. Negative Y would put the probe in front of the nozzle.

                                Z-Bot CoreXY Build | Thingiverse Profile

                                1 Reply Last reply Reply Quote 0
                                • Rat_Patrolundefined
                                  Rat_Patrol
                                  last edited by

                                  Yes, the probe is in front of the nozzle.

                                  1 Reply Last reply Reply Quote 0
                                  • TaDDragonZundefined
                                    TaDDragonZ
                                    last edited by

                                    Looks like the same error I have, I will check the probe offset right now.

                                    1 Reply Last reply Reply Quote 0
                                    • First post
                                      Last post
                                    Unless otherwise noted, all forum content is licensed under CC-BY-SA