Configuring temp reading from sensor for heated chamber
-
Hello folks,
I would like to put an e3d normal temperature sensor to use as chamber temperature monitoring and make it visible in DWC.
I do have DuetWifi with PT100. So I have spare two temperature sensor channels from hotends. I am curious how can I set up this in config.g? I don't have a heater yet, I would like to just to see what temperature can be raised with only heated bed.
I would like to plug this (https://e3d-online.com/thermistor-cartridge) thermistor here -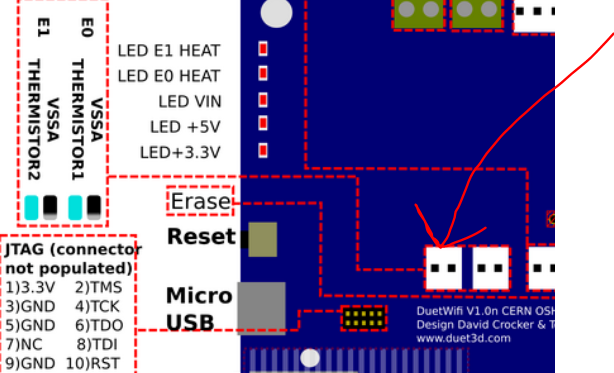
; Configuration file for Duet WiFi (firmware version 2.03) ; executed by the firmware on start-up ; ; generated by RepRapFirmware Configuration Tool v2.1.4 on Thu Jan 02 2020 22:17:48 GMT+0100 (Central European Standard Time) ; General preferences G90 ; send absolute coordinates... M83 ; ...but relative extruder moves M550 P"own" ; set printer name M667 S1 ; select CoreXY mode ; Network M552 S1 ; enable network M586 P0 S1 ; enable HTTP M586 P1 S0 ; disable FTP M586 P2 S0 ; disable Telnet ; Drives M569 P0 S1 ; physical drive 0 goes forwards M569 P1 S1 ; physical drive 1 goes forwards M569 P2 S1 ; physical drive 2 goes forwards M569 P3 S1 ; physical drive 3 goes backwards M569 P4 S0 ; physical drive 4 goes forwards M584 X0 Y1 Z2 E3:4 ; set drive mapping M350 X16 Y16 Z16 E16:16 I1 ; configure microstepping with interpolation M92 X200.0 Y200.0 Z400 E415:415 ; set steps per mm M566 X700 Y700 Z120 E5000.00:5000.00 ; set maximum instantaneous speed changes (mm/min) M203 X15000 Y15000.00 Z600 E13000.00:13000.00 ; set maximum speeds (mm/min) M201 X1300 Y1500 Z300 E4000.00:4000.00 ; set accelerations (mm/s^2) M906 X1450 Y1450 Z1400 E500:500 I30 ; set motor currents (mA) and motor idle factor in per cent M84 S90 ; Set idle timeout ; Axis Limits M208 X-15 Y0 Z0 S1 ; set axis minima M208 X311 Y212 Z345 S0 ; set axis maxima ; Endstops M574 Z1 S2 ; set active low and disabled endstops M574 X1 S0 ; set active high endstops M574 Y2 S0 ; Z-Probe M307 H3 A-1 C-1 D-1 ; disable heater on PWM channel for BLTouch M558 A2 S0.005 P9 H5 F400 T10000 R0.1 ; set Z probe type to bltouch and the dive height + speeds G31 P500 X-10 Y-18.3 Z0.99 ; set Z probe trigger value, offset and trigger height (positive value brings bed closer) M557 X0:290 Y-18.0:190 S15 ; define mesh grid ; Heaters M307 H0 B0 S1.00 ; disable bang-bang mode for the bed heater and set PWM limit M305 P0 T100000 B4138 R4700 ; set thermistor + ADC parameters for heater 0 M143 H0 S140 ; set temperature limit for heater 0 to 160C M305 P1 X200 ; configure PT100 for heater 1 M143 H1 S450 ; set temperature limit for heater 1 to 450C M305 P2 X201 ; configure PT100 for heater 2 M143 H2 S450 ; set temperature limit for heater 2 to 450C ; Fans M106 P0 S0 I0 F500 H-1 ; set fan 0 value, PWM signal inversion and frequency. Thermostatic control is turned off M106 P1 S1 I0 F500 H-1 ; set fan 1 value, PWM signal inversion and frequency. Thermostatic control is turned off M106 P2 S1 I0 F500 H-1 ; set fan 2 value, PWM signal inversion and frequency. Thermostatic control is turned off ; Tools M563 P0 S"Left" D0 H1 F-1 ; define tool 0 G10 P0 X0 Y0 Z0 ; set tool 0 axis offsets G10 P0 S0 R185 ; Set tool 0 active and standby temperatures M563 P1 S"Right" D1 H2 F-1 ; define tool 1 G10 P1 X19.7 Y0 Z0 ; set tool 1 axis offsets G10 P1 S0 R185 ; Set tool 0 active and standby temperatures ; Custom settings are not defined ; Miscellaneous M501 ; load saved parameters from non-volatile memory -
Check out the M305 command. In short, you will need to:
-
Assign a "virtual" heater number, e.g. P102, P103, etc
-
Define the virtual heater name , such as S"Chamber" or S"Y-Stepper"
-
Define the "heater" ADC channel, such as X3, X4. The 'X' value should be one more than the number silkscreened on the Duet/Duex CCA ( E2 would be X3, E3 would be X4)
-
Define temperature sensor values (T, B, C, R) per configurator tool or E3D documentation
Here are two of my "virtual heaters". X3 is E2 on the DueX, X4 is E3 on the Duex
M305P102P103 S"Chamber1" X3 T100000 B4725 C7.060000e-8 R4700
M305P103P104 S"Y-Stepper" X4 T100000 B4725 C7.060000e-8 R4700EDIT: I missed this section when setting up my virtual heaters:
Virtual heaters 100, 101 and 102 are preconfigured to use temperature sensor channels 1000, 1001 and 1002 respectively. We suggest you use virtual heaters 103 upwards if you want to create additional virtual heaters.Just changed P102 to P103, and P103 to P104 in my config.g to avoid conflicts with the Duex driver over temperature warning.
https://duet3d.dozuki.com/Wiki/Heaters -
-
Thank you!
Cant check it now as printer is printing. But as I understood it should be like that if I want to plug the thermistor into the E0 sensing channel?
M305 P103 S"Chamber" X1 T100000 B4725 C7.060000e-8 R4725 ;set thermistor for heated chamber -
@felt342 said in Configuring temp reading from sensor for heated chamber:
Thank you!
Cant check it now as printer is printing. But as I understood it should be like that if I want to plug the thermistor into the E0 sensing channel?
M305 P103 S"Chamber" X1 T100000 B4725 C7.060000e-8 R4725 ;set thermistor for heated chamberLooks just about right to me! I think the only issue is 'R' should be R4700, not R4725, but I may be mistaken.
https://duet3d.dozuki.com/Wiki/Connecting_thermistors_or_PT1000_temperature_sensorsPer that link, it appears the 'R' value is not needed in your (our) case.
-
Yes might be for R-value, I just used configuration tool to see the values, as there you can select E3D thermistor
")
But if I don't need it then doesn't matter! I need to wait 5 hours before I can check if its works
-
You should be able to enter these commands from DWC while the printer is running, as long as you are careful not to type the wrong command. And then you should be able to plug in the sensor. This stuff should have no effect on a running print. Make sure you discharge static before you plug in the sensor, though.
-
Hah, that's works! Thank you!
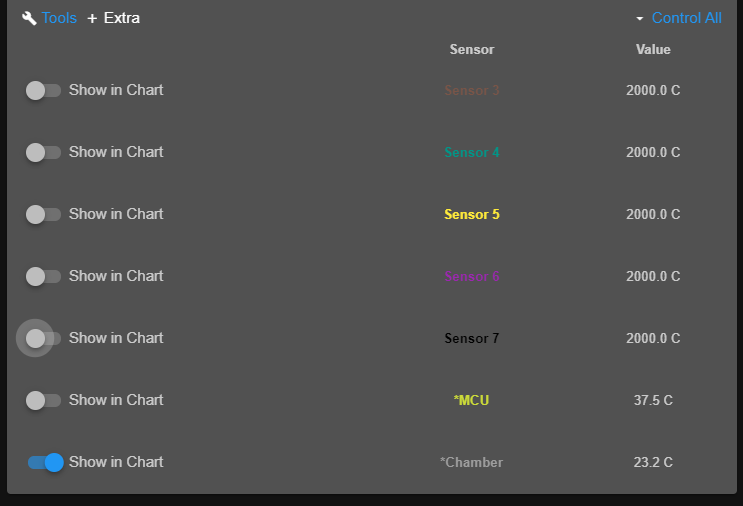
Another thing is is it possible to add it to the dashboard next to the Bed heater for example? For now I can only see it in graphs section -

-
For future reference, under RRF3 the M305 command needs to be replaced with M308.
This is from my machine where I have a thermister connected to the second extruder (E1) thermister connector. The A term is the name of the sensor that appears in the extras list. The S value should be between 0 and 31 for a Duet 2.
M308 S10 A"Extra Thermister" P"e1_temp" Y"thermistor" T100000 B3950 R4700More details at https://duet3d.dozuki.com/Wiki/RepRapFirmware_3_overview#Section_M308_Create_or_modify_sensor_or_report_sensor_parameters