Homing advice
-
Hey guys, new to 3d printing and Duet as well so thanks for help in advance.
i have it all setup, wired in and just trying to finish setup now so i can start printing/tuneing.
when i do the home all option this is what i finish with:
Status
Idle
Mode: FFF
Tool Position
X
0.0
Y
0.0
Z
300.00when i try to print it seems like its trying to go further into the x stop cuz i hear clicking and grinding. then after that finishes the bed lowers to the bottom all the way.
any advice? thank you!
-
Hey. For start please post your config.g file as well as all homing files. Also would help if we know what board it is and what firmware version are you running on it.
-
thanks for the reply
")
Board: Duet 2 wifi
Firmware: 3.1.1
Printer: Ender 5 ProConfig.g:
; Configuration file for Duet WiFi (firmware version 3)
; executed by the firmware on start-up
;
; generated by RepRapFirmware Configuration Tool v3.1.3 on Sun Jul 05 2020 20:32:26 GMT-0500 (Central Daylight Time); General preferences
G90 ; send absolute coordinates...
M83 ; ...but relative extruder moves
M550 P"Schaal3DPrinter" ; set printer name; Network
M552 S1 ; enable network
M586 P0 S1 ; enable HTTP
M586 P1 S1 ; enable FTP
M586 P2 S1 ; enable Telnet; Drives
M569 P0 S1 ; physical drive 0 goes forwards
M569 P1 S1 ; physical drive 1 goes forwards
M569 P2 S1 ; physical drive 2 goes forwards
M569 P3 S1 ; physical drive 3 goes forwards
M584 X0 Y1 Z2 E3 ; set drive mapping
M350 X16 Y16 Z16 E16 I1 ; configure microstepping with interpolation
M92 X80.00 Y80.00 Z400.00 E93.00 ; set steps per mm
M566 X900.00 Y900.00 Z12.00 E120.00 ; set maximum instantaneous speed changes (mm/min)
M203 X6000.00 Y6000.00 Z180.00 E1200.00 ; set maximum speeds (mm/min)
M201 X500.00 Y500.00 Z20.00 E250.00 ; set accelerations (mm/s^2)
M906 X800 Y800 Z800 E800 I30 ; set motor currents (mA) and motor idle factor in per cent
M84 S30 ; Set idle timeout; Axis Limits
M208 X0 Y0 Z0 S1 ; set axis minima
M208 X225 Y225 Z300 S0 ; set axis maxima; Endstops
M574 X1 S1 P"xstop" ; configure active-high endstop for low end on X via pin xstop
M574 Y1 S1 P"ystop" ; configure active-high endstop for low end on Y via pin ystop
M574 Z2 S1 P"zstop" ; configure active-high endstop for high end on Z via pin zstop; Z-Probe
M558 P1 C"zprobe.in" H5 F120 T6000 ; set Z probe type to unmodulated and the dive height + speeds
G31 P500 X0 Y0 Z2.5 ; set Z probe trigger value, offset and trigger height
M557 X15:215 Y15:195 S20 ; define mesh grid; Heaters
M308 S0 P"bedtemp" Y"thermistor" T100000 B4138 ; configure sensor 0 as thermistor on pin bedtemp
M950 H0 C"bedheat" T0 ; create bed heater output on bedheat and map it to sensor 0
M307 H0 B1 S1.00 ; enable bang-bang mode for the bed heater and set PWM limit
M140 H0 ; map heated bed to heater 0
M143 H0 S120 ; set temperature limit for heater 0 to 120C
M308 S1 P"e0temp" Y"thermistor" T100000 B4138 ; configure sensor 1 as thermistor on pin e0temp
M950 H1 C"e0heat" T1 ; create nozzle heater output on e0heat and map it to sensor 1
M307 H1 B0 S1.00 ; disable bang-bang mode for heater and set PWM limit; Fans
M950 F0 C"fan0" Q500 ; create fan 0 on pin fan0 and set its frequency
M106 P0 S0 H-1 ; set fan 0 value. Thermostatic control is turned off
M950 F1 C"fan1" Q500 ; create fan 1 on pin fan1 and set its frequency
M106 P1 S1 H1 T45 ; set fan 1 value. Thermostatic control is turned on; Tools
M563 P0 D0 H1 F0 ; define tool 0
G10 P0 X0 Y0 Z0 ; set tool 0 axis offsets
G10 P0 R0 S0 ; set initial tool 0 active and standby temperatures to 0C; Custom settings are not defined
; Miscellaneous
M911 S10 R11 P"M913 X0 Y0 G91 M83 G1 Z3 E-5 F1000" ; set voltage thresholds and actions to run on power loss
M501Homing files:
; homeall.g
; called to home all axes
;
; generated by RepRapFirmware Configuration Tool v3.1.3 on Sun Jul 05 2020 20:32:27 GMT-0500 (Central Daylight Time)
G91 ; relative positioning
G1 H2 Z5 F6000 ; lift Z relative to current position
G1 H1 X-230 Y-230 F1800 ; move quickly to X and Y axis endstops and stop there (first pass)
G1 H2 X5 Y5 F6000 ; go back a few mm
G1 H1 X-230 Y-230 F360 ; move slowly to X and Y axis endstops once more (second pass)
G1 H1 Z305 F360 ; move Z up stopping at the endstop
G90 ; absolute positioning
G92 Z300 ; set Z position to axis maximum (you may want to adjust this); Uncomment the following lines to lift Z after probing
;G91 ; relative positioning
;G1 Z5 F100 ; lift Z relative to current position
;G90 ; absolute positioning; Example Homing file for RepRapFirmware on delta printer
M117 Use https://configurator.reprapfirmware.org/ to set up your printer config
;G91 ; use relative positioning
;******* Change F250 in the following line to F2500 when you are finished commissioning
;******* Change 320 in the following to a higher value if your Kossel has taller towers
;G1 S1 X320 Y320 Z320 F2500 ; move all carriages up 320mm, stopping at the endstops
;G1 S2 X-3 Y-3 Z-3 ; move all carriages down 3mm
;G1 S1 X6 Y6 Z6 F250 ; move carriages slowly up 6mm, stopping at the endstops
;G1 Z-5 F2000 ; down a few mm so that we can centre the head
;G90 ; back to absolute positioning
;G1 X0 Y0 F2000 ; centre the head and set a reasonable feed rate; homex.g
; called to home the X axis
;
; generated by RepRapFirmware Configuration Tool v3.1.3 on Sun Jul 05 2020 20:32:27 GMT-0500 (Central Daylight Time)
G91 ; relative positioning
G1 H2 Z5 F6000 ; lift Z relative to current position
G1 H1 X-230 F1800 ; move quickly to X axis endstop and stop there (first pass)
G1 H2 X5 F6000 ; go back a few mm
G1 H1 X-230 F360 ; move slowly to X axis endstop once more (second pass)
G1 H2 Z-5 F6000 ; lower Z again
G90 ; absolute positioning; homey.g
; called to home the Y axis
;
; generated by RepRapFirmware Configuration Tool v3.1.3 on Sun Jul 05 2020 20:32:27 GMT-0500 (Central Daylight Time)
G91 ; relative positioning
G1 H2 Z5 F6000 ; lift Z relative to current position
G1 H1 Y-230 F1800 ; move quickly to Y axis endstop and stop there (first pass)
G1 H2 Y5 F6000 ; go back a few mm
G1 H1 Y-230 F360 ; move slowly to Y axis endstop once more (second pass)
G1 H2 Z-5 F6000 ; lower Z again
G90 ; absolute positioning; homez.g
; called to home the Z axis
;
; generated by RepRapFirmware Configuration Tool v3.1.3 on Sun Jul 05 2020 20:32:27 GMT-0500 (Central Daylight Time)
G91 ; relative positioning
G1 H2 Z5 F6000 ; lift Z relative to current position
G1 H1 Z305 F1800 ; move Z up until the endstop is triggered
G92 Z300 ; set Z position to axis maximum (you may want to adjust this); Uncomment the following lines to lift Z after probing
;G91 ; relative positioning
;G1 Z5 F100 ; lift Z relative to current position
;G90 ; absolute positioningThanks again for the help!
-
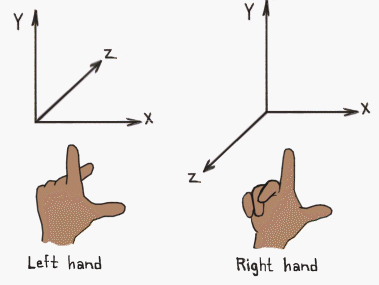
This sounds like a case of incorrect coordinate system.
Please have a look at these posts
https://forum.duet3d.com/topic/12676/mirrored-x-axis/9
https://forum.duet3d.com/topic/14971/vcore-pro-core-xy-the-x-and-y-axis-home-issue/4Basically, you must decide where the front of your printer is when you're looking at it. Then the front left corner is the origin point 0,0.
The homing position is where the endstops are. They aren't always going to be at 0,0.
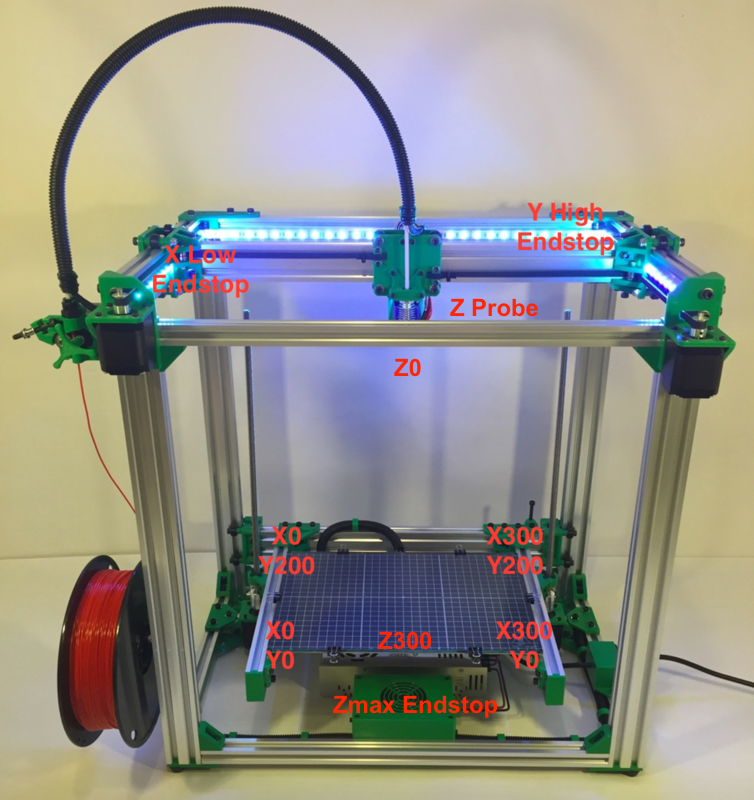
Is the X endstop on the left or right?
Is the Y endstop at the front or back?
The M574 commands that define the endstops must match where they physically are. High or low end of travel.
+X moves to the right, -X to the left. -Y to the front, +Y to the back.
The homing files must move towards the endstops. -
Thanks for the reply!
ill def have a look at those posts.
and this maybe where im getting confused. the stops are in the back right corner. i thought that was 0,0. right now +x moves to the left and +y moves towards me or what im calling the front of the printer.
-
So you have the choice of either viewing the "back" of the printer as the "front" and choosing the back right corner as 0,0 and the homing position, or choosing the front left as 0,0 and the homing position at the high end of travel in the back right corner.
Either way is fine, but you need to be careful that you don't get an axis flipped which can lead to printed models being mirrored from what the slicer shows since the slicer is assuming the 0,0 position is in the front left and +X moves to the right, -X to the left. -Y to the front, +Y to the back.
-
so i think i would like to keep the Back of the printer as the 0,0 since that is where the stop switches are. but im still confused on what i need to change to make that happen. i know im being a complete noob and i apologize for that .
-
Well 0,0 and the endstops don't have to match. Homing to the high end of travel is fine. This has the benefit of staying matched with the slicer view and stays consistent with the language normally used with printers, namely the right handed coordinate system, meaning +X moves to the right, -X to the left. -Y to the front, +Y to the back.
Here are some illustrations.
So in your case, here's what you need to change in your config.
; Endstops
M574 X2 S1 P"xstop" ; configure active-high endstop for low end on X via pin xstop
M574 Y2 S1 P"ystop" ; configure active-high endstop for low end on Y via pin ystop
Instead of X1 and Y1, it's not X2 and Y2, for the high end of travel, back right corner.
And change the directions of travel for the homing moves from negative to positive.
; homeall.g
; called to home all axes
;
; generated by RepRapFirmware Configuration Tool v3.1.3 on Sun Jul 05 2020 20:32:27 GMT-0500 (Central Daylight Time)
G91 ; relative positioning
G1 H2 Z5 F6000 ; lift Z relative to current position
G1 H1 X+250 Y+250 F1800 ; move quickly to X and Y axis endstops and stop there (first pass)
G1 H2 X-5 Y-5 F6000 ; go back a few mm
G1 H1 X+230 Y+230 F360 ; move slowly to X and Y axis endstops once more (second pass)
G1 H1 Z305 F360 ; move Z up stopping at the endstop
G90 ; absolute positioning
G92 Z300 ; set Z position to axis maximum (you may want to adjust this)
; homex.g ; called to home the X axis ; ; generated by RepRapFirmware Configuration Tool v3.1.3 on Sun Jul 05 2020 20:32:27 GMT-0500 (Central Daylight Time) G91 ; relative positioning G1 H2 Z5 F6000 ; lift Z relative to current position G1 H1 X+250 F1800 ; move quickly to X axis endstop and stop there (first pass) G1 H2 X-5 F6000 ; go back a few mm G1 H1 X+230 F360 ; move slowly to X axis endstop once more (second pass) G1 H2 Z-5 F6000 ; lower Z again G90 ; absolute positioning; homey.g ; called to home the Y axis ; ; generated by RepRapFirmware Configuration Tool v3.1.3 on Sun Jul 05 2020 20:32:27 GMT-0500 (Central Daylight Time) G91 ; relative positioning G1 H2 Z5 F6000 ; lift Z relative to current position G1 H1 Y+230 F1800 ; move quickly to Y axis endstop and stop there (first pass) G1 H2 Y-5 F6000 ; go back a few mm G1 H1 Y+230 F360 ; move slowly to Y axis endstop once more (second pass) G1 H2 Z-5 F6000 ; lower Z again G90 ; absolute positioning -
thank you for the detailed explanation, makes a little more sense now. still working on understanding the settings though. i made you suggested changes and now the extruder is in the front right corner and when i do home all sits there and bangs over and over when each of the axis homes.
X+ currently moves to the left
Y+ moves towards myself or the front
Z+ moves the bed up -
Did you copy and paste my homing files into yours?
And just to confirm...
Is the X endstop on the left or right?
Is the Y endstop at the front or back? -
yes sir, copied and pasted.
The Y is in the back right corner.
The x is on the right, -
@Phaedrux said in Homing advice:
M574 X2 S1 P"xstop" ; configure active-high endstop for low end on X via pin xstop M574 Y2 S1 P"ystop" ; configure active-high endstop for low end on Y via pin ystop
And you changed M574 to X2 and Y2?
-
yes sir copied all 3 homing files and pasted over mine.
; Endstops
M574 X2 S1 P"xstop" ; configure active-high endstop for low end on X via pin xstop
M574 Y2 S1 P"ystop" ; configure active-high endstop for low end on Y via pin ystop
M574 Z2 S1 P"zstop" ; configure active-high endstop for high end on Z via pin zstop -
Alright, then we may need to change a motor direction.
; Drives
M569 P0 S1 ; physical drive 0 goes forwards
M569 P1 S1 ; physical drive 1 goes forwards
Try
M569 P0 S0
M569 P1 S0 -
That may have done it.
X+ Moves to the right !!!!!!
Y+ Moves to the Back!!!!
Z+ Moves up!!!!!so after i home, the "position tool" says its X - 225.0, Y 225.0, Z - 300.00 thats what i want right?
-
-
no dashes,
Status
Printing
Mode: FFF
Tool Position
X
225.0
Y
225.0
Z
300.00 -
The last thing to check is that when you move to 0,0 it's at the corner of the bed. If it's not, then you'll have to adjust the M208 maxima values.
-
so when i "home all" it sends it to the back right corner. when i got to 0,0 it goes to the front left corner. when i try to start a print, it starts in the back right corner, bangs against the stops then the bed starts to lower all the way.
-
What do you have in your start gcode?