Smart Effector including toolboard-capabilities?
-
@o_lampe said in Smart Effector including toolboard-capabilities?:
I've seen BMG hardware kits for sale without housing. Are they complete or do I have to print gears to use your version? (Yuck)
I couldn't find any such kits. I ended up going on filastruder and ordering: 1 LDO 36STH17-1004AHG, 1 Bondtech drivegear kit (1.75/5mm), 1 bondtech thumbscrew assembly (that I likely won't use), and 1 Bondtech shaft/gear assembly.
Then I had to order the MR85ZZ bearings from amazon (because filastruder didn't have the correct size available.)
The "bondtech" drivegear kit is supposed to contain: "Gear set for filament size 1.75 mm, primary gear with inner diameter 5 mm, secondary gear with two needle bearings,M3x2 setscrew and one 3 x 20 mm shaft"
The LDO stepper motor has a gear in place of a shaft.
From what I can tell of the diagram, you shouldn't need to print any gears. Only 4 housing pieces. I'm guessing that they can be printed with PETG, but I'm not sure how hot the LDO stepper might get. (I doubt it'd get over 70C, but if it does, I can reprint the plastic with a hybrid PC+.)
@o_lampe said in Smart Effector including toolboard-capabilities?:
BTW: it deserves a name! How about Smart-Orbiter?
In my files, I'm calling it "mrac1 mini extruder", so I agree that it needs a name. To me, the orbiter is a completely different extruder.
"I'm not saying that you are wrong - I'm just trying to fit it into my real world simulated experience."
-
I was on the wrong path and thought it was a reused Orbiter. But it's the orbiter motor w/o the planetary gears? I think, I have to read the whole thread again...
-
@o_lampe said in Smart Effector including toolboard-capabilities?:
I was on the wrong path and thought it was a reused Orbiter. But it's the orbiter motor w/o the planetary gears? I think, I have to read the whole thread again...
There have been 4 different extruders discussed in this thread (that I noticed):
You posted something that references an extruder from a thread on the reprap forums. (Cycloidal direct drive.)
The actual "orbiter" extruder (as found on thingiverse and for sale via LDO distributers along with aliexpress clones already.) This one uses 3 planetary gears around the LDO motor's stepper gear for a ~7:1 ratio.
apak posted some pictures and a video, and mentioned it was based on the orbiter design, but allows pivoting (so it might work fine with 55mm arm spacing.) As far as I'm aware, no more information was posted about this extruder.
mrac1's extruder (that I think might predate the orbiter.) It's closer to a rebuilt BMG, but uses the LDO motor's built in gear instead of the BMG motor gear attached to a stepper's 5mm shaft. (The smaller LDO gear results in a 5:1 ratio instead of a 3:1 ratio from the BMG.)
"I'm not saying that you are wrong - I'm just trying to fit it into my real world simulated experience."
-
@garyd9 said in Smart Effector including toolboard-capabilities?:
From what I can tell of the diagram, you shouldn't need to print any gears. Only 4 housing pieces. I'm guessing that they can be printed with PETG, but I'm not sure how hot the LDO stepper might get. (I doubt it'd get over 70C, but if it does, I can reprint the plastic with a hybrid PC+.)
Yes, there are no extra gears to print. The LDO motor remains under 40° (motor current to 370 mAh) Except the fan duct, my hole effector and extruder ist printed in PLA.
-
@garyd9 said in Smart Effector including toolboard-capabilities?:
In my files, I'm calling it "mrac1 mini extruder", so I agree that it needs a name.
Sounds good
")
In my files I call it D3E (DeltaDirectDriveExtruder)
-
@mrac1 said in Smart Effector including toolboard-capabilities?:
In my files I call it D3E (DeltaDirectDriveExtruder)
It deserves a smart before the D3E, now that it's re-tailored for the Smart effector.
5:1 ratio is enough torque for a fast Delta or are there speed limits?The magballs in your effector are different from Haydn original ballstuds, what ball-diameter do they need?
I'm asking, because I've once designed a Delrin ball effector, which is much lighter, because no steelballs or magnets are needed. I might try to glue in 10mm Delrin balls...(one for each rod this time) -
@garyd9 said in Smart Effector including toolboard-capabilities?:
apak posted some pictures and a video
I'm beginning to see the light!
@apak showed two different designs, but only one is working now.
The other -with the split motor/planetary gearbox- is also quite interesting, since the BMG gears are available with 8mm ID.
Enough room to bypass the extended shaft for the star-wheel.
//edit there would be three parts needed to guide the motion back and forth: stepper shaft and starwheel-shaft both have to share the room inside the BMG wheel...pretty tight
-
@o_lampe said in Smart Effector including toolboard-capabilities?:
5:1 ratio is enough torque for a fast Delta or are there speed limits?
It's tested up to 100 mm/s (normally I do not print faster than 80 mm/s).
-
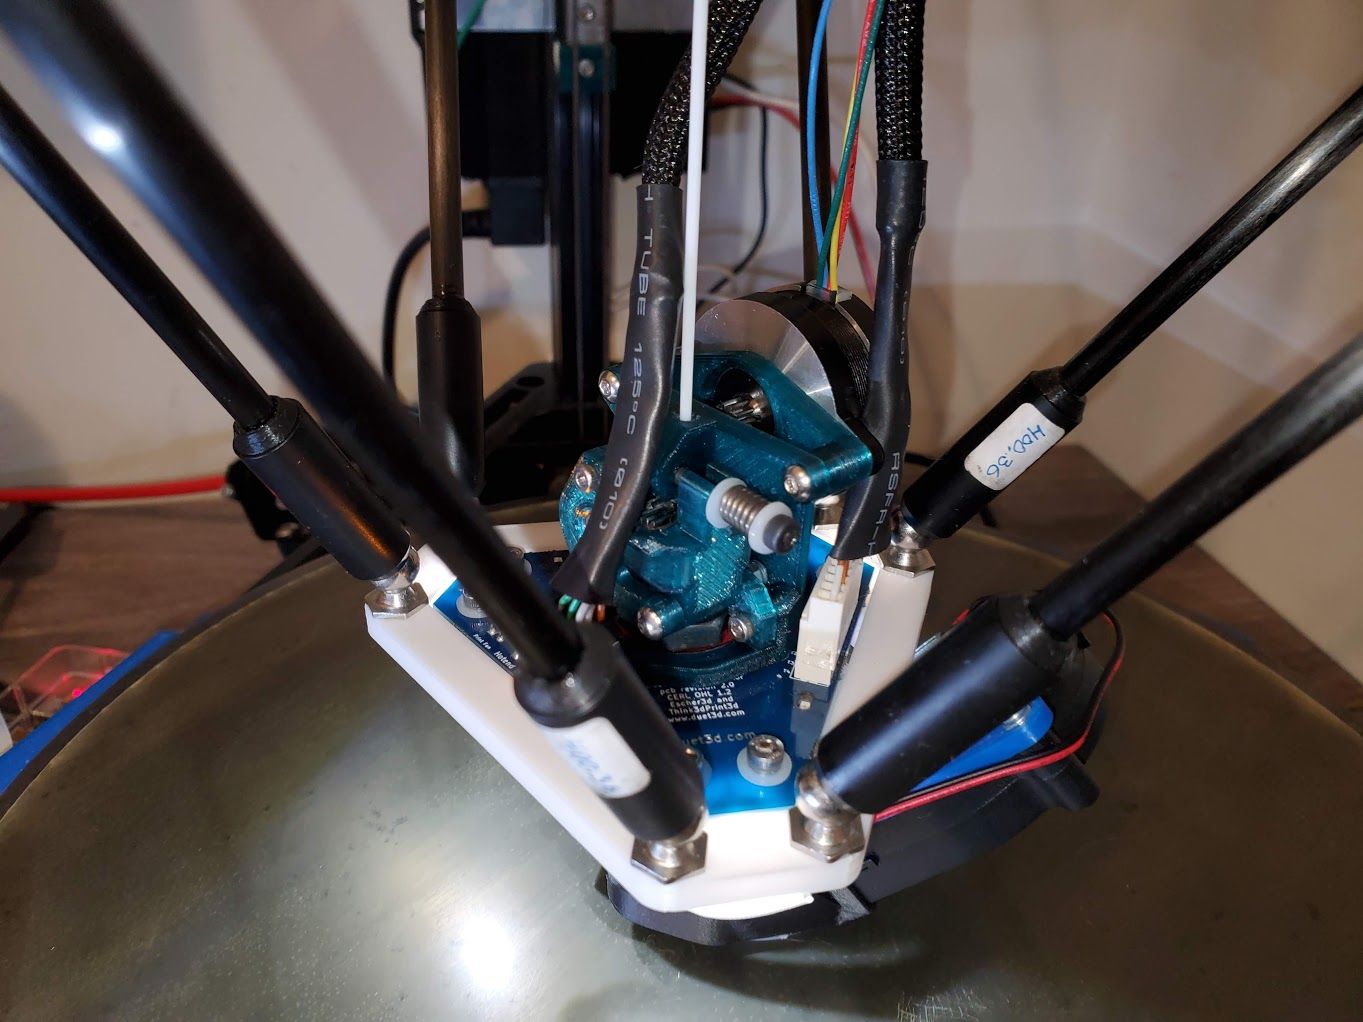
I've been playing with the plastic parts for your extruder and last night I tried a test fit of everything. One issue I noticed was that with the extruder mounted on the effector, I wasn't able to attach the smart effector's 2x3 microfit connector. The extruder's plastic was in the way of the little latch on the connector. (Below are images of the area I'm referring to.)
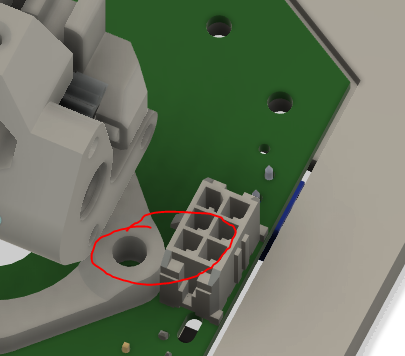
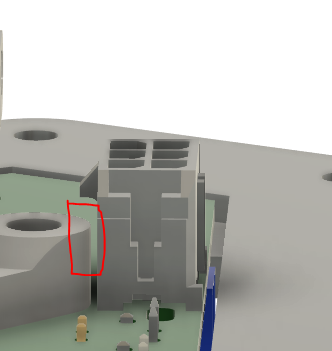
While I can easily make adjustments to the model to make this work, I'm wondering if you encountered the same issue and if so, how you might have handled it.
As a side note for @dc42, on the next iteration of the smart effector, would it be possible to rearrange things so that the inner three mounting holes have a good amount of clearance away from other parts that might interfere with mounting? (This might be easier to accomplish on a combined smart effector/toolboard with larger arm spacing.)
"I'm not saying that you are wrong - I'm just trying to fit it into my real world simulated experience."
-
@garyd9 said in Smart Effector including toolboard-capabilities?:
I've been playing with the plastic parts for your extruder and last night I tried a test fit of everything. One issue I noticed was that with the extruder mounted on the effector, I wasn't able to attach the smart effector's 2x3 microfit connector. The extruder's plastic was in the way of the little latch on the connector. (Below are images of the area I'm referring to.)
While I can easily make adjustments to the model to make this work, I'm wondering if you encountered the same issue and if so, how you might have handled it.
As a side note for @dc42, on the next iteration of the smart effector, would it be possible to rearrange things so that the inner three mounting holes have a good amount of clearance away from other parts that might interfere with mounting? (This might be easier to accomplish on a combined smart effector/toolboard with larger arm spacing.)
I encountered the same issue on my effectors which also uses those mounting holes (For a Zesty Nimble in my Case) the fix for me was to remove the housing on the effector and rotate it by 180 degrees and to wire the lead that connects to it appropriately.
Doug
-
@Dougal1957 said in Smart Effector including toolboard-capabilities?:
I encountered the same issue on my effectors which also uses those mounting holes (For a Zesty Nimble in my Case) the fix for me was to remove the housing on the effector and rotate it by 180 degrees and to wire the lead that connects to it appropriately.
That wouldn't help for this particular model. The same interference would be encountered for all three mounting holes (and would actually be worse on the other two.) The nimble adapter works because one of the three mounting holes is only about 3mm high and so sits under the clip for the micro-fit connector.
-
@Dougal1957 said in Smart Effector including toolboard-capabilities?:
the fix for me was to remove the housing on the effector and rotate it by 180 degrees
Do you say, the connector was on the bottom side of the SE after the rotation? Or the nose of the housing pointed the other way?
-
@garyd9 said in Smart Effector including toolboard-capabilities?:
The extruder's plastic was in the way of the little latch on the connector. (Below are images of the area I'm referring to.)
You are right, it's to tight there. On my Deltas I'm using my first version without brass inserts.
At this point you could take away some material without getting problems with the inserts, I think. Otherwise - it also works if the screws are simply screwed into the plastic. Then there is enough space at that point. -
@o_lampe said in Smart Effector including toolboard-capabilities?:
@Dougal1957 said in Smart Effector including toolboard-capabilities?:
the fix for me was to remove the housing on the effector and rotate it by 180 degrees
Do you say, the connector was on the bottom side of the SE after the rotation? Or the nose of the housing pointed the other way?
i turned the nose out on the connector @garyd9 the first nimble adaptors (I was the guinea pig there) was just as high as the others that's how my solution helped it just moved the locking Tab to the outer edge of the connector.
Doug
-
Still untested, but thought you might appreciate seeing your work:
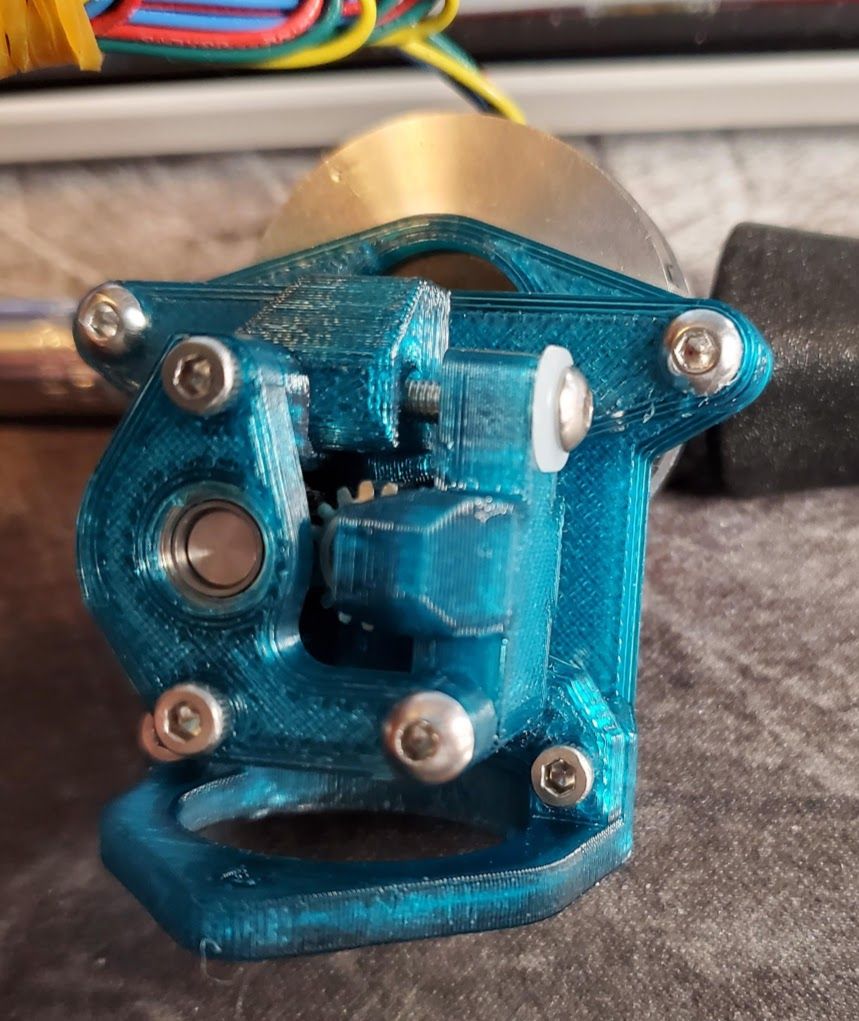
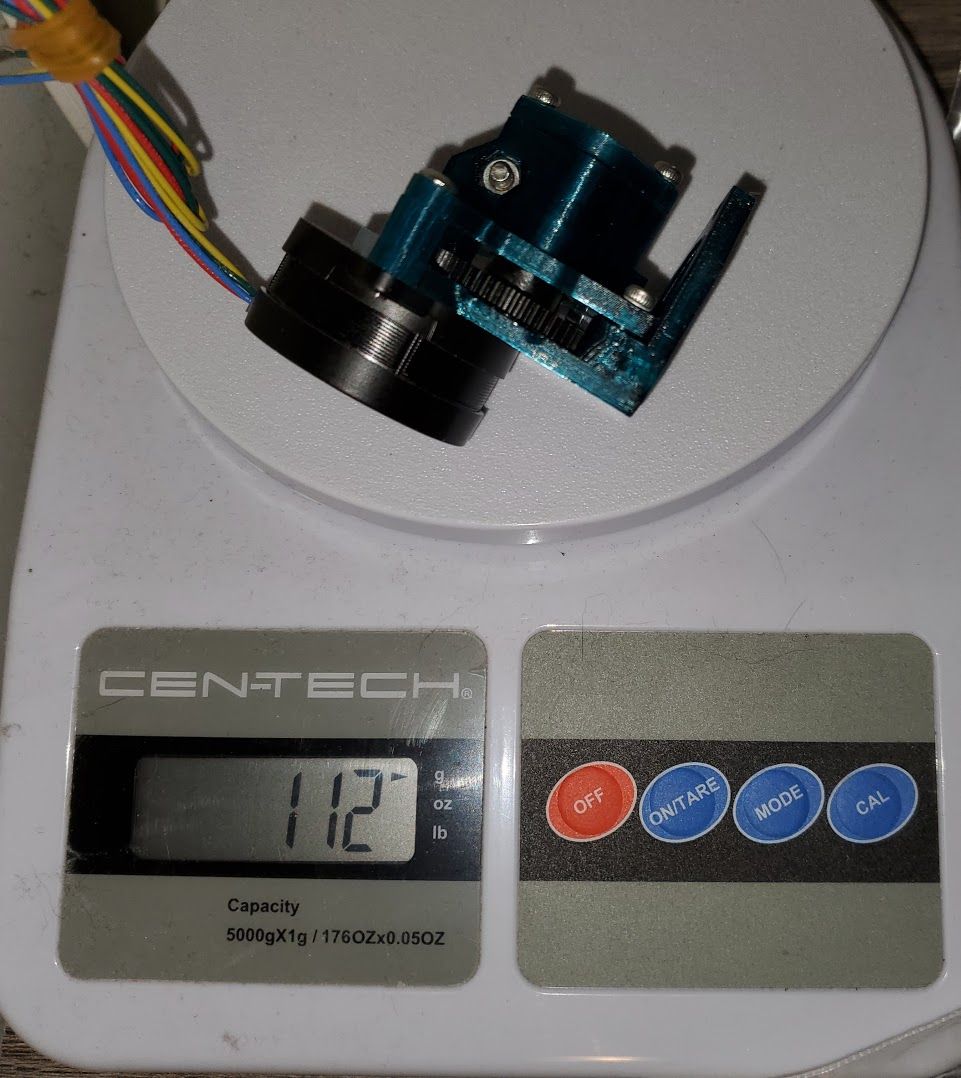
Everything printed with a 0.2mm layer height using SnoLabs "atrovirens" PETG. Only 112g including the stepper! (If you take into account all the dust on that scale, the extruder is probably only 111 grams.)
If you ever decide to publish this on thingiverse or something, feel free to use my photo (and I'd be happy to provide some more.) As well, the following might help anyone else that decides to try this out:
You need to really press the BMG 3x20 shaft into the idler lever. Pliers help. If the shaft falls out easily, or if the idler lever doesn't easily close, it's likely not in there properly.
On the motor mount piece and the 3 holes for mounting to the smart effector: I'm able to use just a M3 screw and nut for the front hole, but I couldn't find a good method for securing the rear two holes. I ended up using my "less than 100% reliable" M3x3 brass inserts. They seem to be secure, but only time will tell.
Manually lining up the BMG gear that mounts on the wheel/gear shaft is annoying. It's made much easier by sticking something all the way through the filament path and lining up the gear based on that.
Buying a BMG thumbscrew was a waste for an extruder this tiny. The "thumb" part of the screw rubs against the extruder, and there's just not enough space for the spring. An M3x25 with nylon washer appears to work well enough, but I might try to find a short spring I can use there. I've found that they're useful for irregular filament. (Edit: I found a long M3x40 screw I can use with the thumbscrew spring!)
It might still be a day or so before I'm able to properly test this. I need to verify that 74mm arm spacing will work on my particular printer, and then design/print new carriages.
Take care
Gary -
@garyd9 said in Smart Effector including toolboard-capabilities?:
Buying a BMG thumbscrew was a waste for an extruder this tiny
Yes, a M3 screw is provided here
Looks good, looking forward to seeing pictures of your first prints. Set the retract to 0.6 mm (PLA) and 1.0 mm (PETG) at 50 mm/s.
-
@dc42 In case the new smart effector becomes a reality, can we have an accelerometer on it to help with the detection of a crash or ringing? (Similar to this)
I don't know how feasible that is but one could even use it for the delta calibration by measuring effector tilt. (Maybe it could even replace the strain gauge if precise enough?)Might be a nice addition for the "normal" toolboards too.
-
@mrac1 said in Smart Effector including toolboard-capabilities?:
@garyd9 said in Smart Effector including toolboard-capabilities?:
Buying a BMG thumbscrew was a waste for an extruder this tiny
Yes, a M3 screw is provided here
I ended up finding an M3x35 that can work with the spring. It's probably not needed, but it makes me feel better.
After initial setup, I calibrated the feedrate on my setup to 698.4 steps/mm, and left jerk/accel/current at the values you suggested above. (That little LDO motor is impressive.)One other change I made with your model was the shorten the bottom of the filament guide and motor mount by 2mm (and then reshape the bottom of the filament guide to fit around the heatsink nut.) Then, because all the exact dimensions are there in fusion360, I made a little tool that lets me cut a piece of PTFE to the perfect length to go up into the extruder (from inside the E3D heatsink.)
I ended up using a 74mm arm spacing. I could have gone as short as 65-70, but 74 made the smart effector adapter easier.
I printed a quick XYZ calibration cube, and it looks better than the Zesty Nimble ever did in terms of consistent extrusion, and no ringing/ghosting. That was sliced with old retraction settings (1.5mm@60mm/sec with a retract prime speed of 20mm/sec.) I also still have pressure advance at 0.04.
I'll need to sit down and recalibrate retraction, pressure advance, etc.
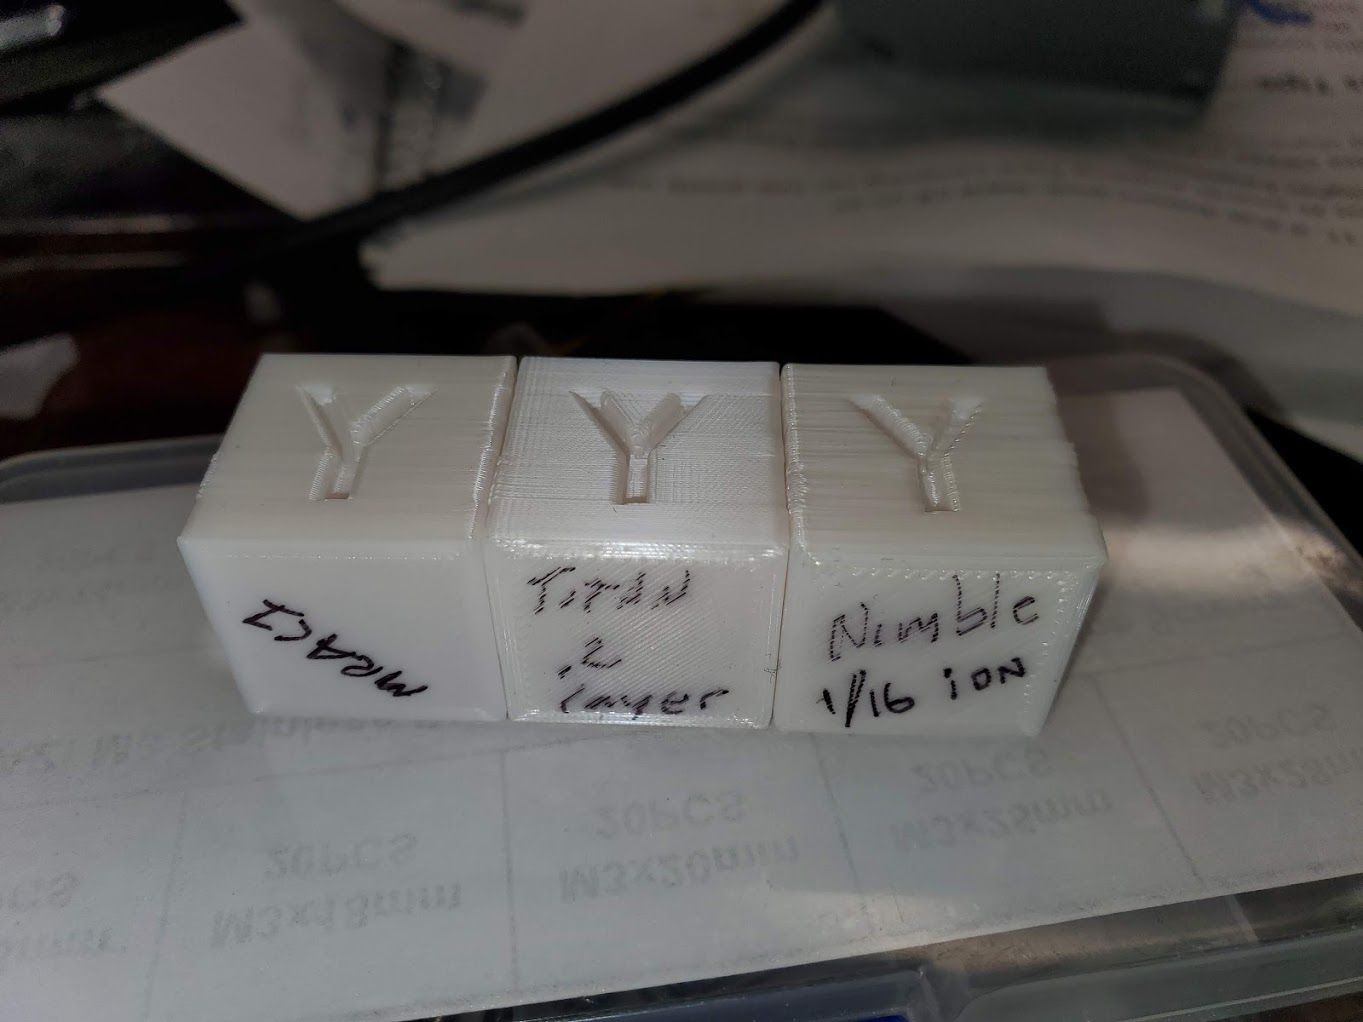
In the meantime, here's a couple more pictures. The first is your extruder mounted and working....
...and the other is a quick short of three XYZ calibration cubes. From left to right, they show your extruder, a titan extruder (with pancake NEMA17) hanging from a (not smart) effector, and finally a Zesty Nimble v1.2. The nimble shows inconsistent extrusion (that actually looks good compared to the nimble v2), and the titan shows obvious ringing. All three show bad retraction settings on the starts/stops.
Thank you again!
"I'm not saying that you are wrong - I'm just trying to fit it into my real world simulated experience."
-
@garyd9
Looks promising, but I still see room for improvement. This quality is possible without any problems:
This was a test of the D3E and two different slicers (S3D on the left, PrusaSlicer on the right).
-
@garyd9
Looks good, although I wouldn't have taken PETG. IMHO it's to flexible.
What do you think, why does the Titan show more ringing, than the D3E? Because it was mounted below the effector?
I have 3 BMG clones (for 22€!) and a roll of Carbon PLA on my way. I'll give it a try, when they arrive.