Large Format Dowell to Duet conversion
-
@charles-fraser ok, now you should not be getting a incompatibility fault and the temp sensors should be showing up. When you heat the heaters you may still get a heater fault. What is reported in the console for those heater faults? if its temperature is rising too slowly then we will fix that when you have the sensors installed in the hotend/bed and we are in a position to tune the PIDs for those heaters.
-
Yup all is heating up now with just a heater fault. there is nothing in the console about those faults. We could run autotune PID for the bed because that is set up but it's on bangbang mode so I wonder if that still has PID? I guess it must right?
I still havn't found a 3mm x 15mm p1000 but I will find one. Perhaps we can move onto the endstops now? I'm not sure which way around the wording convention indicates I have set up my end stops (again a diagram would be helpful) but perhaps there is a way I can test that is working and then start to do motor configuration after that? My thanks again!
Charles
-
In fact on closer inspection, when the bed fault comes on the bed stops heating
-
@charles-fraser
I would expect a report something like this in the DWC console when the bed hater faults:Error: Heater 0 fault: temperature rising much more slowly than the expected 1.7°C/secTo tune the bed the documentation is here:
https://duet3d.dozuki.com/Wiki/M303an example is
M303 H0 P1 S60Send this in the console - it will take a while to run and you will see the temp cycle. once its finished the send
M500in the console to save the results to config-override.gWe can also look at XY endstops (Z probe is out the picture for now as you said)
With the Axis not at their limits where the ends tops are send
M119from the console and see what is reported. Then with each of the endstops triggered in turn, sendM119while they are triggered and see the response in the console. -
Thanks, there is no report of error in terminal re noz heat failure:
I have completed PID tuning and I get (pls NB this is a mattress sized heated bed in a breezy tent!):
28/10/2021, 15:19:45 Edit the M307 H0 command in config.g to match this. Omit the V parameter if the heater is not powered from VIN. 28/10/2021, 15:19:45 Auto tuning heater 0 completed after 3 idle and 25 tuning cycles in 6627 seconds. This heater needs the following M307 command: M307 H0 B0 R0.138 C790.6 D13.87 S1.00 V24.0 28/10/2021, 15:19:44 Warning: heater behaviour was not consistent during tuning 28/10/2021, 13:51:14 Auto tune starting phase 4, tuning with fan off 28/10/2021, 13:37:00 Auto tune starting phase 3, heating system settling 28/10/2021, 13:29:22 Auto tune starting phase 2, heating up 28/10/2021, 13:29:18 M303 H0 P1 S60 Auto tuning heater 0 using target temperature 60.0°C and PWM 1.00 - do not leave printer unattended -
When I send M500 I get
28/10/2021, 16:15:14 M500 Warning: M500: No M501 command was executed in config.g -
@charles-fraser said in Large Format Dowell to Duet conversion:
M307 H0 B0 R0.138 C790.6 D13.87 S1.00 V24.0
For now replace the M307 H0 command in config.g with that command, except change to bang bang
M307 H0 B1 R0.138 C790.6 D13.87 S1.00 V24.0 -
@charles-fraser thats fine for now. we can enable config-override later.
-
@t3p3tony said in Large Format Dowell to Duet conversion:
M307 H0 B1 R0.138 C790.6 D13.87 S1.00 V24.0
okay thanks it syas
28/10/2021, 16:18:02 M307 H0 B1 R0.138 C790.6 D13.87 S1.00 V24.0 Warning: M307: Heater 0 appears to be over-powered. If left on at full power, its temperature is predicted to reach 134C -
@t3p3tony said in Large Format Dowell to Duet conversion:
M307 H0 B1 R0.138 C790.6 D13.87 S1.00 V24.0
Oh wait I added that as a command in the console
How do I change to bangbang?
Just add this?
M307 H0 B1 R0.138 C790.6 D13.87 S1.00 V24.0 -
Like this?)
; Heaters M308 S0 P"1.temp0" Y"PT1000" M950 H0 C"1.out0" T0 M307 H0 B1 R0.138 C790.6 D13.87 S1.00 V24.0 ; enable bang-bang mode for the bed heater and set PWM limit M140 H0 ; map heated bed to heater 0 M143 H0 S80 ; set temperature limit for heater 0 to 80C M308 S1 P"1.temp1" Y"PT1000" ; configure sensor 1 as thermistor on pin temp0 M950 H1 C"1.out1" T1 ; create nozzle heater output on out1 and map it to sensor 1 M307 H1 B0 S1.00 ; disable bang-bang mode for heater and set PWM limit M143 H1 S300 ; set temperature limit for heater 1 to 300C -
@charles-fraser yes that looks good.
-
Okay so I wired a switch up to the Z axis that should close if the bed comes up so far it pushes against the noz and changed the firmware and wiring so hopefully that's all good:
; Endstops
M574 X1 S1 P"io1.in"                                            ; configure active-high endstop for low end on X via pin io1.in
M574 Y1 S1 P"io2.in"                                            ; configure active-high endstop for low end on Y via pin io2.in
M574 Z1 S1 P"io0.in"                                                       ; configure Z-probe endstop for low end on Z
So when I run M119:
28/10/2021, 19:30:54	M119
Endstops - X: not stopped, Y: not stopped, Z: not stopped, Z probe: at min stop
Then I tape down the end-stops one by one and run M119 in order to make sure it's all wired up right. The x endstop (at the left, homing end of the gantry corresponding to left right movement of the gantry when viewed from in-front. Y endstop at the front end of the machine corresponding to Y home & forward and backwards. Z axis on a spring behind the extruder that is closed if the extruder is pushed up by the bed.
28/10/2021, 19:34:30 M119 Endstops - X: at min stop, Y: at min stop, Z: at min stop, Z probe: at min stop -
I guess next is motors

-
@charles-fraser yes. So if you have the gantry safely in the center of its motion, then send G92 X600 Y600 this will tell the printer it's rough position. The idea is to test movement is correct before testing homing.
The use DWC to jog the X axis +/-50 and them Y +/-50 to confirm they move in the right direction.
-
@t3p3tony said in Large Format Dowell to Duet conversion:
G92 X600 Y600
It works :))) it's bloody moving again!! Oh caloo calay!!!
Okay I'll measure how much it is moving each time I send it 100 x and 100 y and try and work out the steps per mm like that should I? I don't think I can count the teeth on these pulleys.
When I try and move the z axis I get:
29/10/2021, 10:08:32 M120 G91 G1 Z-0.05 F6000 G90 M121 Error: G0/G1: insufficient axes homed 29/10/2021, 10:08:29 M120 G91 G1 Z0.05 F6000 G90 M121 Error: G0/G1: insufficient axes homed -
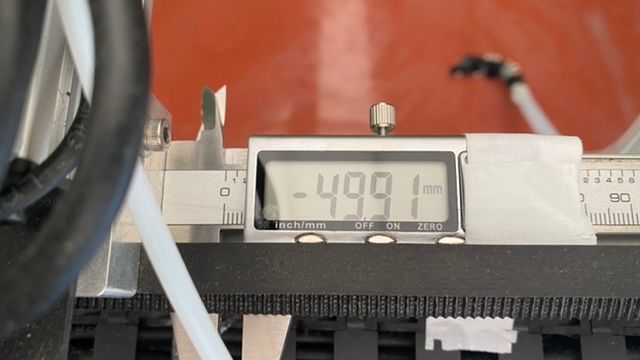
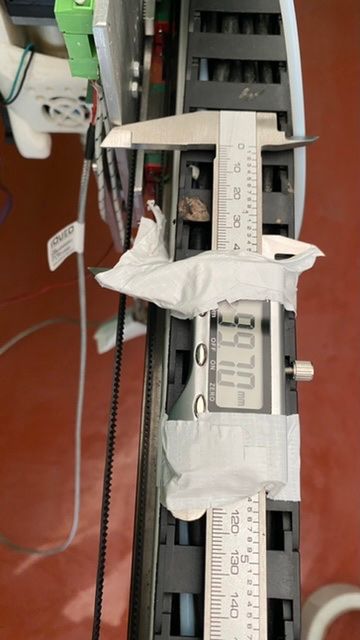
Okay so I taped my digital callipers to the slide rail and for the Y axis a +100 mm command = c. +50mm translation (give or take 0.2mm based on the fact the tape is probably giving a bit when it’s pushed back:

Then for the X axis a +100mm command = a +100mm translation with about the same margin of error:

Any quick tips on how to change the steps per mm for the Y axis? I guess I just double them right?
-
@charles-fraser the command M92 is what you need to change in your config.g
M92 X80.00 Y80.00 Z400.00 E420.00change to
M92 X80.00 Y160.00 Z400.00 E420.00Generally its best to specify the axis steps/mm as they are calculated based on the stepper microstepping setting and the belt/leadscrew gearing. If measured dimensions then end up being different there is a mechanical issue. I assume you have some different gearing or different motors on X and Y?
once you have confirmed the M92 change and assuming motors are going in both directions correctly then testing homing is next. Please post your homing files (homex.g, home y.g and homeall.g)
-
Okay I had a play around to try and keep it as quet as possible. At 16 microsteps and 80 steps per mm it is so super quiet which is amazing as this will be operating around the house. When I change it to 160 it gets pretty noisey so I tried doubling the microsteps and steps per mm again, this made it quieter so I pushed it up to 128 microsteps and 1280 steps per mm. It's still quite a bit noisier but quieter than 16 x 160. Please advise if this is okay or what the way to get it the quietest would be?
M350 X16 Y128 Z16 E16  I1                                ; configure microstepping with interpolation
M92 X80.00 Y1280.00 Z400.00 E420.00          ; set steps per mm
I'll post the homing files next
-
Home x.g
; homex.g
; called to home the X axis
;
; generated by RepRapFirmware Configuration Tool v3.3.3 on Fri Oct 01 2021 16:59:55 GMT+0100 (British Summer Time)
G91                ; relative positioning
G1 H2 Z100 F6000   ; lift Z relative to current position
G1 H1 X-1205 F1800 ; move quickly to X axis endstop and stop there (first pass)
G1 H2 X5 F6000     ; go back a few mm
G1 H1 X-1205 F360  ; move slowly to X axis endstop once more (second pass)
G1 H2 Z-100 F6000  ; lower Z again
G90                ; absolute positioning
Homey.g
; homey.g
; called to home the Y axis
;
; generated by RepRapFirmware Configuration Tool v3.3.3 on Fri Oct 01 2021 16:59:55 GMT+0100 (British Summer Time)
G91                ; relative positioning
G1 H2 Z100 F6000   ; lift Z relative to current position
G1 H1 Y-2005 F1800 ; move quickly to Y axis endstop and stop there (first pass)
G1 H2 Y5 F6000     ; go back a few mm
G1 H1 Y-2005 F360  ; move slowly to Y axis endstop once more (second pass)
G1 H2 Z-100 F6000  ; lower Z again
G90                ; absolute positioning
Homeall.g
; homeall.g
; called to home all axes
;
; generated by RepRapFirmware Configuration Tool v3.3.3 on Fri Oct 01 2021 16:59:55 GMT+0100 (British Summer Time)
G91                       ; relative positioning
G1 H2 Z100 F6000          ; lift Z relative to current position
G1 H1 X-1205 Y-2005 F1800 ; move quickly to X and Y axis endstops and stop there (first pass)
G1 H2 X5 Y5 F6000         ; go back a few mm
G1 H1 X-1205 Y-2005 F360  ; move slowly to X and Y axis endstops once more (second pass)
G90                       ; absolute positioning
G1 X15 Y15 F6000          ; go to first bed probe point and home Z
G30                       ; home Z by probing the bed

; Uncomment the following lines to lift Z after probing
;G91                      ; relative positioning
;G1 Z100 F100             ; lift Z relative to current position
;G90                      ; absolute positioning