extra z-offset every new print G29?
-
hello duet community,
I have the problem that every new print I got a specific extra amount in in the z axis direction.
After a little bit of testing, the amount off extra offset I need, is exactly the amount of the ´´Maximum deviations: -1.612´´ in the heatmap information.Every new print, I have to go down this amount...
Same with the other printer with different amounts. I´m pretty sure.Please help me!
")
I´m usind Duet 6HC + SBC.
; Configuration file for Duet 3 (firmware version 3)
; executed by the firmware on start-up
;
; generated by RepRapFirmware Configuration Tool v3.2.3 on Mon Aug 02 2021 16:15:35 GMT+0200 (Mitteleuropäische Sommerzeit)

; General preferences                                                        ; send absolute coordinates...
M83                                          ; ...but relativ
G4 S4


; Drives ;closed loop
M569.1 P20.0 T2 C1000 E12:8 R60 I4000  D0.07 H10            ; Configure the 1HCL board at CAN address.20quadrature encoder 128 steps/motor full
M569.1 P21.0 T2 C1000 E12:8 R60 I4000  D0.07 H10        ; Configure the 1HCL board at CAN address.21quadrature encoder 128 steps/motor full step.
M569.1 P30.0 T2 C1000 E12:8 R60 I4000  D0.07 H10           ; Configure the 1HCL board at CAN address.21quadrature encoder 128 steps/motor full step.
M569 P20.0 D4 S0  ; Configure the motor on the 1HCL at can address 20 as being in closed-loop drive mode (D4) and not reversed (S1)
M569 P21.0 D4 S1  ; Configure the motor on the 1HCL at can address 21 as being in closed-loop drive mode (D4) and not reversed (S1)
M569 P30.0 D4 S1  ; Configure the motor on the 1HCL at can address 21 as being in closed-loop drive mode (D4) and not reversed (S1)

Other drives; open loop;
M569 P0.0 S0                                               ; physical drive 0.0 goes forwards
M569 P0.1 S0                                               ; physical drive 0.2 goes forwards
M569 P0.2 S0                                               ; physical drive 0.2 goes forwards
M569 P0.3 S0
M569 P0.5 S0
M569 P110.0 S1                                              ; physical drive 0.2 goes forwards
M584 X30.0 Y20.0:21.0 Z0.0:0.1:0.2:0.3 C0.5 E110.0                         ; set drive mapping
M350 X32 Y32 Z16 E16 I1                                         ; configure microstepping with interpolation
M92  X160.00 Y160.00 Z640.00 C91.022 E690.00          ; set steps per mm
M566 X600.00 Y600.00 Z2000.00 C3000 E600                    ; set maximum instantaneous speed changes (mm/min)
M203 X24000.00 Y24000.00 Z300.00 C10000 E24000.00          ; set maximum speeds (mm/min)
M201 X1700.00 Y1700.00 Z2000.00 C550 E8000       ; set accelerations (mm/s^2)
M906 X1700 Y1700 Z2300 C600 E1200 I30                      ; set motor currents (mA) and motor idle factor in per cent
M84 S300                                                             ; Set idle timeout
M671 X-140:-140:990:990 Y-140:990:990:-140 S20 ; leadscrews at front left1 and n´back2. back rigth3 and front4

; Axis Limits
M208 X0 Y-100 Z0 S1                                      ; set axis minima
M208 X860 Y860 Z850 S0                                  ; set axis maxima

M915 P0.5 C S0 F0 R1                                     ;stall detection coupler

; Endstops
M574 C1 S3
M574 X2 S1 P"^30.io1.in"                                      ; configure active-high endstop for high end on X via pin ^io3.in
M574 Y2 S1 P"^20.io1.in+21.io1.in"                                      ; configure active-high endstop for high end on Y via pin ^io1.in

; Z probe
M558 K0 P5 C"0.io1.in" H8 F2000 I0 T5000 	; Set Z probe type to switch, the axes for which it is used and the dive height + speeds

G31 P200 X0 Y0 Z0	 				    ; Set Z probe trigger value, offset and trigger height; Z probe
M556 S50 X0 Y0 Z0                                         ; set orthogonal axis compensation parameters
M557 X50:700 Y50:700 S65                           ; define mesh grid

; Fans
M950 F0 C"110.out1" Q500
M106 P0 H-1                                 ; create fan 2 on pin 101.out1 and set its frequency

M950 F1 C"110.out2" Q500                                    ; create fan 3 on pin 101.out2 and set its frequency                                           ; set fan 2 value. Thermostatic control is turned off
M106 P1 T45 H1 X1

; Heaters
M308 S0 P"temp0" Y"thermistor" T100000 B4138               ; configure sensor 0 as thermistor on pin temp0
M950 H0 C"out0" T0                                         ; create bed heater output on out0 and map it to sensor 0
M307 H0 B0 R0.243 C586.2 D33.87 S1.00 V0                   ; disable bang-bang mode for the bed heater and set PWM limit
M140 H0
M143 H0 S120

M308 S1 P"110.temp0" Y"pt1000"             ; configure sensor 2 as PT1000 on pin 121.temp0
M950 H1 C"2.out0" T1                                         ; create nozzle heater output on out1 and map it to sensor 2
M307 H1 B0 R1.553 C487.8 D10.35 S1.00 V0                   ; disable bang-bang mode for heater  and set PWM limit
M143 H1 S250


; Tools
M563 P0 D0 H1 F0 F1
G10 P0 X-8.85 Y-39.25 Z-21.5
G10 P0 R0 S0
; homez.g ; called to home the Z axis M300 S50 P90 G4 P200 M300 S350 P50 G4 P150 G91 ; Relative mode G1 H2 Z5 F100 ; Lower the bed G90 ; back to absolute positioning G1 X150 Y150 F4400 ; Position the endstop above the bed centre M558 F1000 G30; bed.g ; called to perform automatic bed compensation via G32 G30 P0 X150 Y150 Z-99999 ; probe near a leadscrew G30 P1 X150 Y700 Z-99999 ; probe near a leadscrew G30 P2 X700 Y700 Z-99999 ; probe near a leadscrew G30 P2 X700 Y150 Z-99999 ; probe near a leadscrew G30 P3 X150 Y150 Z-99999 S4 ; probe near a leadscrew and calibrate 3 motors ; ; generated by RepRapFirmware Configuration Tool v3.2.3 on Mon Aug 02 2021 16:15:35 GMT+0200 (Mitteleuropäische Sommerzeit) -
@IndeX4D said in extra z-offset every new print G29?:
the amount off extra offset I need, is exactly the amount of the ´´Maximum deviations: -1.612´´
If that's correct, it's a bug.
Do you allow you z-axis to dive below zero during prints? If not, it's worth a try.
But such a high deviation is an issue you should take a look at, too. ( if it's a not a random number you picked ) -
@o_lampe
ehhmm I´m not sure, if I´m allowed to bo under z0.To make it clear.... the nozzle is by z=0 higher as it should be.
I have that since rrf 3.5... I was waiting, if somebody is posting something. I have it on all machines and I surprised, that nobody else has a problem but yes the deviation is much.
But also with my smaller printer I have 0.2 deviation. No fun to make readjusting babysteps EVERY new print.I have a 1030mm x 1030mm glasbed. So it´s not easy to make a real flat.
what, now?
-
@IndeX4D said in extra z-offset every new print G29?:
I´m not sure, if I´m allowed to bo under z0.
Just send M208 from the DWC console and see the axis min/max limits.
Allowing to go below Z-zero is the best way to make meshbed compensation work. There are other tricks like setting the probe- and nozzle height wrong, but I don't like that. Because the heightmap looks totally off, especially with such a deviation. I bet you only see dark red zones? -
@IndeX4D said in extra z-offset every new print G29?:
G30 P2 X700 Y700 Z-99999 ; probe near a leadscrew
G30 P2 X700 Y150 Z-99999 ; probe near a leadscrewYour bed.g has conflicting P2 points.
@o_lampe said in extra z-offset every new print G29?:
Allowing to go below Z-zero is the best way to make meshbed compensation work.
Allowing move below zero is only needed to allow baby stepping to go lower than the first layer height. The mesh will follow the contours of the heightmap already as it is.
What kind of a probe is it?
Can you post an image of your heightmap?
-
ah sorry. It´s my 850mm machine. Not the 1030 like I said above.
m208
Axis limits (mm)s X0.0:860.0, Y-100.0:860.0, Z0.0:850.0, C0.0:200.0
but I can go further down with babysteps. So that I had z-3.3 after 4 prints.
Probe: tool changer switch E3D
@Phaedrux thanks. I corrected bed.
By the way.
I have the same problem with a smaller amount on my bigger machine.EDIT: one time I applied the needed extra offset via babysteps BEFORE printing --> nozzle crash into heatbed.
Usally I did it always when printing the brim.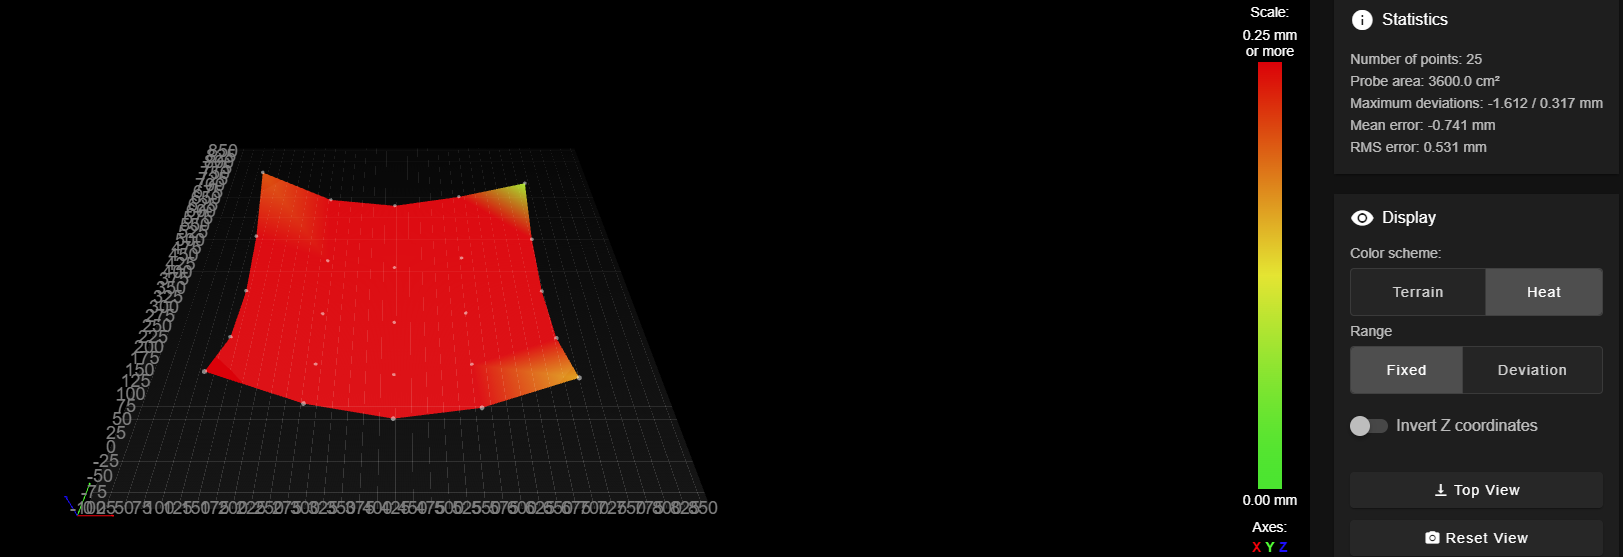
-
A dish shape like that on a large printer like that makes me wonder if you're getting some sag on the XY axis rails. I would bet the bed is flatter and stiffer than the mesh indicates.
Can you also try changing your Z homing so that you're probing the enter point of your mesh? If you hover your cursor over the center point it will give you the XY coordinate. That will at least place the center of your mesh as the Z0 point.
-
@Phaedrux said in extra z-offset every new print G29?:
if you're getting some sag on the XY axis rails
To be honest.
In this case the corners are moved up because of the isolation foam under the glass.
I have full carbon x gantry and not more than 400gramm as toolhead.BUT without such massive deviation. It would have been much more complicated to find out the problem.
I change this at the moment at my bigger printer.... after that on this machine.
So or so I have this issue. Also ennoying when only a deviation at 0.2mm.Let me try to use an exact point for g29 and homeZ...
-
@IndeX4D said in extra z-offset every new print G29?:
This is your current bed.g:G30 P0 X150 Y150 Z-99999 ; probe near a leadscrew G30 P1 X150 Y700 Z-99999 ; probe near a leadscrew G30 P2 X700 Y700 Z-99999 ; probe near a leadscrew G30 P2 X700 Y150 Z-99999 ; probe near a leadscrew G30 P3 X150 Y150 Z-99999 S4 ; probe near a leadscrew and calibrate 3 motorsAs @Phaedrux pointed out, you have two P2 lines. You also have X150 Y150 probed twice. And then you have S4, when there are 5 points. I'm surprised it doesn't throw an error. Try this:
G30 P0 X150 Y150 Z-99999 ; probe near a leadscrew
G30 P1 X150 Y700 Z-99999 ; probe near a leadscrew
G30 P2 X700 Y700 Z-99999 ; probe near a leadscrew
G30 P3 X700 Y150 Z-99999 S4 ; probe near a leadscrew and calibrate 4 motors
With the bed mesh, it looks like you are homing Z at a corner. So you then can't go down any further in the middle. Home at the lowest point, ie the middle, then the bed mesh can correct it.
As for why it resets higher up at the end of each print, I'd guess there's a G92 Z... in your end Gcode somewhere that is messing it up. Post a (short) Gcode file that exhibits this behaviour and we'll have a look.
Ian
Bed-slinger - Mini5+ WiFi/1LC | RRP Fisher v1 - D2 WiFi | Polargraph - D2 WiFi | TronXY X5S - 6HC/Roto | CNC router - 6HC | Tractus3D T1250 - D2 Eth
-
@droftarts
bed.g is already corrected. same behaviour...Probing in the middle is not an option. At the other printer there is low deviation and there is not really a deepest point. I don´t like the idea to look for the deepest point on several printers. Also there will be still any deviation, even it´s not much.
I mean the first print is fine.... then z-1.6 , 3.2, 4,8-and I already was working with this commands without problems for months. I think it came with 3.5
When I stop a print, next print starts at same height.
--> when finishing a print. --> extra offset added.EDIT: when Using a deeper point for homeZ, the extra offset is smaller, the higher the point is, the extra amount which is applying is bigger.
G1 X610.176 Y449.295 E0.10056 G1 X611.585 Y450.704 E0.19684 G1 X610.566 Y450.704 E0.10066 G1 X609.158 Y449.295 E0.19677 G1 X608.14 Y449.295 E0.10056 G1 X609.548 Y450.704 E0.19677 G1 X608.53 Y450.704 E0.10056 G1 X607.121 Y449.295 E0.19684 G1 X606.103 Y449.295 E0.10056 G1 X607.512 Y450.704 E0.19684 G1 X606.493 Y450.704 E0.10066 G1 X605.085 Y449.295 E0.19677 G1 X604.067 Y449.295 E0.10056 G1 X605.475 Y450.704 E0.19677 G1 X604.457 Y450.704 E0.10056 G1 X603.048 Y449.295 E0.19684 G1 X602.03 Y449.295 E0.10056 G1 X603.439 Y450.704 E0.19684 G1 X602.421 Y450.704 E0.10056 G1 X601.012 Y449.295 E0.19684 G1 X600.745 Y449.295 E0.02637 G1 X600.745 Y450.046 E0.07419 G1 X601.402 Y450.704 E0.09185 G1 X600.745 Y450.704 E0.0649 ;TIME_ELAPSED:5734.465541 G1 F6000 E-0.2 M140 S0 M204 P4000 M204 T4000 M566 X1200 Y1200 M82 ;absolute extrusion mode M107 G91 G1 Z20 F400 G90 M83 ;relative extrusion mode M104 S0 ;End of Gcode -
@IndeX4D said in extra z-offset every new print G29?:
M566 X600.00 Y600.00 Z2000.00 C3000 E600 ; set maximum instantaneous speed changes (mm/min)
M203 X24000.00 Y24000.00 Z300.00 C10000 E24000.00 ; set maximum speeds (mm/min)
M201 X1700.00 Y1700.00 Z2000.00 C550 E8000 ; set accelerations (mm/s^2)Your Z axis accel and jerk values are very high. Are you sure you're not skipping steps?
@IndeX4D said in extra z-offset every new print G29?:
I don´t like the idea to look for the deepest point on several printers. Also there will be still any deviation, even it´s not much.
This isn't necessary. The compensation can go above and below the 0 point as needed, but using the center of the bed and more importantly using one of the mesh points will ensure that at least one point of the mesh matches Z0. At the very least this gives a more useful representation of what is going on.
What is in your slicer start gcode?
What is in your homeall.g?
Do you use start.g?@IndeX4D said in extra z-offset every new print G29?:
and I already was working with this commands without problems for months. I think it came with 3.5
Have you tried rolling back to 3.4.5?
-
@Phaedrux
I´m pretty sure not to loose steps
I print with z = 6mm/s.
Prints are looking good.
When I print 1 hour and skip at the last layer, I don´t have this extra amount.
When I print just 1 minute and finishing it, I have extra amount.
And. When I do not use mesh compensation, I don´t have this problem. -
What is in your slicer start gcode? -nothing, don´t have a homeall.g or so
What is in your homeall.g? -nothing / don´t use that
Do you use start.g? - noCan´t go back to 4.... cause of closed loop and other issues.
With readjusting I can work for a momentand BIG EDIT: If i would loose steps, I would loose steps in the upper direction?
Is it clear, that the nozzle is to far away from the heatbed and not the heatbed is moving?
So I think loosing steps in this direction is not possible.
Sorry when I forgot to describe my axis. -
@IndeX4D said in extra z-offset every new print G29?:
What is in your slicer start gcode? -nothing
So how are you preparing for printing between power on and the print starting? When are you homing? When are you leveling? When are you doing the mesh?
-
Power on ---> homing x, y, z, c manually. --> select tool --> start print
I Do the mesh probe after homing ... not before every print.
I tried to apply G29 S1 before and after homing z . Does not made any differences.
When would be the correct time to apply G29 S1?I just finished a 2 hours print and cancelled the print a few seconds before finishing. After that the z position was still correct. I´m wondering why finishing prints can produce this Issue in any way.
-
Do you have a stop.g present in the sys folder?
When do you run G32 for bed.g?
When do you run G29 S1 to load the heightmap. It should be loaded after homing Z.
Can you add M561 to the start of your homez.g?
-
@Phaedrux
Do you have a stop.g present in the sys folder? - no, should I?When do you run G32 for bed.g? - also when homed manually.not every print. I´m not sure if before or after G29. What would be correct?
When do you run G29 S1 to load the heightmap. It should be loaded after homing Z. ----- after homing Z ( I tried before only one time but of course I got an error)
-
@IndeX4D as I said earlier
As for why it resets higher up at the end of each print, I'd guess there's a G92 Z... in your end Gcode somewhere that is messing it up. Post a (short) Gcode file that exhibits this behaviour and we'll have a look.
Or post whatever is the last 10 or 20 lines of your Gcode (actual Gcode, not the comments).
Ian
Bed-slinger - Mini5+ WiFi/1LC | RRP Fisher v1 - D2 WiFi | Polargraph - D2 WiFi | TronXY X5S - 6HC/Roto | CNC router - 6HC | Tractus3D T1250 - D2 Eth
-
This post is deleted! -
@droftarts
I did already above..G1 X610.176 Y449.295 E0.10056 G1 X611.585 Y450.704 E0.19684 G1 X610.566 Y450.704 E0.10066 G1 X609.158 Y449.295 E0.19677 G1 X608.14 Y449.295 E0.10056 G1 X609.548 Y450.704 E0.19677 G1 X608.53 Y450.704 E0.10056 G1 X607.121 Y449.295 E0.19684 G1 X606.103 Y449.295 E0.10056 G1 X607.512 Y450.704 E0.19684 G1 X606.493 Y450.704 E0.10066 G1 X605.085 Y449.295 E0.19677 G1 X604.067 Y449.295 E0.10056 G1 X605.475 Y450.704 E0.19677 G1 X604.457 Y450.704 E0.10056 G1 X603.048 Y449.295 E0.19684 G1 X602.03 Y449.295 E0.10056 G1 X603.439 Y450.704 E0.19684 G1 X602.421 Y450.704 E0.10056 G1 X601.012 Y449.295 E0.19684 G1 X600.745 Y449.295 E0.02637 G1 X600.745 Y450.046 E0.07419 G1 X601.402 Y450.704 E0.09185 G1 X600.745 Y450.704 E0.0649 ;TIME_ELAPSED:5734.465541 G1 F6000 E-0.2 M140 S0 M204 P4000 M204 T4000 M566 X1200 Y1200 M82 ;absolute extrusion mode M107 G91 G1 Z20 F400 G90 M83 ;relative extrusion mode M104 S0 ;End of Gcode