Piezo20 probe and piezo kit now available
-
Started a listing as a repository of 20mm versions which are currently in alpha testing.
http://www.thingiverse.com/thing:2152709
Feel free to try/mod one, its a basic module at the moment for integration into where-ever you need it. Not fully tested but the module does trigger the signal conditioning board when tapped so I am assuming it will be basically functional.
Very small, no rods/pins you need signal board, and 6x20mm m3 bolts and 6xm3 nuts and a 20mm piezo with 5mm hole drilled into it. I put a drilling template on there too.
Please feedback if you make/test one I haven't really a suitable machine to test this properly. I will be putting a version up later today which fits into a titan extruder.
-
Could you post your repeatability figures if you captured them?
If it's of any interest, I just probed my bed 89 times and had the exact same reading every time, to four decimal places, 232 steps and 2.9000mm
Idris
-
Thanks Iris that's a very encouraging result!
-
That's with underbed sensors however.
Idris
-
Idris could you share your underbed mount designs please I may give that method a try on my existing Delta but I suspect I may need to adjust the sizes etc so raw files as well as the STL's would be appreciated
Also do you use it with your 3 port board or with individual ones?
Doug
-
Idris - is that a cartesian, or a delta? I suspect play in my belts, etc between the 3 towers factors in. Less moving factors on a cartesian if you're just moving Z. However, if those results are on a delta, I'm impressed, and probably have more work to do!
-
It is on a delta I have seen the pics
-
It's a kossel mini, originally a T3P3 kit but I think only the vertices and extrusions are original now.

The heated bed is supported on three of these, printed in ABS.

I'm looking at alternatives to the printed support, the ABS is not holding up to the temperature in the long run and the tops of the posts are starting to deform.
I'm happy to post .stl or .step files but unless your printer is identical to mine the mounting holes will not line up with your heated bed. You're better off modelling your own.
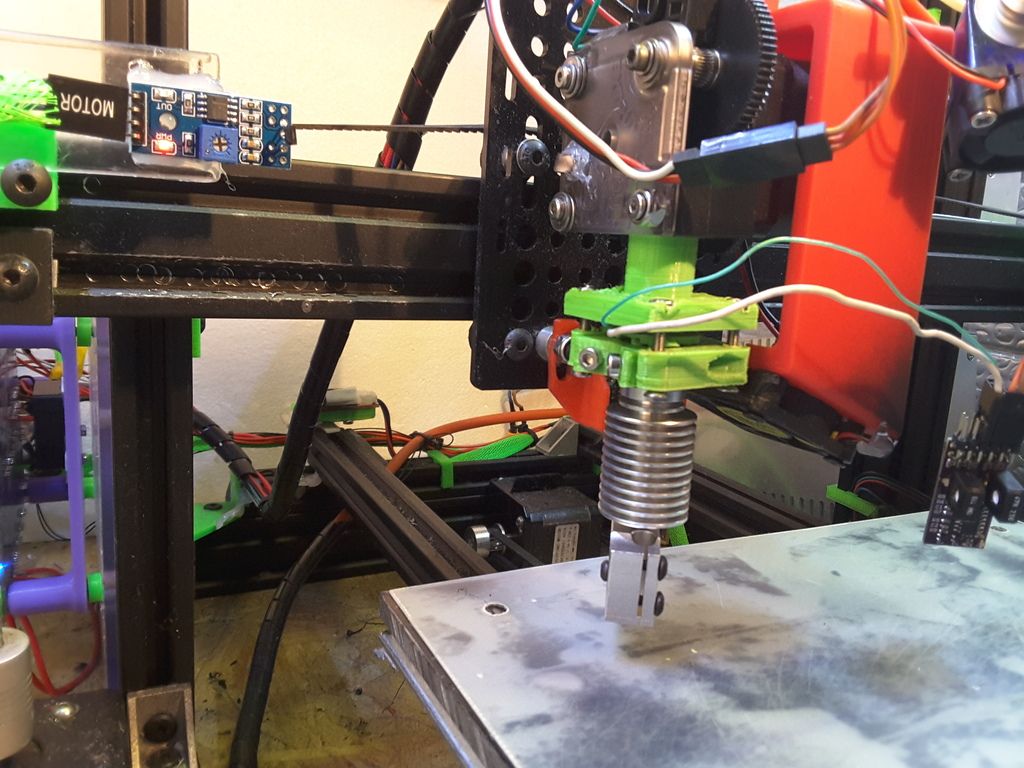
The three piezo disks are wired in parallel to the single input of a V1.0 board.
Idris
-
Yes but the Step files will give me an idea of how you have mounted everything.
I am tempted to do something and get them CNC'd in Alluminium (I am thinking of purchasing a smal Mill in the next few weeks and the CNC version is not to much more than the Manual one tho it comes without a controller or software but I already have all of that)
So if you could post the files it would be appreciated and Maybe when I get set up I could do you a set of yours in Ally?
Doug
(A bit of Payback lol)
-
I've emailed you the file.
Idris
-
Thanks Idris I'll see what I can do with it
-
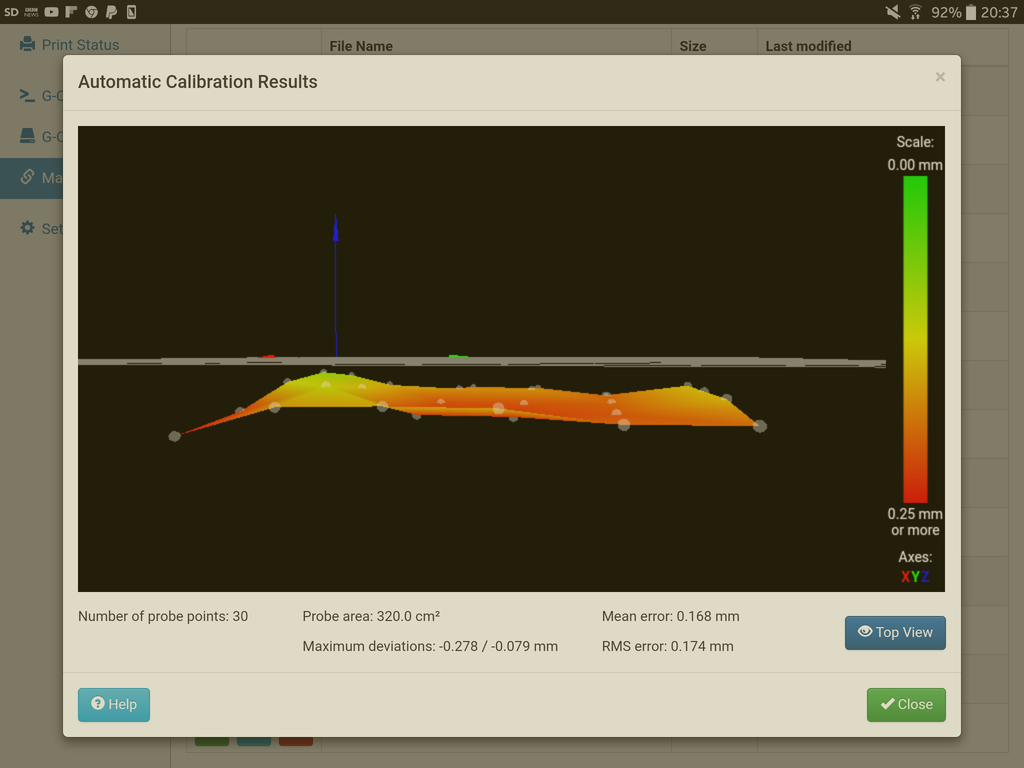
Wow, a world of difference using this probe after a couple of minutes setting up:
For testing:
This is what I got with DC42's sensor AFTER spraying my aluminium heat bed with black matt paint and probing my Printbite (the sticky tape makes it a bit patchy as in the photo - is this causing the problem?):
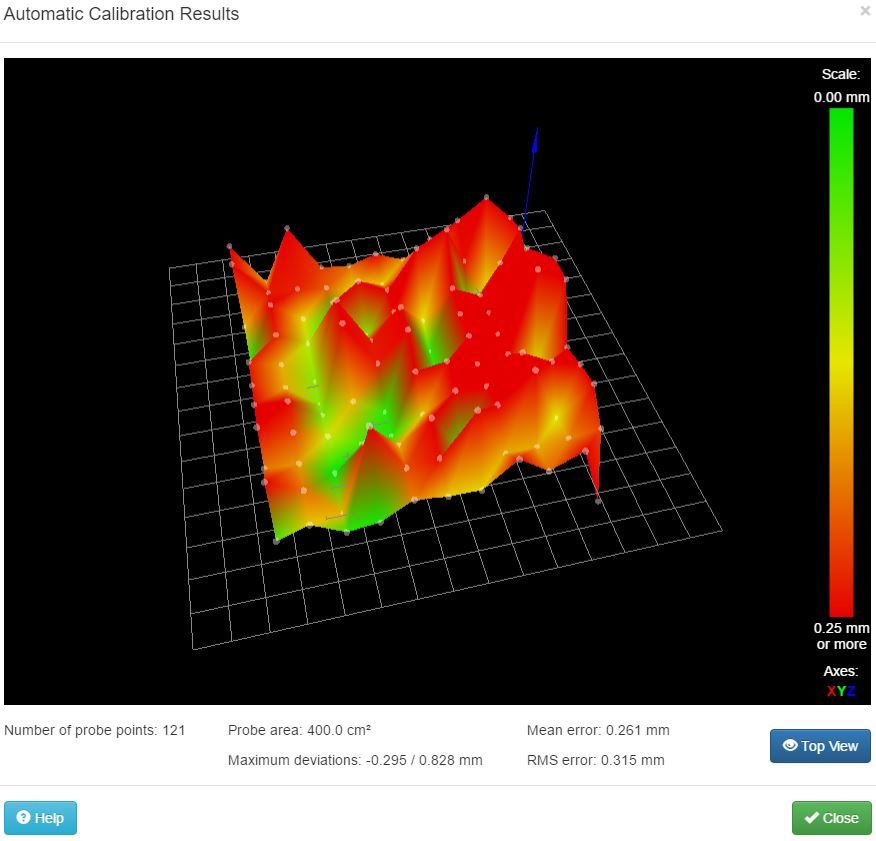
With the piezo board:
A massive difference…
Cant figure out why it is showing under the horizon through.
-
Its probably the probe. In order to get a trigger you have to push down past "z=0" to get it to trigger. So maybe put -0.15 z offset in your G31 command. Then try again.
-
Do a paper test to set your z-height, just like you would with any other probe:
Move the nozzle manually until it grips a sheet of paper.
Then:
G92 Z0
G1 Z5
G30 S-1Record the point that stops at, and put it as the trigger point in your G31.
-
Wow, a world of difference using this probe after a couple of minutes setting up:
…This is what I got with DC42's sensor AFTER spraying my aluminium heat bed with black matt paint and probing my Printbite (the sticky tape makes it a bit patchy as in the photo - is this causing the problem?):Yes, the variable reflection from the sticky tape is the problem. With PEI you have to spray paint the back of the PEI matt black, cure it in an oven, then stick it painted side down to the bed plate. I imagine PrintBite is similar.
-
Re. the z offset, just tried this myself, I was using 0.15 z-offset in slic3r, now I have it in my G31(as -0.15). It works fine, really nice "only just squashed enough to get it to stick" first layer.
-
And don't forgot you can do an "auto first layer" height calibration by sending G30 (RRF) G30 Z0 (smoothie) after levelling/calibration to recheck z=0 and reset it (from bed centre ideally but shouldn't matter if your calibration/levelling are accurate). Assuming you set the z-probe offset correctly you should now get exactly the first layer height you sliced.
Its worth checking the offset with something thinner than paper if you have something that would work.
-
such as a very thin Feeler gauge like the 0.05mm one from this set from Halfords http://www.halfords.com/workshop-tools/tools/hand-tools/halfords-feeler-gauge-metric-and-imperial-16-blades
Doug
Got some 3mm thick PEI Sheet on it's way to me as well
-
And don't forgot you can do an "auto first layer" height calibration by sending G30 (RRF) G30 Z0 (smoothie) after levelling/calibration to recheck z=0 and reset it (from bed centre ideally but shouldn't matter if your calibration/levelling are accurate). Assuming you set the z-probe offset correctly you should now get exactly the first layer height you sliced.
Its worth checking the offset with something thinner than paper if you have something that would work.
Is there a reference for using G30 after a bed level is done? Can it be done after mesh levelling? I must have missed that.
-
Ive done the
G92 Z0
G1 Z5
G30 S-1and it reports a value of 0.0x across the bed.
When printing it drops below the z0 plane and hits my printbite.@DC42: OK, when I rip it apart, I'll try spraying the rear of the printbite to see what effect it has.


