Duet3D Logo Duet3D
    • Tags
    • Documentation
    • Order
    • Register
    • Login
    1. Home
    2. macguyver
    • Profile
    • Following 0
    • Followers 0
    • Topics 9
    • Posts 55
    • Best 16
    • Controversial 0
    • Groups 0

    macguyver

    @macguyver

    23
    Reputation
    10
    Profile views
    55
    Posts
    0
    Followers
    0
    Following
    Joined Last Online

    macguyver Unfollow Follow

    Best posts made by macguyver

    • Tired of Mod, tweak, tune, repair, rinse, repeat...

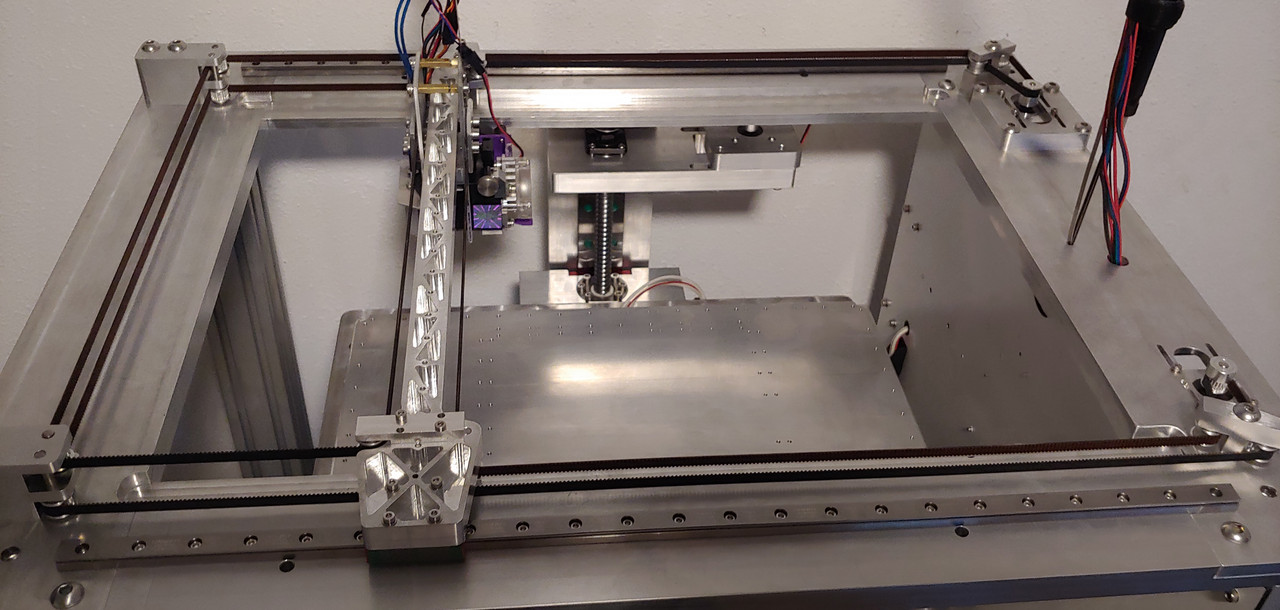
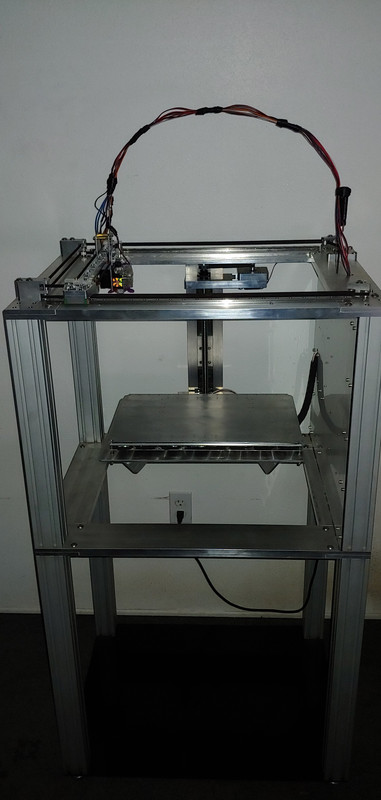
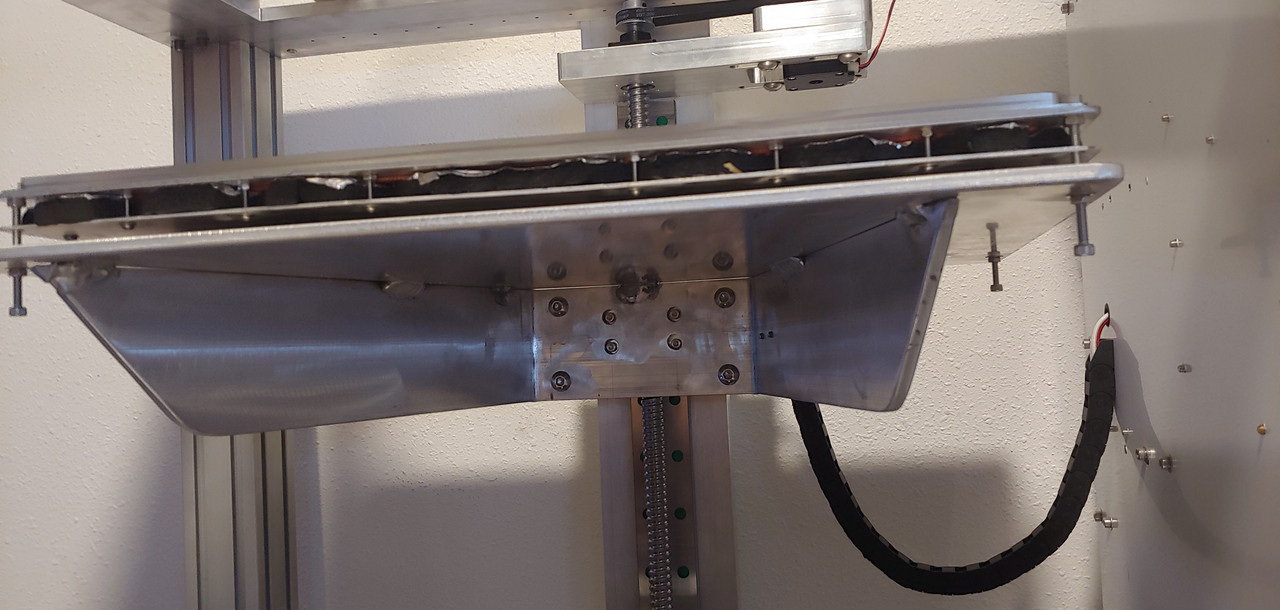
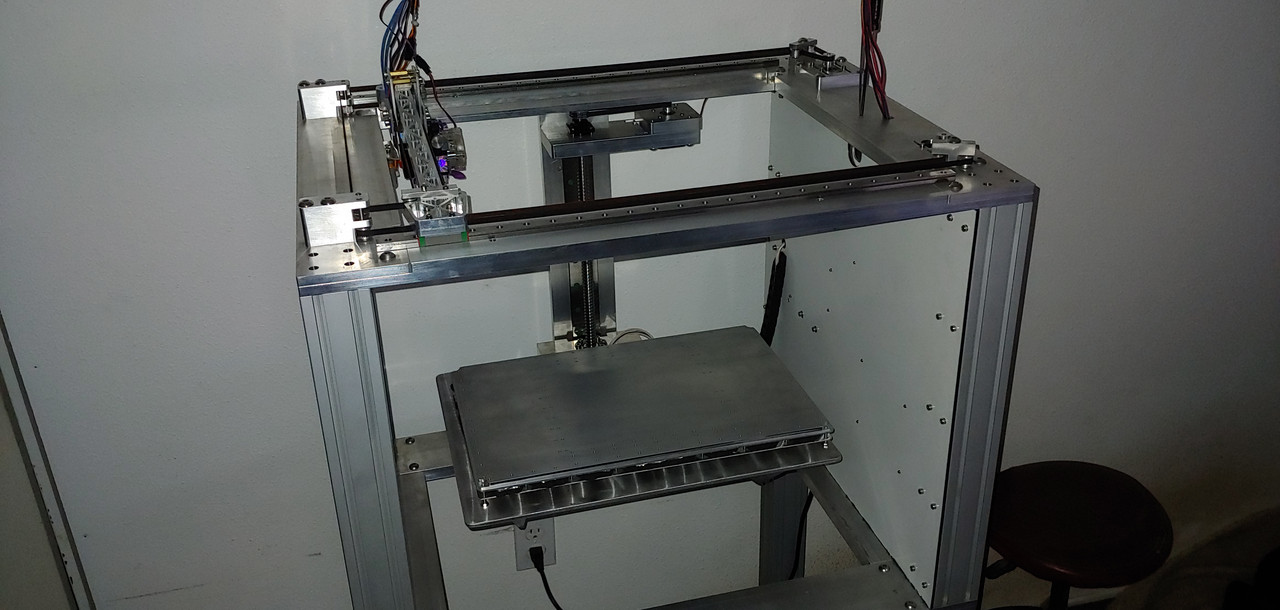
      I got tired of the endless cycle on something that should be the concrete foundation of a production machine, the frame. I've worked in machine and production shops for the last 15 years and one thing i've noticed is the machine's frame is generally 2-5 times what it would theoretically need. When you have problems it is with materials or isolated components, and almost never requires adjustment of the frame. My experience with a Tevo Blackwidow just further reinforced the necessity of this simple rule. and after seeing the results E3D was getting with their early prototypes I knew what I had to do.

      With that idea becoming rule number 1 I designed a new printer. And after some wheeling and dealing with my boss and a few months wait for some free time on a machine I finally have her assembled and moving under her own power and since everything looks like it is going to work I decided I'd show her off. Just a little bit more firmware work and I can start getting some calibration prints going. (I think)

      https://i.postimg.cc/4ymwqbVW/20191006-223243-1.jpg

      alt text

      alt text

      posted in My Duet controlled machine
      macguyverundefined
      macguyver
    • RE: Tired of Mod, tweak, tune, repair, rinse, repeat...

      I had to put this on the back burner for a while, but now she's pretty much fully assembled and up and running. I'm pushing a direct drive aero 0.4 volcano, 0.2 layer heights at 150mm/s with more than satisfactory results. I can push it to 300, but the ringing is terrible, never shifted a layer though. I'll eventually upgrade the rail carriers to the next highest preload and see if I can push it faster.

      My biggest hurdle was getting everything connected to the raspberry pi. It's still a bit wonky, and crashes the duet2 sometimes, but at least I get print finished alerts now. I'm guessing I have to upgrade to the duet3 to get the print paused because of filament alerts though.

      And because it's finished, for now. I grabbed a handtruck and wheeled it over to my neighbor that had a scale big enough to weigh it. 230 LBS/104.3KG and solid as a rock! That will easily jump another 75-100 once I get all the drawers in it and fill them up.

      20200415_102605.jpg
      20200415_102835_HDR.jpg

      posted in My Duet controlled machine
      macguyverundefined
      macguyver
    • RE: Tired of Mod, tweak, tune, repair, rinse, repeat...

      @Phaedrux My current estimate is about 120lbs/55Kg. I figure another 25-30lbs when fully enclosed, and depending on if it wobbles much while printing this one will eventually get drawers to hold tools, nozzles, etc. pushing it up into 200+. Also dependent upon the wobble, this design is "technically" stackable. That would push a stack of 2-3 printers into the 3-500lb/226Kg range.

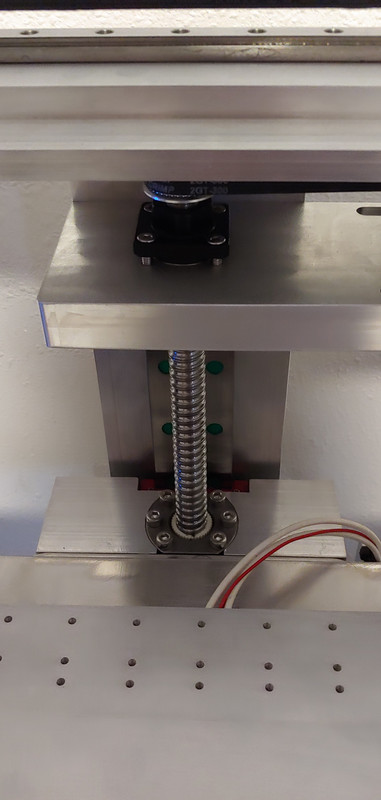
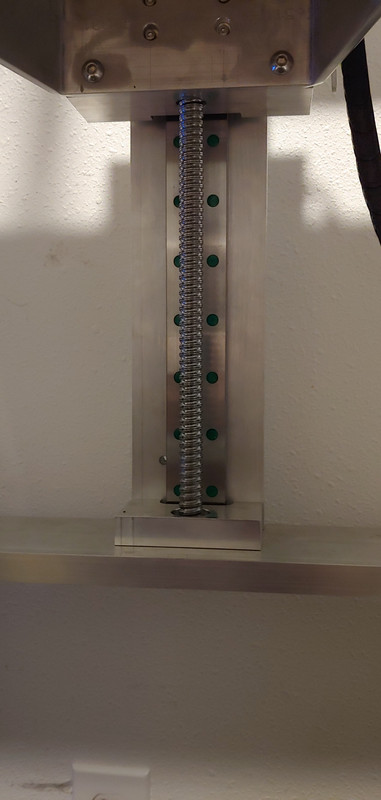
      @fcwilt That would be the doublewide rail on the Z, and the 16mm ball screw probably added a bit as well. The carriage is made from 0.25in/7mm aluminum

      alt text

      alt text

      alt text

      posted in My Duet controlled machine
      macguyverundefined
      macguyver
    • RE: Tired of Mod, tweak, tune, repair, rinse, repeat...

      Made some good changes this weekend! Finally had a few days to myself with no distractions and took the time to learn node red. So now I have a couple more safety features in there. I have temperature monitors that should turn off the printer if it goes over or under certain temperatures. More importantly I have telegram notifications running directly from the raspberry pi, no more open browser needed!! Thanks @MintyTrebor 's for his nodered plugins for that! All I got left to do is get the webcam screenshot figured out and set up a few telegram commands so I can do things remotely.

      Then I did some upgrades and modifications in my electrical drawer. New top o the line Pi, WITH rgb heatsink, of course, and a breakout board to access the unused gpio's neatly. New 12&24v power supplies. And I tidied up the wiring, a little.

      PXL_20211226_022656764[1].jpg

      posted in My Duet controlled machine
      macguyverundefined
      macguyver
    • RE: Chamber heater plan

      From my research the "proper" way would be an enclosure heater from a manufacturer like Stego. They are specifically meant to heat things like electronics enclosures so they should last longer than most cobbled together options. They can also be had second hand on Ebay.

      As it happens, I just bought one that should be arriving friday. It's a 250watt 24v option that I am going to try to run off the bed heater circuit since my bed is A/C. We'll see it it gives me that extra little bit I need. They have a lot more powerful options if this doesn't work though. https://www.stego-usa.com/products/heating/

      posted in General Discussion
      macguyverundefined
      macguyver
    • RE: Raise Z when outside build area

      @fcwilt It's a corexy so the nozzle only moves on X&Y and the brush is on a bracket fixed to the frame.

      posted in Tuning and tweaking
      macguyverundefined
      macguyver
    • RE: Tired of Mod, tweak, tune, repair, rinse, repeat...

      It's been a while since I've updated this, but figured I would update it with what I've learned so far.

      The speed is absolutely amazing. Most filaments now print at 250-300mm/s with a direct drive titan aero. I think there is more speed to be milked, but I'll need to do to a dual drive extruder and the apocalypse is slowing E3d down.

      It has only skipped steps twice in the entire year. Both times the acceleration was at 8,000. 6,000 she would shake a bit, even in her weight class. It can handle 3-4,000 fine, but with ghosting on every edge. Currently it is at 1,800. I'm currently using 6mm belts and the next printer will have 8-12mm. I would/will probably make the next one 1-200lbs/100kg heavier too.

      Reliability. This is after all the main reason I built the thing. I went through the other day and started checking fasteners. Not a single one has come loose. Neither has any of the brackets, connectors, etc. I have found myself leaning on the bed while oiling a rails a few times, and when I check the level it's still perfect. I would say this category has been a success.

      Temperature. I had always theorized that corexy would heatup the chamber above the build plate before the rest of the chamber. What I didn't suspect was that these 2 zones would never balance out. Above the build plate will always be 10-20 degrees warmer than below. This could also be a side effect of the electronics chamber sharing a common wall. That said, I have seen chamber temperatures of up to 58C with a build plate temp of 110. Most times however it bounces between 45-50. This is with polycarbonate side panels. I will eventually insulate the build chamber and get that up higher, though I have yet to see any prints crack.

      Dialing in filaments. I've found most slicers dial in settings like retraction in 0.2mm increments by default. I have found that with many filaments I need to dial that in at 0.01mm increments. I had an ASA that would leave blobs with a negative restart distance of 0.04, and holes at 0.09.

      Electronics. This is often the most neglected part of builds. First off, DIN rails. They are amazing. Mounting all my electronics to the side panel makes them wonderful to work on, add things, troubleshoot, etc. Since it is cooled by fans and sharing a wall with the printer however, it is pulling heat away from the build chamber. I will eventually move them to a drawer at the bottom of the printer.

      The biggest thing I learned is it is going to take longer than you think. There is a lot of information out there for what I would classify as hobbyist grade printers. While a lot of that wisdom will carry over, a lot of it won't and you need to figure out what does or doesn't. You often pay more for this when you buy a machine, than the machine it's self.

      posted in My Duet controlled machine
      macguyverundefined
      macguyver
    • RE: Chamber heater plan

      @mrehorstdmd I like the options, though you have to be careful with them all. There are however the ultra-cheap options I toyed with such as THIS . In the end I eventually stumbled upon the Stego and snagged one up off Ebay for $50. About the same price as anything I would have put together, but much simpler to install and get back to printing in the winter. Though I have a feeling I might need a little more power, like THIS

      posted in General Discussion
      macguyverundefined
      macguyver
    • RE: Sensorless Homing on a CoreXY

      I use sensorless homing on my machine for now. The homing macros turn down the speeds and sensitivity so that it does not slam into the side. Usually it is nice and soft. That said I am going to install a homing switch eventually as they can be more accurate when using stall detection.

      posted in Firmware installation
      macguyverundefined
      macguyver
    • RE: Tired of Mod, tweak, tune, repair, rinse, repeat...

      Made a few more changes. Added a Chamber heater. Didn't have room for the relay for said heater with my previous setup, so I moved all the electronics to a drawer. with plenty of din rails, and room for more in the future...

      I upgraded the stepper wires to 20 gauge. This was a challenge. The jst connectors that nema 1.7's use are for 24 gauge max. It was difficult and took some time to get the connectors over the insulation.

      I upgraded my part cooling fan to a 5020 and this thing is blowing more than the 4 pack of 5015s I had before it combined!

      I've moved over to Prusaslicer from Simplify3d. S3d was giving me issues with at the start of extrusions on some parts. PS seems to have fixed those, though I will find out for sure this week when I print one of the parts that was giving me a lot of problems. Imo PS seems to handle higher speeds better than S3d, and the time estimates are closer to reality.

      20210131_011221[1].jpg
      20210131_011314[1].jpg

      posted in My Duet controlled machine
      macguyverundefined
      macguyver

    Latest posts made by macguyver

    • RE: Filament monitor not working.

      @dc42 The accumulated distance is still stopping randomly, but I am now able to reset it without it pausing the print.

      posted in Filament Monitor
      macguyverundefined
      macguyver
    • RE: Filament monitor not working.

      @dc42 Thank you, i'll try these tonight when I get home and report back any findings!

      posted in Filament Monitor
      macguyverundefined
      macguyver
    • RE: Filament monitor not working.

      @dc42 yes I can try a new fw build. I have lots of can connected boards. 3 1hcl and a tool board.

      posted in Filament Monitor
      macguyverundefined
      macguyver
    • RE: Filament monitor not working.

      @T3P3Tony @dc42 lost another print this weekend due to this bug. Is there a command I can put in my layer change that will reset the accumulated distance without pausing the job?

      posted in Filament Monitor
      macguyverundefined
      macguyver
    • RE: More problems

      @invertmast Another thought I had while cleaning up the mess from my most recent upgrade. Is the ethernet cable you're using solid or stranded. Solid core wire doesn't like to flex and can break internally, but still provide conductivity 95% of the time.

      Machined aluminum parts are SOO nice! I havent had a problem with my entire motion system in over 2 years! With the exception of my Z axis stepper. But that's understandable, i think my main mistake there was using a 1.7 to life a 25lb bed platform...

      And looking up the Dyze sent me down a rabbit hole. I'm liking the idea of their pressure sensor extruder for leveling. It's almost as if the upgrades will never stop!!!

      posted in Filament Monitor
      macguyverundefined
      macguyver
    • RE: More problems

      @invertmast I have a duet 3 and a toolboard and they are what I was having my problems on, so doubtful that would fix it.

      The bigtreetech sensor is interesting. It is driven by 2 v-groove bearings. One of them is in a carriage with a rubber coated metal wheel with holes in it. The sensor appears to track light through those holes. It's bulky, and heavy at 84grams so it will almost certainly mess with any input shaping you have going on. But it is built solidly from the looks of it.

      PXL_20231020_072420536[1].jpg

      PXL_20231020_072242811[1].jpg

      PXL_20231020_070159242[1].jpg

      posted in Filament Monitor
      macguyverundefined
      macguyver
    • RE: More problems

      @invertmast said in More problems:

      @macguyver said in More problems:

      @invertmast I had a TON of similar problems with my sensor. The main fix is kinda easy. Design a housing that will hard mount the sensor to the extruder. You want this housing to be rigid to the extruder to absolutely constrain the filament between the drive gear and the sensor. My theory here is that the constant movement wears the bowden enough to allow the sensor housing to move and effect readings. This brought my readings to 90%-110% with no more false readings.

      I had problems with wires too. Small wires don't like movement, especially at sharp points, let alone constantly moving. Strain relief really helps here. The best way I have found is to put some RTV silicone into a syringe. Use a needle that will allow you to inject silicone into the connector ends. Don't fill it completely up, just enough to encapsulate up to the crimp, and then some more on the outside of the connector. You could probably even print up some strain relief molds if you want to be really slick. You "could" use hot glue if your printer isnt in an enclosure, but I wouldn't recommend it. If it gets enough radiant heat from the bed, it will remelt and seep into every nook and cranny of the connector, even gluing itself to the OTHER connector it's plugged into. Ask me how i know...

      The absolute best way to strain relief is Silastic. That is the glue used inside commercial electronics for strain relief of wires and capacitors. But every time I've looked into it, I've found it to be more of an empty rabbit hole and the products I've found vary too wildly in their specs, availability, and cost so I just gave up and went with rtv silicone.

      PXL_20231018_033955711[1].jpg

      The monitor is rigidly mounted to the carriage assembly. there is only a 25mm gap between the extruder and the filament monitor.

      as for strain relief, the wires between the ethernet breakout board and the filament monitor are less than 100mm long and are rigidly attached at both ends. there is little to no movement of them.

      Couldn't tell it was hard mounted by the picture. My bowden between the sensor is only 25mm total, though I doubt that matters much. As long as you can't see the sensor housing moving while printing that should be fine.

      My wires are even shorter. They don't need to sway to wear out and break. Vibrations alone can and will do it. As will removing the connectors countless times for troubleshooting. It's just the nature of 20+ gauge wire and these were what fixed my issues which were pretty much identical to yours.

      I had grown exhausted by the problems of the sensor. I wanted to make sure that everything was bomb proof before giving up on it entirely. I had even gone so far as to make extra cables so I wouldn't be slowed down in my troubleshooting if i found a broke one. Luckily it's been going strong for several months now. Another thing to check is the actual gear on the sensor it's self. I have worn one of those smooth all the way around. Honestly I had almost given up on the duet sensor, even have a bigtreetech sensor sitting on the shelf that was going to replace it. Than again, maybe THAT's the reason it's working. It knew it might end up as E-waste if it didnt start working right.

      posted in Filament Monitor
      macguyverundefined
      macguyver
    • RE: More problems

      @invertmast I had a TON of similar problems with my sensor. The main fix is kinda easy. Design a housing that will hard mount the sensor to the extruder. You want this housing to be rigid to the extruder to absolutely constrain the filament between the drive gear and the sensor. My theory here is that the constant movement wears the bowden enough to allow the sensor housing to move and effect readings. This brought my readings to 90%-110% with no more false readings.

      I had problems with wires too. Small wires don't like movement, especially at sharp points, let alone constantly moving. Strain relief really helps here. The best way I have found is to put some RTV silicone into a syringe. Use a needle that will allow you to inject silicone into the connector ends. Don't fill it completely up, just enough to encapsulate up to the crimp, and then some more on the outside of the connector. You could probably even print up some strain relief molds if you want to be really slick. You "could" use hot glue if your printer isnt in an enclosure, but I wouldn't recommend it. If it gets enough radiant heat from the bed, it will remelt and seep into every nook and cranny of the connector, even gluing itself to the OTHER connector it's plugged into. Ask me how i know...

      The absolute best way to strain relief is Silastic. That is the glue used inside commercial electronics for strain relief of wires and capacitors. But every time I've looked into it, I've found it to be more of an empty rabbit hole and the products I've found vary too wildly in their specs, availability, and cost so I just gave up and went with rtv silicone.

      PXL_20231018_033955711[1].jpg

      posted in Filament Monitor
      macguyverundefined
      macguyver
    • RE: Filament monitor not working.

      Last bit of info for the weekend in case it helps in any way. Resetting the measured distance by disabling and reenabling the filament sensor seems to fix this temporarily. It will still eventually stop accumulating measured distance and that number appears to be random. I had it go as high as 43,000mm and as low as 12mm. This happened 12+ times over a 24 hour print.

      posted in Filament Monitor
      macguyverundefined
      macguyver
    • RE: Filament monitor not working.

      @T3P3Tony So I've done some more of my own troubleshooting. While the measured distance of filament is low the sensor detects and triggers as it should. Eventually the measured distance stops recording. When that happened I cut the filament and it did not detect the lack of filament and continued to print. The number that it freezes at is variable. First time this happened it stopped at 4382.3mm, now it's stopped at 6214.0mm. Below will be a M122 if it helps.

      As a possible work around until this is fixed, I am wondering if there is a command to restart the measured distance that I could put in the slicer's layer change Gcode. Disabling and reenabling the filament monitor via M591 S works, but it pauses the print every time it is reenabled.

      10/14/2023, 4:53:57 PM	m591 d0
      Duet3D rotating magnet filament monitor v4 on pin 121.io1.in, enabled always, sensitivity 24.80mm/rev, allow 10% to 600%, check printing moves every 3.0mm, version 4, mag 130 agc 82, measured sensitivity 25.19mm/rev, min -9% max 107% over 6214.0mm
      
      10/14/2023, 4:44:51 PM	m122
      === Diagnostics ===
      RepRapFirmware for Duet 3 MB6HC version 3.5.0-rc.1 (2023-08-31 16:19:24) running on Duet 3 MB6HC v1.01 (SBC mode)
      Board ID: 08DJM-956L2-G43S8-6JTD0-3S06P-9A2UD
      Used output buffers: 1 of 40 (18 max)
      === RTOS ===
      Static ram: 154852
      Dynamic ram: 88072 of which 3852 recycled
      Never used RAM 95424, free system stack 143 words
      Tasks: SBC(2,rWait:,4.2%,398) HEAT(3,nWait,0.0%,323) Move(4,nWait,1.7%,214) CanReceiv(6,nWait,0.1%,771) CanSender(5,nWait,0.1%,326) CanClock(7,delaying,0.0%,349) TMC(4,nWait,17.5%,59) MAIN(2,running,76.3%,137) IDLE(0,ready,0.1%,30), total 100.0%
      Owned mutexes: HTTP(MAIN)
      === Platform ===
      Last reset 03:01:48 ago, cause: software
      Last software reset at 2023-10-14 16:43, reason: User, Gcodes spinning, available RAM 99000, slot 0
      Software reset code 0x6003 HFSR 0x00000000 CFSR 0x00000000 ICSR 0x00400000 BFAR 0x00000000 SP 0x00000000 Task SBC Freestk 0 n/a
      Error status: 0x00
      MCU temperature: min 40.2, current 46.5, max 47.4
      Supply voltage: min 23.5, current 23.8, max 23.9, under voltage events: 0, over voltage events: 0, power good: yes
      12V rail voltage: min 12.1, current 12.2, max 12.2, under voltage events: 0
      Heap OK, handles allocated/used 99/1, heap memory allocated/used/recyclable 2048/352/312, gc cycles 0
      Events: 4 queued, 4 completed
      Driver 0: standstill, SG min n/a, mspos 8, reads 38608, writes 11 timeouts 0
      Driver 1: standstill, SG min n/a, mspos 8, reads 38608, writes 11 timeouts 0
      Driver 2: standstill, SG min n/a, mspos 8, reads 38608, writes 11 timeouts 0
      Driver 3: standstill, SG min n/a, mspos 8, reads 38609, writes 11 timeouts 0
      Driver 4: standstill, SG min n/a, mspos 8, reads 38609, writes 11 timeouts 0
      Driver 5: standstill, SG min n/a, mspos 8, reads 38609, writes 11 timeouts 0
      Date/time: 2023-10-14 19:44:50
      Slowest loop: 701.90ms; fastest: 0.05ms
      === Storage ===
      Free file entries: 20
      SD card 0 not detected, interface speed: 37.5MBytes/sec
      SD card longest read time 0.0ms, write time 0.0ms, max retries 0
      === Move ===
      DMs created 125, segments created 39, maxWait 3783424ms, bed compensation in use: mesh, height map offset 0.000, ebfmin 0.00, ebfmax 0.00
      next step interrupt due in 11308 ticks, disabled
      Moves shaped first try 10423, on retry 2104, too short 11770, wrong shape 25470, maybepossible 2351
      === DDARing 0 ===
      Scheduled moves 64797, completed 64772, hiccups 0, stepErrors 0, LaErrors 0, Underruns [0, 0, 5], CDDA state 3
      === DDARing 1 ===
      Scheduled moves 0, completed 0, hiccups 0, stepErrors 0, LaErrors 0, Underruns [0, 0, 0], CDDA state -1
      === Heat ===
      Bed heaters 0 -1 -1 -1 -1 -1 -1 -1 -1 -1 -1 -1, chamber heaters 3 -1 -1 -1, ordering errs 0
      Heater 0 is on, I-accum = 0.1
      Heater 1 is on, I-accum = 0.0
      Heater 3 is on, I-accum = 0.0
      === GCodes ===
      Movement locks held by null, null
      HTTP* is doing "M122" in state(s) 0
      Telnet is idle in state(s) 0
      File* is idle in state(s) 3
      USB is idle in state(s) 0
      Aux is idle in state(s) 0
      Trigger* is idle in state(s) 0
      Queue* is idle in state(s) 0
      LCD is idle in state(s) 0
      SBC is idle in state(s) 0
      Daemon is idle in state(s) 0
      Aux2 is idle in state(s) 0
      Autopause* is idle in state(s) 0
      File2* is idle in state(s) 0
      Queue2 is idle in state(s) 0
      Q0 segments left 6, axes/extruders owned 0x80000007
      Code queue 0 is empty
      Q1 segments left 0, axes/extruders owned 0x0000000
      Code queue 1 is empty
      === Filament sensors ===
      Extruder 0: no data received
      === CAN ===
      Messages queued 357391, received 486221, lost 0, boc 0
      Longest wait 14ms for reply type 6018, peak Tx sync delay 14949, free buffers 50 (min 34), ts 54545/54544/0
      Tx timeouts 0,0,0,0,0,0
      === SBC interface ===
      Transfer state: 5, failed transfers: 0, checksum errors: 0
      RX/TX seq numbers: 2358/2358
      SPI underruns 0, overruns 0
      State: 5, disconnects: 0, timeouts: 0 total, 0 by SBC, IAP RAM available 0x25a98
      Buffer RX/TX: 3168/360-4096, open files: 0
      === Duet Control Server ===
      Duet Control Server version 3.5.0-rc.1 (2023-09-01 07:16:31)
      File /opt/dsf/sd/gcodes/sunglass switch pro 16.gcode is selected, processing
      File:
      Buffered code: G1 X224.497 Y141.703 E1.91722
      Buffered code: G1 F1088.291
      Buffered code: G1 X223.807 Y141.703 E.02149
      Buffered code: G1 F1085.714
      Buffered code: G1 X223.807 Y141.688 E.00047
      Buffered code: G1 F1044.907
      Buffered code: G1 X223.807 Y141.013 E.02102
      Buffered code: G1 F3599.987
      Buffered code: G1 X223.807 Y113.286 E.86344
      Buffered code: G1 F3600
      Buffered code: G1 X223.807 Y112.836 E.01401
      Buffered code: G1 F2820.875
      Buffered code: G1 X223.753 Y112.698 E.00461
      Buffered code: G1 F1891.453
      Buffered code: G1 X223.603 Y112.633 E.00509
      Buffered code: G1 F1859.094
      Buffered code: G1 X223.062 Y112.633 E.01685
      Buffered code: G1 X203.102 Y112.633 E.62157
      Buffered code: G1 X202.561 Y112.633 E.01685
      Buffered code: G1 F1891.453
      Buffered code: G1 X202.422 Y112.687 E.00464
      Buffered code: G1 F2719.649
      Buffered code: G1 X202.357 Y112.836 E.00506
      Buffered code: G1 F3599.987
      Buffered code: G1 X202.357 Y113.286 E.01401
      Buffered code: G1 X202.357 Y141.013 E.86344
      Buffered code: G1 F1010.728
      Buffered code: G1 X202.357 Y141.688 E.02102
      Buffered code: G1 F1053.382
      Buffered code: G1 X202.357 Y141.703 E.00047
      Buffered code: G1 F1056.076
      Buffered code: G1 X201.667 Y141.703 E.02149
      Buffered codes: 1312 bytes total
      Code buffer space: 2808
      Configured SPI speed: 8000000Hz, TfrRdy pin glitches: 0
      Full transfers per second: 120.38, max time between full transfers: 80.1ms, max pin wait times: 61.6ms/22.5ms
      Codes per second: 394.01
      Maximum length of RX/TX data transfers: 4524/3360
      
      posted in Filament Monitor
      macguyverundefined
      macguyver