Duet3D Logo Duet3D
    • Tags
    • Documentation
    • Order
    • Register
    • Login
    1. Home
    2. Dugee
    3. Posts
    • Profile
    • Following 1
    • Followers 0
    • Topics 13
    • Posts 81
    • Best 5
    • Controversial 0
    • Groups 0

    Posts made by Dugee

    • RE: RRF3

      @jay_s_uk I saw that one, but it doesn't automate the trigger heights, but the calibration process.

      I did see a thread that included automating the trigger heights,

      https://forum.duet3d.com/topic/14280/invitation-to-share-your-conditional-gcode-scripts

      but havent yet found any follow up.

      I also found this one, which I'll have to read through first!

      https://forum.duet3d.com/topic/17872/automatic-bed-leveling-with-conditional-gcode-iterations/40

      posted in Firmware installation
      Dugeeundefined
      Dugee
    • RE: RRF3

      @o_lampe I looked at that, with the amount of work involved in putting a smart effector into my machine it isnt worth it.

      It's only a Mini, and one of the reasons for getting the machine back out is to print the pieces for a D bot, as I think that will be more useful for what I want to print.

      I can just print everything I need on the mini, it's tight but it just makes it.

      posted in Firmware installation
      Dugeeundefined
      Dugee
    • RE: RRF3

      @Veti yes, it's just that previously to determine the trigger heights ( 3 underbed sensors for hot end probing) it felt like it took an age to probe, get the results, put them through a spreadsheet to get the differential to origin, then input into the bed.g file for the probe points. I had created a file to probe all of the calibration points 5(?) times to then average the trigger height in a spreadsheet which I then put in to bed.g manually.

      When I was looking before at the conditional g-code I remember some talk of being able to use <average> but cant find anything in the forum, Probably not using the correct search terms.

      I think the configurator is a great tool, but I havent been in to it for a long time. I'll have a look to see what has changed,

      posted in Firmware installation
      Dugeeundefined
      Dugee
    • RE: RRF3

      @o_lampe mine was just lutherie type stuff, woodwork, painting, electrics, so if you we get to 3d instruments, you've already won.

      posted in Firmware installation
      Dugeeundefined
      Dugee
    • RE: RRF3

      @Veti true, I tended to use 6 until I got a stable calibration then reduced for actual printing.

      I
      With RRF3 is it possible to create something that will do the probing for the bed.g probe trigger heights and automatically populate the file or is it still a manual process? that was the biggest PITA that I had, and with the printer sitting so long I will need to basically start from scratch to calibrate.

      I couldn't see anything obvious other then this still being referenced in the Delta Calibration steps. I didn't go through the full differences to RRF3, and what the conditional processes can do, just looked the process for migration, so apologies if this is a question answered in the dozuki.

      posted in Firmware installation
      Dugeeundefined
      Dugee
    • RE: RRF3

      @dc42 is the delta calibration algorithm the same, 6 factor still being the most appropriate?

      posted in Firmware installation
      Dugeeundefined
      Dugee
    • RE: RRF3

      @Veti Well, i priced the components for creating a d-bot last night and it seems I can get everything I need for about £200 and then I would definitely migrate to rrf3.

      And then I could probably make one!

      posted in Firmware installation
      Dugeeundefined
      Dugee
    • RE: RRF3

      we should start a music channel in here to compare lockdown, non, 3d projects!@o_lampe
      🎸 🎺

      posted in Firmware installation
      Dugeeundefined
      Dugee
    • RRF3

      Hi all.

      I put my printer away last year after getting everything working, didn't cope well with lockdown, but started rebuilding a guitar instead. That's finished, so back to the printer

      My question, I have the final version of RRF2 installed. Will I get any benefit by migrating to RRF3? It's just a mini delta.

      posted in Firmware installation
      Dugeeundefined
      Dugee
    • RE: Improving calibration/bed mesh

      @Veti I'll add that back in tonight and check PID. I was having problems with my bed heater, and had removed it from the config previously. thanks for spotting.

      posted in Tuning and tweaking
      Dugeeundefined
      Dugee
    • RE: Improving calibration/bed mesh

      6a3f0fee-61ed-47e4-8307-a6e9a3155eae-image.png

      posted in Tuning and tweaking
      Dugeeundefined
      Dugee
    • RE: Delta Auto Calibration - slams into bed.

      @finnerj double check your steps/mm also

      posted in Duet Hardware and wiring
      Dugeeundefined
      Dugee
    • RE: Improving calibration/bed mesh

      from doing a bit of research today some of my issues may be down to using gt2 gears and s2m belts.

      hopefully the gt2 will be with me soon.

      posted in Tuning and tweaking
      Dugeeundefined
      Dugee
    • Improving calibration/bed mesh

      Hi,

      I am getting reasonably good autocalibration deviations:

      9:34:18 PMG32
      Calibrated 8 factors using 16 points, deviation before 0.032 after 0.031
      9:33:33 PMG32
      Calibrated 8 factors using 16 points, deviation before 0.031 after 0.029

      I improved this from 0.060-0.067 by tensioning the belts better. I don't use M500, I prefer to enter the autocalibration results into my config.g file.

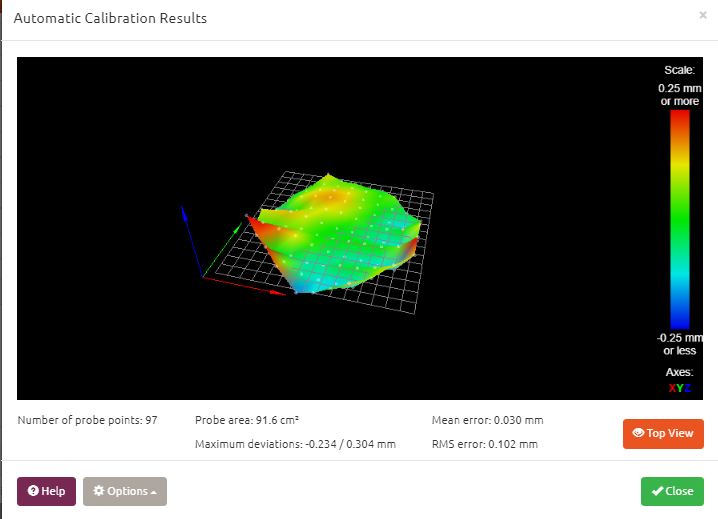
      but my bed mesh is all over the place

      fcef7e6e-afb5-4673-87a3-bf76cea8319a-image.png 
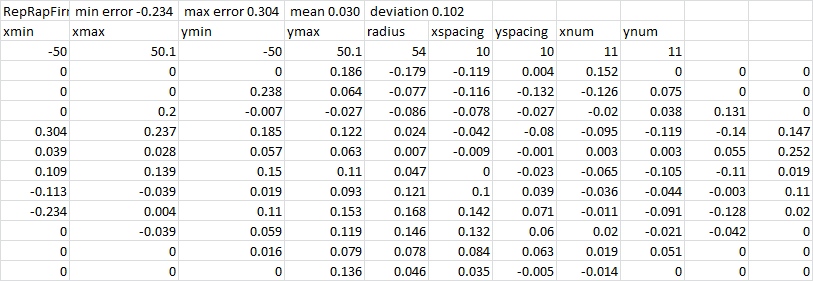
RepRapFirmware height map file v2 generated at 2019-10-16 21:37 min error -0.234 max error 0.304 mean 0.030 deviation 0.102
      xmin xmax ymin ymax radius xspacing yspacing xnum ynum
      -50 50.1 -50 50.1 54 10 10 11 11
      0 0 0 0.186 -0.179 -0.119 0.004 0.152 0 0 0
      0 0 0.238 0.064 -0.077 -0.116 -0.132 -0.126 0.075 0 0
      0 0.2 -0.007 -0.027 -0.086 -0.078 -0.027 -0.02 0.038 0.131 0
      0.304 0.237 0.185 0.122 0.024 -0.042 -0.08 -0.095 -0.119 -0.14 0.147
      0.039 0.028 0.057 0.063 0.007 -0.009 -0.001 0.003 0.003 0.055 0.252
      0.109 0.139 0.15 0.11 0.047 0 -0.023 -0.065 -0.105 -0.11 0.019
      -0.113 -0.039 0.019 0.093 0.121 0.1 0.039 -0.036 -0.044 -0.003 0.11
      -0.234 0.004 0.11 0.153 0.168 0.142 0.071 -0.011 -0.091 -0.128 0.02
      0 -0.039 0.059 0.119 0.146 0.132 0.06 0.02 -0.021 -0.042 0
      0 0 0.016 0.079 0.078 0.084 0.063 0.019 0.051 0 0
      0 0 0 0.136 0.046 0.035 -0.005 -0.014 0 0 0

      Unfortunately when I downloaded this is didn't give me the heightmap image.

      What can I do to improve this?

      Small delta, config.g below ( this says firmware 2.03, but I am sure I am on 2.04, I think this file was originally generated before I installed 2.04)):

      ; Configuration file for Duet Maestro (firmware version 2.03)
      ; executed by the firmware on start-up
      ;
      ; generated by RepRapFirmware Configuration Tool v2.0.4 on Tue Sep 17 2019 20:28:32 GMT+0100 (British Summer Time)

      ; General preferences
      G90 ; send absolute coordinates...
      M83 ; ...but relative extruder moves
      M550 P"My Printer" ; set printer naME
      M665 L120.75:120.25:120.25 R61.788 H124.094 B55.0 X1.209 Y0.638 Z0.000 ; Set delta radius, diagonal rod length, printable radius and homed heigh
      M666 X0.85 Y-1.18 Z0.33 A-1.93 B0.43 ; put end stop adjustments here, or let auto calibration find them

      ; Network
      M552 P0.0.0.0 S1 ; enable network and acquire dynamic address via DHCP
      M586 P0 S1 ; enable HTTP
      M586 P1 S0 ; disable FTP
      M586 P2 S0 ; disable Telnet

      ; Drives
      M569 P0 S0 ; physical drive 0 goes backwards
      M569 P1 S0 ; physical drive 1 goes backwards
      M569 P2 S0 ; physical drive 2 goes backwards
      M569 P3 S1 ; physical drive 3 goes forwards
      M584 X0 Y1 Z2 E3 ; set drive mapping
      M350 E256 I0 ; configure microstepping without interpolation
      M350 X32 Y32 Z32 I1 ; configure microstepping with interpolat
      M92 X204.520 Y204.520 Z204.520 E1675 ; set steps per mm
      M566 X1200.00 Y1200.00 Z1200.00 E1200.00 ; set maximum instantaneous speed changes (mm/min)
      M203 X18000.00 Y18000.00 Z18000.00 E1200.00 ; set maximum speeds (mm/min)
      M201 X1000.00 Y1000.00 Z1000.00 E1000.00 ; set accelerations (mm/s^2)
      M906 X600 Y600 Z600 E600 I30 ; set motor currents (mA) and motor idle factor in per cent
      M84 S30 ; Set idle timeout

      ; Axis Limits
      M208 Z-3 S1 ; set minimum Z

      ; Endstops
      M574 X2 Y2 Z2 S0 ; set active low and disabled endstops

      ; Z-Probe
      M558 P1 H10 I1 F1200 T12000 A5 ; set Z probe type to switch and the dive height + speeds
      G31 P0001 X0 Y0 Z-0.2 ; set Z probe trigger value, offset and trigger height
      M557 R54 S10 ; define mesh grid

      ; Heaters
      M305 P1 T100000 B4138 R2200 ; set thermistor + ADC parameters for heater 1
      M143 H1 S280 ; set temperature limit for heater 1 to 280C
      M307 H1 A322.4 C143.5 D6.3 S1.00 V12.6 B0 ; SET pid FIGURES FROM AUTOTUNE
      M305 P0 T100000
      M143 H0 S120

      ; Fans
      M106 P0 S0 I0 F500 H1 ; set fan 0 value, PWM signal inversion and frequency. Thermostatic control is turned off
      M106 P1 S1 I0 F500 H1 T45 ; set fan 1 value, PWM signal inversion and frequency. Thermostatic control is turned on

      ; Tools
      M563 P0 D0 H1 F0 ; define tool 0
      G10 P0 X0 Y0 Z0 ; set tool 0 axis offsets
      G10 P0 R0 S0 ; set initial tool 0 active and standby temperatures to 0C

      ; Custom settings are not defined

      ;scaling
      m570 x0.9481 y1.0115 ; scaling adjusted

      ; Miscellaneous
      M501 ; load saved parameters from non-volatile memory

      Bed.g:

      ; bed.g
      ; called to perform automatic delta calibration via G32
      ;
      ; generated by RepRapFirmware Configuration Tool v2.0.4 on Tue Sep 17 2019 20:28:32 GMT+0100 (British Summer Time)
      M561 ; clear any bed transform
      G28 ; home all towers
      ; Probe the bed at 12 peripheral and 3 halfway points, and perform 3-factor auto compensation
      ; Before running this, you should have set up your Z-probe trigger height to suit your build, in the G31 command in config.g.40
      M140 H0 S60
      G30 P0 X0 Y48 H0.13 Z-99999
      G30 P1 X24.95 Y43.21 H0.0772 Z-99999
      G30 P2 X43.21 Y24.95 H-0.159 Z-99999
      G30 P3 X48 Y0 H0.099 Z-99999
      G30 P4 X43.21 Y-24.95 H0.1712 Z-99999
      G30 P5 X24.95 Y-43.21 H-0.027 Z-99999
      G30 P6 X0 Y-48 H-0.0902 Z-99999
      G30 P7 X-24.95 Y-43.21 H0.133 Z-99999
      G30 P8 X-43.21 Y-24.95 H0.192 Z-99999
      G30 P9 X-48 Y0 H0-0.512 Z-99999
      G30 P10 X-43.21 Y24.95 H-0.022 Z-99999
      G30 P11 X-24.95 Y43.21 H0.1116 Z-99999
      G30 P12 X0 Y24.9 H0.116 Z-99999
      G30 P13 X21.56 Y-12.45 H0.008 Z-99999
      G30 P14 X-21.56 Y-12.45 H0.146 Z-99999
      G30 P15 X0 Y0 H0 Z-99999 S8

      ; Use S-1 for measurements only, without calculations. Use S4 for endstop heights and Z-height only. Use S6 for full 6 factors
      ; If your Z probe has significantly different trigger heights depending on XY position, adjust the H parameters in the G30 commands accordingly. The value of each H parameter should be (trigger height at that XY position) - (trigger height at centre of bed)

      The heightmap is high towards each tower, and is shows peaks and troughs. I think I may have a belt issue, I have GT2 16t drive gear and idlers with S2M belt. I am waiting for GT2 belt to arrive but it seems to be taking an age to come. Could this be causing the issue, or is there something else I can examine? Is it worth me redoing my trigger heights in case there has been any movement?

      I can add some figures from a calibration object I printed later today if it would be of any use?

      posted in Tuning and tweaking
      Dugeeundefined
      Dugee
    • RE: autocalibration target

      FYI, I adjusted my belt tensions and immediately the autocalibration deviation fell to 0.35-0.40. Simple improvement.

      posted in Tuning and tweaking
      Dugeeundefined
      Dugee
    • RE: Help on "Calibrating_a_delta_printer" wiki

      @mihaitintea On the number of calibrations to run, I do it until my before and after are within 0.003 of each other, then save the M665/M666 numbers to config.g

      posted in Tuning and tweaking
      Dugeeundefined
      Dugee
    • RE: Help on "Calibrating_a_delta_printer" wiki

      you have a choice -

      if you run M500 it will save your numbers to a config_override.g file. The firmware will only call up these figures if you also put a M501 towards the end of your config.g file. You need to reboot to get the firmware to access these numbers.

      or --- you manually put your m665 and m666 numbers into the config.g file to replace the ones that were created when you did the configurator. To get these just put "M665" and "M666" into the gcode console on DWC. I prefer to use my phone to get these so I can get the numbers on the phone then type them in on my PC.

      You are getting good calibration results, but if the height map is way off then either wait until you get glass or remove the painter tape, with the tolerances that can be returned, anything on the bed that can give variance will really show up. Mine varies a lot just by have traces of glue on it.

      With a smart effector I would be surprised if you need the trigger height offsets, in bed.g. with such a variance I would think you have a bed that isnt particularly flat, but others with more experience of this than me are better to jump in ( I use under bed switches for mine, so trigger height does vary). The trigger height might be throwing a lot off as you have a 0.8+ difference between some points, when the smart effector should be consistent and repeatable when triggering. Try resetting your "H" parameter to 0 before re-running the calibration. I wouldn't bother doing an M500 or entering the M665/M666 figures until you do this though.

      Once you get going, see below. You need to print some objects of varying height to confirm your steps/mm on the motors, If this is wrong, it will skew your calibration and bed mesh.

      dc42 ADMINISTRATORS 18 Sep 2019, 17:51
      @Dugee said in dimensional accuracy:

      Finally got my 1st calibration cube from my upgraded Monoprice Mini Delta. Small machine, but there is definitely a lot of potential lurking in there. Some parts very much built down to a price, but these are easily replacable, like bed clips and drive gears. Delta calibration and bed mesh has come in to 2 decimal places pretty easily and after working through the config files to get it operational I am very pleased so far, so firstly thanks for the help I have had from this site, directly and by searching old posts.

      On to my question - the MPMD FB groups aim for dimensional accuracy via adjustment of the steps/mm of the steppers, but the guide for calibrating Delta printers on the dozuki recommends using M579 to do this. Admittedly MPMD uses a customised version of Marlin, not RepRap, which doesnt support M579 so they may use this for that reason.

      What are the pros/cons of the two methods of adjusting the scaling this way, and which should I use?

      Thanks in advance.

      Adjust the tower steps/mm (keep all 3 the same) to get the correct Z height. To avoid first and last layer effects, print 2 otherwise similar test cuboids of different heights, and measure the difference to calibrate the steps/mm. It should be very close to the theoretical value.

      After doing that and setting the correct steps/mm, re-run calibration, then print a noughts-and-crosses/tic-tac-toe pattern. Check that the lines are straight. If they are, use M570 to adjust the X and Y scaling if necessary. If they are not, you will need to adjust the configured rod length, recalibrate, and repeat.

      Edited to add: what @DC42 says 👆

      posted in Tuning and tweaking
      Dugeeundefined
      Dugee
    • RE: Help on "Calibrating_a_delta_printer" wiki

      When you set up the config, easiest using the online tool mentioned in the wiki you should be setting your target height a little above (10-20mm) your measured height.

      I didn't need to edit the homedelta file at all, it should all be in there based on the configurator tool.

      before you run autocalibration you should be able to home the printer then move the nozzle down using the z- buttons on the dwc so that 1 or 2 pieces of paper are just held in place by the nozzle. The you use g92 z0. this sets your z0 position. The wiki also gives the command for allowing the nozzle to go below your z0 height. you will need to do this, putting a figure such as z-5 in, to allow the nozzle to go below there, DEPENDING ON Z-PROBE.

      Then you run autocalibration. BUT a lot will depend on what type of probe you have. What are you using for your z-probe?

      the recommendation on the forum is that you run autocalibration until you get an acceptable deviation (this will depend on your machine "straightness", but I am getting 0.05 to 0.06, others as low as 0.015-0.025) then get your m665 and m666 figures from this entering "M665" and "M666" in the g-code console, enter the numbers you get into config.g using the file editor, replacing the numbers that are there for these commands, reboot and run it again. repeat until the before and after deviations are fairly constant.

      M500 creates a config override file that will only be accessed if you have an M501 command at the end on your config.g file, which requires a reboot after each M500 to load.

      If you have varying z-probe trigger heights then this is where you amend the bed.g file, putting in the offset from x0y0z0 for each probe position. This is a laborious task. This is the only edit I have done to this file, other than selecting which calibration method to use. Mostly the recommendation is to use S6 in the last line of your G30 in here, but as I have a slight tilt in my bed I am using S8 at the moment. Try and avoid S7 or S9 as this can screw up your arm lengths. This is important to get an accurate calibration though. But, again, what is your z-probe?

      Others with more knowledge may offer a different approach but this worked for me.

      posted in Tuning and tweaking
      Dugeeundefined
      Dugee
    • RE: autocalibration target

      Can't be too bad generally. I'm about half way through a 100mm cylindrical multi height tower to check z height. Looks OK, printing on glass with a brim.

      Allowing me to measure 5, 20, 50, 80, 95 and 100mm on my z. I may have gone too far with the design, but gives the machine a good work out and looks pretty. Spreadsheet sitting waiting for measurements to be inputted. At least I'll get my motor steps /mm sorted out today.

      If I can I'll stick a pic up when it's done.

      posted in Tuning and tweaking
      Dugeeundefined
      Dugee
    • RE: autocalibration target

      @Veti by necessity I've changed drive gear and idler, upgraded to capricorn tubing, installed different endstops, upgraded bed clips, rewired under bed switches and installed a glass bed. Not to mention getting a Duet board.

      Although it's a much better board, it only cost me about £10 more than getting a replacement standard board from USA and was actually in stock.

      The biggest thing I've learned from what I've done so far is to triple check nozzle/heater block/throat position. The problems I had because the nozzle didn't seat against the throat were mental. Couldn't understand why pla was oozing when the nozzle was tight against the block. Noob.

      posted in Tuning and tweaking
      Dugeeundefined
      Dugee