Duet3D Logo Duet3D
    • Tags
    • Documentation
    • Order
    • Register
    • Login
    1. Home
    2. evan38109
    3. Best
    • Profile
    • Following 0
    • Followers 0
    • Topics 7
    • Posts 41
    • Best 9
    • Controversial 0
    • Groups 0

    Best posts made by evan38109

    • Polynomial Temp Compensation for Probes?

      As of RRF v3.1.1, we can pass G31 a temperature coefficient, C, when using an inductive probe like a PINDA v2 to offset the probe's variance at different temperatures. In practice, though, the relationship isn't linear, and the temperature effect yields increasing offsets at higher temperatures.

      How about an additional optional parameter, (D?), that is the factor for a second-degree polynomial for temperature compensation? The additional compensated height would then be C * temp + D * temp^2.

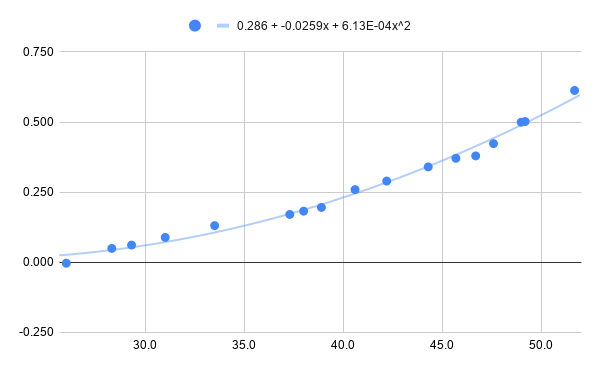
      I find that I can sufficiently approximate the relationship with a second-degree polynomial. (A third-degree polynomial is better, but second-degree gets close enough for FFF printing.)

      pinda-temp-polynomial.png

      I model this (messily!) in RRF3 with some conditional GCode. I have a G831.g script that approximates the model with a series of short linear segments, and call it just before homing Z, leveling the bed, or measuring a mesh:

      if sensors.analog[2].lastReading < 25       ;       temp < 25°C
          G31 P500 X23 Y5 Z{ 0.65 + 0.000 } H2 S20 C0.001685
      elif sensors.analog[2].lastReading < 30     ; 25 <= temp < 30
          G31 P500 X23 Y5 Z{ 0.65 + 0.008425 } H2 S25 C0.007815 
      elif sensors.analog[2].lastReading < 35     ; 30 <= temp < 35
          G31 P500 X23 Y5 Z{ 0.65 + 0.047500 } H2 S30 C0.013945 
      elif sensors.analog[2].lastReading < 40     ; 35 <= temp < 40
          G31 P500 X23 Y5 Z{ 0.65 + 0.117225 } H2 S35 C0.020075 
      elif sensors.analog[2].lastReading < 45     ; 40 <= temp < 45
          G31 P500 X23 Y5 Z{ 0.65 + 0.217600 } H2 S40 C0.026205
      elif sensors.analog[2].lastReading < 50     ; 45 <= temp < 50
          G31 P500 X23 Y5 Z{ 0.65 + 0.348625 } H2 S45 C0.032335
      elif sensors.analog[2].lastReading < 55     ; 50 <= temp < 55
          G31 P500 X23 Y5 Z{ 0.65 + 0.510300 } H2 S50 C0.038465  
      elif sensors.analog[2].lastReading < 60     ; 55 <= temp < 60
          G31 P500 X23 Y5 Z{ 0.65 + 0.702625 } H2 S55 C0.044595
      elif sensors.analog[2].lastReading < 65     ; 60 <= temp < 65
          G31 P500 X23 Y5 Z{ 0.65 + 0.925600 } H2 S60 C0.050725
      else                                        ; 65 <= temp
          G31 P500 X23 Y5 Z{ 0.65 + 1.179225 } H2 S65 C0.056855
      

      This works pretty well, but it is a bit hacky. I find myself sprinkling G831 calls all over homez.g, homeall.g, bed.g, print start scripts, etc. A polynomial factor would be easier and cleaner.

      (One more parameter -- E? -- would be even better, for C * temp + D * temp^2 + E * temp^3, but hey, I don't want to get greedy here. At least on my machine, the 2nd-degree approximation gets within 0.01mm error for the usable temperature range.)

      posted in Firmware wishlist
      evan38109undefined
      evan38109
    • RE: Polynomial Temp Compensation for Probes?

      @dc42 said in Polynomial Temp Compensation for Probes?:

      ...They are also bigger and heavier than the alternatives. Why does anyone use them?

      As far as bulkiness goes, the one I’m using is modeled after Prusa’s PINDA2, with a thermistor embedded in the probe. It’s about 7.5mm in diameter by 36mm long. It only weighs a few grams, or 15g with the entire cable assembly on the scale. That’s smaller than a BLTouch, and costs less than half, too (about $15 US / £13.45 GPB, on a quick Googling). Runs on 5V, so it was easy to wire up to a Duet3.

      Why did I use it for this project? Well, mostly convenience. This project itself was somewhat less than planned. I’d been going back and forth between building a Railcore or retrofitting my old Prusa MK3S, and ultimately decided to go with the Railcore. But then parts got delayed. While I waited, I got antsy. Needing something to do over a long weekend other than stare at a screen, I finally decided to rip up my already-heavily-modified Prusa MK3S and switch it over to a Duet3 6HC. (Yes, it’s massive overkill for this purpose; I also love it.)

      In this case, my main motivation was that I could get the PINDA2 working without redesigning the extruder or ordering more parts. That said, I think inductive probes like these with embedded thermistors may be worth a second look on the merits.

      They may have significant temperature drift, but it’s predictable drift. With the thermistor embedded in the probe, I’ve found the compensation to be quite reliable, both before and after the Duet conversion. I’m sure it’s not the most precise probe out there, but I’m used to just hitting print and it works.

      Probing is fast, too. Tolerates fast dive speeds, is happy with less than 1mm dive height, and no need to deploy a pin or whatnot. I have no problem setting M558 … S0.001 A20 and even if it has to probe half a dozen times, it still takes less than a second.

      I'm no fanboy here, and I'm certainly not claiming that it's the Best Probe Ever. It feels like all the options out there today have some compromises, though. When it comes to inductive probes, you've got compact, lightweight, cheap, fast, convenient, plus reliable and accurate enough for an everyday printer. On the balance, you've got to do some software temperature compensation and avoid magnets. Perfect? Nah. Acceptable? Sure.

      There may be better alternatives for a given printer, depending on the compromises one chooses. I’ll head in a different direction with that Railcore eventually. In the meantime, though, the printer is busy laying down plastic. (And that Duet is great!)

      posted in Firmware wishlist
      evan38109undefined
      evan38109
    • RE: Issues with pressure advance since RRF 3.4

      @droftarts Yes, I've heard this before and followed this instruction.

      First, I tuned IS with PA off, arriving at M593 P"ei3" F42.

      Second, I printed this calibration print with input shaping held constant and PA values varied from 0.00 at the far right (bottom of the print) to 0.14 at the far left, incrementing every 5mm.

      Note how the pre- and post-seam artifact is not present when PA is zero on the right-hand side when PA is off. The artifact I am referring to the horizontal line / thin section that measures around 4mm before and after the seam, and the corners. It's present for any PA values from way too low to way too high as long as IS is enabled, and absent if PA is off. Apologies for my photography.

      Did I misunderstand something? What else could I have done?

      pa-test-with-is.jpg

      posted in General Discussion
      evan38109undefined
      evan38109
    • RE: Issues with pressure advance since RRF 3.4

      @gnydick I've also seen issues with input shaping + pressure advance, though I'm always open to having done something wrong on my end. At the risk of hijacking a closely-related-but-not-quite-the-same thread, you can see the artifact show up as an indentation before and after turns in the photo below. I wasn't able to remove it with any amount of tuning.

      is-pa_artifact.jpg

      • gcode here.
      • Ringing tower model here.
      • Config files for the machine when the above was printed in this commit. (Newer repo state is a bit different; I'm converting to closed loop.)
      • If you want to re-slice for your machine, the PrusaSlicer layer change script, designed for 0.25mm layer height, is:
      {if layer_num== 1}
      M593 P"none"                           ; no input shaping
      M572 D0 S0                             ; no PA
      {elsif layer_num== 60}
      M593 P"ei3" F42 S0.1                   ; enable input shaping
      M572 D0 S0                             ; no PA
      {elsif layer_num== 120}
      M593 P"none"                           ; no input shaping
      M572 D0 S0.09                          ; enable PA
      {elsif layer_num== 180}
      M593 P"ei3" F42 0.1                    ; enable input shaping
      M572 D0 S0.09                          ; enable PA
      {endif}
      
      posted in General Discussion
      evan38109undefined
      evan38109
    • RE: Duet 3 StealthChop 2 Tuning for Nema23

      I've been able to get some nice, big Moons MS23HA8L4360 NEMA23 steppers working well this weekend. I've tested them up to 400mm/sec with acceleration at 4000mm/sec², and suspect they could go higher if I drop microstepping down to x16.

      Config looks like:

      ; Drives
      M569 P0.1 S1 D3                              ; Y / Front    0.1 goes forwards   0.9° Moons MS23HA8L4360*
      M569 P0.2 S0 D3                              ; X / Rear     0.2 goes backwards  0.9° Moons MS23HA8L4360*
      ...
      M350 X32 Y32 Z32 E32 I1                      ; configure microstepping with interpolation
      
      ; Steps on X & Y
      ;   = steps per rotation / (pulley teeth * belt spacing) * microstep multiplier
      ;     0.9° degree stepper has 400 steps per rotation, 1.8° stepper has 200
      M92 X{400 / (18 * 2) * 32} Y{400 / (18 * 2) * 32} Z6400.00 E1674.00  ; set steps per mm
      
      ; Motor current
      ;   = Max stepper rating in milliamps * 0.8
      ;     Adjust multiplier as desired. Lower is quieter, while higher means more torque, noise, and heat.
      ;     ...but never over 1.0! (and even over 0.8 may lead to excess heat)
      M906 X{3600 * 0.8} Y{3600 * 0.8} Z{2000 * 0.8} E1100 I30           ; set motor currents (mA) and motor idle factor in per cent
      M84 S30                                                            ; Set idle timeout
      
      ; Speeds
      M203 X24000.00 Y24000.00 Z480.00 E3600.00    ; set maximum speeds (mm/min)
      M201 X4000.00  Y4000.00  Z80.00  E1500.00    ; set accelerations (mm/s^2)
      
      ; Jerk and accelerations
      ; M566 X500.00   Y500.00   Z20.00  E1500.00    ; set maximum jerk (instantaneous speed changes) (mm/min)
      M566 X300.00   Y300.00   Z20.00  E1500.00   ; set maximum jerk (instantaneous speed changes) (mm/min)
      M204 1000 T2000                              ; use 1000mm/s² acceleration for print moves and 2000mm/s² for travel moves
      
      ; Trinamic Drive Tuning
      ; Tune tpwmthrs (V) so stealthchop runs at appropriate speeds
      ; and tune thigh (H) to avoid shifting into fullstep mode
      M569 P0.1 V40   H5                                    ; X            - Set tpwmthrs so StealthChop runs up to 105.5mm/sec
      M569 P0.2 V40   H5                                    ; Y            - Set tpwmthrs so StealthChop runs up to 105.5mm/sec
      ...
      M915 X Y T20000                                       ; Set CoolStep threshold super low
      

      One thing I've noticed is that using M915 T... with low values to disable CoolStep leads to some nasty, loud noises. I suspect the current reduction that CoolStep does is beneficial in reducing back EMF.

      posted in Tuning and tweaking
      evan38109undefined
      evan38109
    • RE: Duet3: Loading config.g after upload

      Ahh, that's what I was missing. Thank you!

      posted in Beta Firmware
      evan38109undefined
      evan38109
    • RE: Duet 3 StealthChop 2 Tuning for Nema23

      For posterity --

      I was misunderstanding how CoolStep interacted with the other modes. Thank you for clarifying.

      I've now gotten in the habit of just effectively disabling CoolStep with M915 X Y Z E T1. I've not been able to find any situations on either of my printers where CoolStep works materially better than SpreadCycle. (That's not to say they don't exist, I just haven't found them!)

      posted in Tuning and tweaking
      evan38109undefined
      evan38109
    • RE: Duet 3: "Attempt to move motors when VIN is not in range" @ 30V

      I tried with a lower-voltage power supply this evening and the steppers move just fine. I'm now reasonably confident that this is a bug.

      (...or maybe I'm missing a voltage setting somewhere? There's always a chance this is my fault. 😉 )

      Is there a preferred method to file a bug report, or is this kind of forum post sufficient?

      posted in Beta Firmware
      evan38109undefined
      evan38109
    • RE: Input Shaping + Pressure Advance Artifact

      Try as I might, I can't get rid of these artifacts with any combination of IS and PA options.

      Here's how it shows up in real prints. Note the gaps where it looks like some segments of certain layers just didn't print.

      one-mouse.jpg

      Here's a comparison with input shaping enabled + pressure advance enabled on the left (M593 P"ei2" F42.0 + M572 D0 S0.09); and only PA enabled on the right (M593 P"none" + M572 D0 S0.07). Same filament, gcode, printer, etc. Printed back to back, didn't even restart or re-home the printer. The one with IS disabled is fine.

      two-dessert-mice.jpg

      Is anyone out there using both input shaping and pressure advance at the same time with v3.4.0?

      posted in Tuning and tweaking
      evan38109undefined
      evan38109