@grabercars I think I solve my own problem. It was the QUOTES.
Posts made by grabercars
-
RE: Unable to set up a servo pin for BLTouch - Error in config.g "posted in Duet Hardware and wiring
-
Unable to set up a servo pin for BLTouch - Error in config.g "posted in Duet Hardware and wiring
Unable to set up a servo pin for BLTouch
When attempting to set up a BLtouch (genuine) for the first time I followed the BlTouch guided install PDF. The directions are clear and foolproof. However my system does not like the M950 command and returns the error message "Error in macro line 45 while starting up: exactly one of EFHJPSR must be given". Line 45 corresponds to M950 S0 C"exp.heater3"
I've tried variations of the M950 command by mapping other available heater pin names on the expansion header and the result is always the same error.
And here I'm stuck. Any suggestions?
Steve Graber
Config.g
; General preferences
G90                                                    ; send absolute coordinates...
M83                                                    ; ...but relative extruder moves
M550 P"Cerberus400_1"                                  ; set printer name
M665 R220.7 L454.9876 B180 H334                        ; Set delta radius, diagonal rod length, printable radius and homed height
M666 X0 Y0 Z0                                          ; put your endstop adjustments here, or let auto calibration find them

; Network
M552 S1                                                ; enable network
M586 P0 S1                                             ; enable HTTP
M586 P1 S0                                             ; disable FTP
M586 P2 S0                                             ; disable Telnet

; Drives
M569 P0 S0                                             ; physical drive 0 goes backwards
M569 P1 S0                                             ; physical drive 1 goes backwards
M569 P2 S0                                             ; physical drive 2 goes backwards
M569 P3 S1                                             ; physical drive 3 goes forwards
M584 X0 Y1 Z2 E4                                       ; set drive mapping
M350 X32 Y32 Z32 I0                                    ; configure microstepping without interpolation
M350 E16 I0                                            ; configure microstepping with no interpolation
M92 X160.00 Y160.00 Z160.00 E2725.00                   ; set steps per mm
M566 X1200.00 Y1200.00 Z1200.00 E40.00                ; set maximum instantaneous speed changes (mm/min)
M203 X18000.00 Y18000.00 Z18000.00 E3000.00            ; set maximum speeds (mm/min)
M201 X1700.00 Y1700.00 Z1700.00 E120.00                ; set accelerations (mm/s^2)
M906 X1100 Y1100 Z1100 E550 I40                        ; set motor currents (mA) and motor idle factor in per cent
M84 S30                                                ; Set idle timeout

; Axis Limits
M208 Z0 S1                                             ; set minimum Z

; Endstops
M574 X2 S1 P"xstop"                                    ; configure active-high endstop for high end on X via pin xstop
M574 Y2 S1 P"ystop"                                    ; configure active-high endstop for high end on Y via pin ystop
M574 Z2 S1 P"zstop"                                    ; configure active-high endstop for high end on Z via pin zstop

; BLTouch
M558 P9 C"^zprobe.in" H5 F100 T2000
M950 S0 C”exp.heater3”
G31 X0 Y-37 Z3.3 P25
M557 R150 S25

; Heaters
M308 S0 P"e0temp" Y"thermistor" T100000 B4092           ; configure sensor 0 as thermistor on pin e0temp
M950 H0 C"e0heat" T0                                    ; create bed heater output on e0heat and map it to sensor 0
M307 H0 B0 S1.00                                        ; disable bang-bang mode for the bed heater and set PWM limit
M140 H0                                                 ; map heated bed to heater 0
M143 H0 S120                                            ; set temperature limit for heater 0 to 120C
M308 S1 P"bedtemp" Y"thermistor" T100000 B4725 C7.06e-8   ; configure sensor 1 as thermistor on pin bedtemp
M950 H1 C"bedheat" T1                                   ; create nozzle heater output on bedheat and map it to sensor 1
M307 H1 B0 S1.00                                        ; disable bang-bang mode for heater  and set PWM limit
M143 H1 S280                                            ; set temperature limit for heater 1 to 280C

; Fans
M950 F1 C"fan0" Q25000                                 ; create fan 0 on pin fan0 and set its frequency
M106 P1 S0 H1 B.3 T45                                    ; set fan 0 value. Thermostatic control is turned on
M950 F0 C"fan1" Q25000                                 ; create fan 1 on pin fan1 and set its frequency
M106 P0 S0 H-1                                         ; set fan 1 value. Thermostatic control is turned off

; Tools
M563 P0 S"Hotend" D0 H1 F0           			; define tool 0
G10 P0 X0 Y0 Z0                                	; set tool 0 axis offsets
G10 P0 R0 S0

; Miscellaneous
M501                                                   ; load saved parameters from non-volatile memory
M911 S11 R12 P"M913 X0 Y0 G91 M83 G1 Z3 E-5 F1000"     ; set voltage thresholds and actions to run on power loss
M122
=== Diagnostics ===
RepRapFirmware for Duet 2 WiFi/Ethernet version 3.5.1 (2024-04-19 14:40:46) running on Duet WiFi 1.02 or later
Board ID: 08DGM-917NK-F2MS4-7JTDL-3S46N-TDSND
Used output buffers: 3 of 26 (14 max)
Error in macro line 45 while starting up: exactly one of EFHJPSR must be given
=== RTOS ===
Static ram: 23256
Dynamic ram: 72180 of which 0 recycled
Never used RAM 14852, free system stack 184 words
Tasks: NETWORK(1,ready,15.0%,220) HEAT(3,nWait 5,0.0%,328) Move(4,nWait 5,0.0%,359) MAIN(1,running,84.8%,761) IDLE(0,ready,0.1%,29), total 100.0%
Owned mutexes:
=== Platform ===
Last reset 00:16:18 ago, cause: software
Last software reset at 2024-05-10 13:39, reason: User, Gcodes spinning, available RAM 14876, slot 1
Software reset code 0x0003 HFSR 0x00000000 CFSR 0x00000000 ICSR 0x0041f000 BFAR 0xe000ed38 SP 0x00000000 Task MAIN Freestk 0 n/a
Error status: 0x00
MCU temperature: min 32.7, current 33.2, max 34.2
Supply voltage: min 11.9, current 12.0, max 12.2, under voltage events: 0, over voltage events: 0, power good: yes
Heap OK, handles allocated/used 99/2, heap memory allocated/used/recyclable 2048/48/0, gc cycles 0
Events: 0 queued, 0 completed
Driver 0: standstill, SG min n/a
Driver 1: standstill, SG min n/a
Driver 2: standstill, SG min n/a
Driver 3: standstill, SG min n/a
Driver 4: standstill, SG min n/a
Driver 5:
Driver 6:
Driver 7:
Driver 8:
Driver 9:
Driver 10:
Driver 11:
Date/time: 2024-05-10 13:56:08
Cache data hit count 4294967295
Slowest loop: 9.51ms; fastest: 0.18ms
I2C nak errors 0, send timeouts 0, receive timeouts 0, finishTimeouts 0, resets 0
=== Storage ===
Free file entries: 10
SD card 0 detected, interface speed: 20.0MBytes/sec
SD card longest read time 0.8ms, write time 0.0ms, max retries 0
=== Move ===
DMs created 83, segments created 0, maxWait 0ms, bed compensation in use: none, height map offset 0.000, max steps late 0, min interval 0, bad calcs 0, ebfmin 0.00, ebfmax 0.00
no step interrupt scheduled
Moves shaped first try 0, on retry 0, too short 0, wrong shape 0, maybepossible 0
=== DDARing 0 ===
Scheduled moves 0, completed 0, hiccups 0, stepErrors 0, LaErrors 0, Underruns [0, 0, 0], CDDA state -1
=== Heat ===
Bed heaters 0 -1 -1 -1, chamber heaters -1 -1 -1 -1, ordering errs 0
=== GCodes ===
Movement locks held by null
HTTP is idle in state(s) 0
Telnet is idle in state(s) 0
File is idle in state(s) 0
USB is idle in state(s) 0
Aux is idle in state(s) 0
Trigger is idle in state(s) 0
Queue is idle in state(s) 0
LCD is idle in state(s) 0
Daemon is idle in state(s) 0
Autopause is idle in state(s) 0
Q0 segments left 0
Code queue 0 is empty
=== Network ===
Slowest loop: 9.45ms; fastest: 0.00ms
Responder states: HTTP(0) HTTP(0) HTTP(0) FTP(0) Telnet(0)
HTTP sessions: 1 of 8
=== WiFi ===
Interface state: active
Module is connected to access point
Failed messages: pending 0, notrdy 0, noresp 0
Firmware version 2.1.0
MAC address 60:01:94:2e:c7:08
Module reset reason: Turned on by main processor, Vcc 3.39, flash size 4194304, free heap 42784
WiFi IP address 10.1.1.117
Signal strength -71dBm, channel 11, mode 802.11n, reconnections 0
Clock register 00002002
Socket states: 0 0 0 0 0 0 0 0 -
RE: Heaters not remapping upgrading from RRFv2 to v3.3posted in Firmware installation
@phaedrux -- Problem resolved on my end.
Thank you very much for getting me over that hurdle. I'm very appreciative of your time and expertise with something that really had me stumped.
-
RE: Heaters not remapping upgrading from RRFv2 to v3.3posted in Firmware installation
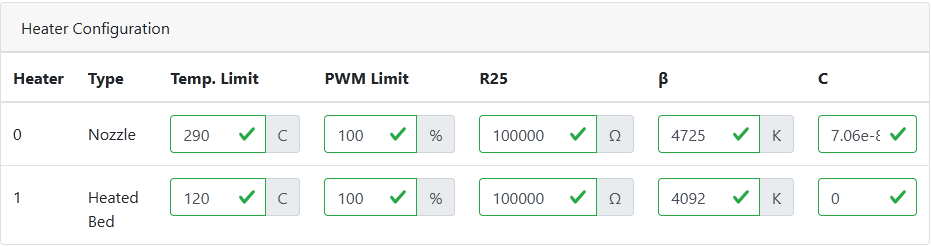
RRF Config Tool Settings:
What am I doing wrong here?
I/O Mapping screenshot:
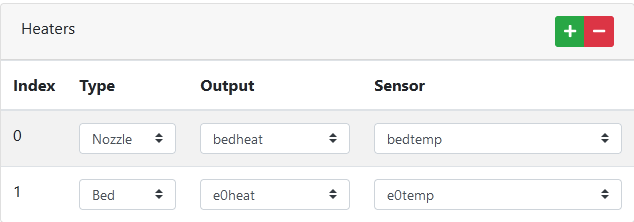
Heaters screenshot:
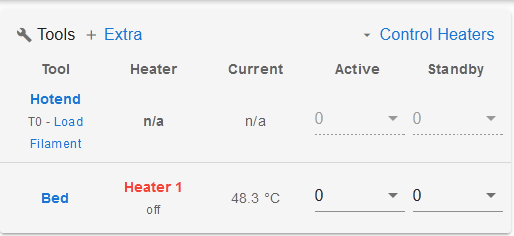
Web Interface screenshot: Notice that the bed heat is working but the hotend is disabled:
This is what I get when using the code generated above by the RRF Config Tool.
-
Heaters not remapping upgrading from RRFv2 to v3.3posted in Firmware installation
I finally decided to take the plunge and upgrade my deltabot printer from v2 to v3 firmware. This was very scary in concept, and not so hard in reality. Except that the bed and hotend heaters didn't remap properly. Honestly the V3 codes are much harder for me to understand and 5 hours into this I still can't edit my way out of the problem. Aside from feeling like a loser, the heater remapping is my problem that I need help with.
I'm using a 24v SuperVolcano hotend and a 110v SSR controlled bed heater. Because of this I have the heater and bed outputs remapped/swapped. The bed heater mosfet being better suited to the current draw from the 80W SuperVolcano heater, and the Duet hotend mosfet controlling the bed SSR.
M122
=== Diagnostics ===
RepRapFirmware for Duet 2 WiFi/Ethernet version 3.3 (2021-06-15 21:44:54) running on Duet WiFi 1.02 or laterMy functional 'Heaters' code from my V2 config.sys is;
; Heaters
M140 H1                                     ; remap heated bed to heater 1
M307 H1 B0 S1.0                             ; disable bang-bang mode for the bed heater and set PWM limit
M305 P0 T100000 B4388 R4700                 ; set thermistor + ADC parameters for heater 0
M143 H0 S290                                ; set temperature limit for heater 0 to 280C
M305 P1 T100000 B3950 R4700                 ; set thermistor + ADC parameters for heater 1
M143 H1 S120                                ; set temperature limit for heater 1 to 120C
I used the RRF config tool and uploaded my v2 JSON template, specifying V3 config.sys output. But this is not working.
; Heaters M308 S0 P"bedtemp" Y"thermistor" T100000 B4725 C7.06e-8 ; configure sensor 0 as thermistor on pin bedtemp M950 H0 C"bedheat" T0 ; create nozzle heater output on bedheat and map it to sensor 0 M307 H0 B0 S1.00 ; disable bang-bang mode for heater and set PWM limit M143 H0 S290 ; set temperature limit for heater 0 to 290C M308 S1 P"e0temp" Y"thermistor" T100000 B4092 ; configure sensor 1 as thermistor on pin e0temp M950 H1 C"e0heat" T1 ; create bed heater output on e0heat and map it to sensor 1 M307 H1 B0 S1.00 ; disable bang-bang mode for the bed heater and set PWM limit M140 H1 ; map heated bed to heater 1 M143 H1 S120 ; set temperature limit for heater 1 to 120C -
RE: What is the correct Mcode to restart a completed print job?posted in Tuning and tweaking
It struck me last night as I was falling asleep that I wasn't seeing the super basic and easy way to accomplish what I want.
The best overall solution would of course be to set up a dynamic macro to repeat any currently selected print via a physical button. And that would require knowing the current print file name and path which would require upgrading to RRF3.1. That way the button would be maintenance free.
In my case I'm printing a known file over and over and I don't have time to upgrade right now. So I'll simply hard-code the macro with the filename I want to reprint. If that file ever changes due to versioning, etc. I'll just edit the macro.
M32 "0:/gcodes/Cerb400_1-1.0mmNozz/PETG/30xMB_V4.0-Plated.gcode"
When I finalize the physical button housing attached to the printer it will include several other momentary push buttons for preheat, motors off, home and board reset. Maybe I'll include a little clip to hold a post-it with the macro-filename listed on it.
-
RE: What is the correct Mcode to restart a completed print job?posted in Tuning and tweaking
Unfortunately, M24 and M23 commands both expect a filename to be included with the command. So that's a no-go.
The 'Start Again' button in the DWC uses M32 command but it too is asking for the filename, and in the DWC the command+filename is written out directly to the html page when it's generated.
It appears that any macro created to restart a completed job using the M23, 24 or 32 commands would need to have the filename of the currently selected file written to it each time a print was selected. Or maybe the filename would need to be held in memory.
Unless there is some other option.
-
RE: What is the correct Mcode to restart a completed print job?posted in Tuning and tweaking
@bot Why thank you Bot (not actually a bot)!
I'll give it a try as soon as the current print is finished

-
What is the correct Mcode to restart a completed print job?posted in Tuning and tweaking
Hi guys,
I've been printing the same plate of mask buckles in production mode over and over with no issues. It would be great if I had a physical push button on the printer to start the last print over again after clearing the bed instead of having to wake the pc from sleep, wait for it to reconnect to the wifi and then click the restart print button in the DWC.
I understand how to set up physical buttons to run macros, but what is the Mcode to restart a print that completed successfully? (I did look for this but maybe I'm going blind? ...)
Thanks!
Steve Graber
Board: Duet WiFi 1.02 or later
Firmware: RepRapFirmware for Duet 2 WiFi/Ethernet 2.02(RTOS) (2018-12-24b1)
Duet WiFi Server Version: 1.23 -
RE: Drive mapping not quite working for mixing extruder setupposted in Tuning and tweaking
@dc42 Well....
 No worries. I'm just happy to get it working and to move on to my next issue, which is to figure out exactly how many steps/mm this big stepper puppy needs and what the actual mix ratio is supposed to be. The Cerambot documentation is thin, to put it kindly.
Thanks again for a really fantastic piece of configurable hardware.
Steve Graber
-
RE: Drive mapping not quite working for mixing extruder setupposted in Tuning and tweaking
Ok, I resolved the issue by moving the E0 stepper to E1 connector and making the change for that stepper output 3 to 4 in the config.g file.
M569 P4 S1 ; physical drive 4 goes forwards
M569 P5 S1 T2.5:2.5:5:2 ; physical drive 5 goes forwards
M584 X0 Y1 Z2 E4:5 ; set drive mappingIt appears that you can skip a stepper driver P3 after defining the xyz motion steppers, but the extruder mixing stepper drivers have to sequential? E4:E5
-
RE: Drive mapping not quite working for mixing extruder setupposted in Tuning and tweaking
Is it allowed to skip the second board driver E1 in the mapping?
Danal, because of the way the 'Tool' is set up as mixing, it is treated like any extruder extrusion command the firmware does the mixing based on the M567 ratio.
But, this is my first attempt at a mixing extruder, so I've almost certainly fat-fingered something?
-
RE: Drive mapping not quite working for mixing extruder setupposted in Tuning and tweaking
@Danal said in Drive mapping not quite working for mixing extruder setup:
Most external drivers need a longer pulse width than Duet default. See doc for M569.
Of the two, the external driver is the one that's working though.
-
Drive mapping not quite working for mixing extruder setupposted in Tuning and tweaking
Hi there again. Another unusual setup. I am building a delta ceramic printer using extrusion components sourced from Cerambot.
This printer uses a Nema 23 piston-powered main clay reservoir and a Nema 17 driven auger extruder. I've got everything working, except that the Nema 17 auger extruder is not functioning (connected to the Duet wifi E0 internal stepper driver). Big stepper external driver is connected using step/dir/enable via E3 on the expansion header.
Board: RepRapFirmware for Duet 2 WiFi/Ethernet version 2.05 running on Duet WiFi 1.02 or later
In my config file drive mapping section, P5 is the external stepper driver to the Nema 23 piston extruder and that's working great. Nema 17 motor P3 is the auger, connected to the E0 stepper driver output.
; Drives
M569 P0 S0 ; physical drive 0 goes forwards
M569 P1 S0 ; physical drive 1 goes forwards
M569 P2 S0 ; physical drive 2 goes forwards
M569 P3 S1 ; physical drive 3 goes forwards (Nema 17)
M569 P5 S1 T2.5:2.5:5:2 ; physical drive 5 goes forwards (External, Nema 23)
M584 X0 Y1 Z2 E3:5 ; set drive mapping
M350 X16 Y16 Z16 E16:16 I1 ; configure microstepping with interpolation
M92 X200.00 Y200.00 Z200.00 E663.00:663.00 ; set steps per mm
M566 X600.00 Y600.00 Z600.00 E1200.00:1200.00 ; set maximum instantaneous speed changes (mm/min)
M203 X12000.00 Y12000.00 Z12000.00 E1200.00:1200.00 ; set maximum speeds (mm/min)
M201 X500.00 Y500.00 Z500.00 E1000.00:1000.00 ; set accelerations (mm/s^2)
M906 X1700 Y1700 Z1700 E800:800 I60 ; set motor currents (mA) and motor idle factor in per cent
M84 S30 ; Set idle timeout; Tools
M563 P0 S"Clay" D0:1 F0 ; define tool 0
G10 P0 X0 Y0 Z0 ; set tool 0 axis offsets
G10 P0 R0 S0 ; set initial tool 0 active and standby temperatures to 0C
M568 P0 S1 ; enable mixing for tool 0
M567 P0 E0.5:0.5 ; set mixing ratios for tool 0
;M302 P1 ; Allow cold extrusion
T0 -
RE: Filename too long error in WebControl.posted in Duet Web Control
I'm experiencing the same error on a new machine I'm setting up right now. Fresh install. I have re-uploaded the firmware and Webcontrols using Duet2Firmware-2.05.zip to no avail. This is the first time I've seen this particular error. It pops up every minute to let me know.
(Edit to say that the 'name=' itself is different on my printer. name=R/A3gKIDdlMW...)
-
RE: Very large heated bed - autotune cancelled errorposted in Tuning and tweaking
@T3P3Tony - The heater does heat quite slowly, but that is due to the fact that the maximum achievable temperature is fairly low, something like 90C at full power. For obvious safety reasons. This is a PLA/PETG printer so really no reason to go higher.
It takes approximately 8 minutes to reach 50C from ambient, with an initial overshoot of around 3C, but it never appears to go out of the configured temperature window. I haven't put a timer on the appearance of the error to check the P parameter time. It's printing a large job at the moment but as soon as we can I'll check on that.
The issue is that there is no error if we are not actively printing. The error occurs at the start of a print job, even if the bed has been preheated to 50C and is set to 50C in the gcode.
The printer then pauses on error and bed halts. The temp error can be cleared with M562 but as soon as the print is resumed it halts within a short period of time (I need to time this). Clearing the fault some number of times (I need to verify the exact number) then seems to allow the printer to continue printing EVEN THOUGH... the error message pops back up but then it's no longer pausing the print.
-
RE: Very large heated bed - autotune cancelled errorposted in Tuning and tweaking
@dc42 Well unfortunately the joy has not lasted very long. Even though the bed heater will manually allow itself to be heated to its commanded temperature and will hold temp within a degree or so for hours, it will only do that if the heater is commanded manually. Any attempt to use the bed heater (H0) during a print job causes a temperature fault after a few minutes. This error occurs AFTER the bed has been manually brought up to temperature (in this case 55 or 60C) and then the print job gets started once it has stabilized. In some cases I have been able to issue M562 multiple times and the print will finally get underway, even though the temperature fault error message still appears on the screen!
To recap: The bed is preheated to 55C, the print job is started with the bed commanded to 55C. The bed is AT 55C (or 56, or 54) for ~15 minutes before the print job is then started, within the first couple of minutes a bed temperature fault error pauses the print and disables the heaters. Restarting via M562 multiple times seems to finally allow the print to continue, but the fault message still appears onscreen.
It's very likely I'm doing something wrong as I am still on a steep learning curve and in the deep end of the pool.
")
Relevant config entries:
config.g
Heaters;
M305 P0 T100000 B4138 R4700
M143 H0 S60
M570 H0 P400 T15 S400config-override.g
; Heater model parameters
M307 H0 A90.0 C7000.0 D70.0 S1.00 V12.4 B0 -
RE: Very large heated bed - autotune cancelled errorposted in Tuning and tweaking
@dc42 - Thank you. I may attempt the autotune again at some point now that I've increased the dead-time significantly, but the bed appears to be quite stable now in any case. Good to know about the bed pwm frequency.
-
RE: Very large heated bed - autotune cancelled errorposted in Tuning and tweaking
Yes! Success.
(edit: I manually entered the tuning paramters, not using autotune)
The following parameters did the job with a +3C overshoot to the commanded 55C, which is pretty good considering the significant thermal mass involved.
; Heater model parameters
M307 H0 A90.0 C7000.0 D70.0 S1.00 V12.4 B0
M570 H0 P400 T30 S400M307 H0
Heater 0 model: gain 900.0, time constant 7000.0, dead time 70.0, max PWM 1.00, calibration voltage 12.4, mode PID, inverted no, frequency default
Computed PID parameters for setpoint change: P19.8, I0.028, D971.8Those PID parameters are in the ballpark compared to when the printer was running on Smoothieware.
I notice the words 'frequency default'. What is the default pwm frequency and would it be beneficial to the SSR lifespan to lower that? If so, how do I do that?
Thanks again. I'm still getting up to speed but so far Duet3D ROCKS!
-
RE: Very large heated bed - autotune cancelled errorposted in Tuning and tweaking
@Phaedrux - I'll give that a try tomorrow. Thanks for your help.