Unable to set up a servo pin for BLTouch
When attempting to set up a BLtouch (genuine) for the first time I followed the BlTouch guided install PDF. The directions are clear and foolproof. However my system does not like the M950 command and returns the error message "Error in macro line 45 while starting up: exactly one of EFHJPSR must be given". Line 45 corresponds to M950 S0 C"exp.heater3"
I've tried variations of the M950 command by mapping other available heater pin names on the expansion header and the result is always the same error.
And here I'm stuck. Any suggestions?
Steve Graber
Config.g
; General preferences
G90 ; send absolute coordinates...
M83 ; ...but relative extruder moves
M550 P"Cerberus400_1" ; set printer name
M665 R220.7 L454.9876 B180 H334 ; Set delta radius, diagonal rod length, printable radius and homed height
M666 X0 Y0 Z0 ; put your endstop adjustments here, or let auto calibration find them
; Network
M552 S1 ; enable network
M586 P0 S1 ; enable HTTP
M586 P1 S0 ; disable FTP
M586 P2 S0 ; disable Telnet
; Drives
M569 P0 S0 ; physical drive 0 goes backwards
M569 P1 S0 ; physical drive 1 goes backwards
M569 P2 S0 ; physical drive 2 goes backwards
M569 P3 S1 ; physical drive 3 goes forwards
M584 X0 Y1 Z2 E4 ; set drive mapping
M350 X32 Y32 Z32 I0 ; configure microstepping without interpolation
M350 E16 I0 ; configure microstepping with no interpolation
M92 X160.00 Y160.00 Z160.00 E2725.00 ; set steps per mm
M566 X1200.00 Y1200.00 Z1200.00 E40.00 ; set maximum instantaneous speed changes (mm/min)
M203 X18000.00 Y18000.00 Z18000.00 E3000.00 ; set maximum speeds (mm/min)
M201 X1700.00 Y1700.00 Z1700.00 E120.00 ; set accelerations (mm/s^2)
M906 X1100 Y1100 Z1100 E550 I40 ; set motor currents (mA) and motor idle factor in per cent
M84 S30 ; Set idle timeout
; Axis Limits
M208 Z0 S1 ; set minimum Z
; Endstops
M574 X2 S1 P"xstop" ; configure active-high endstop for high end on X via pin xstop
M574 Y2 S1 P"ystop" ; configure active-high endstop for high end on Y via pin ystop
M574 Z2 S1 P"zstop" ; configure active-high endstop for high end on Z via pin zstop
; BLTouch
M558 P9 C"^zprobe.in" H5 F100 T2000
M950 S0 C”exp.heater3”
G31 X0 Y-37 Z3.3 P25
M557 R150 S25
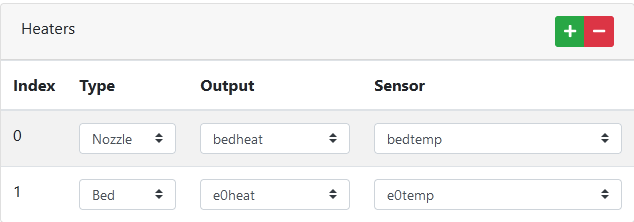
; Heaters
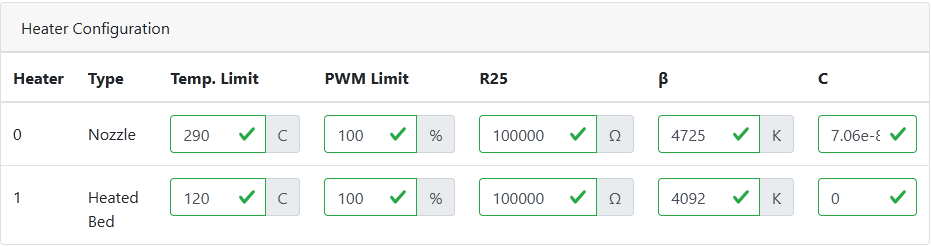
M308 S0 P"e0temp" Y"thermistor" T100000 B4092 ; configure sensor 0 as thermistor on pin e0temp
M950 H0 C"e0heat" T0 ; create bed heater output on e0heat and map it to sensor 0
M307 H0 B0 S1.00 ; disable bang-bang mode for the bed heater and set PWM limit
M140 H0 ; map heated bed to heater 0
M143 H0 S120 ; set temperature limit for heater 0 to 120C
M308 S1 P"bedtemp" Y"thermistor" T100000 B4725 C7.06e-8 ; configure sensor 1 as thermistor on pin bedtemp
M950 H1 C"bedheat" T1 ; create nozzle heater output on bedheat and map it to sensor 1
M307 H1 B0 S1.00 ; disable bang-bang mode for heater and set PWM limit
M143 H1 S280 ; set temperature limit for heater 1 to 280C
; Fans
M950 F1 C"fan0" Q25000 ; create fan 0 on pin fan0 and set its frequency
M106 P1 S0 H1 B.3 T45 ; set fan 0 value. Thermostatic control is turned on
M950 F0 C"fan1" Q25000 ; create fan 1 on pin fan1 and set its frequency
M106 P0 S0 H-1 ; set fan 1 value. Thermostatic control is turned off
; Tools
M563 P0 S"Hotend" D0 H1 F0 ; define tool 0
G10 P0 X0 Y0 Z0 ; set tool 0 axis offsets
G10 P0 R0 S0
; Miscellaneous
M501 ; load saved parameters from non-volatile memory
M911 S11 R12 P"M913 X0 Y0 G91 M83 G1 Z3 E-5 F1000" ; set voltage thresholds and actions to run on power loss
M122
=== Diagnostics ===
RepRapFirmware for Duet 2 WiFi/Ethernet version 3.5.1 (2024-04-19 14:40:46) running on Duet WiFi 1.02 or later
Board ID: 08DGM-917NK-F2MS4-7JTDL-3S46N-TDSND
Used output buffers: 3 of 26 (14 max)
Error in macro line 45 while starting up: exactly one of EFHJPSR must be given
=== RTOS ===
Static ram: 23256
Dynamic ram: 72180 of which 0 recycled
Never used RAM 14852, free system stack 184 words
Tasks: NETWORK(1,ready,15.0%,220) HEAT(3,nWait 5,0.0%,328) Move(4,nWait 5,0.0%,359) MAIN(1,running,84.8%,761) IDLE(0,ready,0.1%,29), total 100.0%
Owned mutexes:
=== Platform ===
Last reset 00:16:18 ago, cause: software
Last software reset at 2024-05-10 13:39, reason: User, Gcodes spinning, available RAM 14876, slot 1
Software reset code 0x0003 HFSR 0x00000000 CFSR 0x00000000 ICSR 0x0041f000 BFAR 0xe000ed38 SP 0x00000000 Task MAIN Freestk 0 n/a
Error status: 0x00
MCU temperature: min 32.7, current 33.2, max 34.2
Supply voltage: min 11.9, current 12.0, max 12.2, under voltage events: 0, over voltage events: 0, power good: yes
Heap OK, handles allocated/used 99/2, heap memory allocated/used/recyclable 2048/48/0, gc cycles 0
Events: 0 queued, 0 completed
Driver 0: standstill, SG min n/a
Driver 1: standstill, SG min n/a
Driver 2: standstill, SG min n/a
Driver 3: standstill, SG min n/a
Driver 4: standstill, SG min n/a
Driver 5:
Driver 6:
Driver 7:
Driver 8:
Driver 9:
Driver 10:
Driver 11:
Date/time: 2024-05-10 13:56:08
Cache data hit count 4294967295
Slowest loop: 9.51ms; fastest: 0.18ms
I2C nak errors 0, send timeouts 0, receive timeouts 0, finishTimeouts 0, resets 0
=== Storage ===
Free file entries: 10
SD card 0 detected, interface speed: 20.0MBytes/sec
SD card longest read time 0.8ms, write time 0.0ms, max retries 0
=== Move ===
DMs created 83, segments created 0, maxWait 0ms, bed compensation in use: none, height map offset 0.000, max steps late 0, min interval 0, bad calcs 0, ebfmin 0.00, ebfmax 0.00
no step interrupt scheduled
Moves shaped first try 0, on retry 0, too short 0, wrong shape 0, maybepossible 0
=== DDARing 0 ===
Scheduled moves 0, completed 0, hiccups 0, stepErrors 0, LaErrors 0, Underruns [0, 0, 0], CDDA state -1
=== Heat ===
Bed heaters 0 -1 -1 -1, chamber heaters -1 -1 -1 -1, ordering errs 0
=== GCodes ===
Movement locks held by null
HTTP is idle in state(s) 0
Telnet is idle in state(s) 0
File is idle in state(s) 0
USB is idle in state(s) 0
Aux is idle in state(s) 0
Trigger is idle in state(s) 0
Queue is idle in state(s) 0
LCD is idle in state(s) 0
Daemon is idle in state(s) 0
Autopause is idle in state(s) 0
Q0 segments left 0
Code queue 0 is empty
=== Network ===
Slowest loop: 9.45ms; fastest: 0.00ms
Responder states: HTTP(0) HTTP(0) HTTP(0) FTP(0) Telnet(0)
HTTP sessions: 1 of 8
=== WiFi ===
Interface state: active
Module is connected to access point
Failed messages: pending 0, notrdy 0, noresp 0
Firmware version 2.1.0
MAC address 60:01:94:2e:c7:08
Module reset reason: Turned on by main processor, Vcc 3.39, flash size 4194304, free heap 42784
WiFi IP address 10.1.1.117
Signal strength -71dBm, channel 11, mode 802.11n, reconnections 0
Clock register 00002002
Socket states: 0 0 0 0 0 0 0 0


 No worries. I'm just happy to get it working and to move on to my next issue, which is to figure out exactly how many steps/mm this big stepper puppy needs and what the actual mix ratio is supposed to be. The Cerambot documentation is thin, to put it kindly.