@Phaedrux Thanks a lot, then I will use the settings for the acceleration from the slicer.
Posts made by Kubunter
-
RE: Which axis speeds to use in config.gposted in General Discussion
-
Which axis speeds to use in config.gposted in General Discussion
I have been using a Caribou Duet 320 for some time.
The printer is equipped with 0.9 degree motors on all axes.Now I have noticed in the Caribou Slicer (latest version) that there are
different machine limits for acceleration, acceleration during printing, speed and jerk compared to the values in the caribou config.g.I am currently using the values from the latest configuration macro.
The values in the slicer are much higher, especially for the print accelerations.
Values in the config macro from the caribou website:
M201 X3000.00 Y3000.00 Z100.00 E500.00                                 ; set accelerations (mm/s^2)
M203 X18000.00 Y18000.00 Z1000.00 E3600.00                             ; set maximum speeds (mm/min)
M204 P500.0 T500.0                                                                  ; set print and travel accelerations (mm/s^2)
M566 X480.00 Y480.00 Z48.00 E300.00                                    ; set maximum instantaneous speed changes (mm/min)
Values of caribou slicer, when used in config.g:
M201 X1000.00 Y1000.00 Z200.00 E5000.00                                 ; set accelerations (mm/s^2)
M203 X12000.00 Y12000.00 Z720.00 E7200.00                             ; set maximum speeds (mm/min)
M204 P1250.0 T1500.0                                                               ; set print and travel accelerations (mm/s^2)
M566 X480.00 Y480.00 Z48.00 E270.00                                    ; set maximum instantaneous speed changes (mm/min)
I have performed a test print for a couple of hours with the faster speeds,
it seems that the drives can handle the speed, also print quality seems to be not affected.
Of course, the drives run a couple of degrees hotterWhat do you think, should I use the original values from caribou website or the values from the slicer?
Thanks a lot,
Regards Kubunter -
RE: Weird partial layer shiftposted in General Discussion
@droftarts I do not see a hole or an error when checking the letters with a G-Code Viewer.
I will take a look at my pressure advance settings.
Thanks a lot!
-
RE: Simple Alternative to Fusion360posted in General Discussion
Hello Valveman,
personally I tried it first with FreeCAD, but in my opinion this is really complicated.
After a couple of Youtube Videos about Fusion, it started out that it is way more "simpler" then FreeCAD.So in my opinion after a couple of youtube videos Fusion is useable for drawing parts.
Sure, I need to practice for complicated parts, but easier geometries are absolutely no issue.For the start it is also good to maybe mod some existing files.
Regards Kubunter
-
RE: Weird partial layer shiftposted in General Discussion
Good morning,
so yesterday I checked the pulley, both worm screws were absolutely tight, no movement of the pulley on the motor shaft at all.
I reduced the Y-Axis belt tension a little bit from 115 to 90Hz.
I printed a test part, the same layer shift in 2 layers appears.But then I recognized, that the layer shift happens in a layer where some letters are extruded through the part and at exactly the layer where I see the shift, the extruded letters have a damage.
After this i started up Fusion and removed the letters from the test part.
The next test part without the letters comes out absolutely smooth without any layer shift.So is it possible that the nozzle collides with small printing errors, leading to a shift of the Y-Axis?
Thanks a lot,
Regards Tobias -
RE: Weird partial layer shiftposted in General Discussion
@droftarts Thats what I also think about after my test print yesterday.
But so far I was able to reproduce the shift.
The test print was shorter on the Y-Axis (that is maybe why the shift is not that noticeable than on the print before).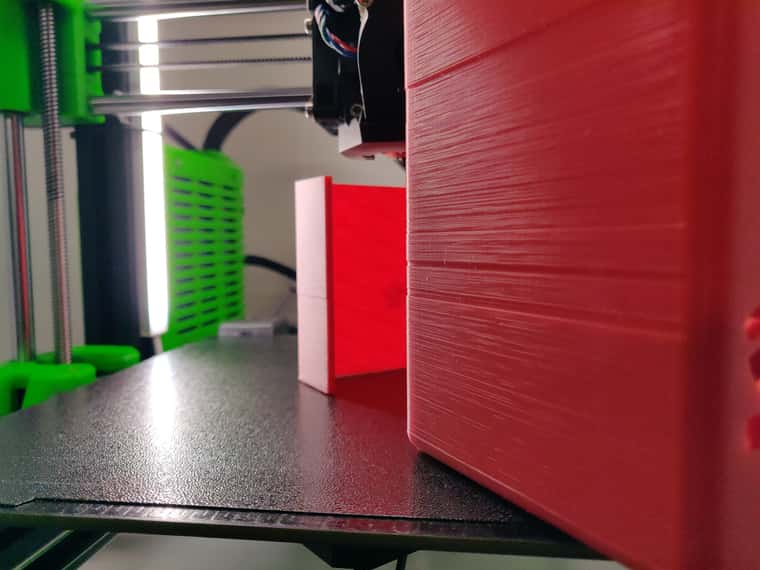
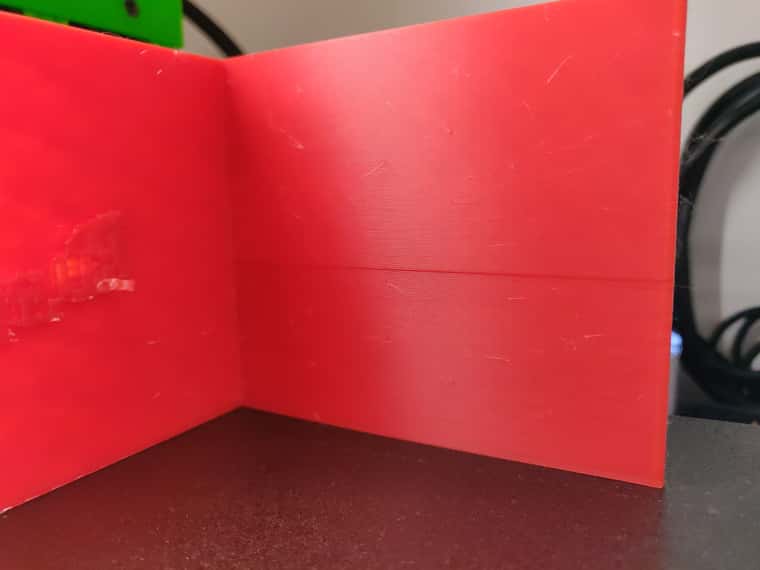
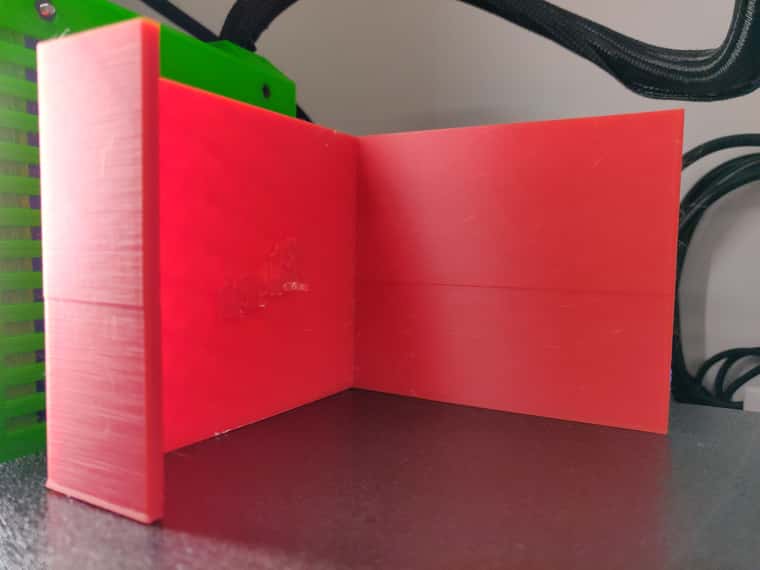
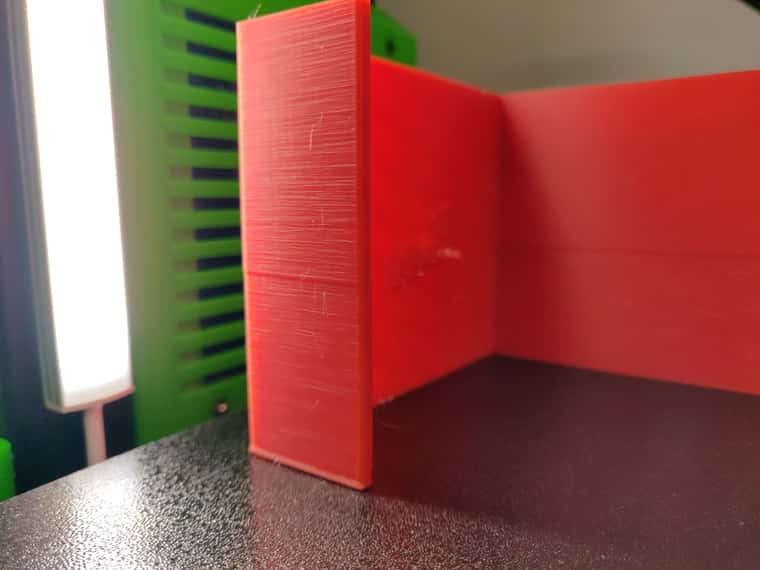
Additional the Z-Axis position when it appears was lower.
This time it looks like the shift remained.
But so far I do not understand why it needs a couple of mm (on the last print 32.2mm) to appear.
Maybe it depends on the weight of the printed part, leading to the conclusion that pulley might be slightly loose.I will check belt tension and pulley assembly on the stepper motor shaft, then I will repeat the last testprint.
Thanks a lot,
Regards Kubunter -
RE: Weird partial layer shiftposted in General Discussion
@cosmowave Thats what I need to test today.
I have printed parts who were higher, but all of them where mainly orientated in X-Axis.
Maybe this influences also the layer shift.
I believe I do not see the shifts on these parts.I will leave a reply once test is done.
-
RE: Weird partial layer shiftposted in General Discussion
@cosmowave Thanks for your reply.
The shifts are visible through the complete layer. -
Weird partial layer shiftposted in General Discussion
Hello together,
I have a little bit of a weird problem with layer shift only in Y-Direction.
First of all the 3D-Printers details:
Model: Caribou Duet 320
Board: Duet2 Wifi
Firmware Version: 3.5.3
Filament: Sunlu PLA (Hotend @195°C, Bed @55°C)
Slicer: Caribour Slicer 2.8.0 (based on PrusaSlicer)This is my first 24h+ print job.
The part is also so far my biggest and heaviest one.
With all print jobs before I do not have a issue like this.Some layers are shifted toward the back side, but comming back after a couple of layers to the original value.
I do not see this shifts when checking the g-code with g-code viewer.So far I have checked belt tension recently, it is within tolerance.
On the Y-Axis I use a MT-1704HSM168RE (also known as MT-1704HSM168A) stepper with the following values in config.g:
; =========================================================================================================
; drives
; =========================================================================================================
;
M569 P0 S1 F11                                         			; physical drive 0 goes forwards - x-axis
M569 P1 S0 F8 Y3:2                                    			; physical drive 1 goes backwards - y-axis ;
M569 P2 S1 F10                                        			; physical drive 2 goes forwards - z - left
M569 P3 S1 F14                                         			; physical drive 3 goes forwards  - Extruder
M569 P4 S1 F10                                         			; physical drive 4 goes forwards - z right
;
; motor configuration
;
M584 X0 Y1 Z2:4 E3                                                     ; set drive mapping
M671 X-43.5:293.5 Y0:0 S2.00                                           ; leadscrews at left (connected to Z/drive 2) and right (connected to E1/drive 4) of x axis
;
; set microsteps and steps / mm
; =========================================================================================================
;
M350 X16 Y16 Z16 E16 I1                                                ; configure microstepping with interpolation
M92 X200.00 Y200.00 Z400.00                                            ; set steps per mm
M98 P"0:/settings/Set-E-Steps.g"                                       ; set esteps
;
; set motor currents
; =========================================================================================================
;
M906 X1250 Y1250 Z650 E650 I40                                         ; set motor currents (mA) and motor idle factor in percent
;
M84 S60                                                                ; set idle timeout
;
; set speeds
; =========================================================================================================
;
M201 X3000.00 Y3000.00 Z100.00 E500.00                                 ; set accelerations (mm/s^2)
M203 X18000.00 Y18000.00 Z1000.00 E3600.00                             ; set maximum speeds (mm/min)
M204 P500.0 T500.0                                                     ; set print and travel accelerations (mm/s^2)
M566 X480.00 Y480.00 Z48.00 E300.00                                    ; set maximum instantaneous speed changes (mm/min)
;
set global.x_accel = move.axes[0].acceleration                         ; save accelerations (mm/s^2)
set global.x_jerk = move.axes[0].jerk                                  ; save maximum instantaneous speed changes (mm/min)
;
set global.y_accel = move.axes[1].acceleration                         ; save accelerations (mm/s^2)
set global.y_jerk = move.axes[1].jerk                                  ; save maximum instantaneous speed changes (mm/min)
;
M564 H0                                                                ; allow unhomed movement!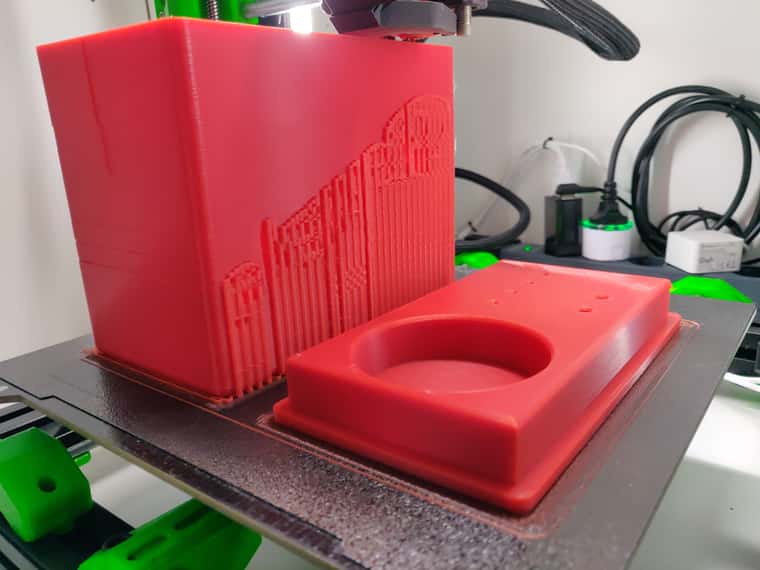
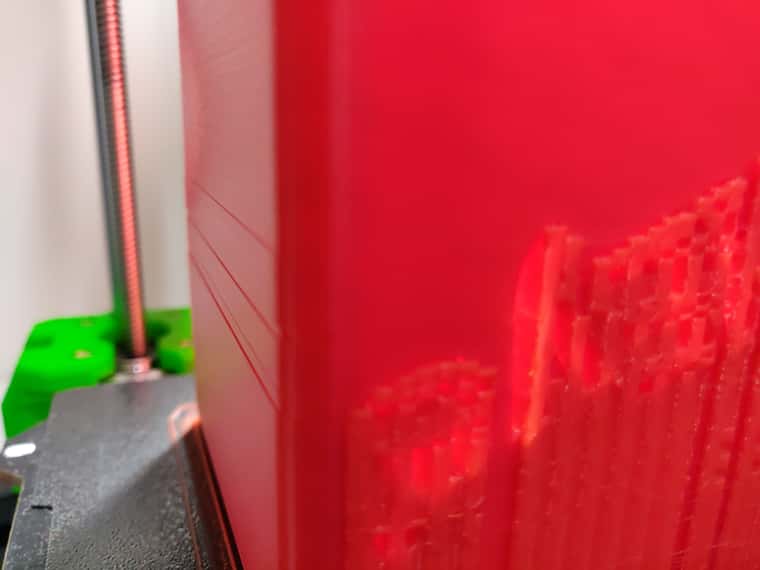
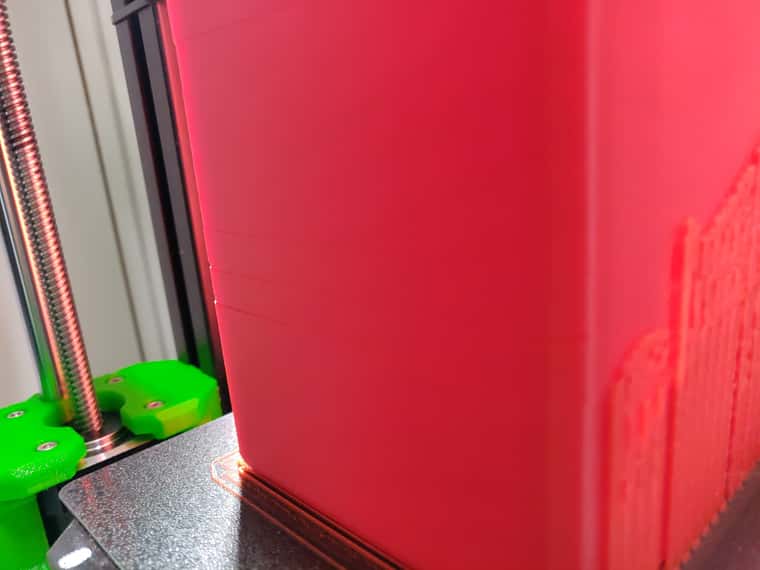
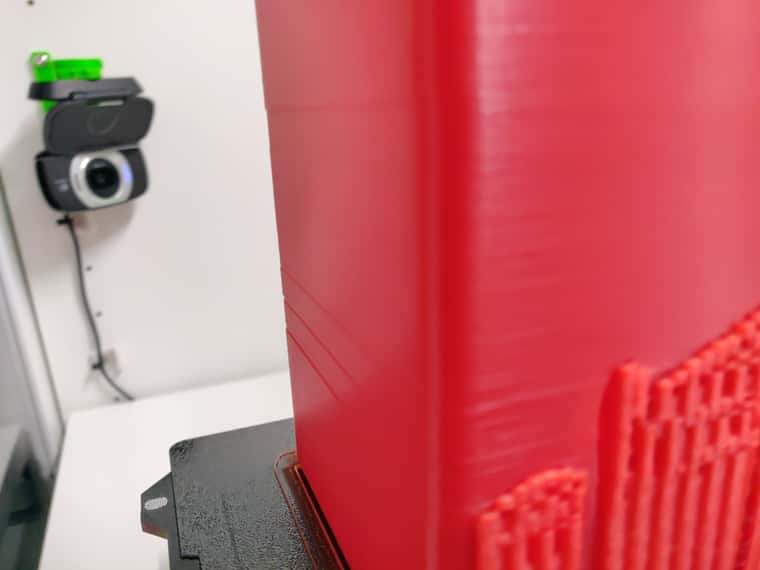
Should I raise the motor current a little bit or what might be the solution here?
Thanks a lot,
Regards Kubunter -
RE: Bed leveling vs height mapposted in Tuning and tweaking
@Phaedrux Thanks a lot, that has done the trick.
Changed value to 80%, now there is no error anymore when zLift is carried out.Please mark topic as solved!
Regards Kubunter
-
RE: Bed leveling vs height mapposted in Tuning and tweaking
Hello,
I was able to dig a little bit deeper.
Mechanically the printer is within tolerances.
Espacially the 90 degree angle between bed and Z-Rods is looking good.My problem arises when the zLift.g macro is carried out when homing.
I have commented out M98 to call the zLift macro.
Then the X-Axis stays completely leveled.What might be the problem in zLift?
Here is the code:
; =========================================================================================================
;
; lifts the z axis in a more controlled way. If homed and possible, the z axis is lifted
; by zLiftDistance mm. Otherwise z ist liftes and current is reduced to avoid issues at
; the high end.
;
; =========================================================================================================
;
G91                                                                    ; relative positioning
;
if move.axes[2].homed
    if {move.axes[2].machinePosition < (move.axes[2].max -20)}         ; if the z position is below 20mm below max z
    G1 Z{global.zLiftDistance}                                         ; lift z axis by 15mm
else
    M913 Z40                                                           ; reduce z motor current to 30% of set current
    G1 Z{global.zLiftDistance} F300                                    ; move z axis 15mm up slowly leveling the X gantry
    M913 Z100                                                          ; return z motor current to 100% of set current
;
M400                                                                   ; wait for moves to finish
;
G90                                                                    ; absolute positioning
;
; =========================================================================================================
;
Thanks a lot
-
RE: Bed leveling vs height mapposted in Tuning and tweaking
@droftarts
I will check mechanical assembly when I'm at home and Give the mesh.g a try. Sounds also good. -
RE: Bed leveling vs height mapposted in Tuning and tweaking
M98 P"config.g"
M98 P"config.g"
Error: in file macro line 5 column 21: meta command: variable 'IdleCounter' already exists
Homeall
; =========================================================================================================
;
; home xyz axes
;
; =========================================================================================================
;
M98 P"homez.g"                                                         ; homeall is the same as homez
;
; =========================================================================================================
;
Homez
; =========================================================================================================
;
; home xyz axes
;
; for Caribou320 Duet2 WiFi/Ethernet LGX Copperhead - E3d or SE Thermistor - PINDA2
;
; =========================================================================================================
;
G91                                                                    ; relative positioning
M98 P"0:/sys/00-Functions/CurrentSenseHoming"                          ; ensure the current and sensitivity is set for homing routines.
;
set global.zLiftDistance = 5                                           ; set distance to lift
M98 P"0:/sys/00-Functions/zLift"                                       ; call macro to lift z
;
; =========================================================================================================
; home x Axis
; =========================================================================================================
;
M17 X                                                                  ; energise motors to ensure they are not stalled
G4 P100                                                                ; wait 100ms
;
if !move.axes[0].homed
    G1 H1 X5 F1000                                                     ; move slowly away
    G1 H1 X-260 F2000                                                  ; move quickly to x axis endstop and stop there (first pass)
    G1 H2 X5 F1000                                                     ; go back a few mm
    G1 H1 X-10 F2000                                                   ; move slowly to x axis endstop once more (second pass)
    M400                                                               ; wait for current moves to finish
;
; =========================================================================================================
; home y Axis
; =========================================================================================================
;
M17 Y                                                                  ; energise motors to ensure they are not stalled
G4 P100                                                                ; wait 100ms
;
if !move.axes[1].homed
    G1 H1 Y5 F1000                                                     ; move slowly away
    G1 H1 Y-260 F2000                                                  ; move quickly to x axis endstop and stop there (first pass)
    G1 H2 Y5 F1000                                                     ; go back a few mm
    G1 H1 Y-10 F2000                                                   ; move slowly to x axis endstop once more (second pass)
    M400                                                               ; wait for current moves to finish
;
; =========================================================================================================
;
M913 X100 Y100                                                         ; return x & y motor
G4 P200                                                                ; wait 200ms
;
G90                                                                    ; absolute positioning
;
; =========================================================================================================
; home z axis
; =========================================================================================================
;
G90                                                                    ; absolute positioning
;
G1 X11.5 Y-3 F6000                                                     ; go to first probe point
G30                                                                    ; home z by probing the bed
G1 Z1.15 F100                                                          ; move z to origin and 1.15mm above bed
G90                                                                    ; absolute positioning
M400                                                                   ; wait for current moves to finish
;
; =========================================================================================================
;
G90                                                                    ; absolute positioning
;
M98 P"0:/sys/00-Functions/CurrentSenseNormal"                          ; ensure the current and sensitivity is set for normal routines.
;
; =========================================================================================================
;
Homey
; =========================================================================================================
;
; home y Axis
;
; =========================================================================================================
;
G91                                                                    ; relative positioning
M98 P"0:/sys/00-Functions/CurrentSenseHoming"                          ; ensure the current and sensitivity is set for homing routines.
;
M17 Y                                                                  ; energise motor to ensure it's not stalled
G4 P100                                                                ; wait 100ms
;
set global.zLiftDistance = 5                                           ; set distance to lift
M98 P"0:/sys/00-Functions/zLift"                                       ; call macro to lift z
;
G1 H1 Y5 F1000                                                         ; move slowly away
G1 H1 Y-225 F2000                                                      ; move quickly to y axis endstop and stop there (first pass)
G1 H2 Y5 F1000                                                         ; go back a few mm
G1 H1 Y-10 F2000                                                       ; move slowly to y axis endstop once more (second pass)
G1 H2 Z-5 F4000                                                        ; lower z again
;
M400                                                                   ; wait for current moves to finish
G4 P200                                                                ; wait 200ms
;
G90                                                                    ; absolute positioning
;
M98 P"0:/sys/00-Functions/CurrentSenseNormal"                          ; ensure the current and sensitivity is set for normal routines.
;
; =========================================================================================================
;
Homex
; ========================================================================================================= ; ; home x Axis ; ; ========================================================================================================= ; G91 ; relative positioning M98 P"0:/sys/00-Functions/CurrentSenseHoming" ; ensure the current and sensitivity is set for homing routines. ; M17 X ; energise motor to ensure it's not stalled G4 P100 ; wait 100ms ; set global.zLiftDistance = 5 ; set distance to lift M98 P"0:/sys/00-Functions/zLift" ; call macro to lift z ; G1 H1 X5 F1000 ; move slowly away G1 H1 X-260 F2000 ; move quickly to x axis endstop and stop there (first pass) G1 H2 X5 F1000 ; go back a few mm G1 H1 X-10 F2000 ; move slowly to x axis endstop once more (second pass) G1 H2 Z-5 F6000 ; lower z again ; M400 ; wait for current moves to finish G4 P200 ; wait 200ms ; G90 ; absolute positioning ; M98 P"0:/sys/00-Functions/CurrentSenseNormal" ; ensure the current and sensitivity is set for normal routines. ; ; ========================================================================================================= ; -
RE: Bed leveling vs height mapposted in Tuning and tweaking
@Phaedrux
This is m122M122 === Diagnostics === RepRapFirmware for Duet 2 WiFi/Ethernet version 3.5.2 (2024-06-11 17:13:43) running on Duet WiFi 1.02 or later Board ID: 0JD0M-9P6M2-NW4SS-6J9FD-3SD6L-KUZZL Used output buffers: 8 of 26 (19 max) === RTOS === Static ram: 23384 Dynamic ram: 75216 of which 56 recycled Never used RAM 11512, free system stack 150 words Tasks: NETWORK(2,nWait 6,17.8%,222) HEAT(3,nWait 5,0.1%,328) Move(4,nWait 5,0.0%,302) MAIN(1,running,82.0%,746) IDLE(0,ready,0.2%,29), total 100.0% Owned mutexes: === Platform === Last reset 00:09:04 ago, cause: power up Last software reset at 2024-07-14 13:44, reason: User, Gcodes spinning, available RAM 11936, slot 1 Software reset code 0x0003 HFSR 0x00000000 CFSR 0x00000000 ICSR 0x0041f000 BFAR 0xe000ed38 SP 0x00000000 Task MAIN Freestk 0 n/a Error status: 0x00 Aux0 errors 0,0,0 MCU temperature: min 33.3, current 35.5, max 36.7 Supply voltage: min 24.0, current 24.3, max 24.6, under voltage events: 0, over voltage events: 0, power good: yes Heap OK, handles allocated/used 99/17, heap memory allocated/used/recyclable 2048/1276/936, gc cycles 5 Events: 0 queued, 0 completed Driver 0: standstill, SG min 171 Driver 1: standstill, SG min 0 Driver 2: standstill, SG min n/a Driver 3: standstill, SG min 0 Driver 4: standstill, SG min n/a Driver 5: Driver 6: Driver 7: Driver 8: Driver 9: Driver 10: Driver 11: Date/time: 2024-07-15 19:03:06 Cache data hit count 4294967295 Slowest loop: 23.36ms; fastest: 0.17ms I2C nak errors 0, send timeouts 0, receive timeouts 0, finishTimeouts 0, resets 0 === Storage === Free file entries: 10 SD card 0 detected, interface speed: 20.0MBytes/sec SD card longest read time 12.2ms, write time 1.4ms, max retries 0 === Move === DMs created 83, segments created 5, maxWait 80627ms, bed compensation in use: none, height map offset 0.000, max steps late 0, min interval 0, bad calcs 0, ebfmin 0.00, ebfmax 0.00 no step interrupt scheduled Moves shaped first try 0, on retry 0, too short 0, wrong shape 0, maybepossible 0 === DDARing 0 === Scheduled moves 18, completed 18, hiccups 0, stepErrors 0, LaErrors 0, Underruns [0, 0, 8], CDDA state -1 === Heat === Bed heaters 0 -1 -1 -1, chamber heaters -1 -1 -1 -1, ordering errs 0 === GCodes === Movement locks held by null HTTP is idle in state(s) 0 Telnet is idle in state(s) 0 File is idle in state(s) 0 USB is idle in state(s) 0 Aux is idle in state(s) 0 Trigger is idle in state(s) 0 Queue is idle in state(s) 0 LCD is idle in state(s) 0 Daemon is idle in state(s) 0 Autopause is idle in state(s) 0 Q0 segments left 0 Code queue 0 is empty === Network === Slowest loop: 39.49ms; fastest: 0.01ms Responder states: HTTP(0) HTTP(0) HTTP(0) FTP(0) Telnet(0) HTTP sessions: 1 of 8 === WiFi === Interface state: active Module is connected to access point Failed messages: pending 0, notrdy 0, noresp 0 Firmware version 2.1.0d MAC address 8c:ce:4e:d5:b0:06 Module reset reason: Turned on by main processor, Vcc 3.35, flash size 4194304, free heap 40012 WiFi IP address 10.80.83.243 Signal strength -69dBm, channel 10, mode 802.11n, reconnections 0 Clock register 00002002 Socket states: 0 0 0 0 0 0 0 0 -
RE: Bed leveling vs height mapposted in Tuning and tweaking
@Phaedrux
Here is my config.g; ========================================================================================================= ; ; Configuration file for Duet2-WiFi/Ethernet (firmware version 3.4 and higher) ; ; for 0.9° motors on xy, and 0.9° or 1.8° (only LGXM) motor e ; ; for Caribou320 Duet2 WiFi/Ethernet LGX Copperhead - E3d or SE Thermistor - PINDA2 ; ; CariboDuetConfiguration Release : "2.2.0" ; Build : 587 ; ; Copyright Caribou Research & Development 2023. Licensed under GPL3. No commercial use. ; Source code and release notes are available on github: https://github.com/Caribou3d/CaribouDuet2-ConfigurationMacros ; ; ========================================================================================================= ; ; general settings ; M111 S0 ; debugging off G21 ; work in millimetres ; ; global variables ; M98 P"0:/settings/Set-Global-Variables.g" ; set global variables ; ; ========================================================================================================= ; network settings ; ========================================================================================================= ; M550 P"Caribou320-LGXC-NP" ; set printer name ; ;if {network.interfaces[0].type = "ethernet"} ; echo >"0:/sys/runonce.g" "M98 P""0:/settings/Set-Ethernet-Mode.g""" ;else ; M98 P"0:/settings/Set-WiFi-mode.g" ; M552 S1 ; enable network M586 P0 S1 ; enable HTTP M586 P1 S1 ; enable FTP M586 P2 S0 ; disable Telnet M575 P1 S1 B57600 ; enable support for PanelDue ; ; ========================================================================================================= ; drives ; ========================================================================================================= ; M569 P0 S1 F11 ; physical drive 0 goes forwards - x-axis M569 P1 S0 F8 Y3:2 ; physical drive 1 goes backwards - y-axis ; M569 P2 S1 F10 ; physical drive 2 goes forwards - z - left M569 P3 S1 F14 ; physical drive 3 goes forwards - Extruder M569 P4 S1 F10 ; physical drive 4 goes forwards - z right ; ; motor configuration ; M584 X0 Y1 Z2:4 E3 ; set drive mapping M671 X-36.5:293.5 Y0:0 S2.00 ; leadscrews at left (connected to Z/drive 2) and right (connected to E1/drive 4) of x axis ; ; set microsteps and steps / mm ; ========================================================================================================= ; M350 X16 Y16 Z16 E16 I1 ; configure microstepping with interpolation M92 X200.00 Y100.00 Z400.00 ; set steps per mm M98 P"0:/settings/Set-E-Steps.g" ; set esteps ; ; set motor currents ; ========================================================================================================= ; M906 X1250 Y1250 Z650 E650 I40 ; set motor currents (mA) and motor idle factor in percent ; M84 S60 ; set idle timeout ; ; set speeds ; ========================================================================================================= ; M201 X3000.00 Y3000.00 Z100.00 E500.00 ; set accelerations (mm/s^2) M203 X18000.00 Y18000.00 Z1000.00 E3600.00 ; set maximum speeds (mm/min) M204 P500.0 T500.0 ; set print and travel accelerations (mm/s^2) M566 X480.00 Y480.00 Z48.00 E300.00 ; set maximum instantaneous speed changes (mm/min) ; set global.x_accel = move.axes[0].acceleration ; save accelerations (mm/s^2) set global.x_jerk = move.axes[0].jerk ; save maximum instantaneous speed changes (mm/min) ; set global.y_accel = move.axes[1].acceleration ; save accelerations (mm/s^2) set global.y_jerk = move.axes[1].jerk ; save maximum instantaneous speed changes (mm/min) ; M564 H0 ; allow unhomed movement ; ; ========================================================================================================= ; axes limits ; ========================================================================================================= ; M208 X-2 Y-7.5 Z0 S1 ; set axes minimum M208 X253.5 Y214 Z325.50 S0 ; set axes maximum ; ; ========================================================================================================= ; endstops ; ========================================================================================================= ; M574 X1 S3 ; configure sensorless endstop for low end on x M574 Y1 S3 ; configure sensorless endstop for low end on y M574 Z1 S2 ; configure z-probe endstop for low end on z M574 Z2 S3 ; configure sensorless endstop for high end on z ; ; ========================================================================================================= ; ; PINDA2 ; M558 P5 C"^zprobe.in" H1.5 F600 T8000 A3 S0.03 ; set z probe to PINDA2 M308 S2 P"e1temp" A"Pinda V2" Y"thermistor" T100000 B3950 ; temperature of PINDA2 M557 X23:235 Y5:186 S30.25:30 ; define mesh grid ; ; ========================================================================================================= ; M574 Z1 S2 ; set endstops controlled by probe ; ; stallguard sensitivy ; M915 X S2 F0 H400 R0 ; set x axis sensitivity M915 Y S1 F0 H200 R0 ; set y axis sensitivity M915 Z S0 F0 H200 R0 ; set z axis sensitivity ; ; ========================================================================================================= ; heaters, fans, thermistors ; ========================================================================================================= ; ; heated bed ; ========================================================================================================= ; M308 S0 P"bedtemp" Y"thermistor" T100000 B4138 R4700 A"Bed" ; configure sensor 0 as thermistor on pin bedtemp M950 H0 C"bedheat" Q50 T0 ; create bed heater output on bedheat and map it to sensor 0 M143 H0 S110 ; set temperature limit for heater 0 to 110°C M307 H0 B0 S1.00 ; disable bang-bang mode for the bed heater and set PWM limit M140 H0 ; map heated bed to heater 0 ; ; extruder ; ========================================================================================================= ; ; hotend (Mosquito or Mosquito Magnum with E3d Thermistor) ; M308 S1 P"e0temp" Y"thermistor" T100000 B4658 C6.533898e-8 A"Nozzle E1"; E3d configure sensor 0 as thermistor on pin e0temp ; M950 H1 C"e0heat" T1 ; create nozzle heater output on e0heat and map it to sensor 1 M307 H1 B0 S1.00 ; disable bang-bang mode for heater 1 and set PWM limit M143 H1 S280 ; set temperature limit for heater 1 to 280°C ; ; display MCU and drivers temperature ; ========================================================================================================= ; M308 S4 P"mcu-temp" Y"mcu-temp" A"MCU" ; set virtual heater for MCU M308 S5 P"drivers" Y"drivers" A"Driver" ; set virtual heater for stepper drivers ; ; fans ; ========================================================================================================= ; ; radial fan ; M950 F0 C"fan1" Q160 ; create fan 0 on pin fan1 and set its frequency M106 P0 S0 H-1 ; set fan 0 value. Thermostatic control is turned off ; ; extruder fan (temperature controlled) ; M950 F1 C"fan0" Q500 ; create fan 1 on pin fan0 and set its frequency M106 P1 H1 T45 ; fan turns on at 45°C ; ; ======================================================================================================== ; tools ; ========================================================================================================= ; M563 P0 D0 H1 F0 ; define tool 0 G10 P0 X0 Y0 Z0 ; set tool 0 axis offsets M568 P0 S0 R0 A0 ; turn off extruder M302 S180 R180 ; allow extrusion starting from 180°C and retractions already from 180°C ; ; ========================================================================================================= ; other settings ; ========================================================================================================= ; M98 P"0:/settings/Set-PID-Bed.g" ; set PID values for the heated bed M98 P"0:/settings/Set-PID-Nozzle.g" ; set PID values for the nozzle ; ; ========================================================================================================= ; filament handling ; ========================================================================================================= ; ; execute macros that determine the status of the filament sensor ; M98 P"0:/settings/Set-FilamentSensorStatus.g" ; load filament sensor settings M98 P"0:/settings/Set-AutoLoadStatus.g" ; load autoload settings M98 P"0:/sys/00-Functions/FilamentsensorStatus" ; update sensor status ; ; ========================================================================================================= ; offsets - place off-sets for x and y here. z-offsets are handled in the print sheet macros ; ========================================================================================================= ; M98 P"0:/settings/Set-Probe-XY-Offsets.g" ; set probe xy-offset M98 P"0:/settings/Set-Probe-Z-Offset.g" ; set probe z-offset M18 XY ; release / unlock x, y G90 ; send absolute coordinates... M83 ; ... but relative extruder moves ; ; ========================================================================================================= ; check connectivity ; ========================================================================================================= ; if {network.interfaces[0].type = "wifi"} echo >"0:/sys/runonce.g" "M98 P""0:/sys/test-WiFi.g""" ; ; ========================================================================================================= ;Thanks a lot.
-
RE: Bed leveling vs height mapposted in Tuning and tweaking
Dammit, happened again.
Printer has done the bed leveling, tells me the gantry deviation that has been reached,
right after this message the Z-Axis moves again off. You can see it by eye and you can hear it.
Then height map is again off by approx. 1mm when completed.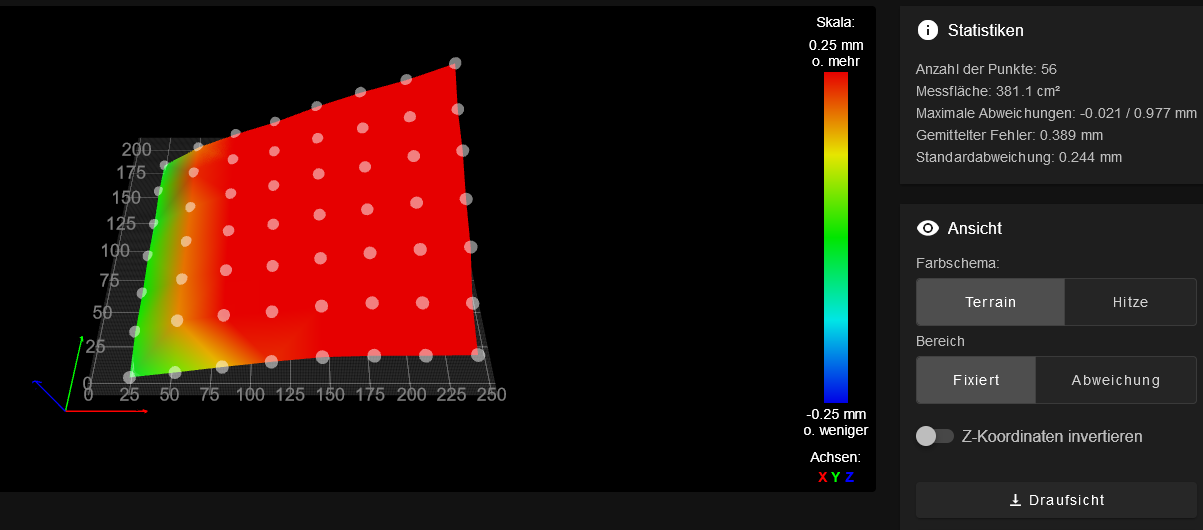
Which offset value is taken into affect here?
Or has it something to do with the startcode in my slicer?
G28 W ; home all without mesh bed level
G90 ; use absolute coordinates
M83 ; extruder relative mode
G0 X60 Y-3 Z80 ; move extruder above bed, keep extruder in front for cleaning and checking
M104 S160 T0; pre-heat extruder to 160C
M140 S[first_layer_bed_temperature] ; set bed temp
M190 S[first_layer_bed_temperature] ; wait for bed temp
G29 ; mesh bed leveling using defined mesh grid
G0 X0 Y-3 Z0.6 ; go outside print area
M104 S[first_layer_temperature] ; set extruder temp
M109 S[first_layer_temperature] ; wait for extruder temp
M98 P"0:/sys/primeLine.g"; execute primeline macro
G92 E0.0M572 D0 S0.07 ; set pressure advance
I only do wonder about the "W" behind the G28, as I do not have a W-Axis in my setup
Or should I use G29 S1 in the slicers Startcode? -
RE: Bed leveling vs height mapposted in Tuning and tweaking
@oliof
Thanks a lot for the fast reply.
I have changed the S-Value to 0.03I will see how the next prints are running.
Thanks a lot,
Regards Tobias -
Bed leveling vs height mapposted in Tuning and tweaking
Hello together,
I have a strange roblem with my Caribou Duet 320 running newest version of Duet Firmware.
When doing bed leveling it levels out perfectly.
But then sometimes when a height map is generated before a print, the bed leveling is way off.
I see this on the height map where one side of the the bed is 1mm higher then the other.
Sometimes it is within a tolerance of 0,3mm.What happens between bed leveling and generating the height map?
Is there a offset or setting I need to tweak to?here is part of my config.g:
; =========================================================================================================
; drives
; =========================================================================================================
;
M569 P0 S1 F11                                         			; physical drive 0 goes forwards - x-axis
M569 P1 S0 F8 Y3:2                                    			; physical drive 1 goes backwards - y-axis ;
M569 P2 S1 F10                                        			; physical drive 2 goes forwards - z - left
M569 P3 S1 F14                                         			; physical drive 3 goes forwards  - Extruder
M569 P4 S1 F10                                         			; physical drive 4 goes forwards - z right
;
; motor configuration
;
M584 X0 Y1 Z2:4 E3                                                     ; set drive mapping
M671 X-36.5:293.5 Y0:0 S2.00                                           ; leadscrews at left (connected to Z/drive 2) and right (connected to E1/drive 4) of x axis
;
; set microsteps and steps / mm
; =========================================================================================================
;
M350 X16 Y16 Z16 E16 I1                                                ; configure microstepping with interpolation
M92 X200.00 Y100.00 Z400.00                                            ; set steps per mm
M98 P"0:/settings/Set-E-Steps.g"                                       ; set esteps
;
This is my bed.g
M561                                                                   ; clear any existing bed transform
;
if !move.axes[0].homed || !move.axes[1].homed || !move.axes[2].homed
   G28                                                                 ; home all axes without mesh bed level
;
G90
G0 X{25-sensors.probes[0].offsets[0]} Y{105-sensors.probes[0].offsets[1]} Z5 F4000; move to measure point
;
M558 F600 A5 S0.01                                                     ; slow z-probe, up to 5 probes until disparity is 0.01 or less - else yield average
while iterations <=2                                                   ; perform 3 passes
   G30 P0 X25 Y105 Z-99999                                             ; probe near a leadscrew, half way along the y axis
   G30 P1 X240 Y105 Z-99999 S2                                         ; probe near a leadscrew and calibrate 2 motors
   G1 X125 F10000                                                      ; move to the center of the bed
   G30                                                                 ; probe the bed at the current xy position
   M400                                                                ; finish all moves, clear the buffer
;
M558 F200 A5 S-1                                                       ; slow the z-probe, perform 5 probes and yield the average
while move.calibration.initial.deviation >= 0.01                       ; perform additional leveling if previous deviation was over 0.003mm
   if iterations = 5                                                   ; perform 5 addition checks, if needed
      M300 S3000 P500                                                  ; sound alert, the required deviation could not be achieved
      M558 F200 A1                                                     ; set normal z-probe speed
      abort "!!! ABORTED !!! Failed to achieve < 0.01 deviation. Current deviation is " ^ move.calibration.initial.deviation ^ "mm."
   G30 P0 X25 Y105 Z-99999                                             ; probe near a leadscrew, half way along the y axis
   G30 P1 X240 Y105 Z-99999 S2                                         ; probe near a leadscrew and calibrate 2 motors
   G1 X125 F10000                                                      ; move the nozzle to the center of the bed
   G30                                                                 ; probe the bed at the current XY position
   M400                                                                ; finish all moves, clear the buffer
;
M558 F600 T8000 A3 S0.03                                               ; for PINDA2
;
echo "Gantry deviation of " ^ move.calibration.initial.deviation ^ "mm obtained."
;
G1 Z8                                                                  ; raise nozzle 8mm to ensure it is above the z probe trigger height
;
; =========================================================================================================
;
Thanks a lot,
Regards Kubunter -
RE: [solved] Standard Firmware on a Caribouposted in Firmware installation
Update to the newest Firmware of Duet2 and PanelDue works flawless today, additional I flashed V2.10d onto the Wifi Module, because I also have problems before.
The config.g need a couple of tweaking.
But so far it is looking good.Thanks a lot,
Regards Kubunter -
RE: [solved] Standard Firmware on a Caribouposted in Firmware installation
@T3P3Tony Thats what I also think.
There is no danger damaging something?
The reduced current is activated for homing.