@ccs86 ordered the device will come in latest in the weekend. Then we know more and have numbers. Thank you mate
Posts made by megaloduet
-
RE: Mesh Bed Level Issuesposted in Tuning and tweaking
-
RE: Mesh Bed Level Issuesposted in Tuning and tweaking
"I totally agree that if your Z axis is binding, it will not be able to track with the tiny mesh compensations. You could physically test this by setting up an indicator between the carriage and bed, then requesting tiny Z moves up and down, to see if the actual motion is reliable."
You mean like measuring it with a feeler gauge, moving z axis up down left right and back to the spot and see if its still exactly like before (the same distance measured with a feeler gauge?"Also, double check that your probe offset values are truly correct. It isn't hard to get them inverted."
I will also double check but I think I already did that as well. -
RE: Mesh Bed Level Issuesposted in Tuning and tweaking
@droftarts just ordered 8mm steel balls, to rule this out as well, seems like a good tipp anyhow.
Did manually level the X axis, this slightly improved the result, but still same artifacts with less magnitude. I noticed a Z motor was slightly tilted. Didnt had time to decouple the Z Stepper motors and to make them indepedent, will update soon. However do you have any tipp to test for binding? If I move the z motors by hand it seems to run smooth.
Will collect the results of today and will upload it tomorrow, for further details on improvement.
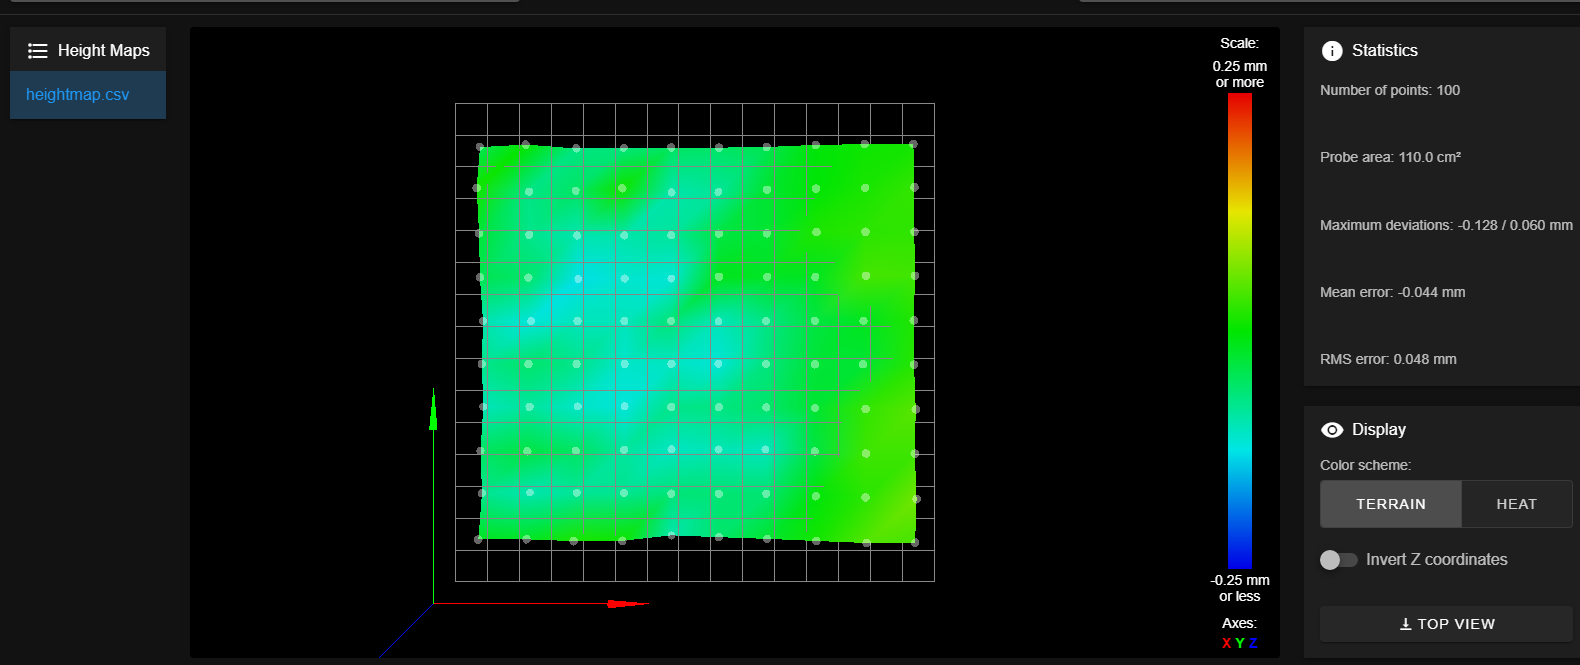
This is what the heighmap looks now:
-
RE: Mesh Bed Level Issuesposted in Tuning and tweaking
@droftarts regarding the both z steppers, I also thought in this direction but could not find how others fix it. Seems that I got alot new hints how to tackle the issue. Irrespective the other Tipps I think a proper way to sync the motors is anyhow a good idea
-
RE: Mesh Bed Level Issuesposted in Tuning and tweaking
@phaedrux rotating the buildplate 90° has a slight improvement.
Will test another buildplate tomorrow and also clean both.Shouldn't the meshbed leveling be capable of compensating the slight tilt? As done by the original Prusa ?
Have ordered springs and knobs to adjust the bed will also try this (I am afraid I can't use it because of narrow space between Y carriage an frame)
PID is tuned, this one I ruled out already.
Will report the progress tomorrow with both buildplates cleaned. If both show the same artifacts I think at least we can rule out the buildplate.
Next guess would be move the print around on the buildplate, maybe de magnets in the bed interfer with the hotend and push it down while printing over magnets ? Does this sound reasonable to test?
-
RE: Mesh Bed Level Issuesposted in Tuning and tweaking
@droftarts do you have an advice in regards to the topic main problem ?
-
RE: Mesh Bed Level Issuesposted in Tuning and tweaking
@64bit https://duet3d.dozuki.com/Wiki/Setting_up_automatic_probing_of_the_print_bed
Obsolete information
The remainder of this page describes G32 bed probing for bed compensation, which is no longer recommended. For G29 bed probing, see Using mesh bed compensation.
-
RE: Mesh Bed Level Issuesposted in Tuning and tweaking
@fcwilt unfortunatly the result didnt change, when using the center in the homeall.g
G1 X92.5 Y93 F3000; Z safe homingThe heighmap now looks different, but in general yields the same information (at another z-height). I retested it center + probe offset but I didn't behave differently.
 Still pretty much the same print result.
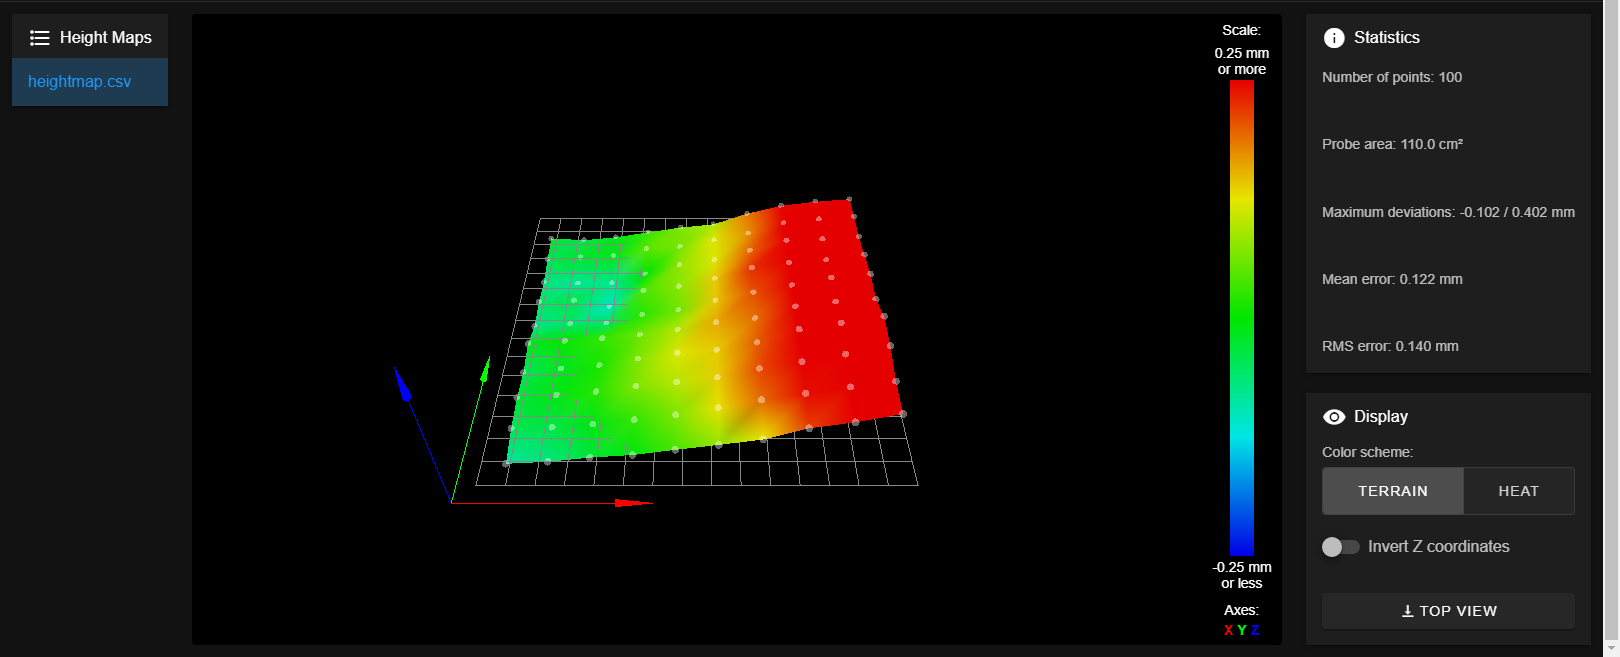
as I dont have a mesh.g I also cannot share it (according to documentation it instead just uses G29 S0).
-
RE: Mesh Bed Level Issuesposted in Tuning and tweaking
@fcwilt Hi, thank you for taking the time to take a look at my problem.
You are right, its off center. Ill try to rectify it. Should the nozzle or the sensor be at the center of the bed?
It was subject to several tinkering changes, but its not center you are right, I thought it compensates for it as the heighmap is the heightcompensation based on the G30 in homeall.g. Therefore thought it doesnt really matter where the reference z=0 is measured because each point individually is again measured during mesh leveling (G29).Nozzle centered would be X:92.5 Y:93, if senor should be centered, then i would just add the offset (X:-33,5, Y:-26).
In my start g-code I use:
G28 ;Home
G29;
To G28 home (I guess it calls homeall.g) and then use G29 (mesh.g).
Ill test it again with nozzle centered to the bed during G30 and will report results. I will also attach my mesh.g
-
RE: Mesh Bed Level Issuesposted in Tuning and tweaking
@phaedrux thank you for your reply. As with the original Prusa bed, mine is fixed with aluminum spacers and cannot be adjusted currently.
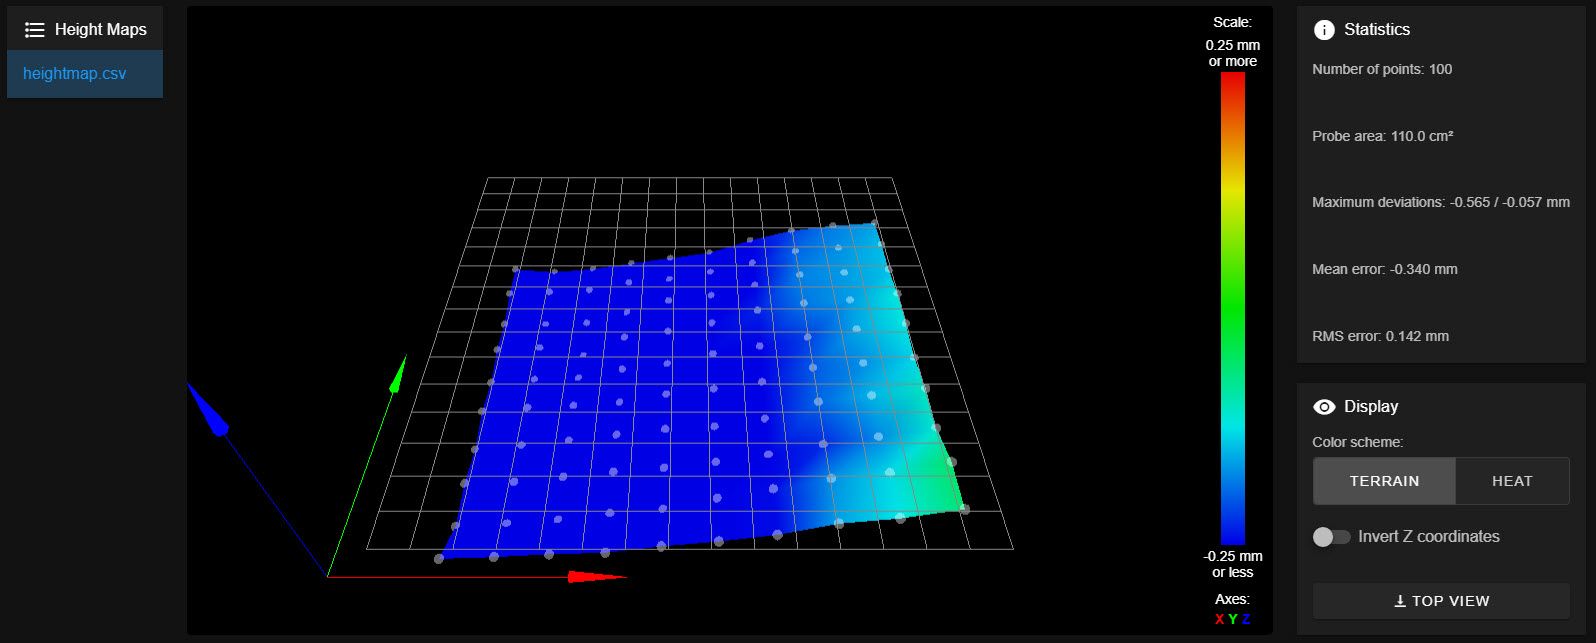
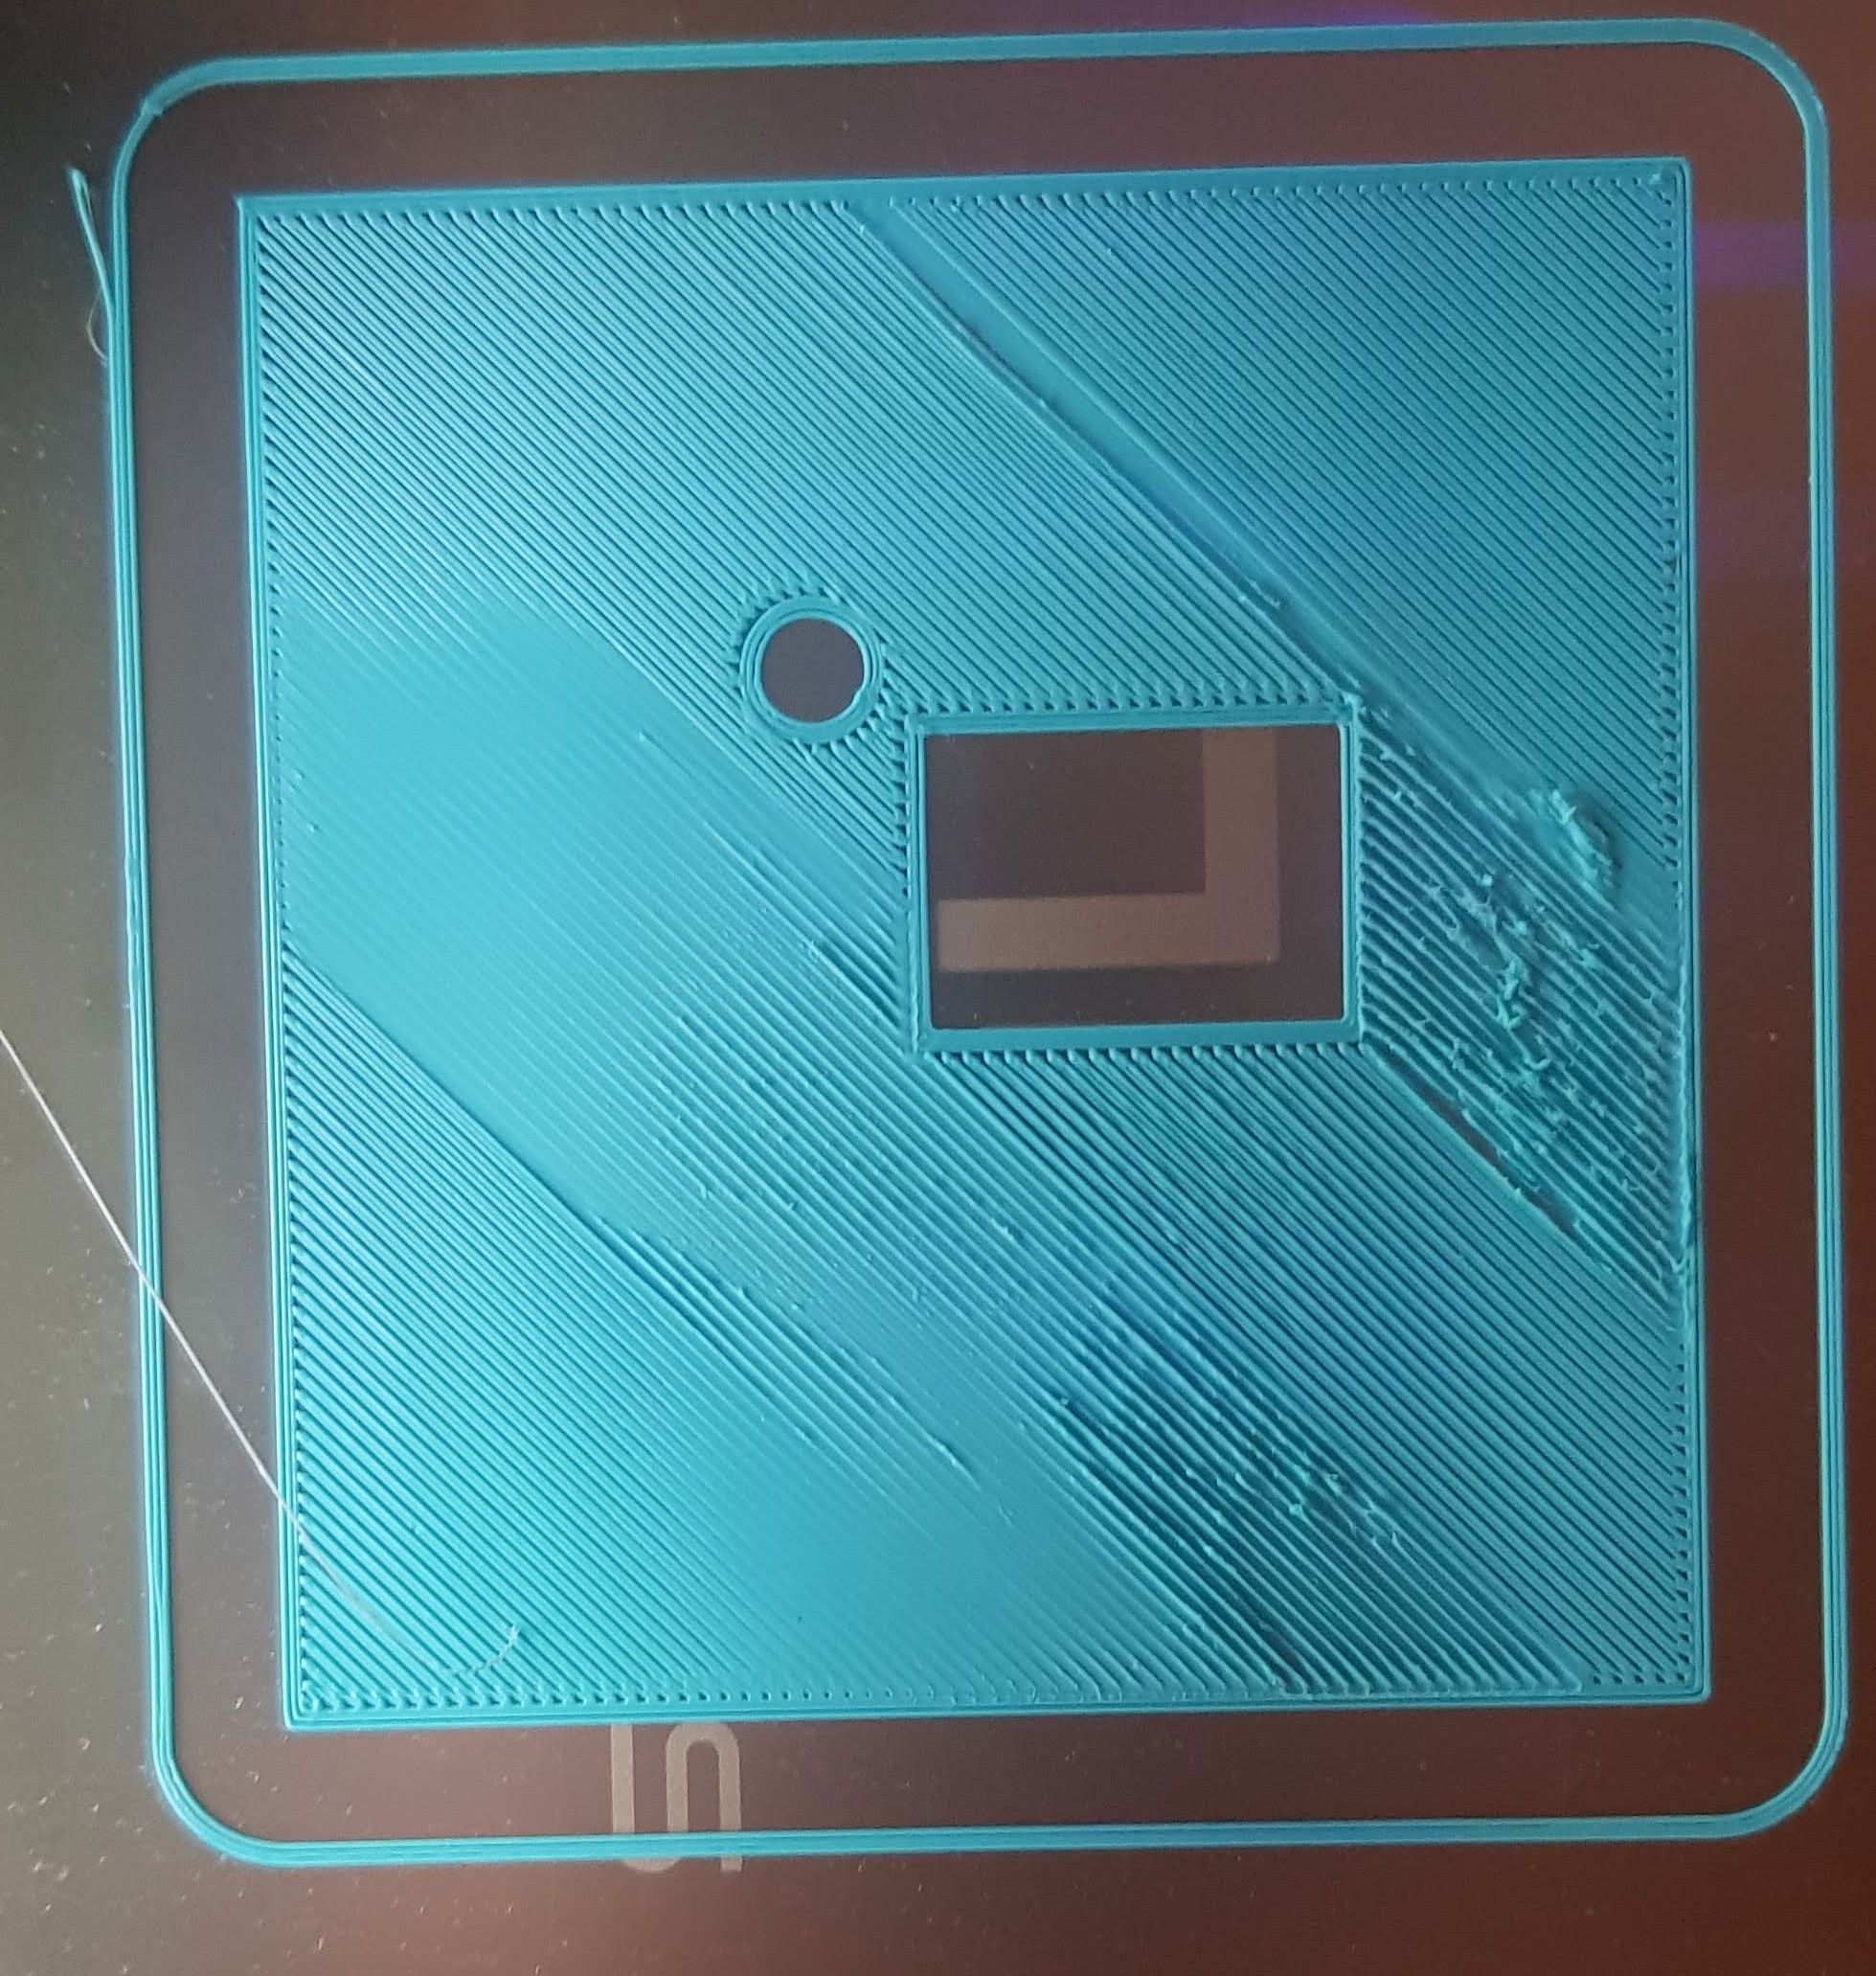
Ive been following your suggestion and tried 10:10 Mesh leveling, but the result is pretty much the same. What confuses me the most is not the uneven result, but that it seems that the compensation fails at the orange / purple areas, as these are close to each other one is to low and one is way higher.
M557 X30:140 Y40:140 P10Results:

-
Mesh Bed Level Issuesposted in Tuning and tweaking
Dear Community,
I try to get a even first layer with my printer and now fail to make progress for weeks, now I try to showcase you the problem and hope someone can help me to pinpoint the issue.
Printer:
Custom Cartesian (see images)
Magnetic Heatbed mk52 base (Prusa Bed Clone)
On top of it I have a twotrees spring sheet with a PEI sticker.
Board: Duet 2 Wifi (Duet Web Control 3.2.2, RepRapFirmware for Duet 2 WiFi/Ethernet 3.2.2 (2021-02-11))
Z Axis Motors are mounted in series
Bed-Sensor: LJ12A3-4-Z/BX-5VThis is the result if I print attached gcode file (a 0.2mm player test).
I am very confused that it seems to have too low and too high nozzle distance to the printbed between two nearby lines (see cropped detail photo). While Skirt seems to be printed quite ok. (You can also see when it prints the skirt that it adds the heightmap, so a Z movement is visible, if it moves only along the X axis per g-CodeI also attached all *.g files that I thought might be relevant.
Already tried 4 point leveling because I thought the magnets on the bed might interfere, but nearly same result.

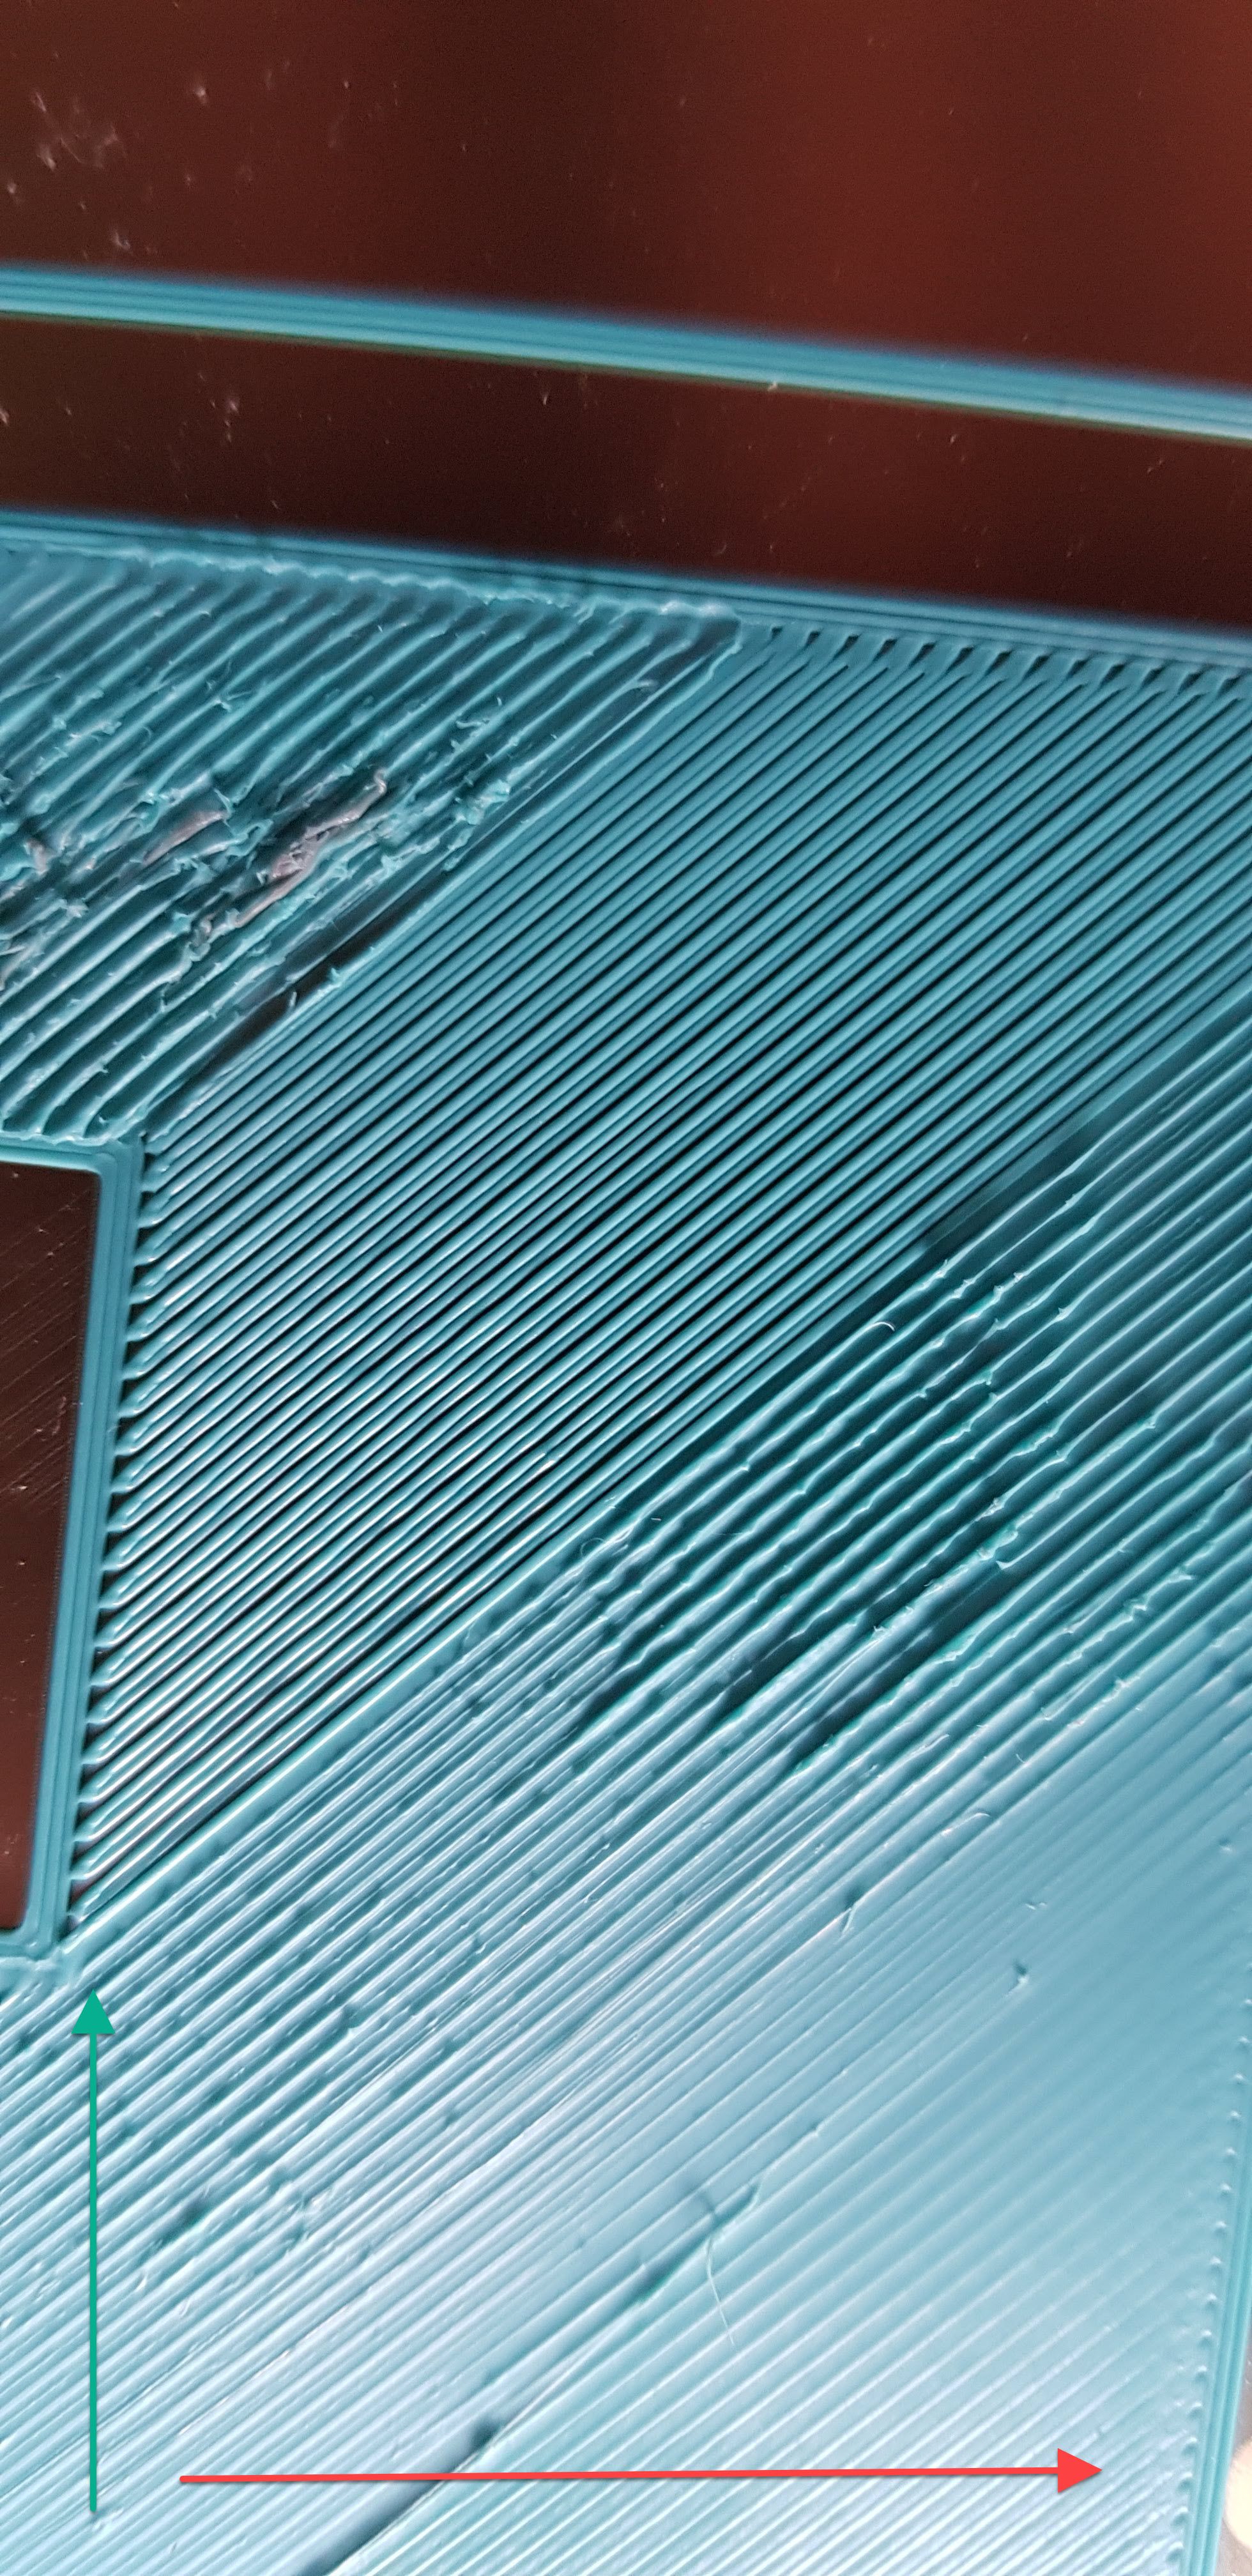
Heightmap:
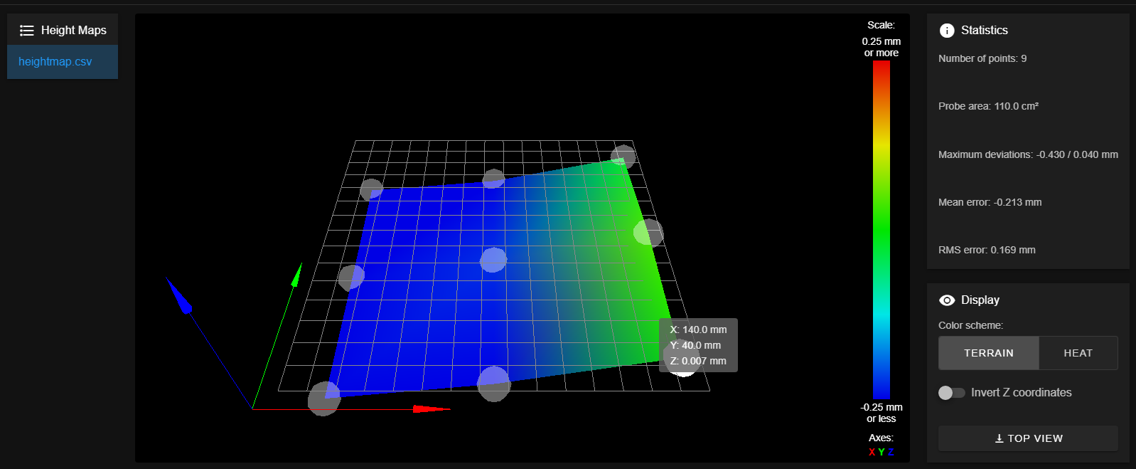
RepRapFirmware height map file v2 generated at 2021-05-03 13:13, min error -0.430, max error 0.040, mean -0.213, deviation 0.169
xmin,xmax,ymin,ymax,radius,xspacing,yspacing,xnum,ynum
30.00,140.00,40.00,140.00,-1.00,55.00,50.00,3,3
 -0.430, -0.263,  0.007
 -0.402, -0.225,  0.040
 -0.358, -0.260, -0.027
Start G-Code in Prusa Slicer:
G28 ;Home
G29;
G29 S1 P"heightmap.csv"; Test load heightmap
G1 Z15.0 F6000 ;Move the platform down 15mm
;Prime the extruder
G92 E0; Setze den Extruder auf Null
G1 X5 Y5 Z0.28 F5000.0; Fahre an die Startposition X5 Y5 Z0.28
G1 X150 Y5 Z0.28 F1500.0 E15; Ziehe eine Linie nach X200
G1 X150 Y5.4 Z0.28 F5000.0;
G1 X5 Y5.4 Z0.28 F1500.0 E30; Ziehe eine Linie nach X200
G1 X5 Y5.4 Z5 F1500.0; Ziehe eine Linie nach X200
G92 E0; Setze den Extruder auf Null
testprint0p2mm.gcode
homeall.g
config-override.g
config.g
cancel.g
bed.gBed Mounted with aluminum spacers


-
RE: Z probe already triggered (with I0 and I1)posted in Duet Hardware and wiring
Thank you, you are a wizard! It works perfectly!
-
Z probe already triggered (with I0 and I1)posted in Duet Hardware and wiring
Dear Friends,
i hope it is a small issue and anyone has a advice for me.
I use a NPN Normally Open sensor but it always gives me the error:G28 Z Error: Z probe already triggered at start of probing move Error: Homing failedHardware: Duet 2 Wifi
Board: Duet 2 WiFi (2WiFi)
Firmware: RepRapFirmware for Duet 2 WiFi/Ethernet 3.1.1 (2020-05-19b2)
Duet WiFi Server Version: 1.23Probe: lj12a3-4-z/bx-5v
connected as described in: https://duet3d.dozuki.com/Wiki/Connecting_a_Z_probe#Section_NPN_output_normally_open_inductive_or_capacitive_sensor
No matter if I invert the probe via M558 or not. (If I start homing with a piece of metal below the sensor it starts)
See my Tests and config:
config:
; Z-Probe
;M558 P1 C"zprobe.in" H5 F120 T6000
M558 P5 C"zprobe.in" H5 F120 T6000 I1         ; set Z probe type to unmodulated and the dive height + speed
;G31 P500 X0 Y0 Z2.5
G31 X0 Y0 Z2.5                           ; set Z probe trigger value, offset and trigger height
M557 X15:215 Y15:195 S20                       ; define mesh grid
Homez.g
; homez.g
; called to home the Z axis
;
; generated by RepRapFirmware Configuration Tool v3.1.3 on Mon Jun 22 2020 09:53:01 GMT+0200 (Mitteleuropäische Sommerzeit)
G91              ; relative positioning
G1 H2 Z5 F6000   ; lift Z relative to current position
G90              ; absolute positioning
G1 X15 Y15 F6000 ; go to first probe point
G30              ; home Z by probing the bed
The web Ui confirmes that the probe is connected and reads the values.
Default : ZPROBE 1000
With piece of metal below: ZPROBE 0Tests:
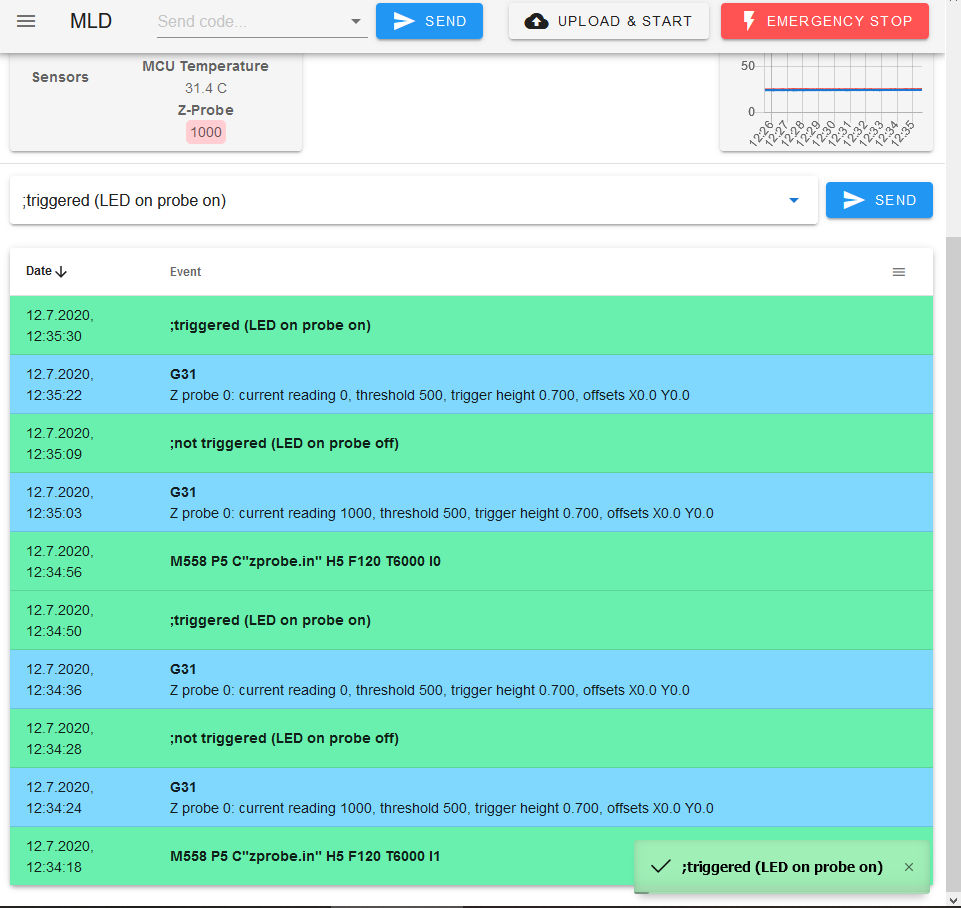
Results with I0/I1 when homing:
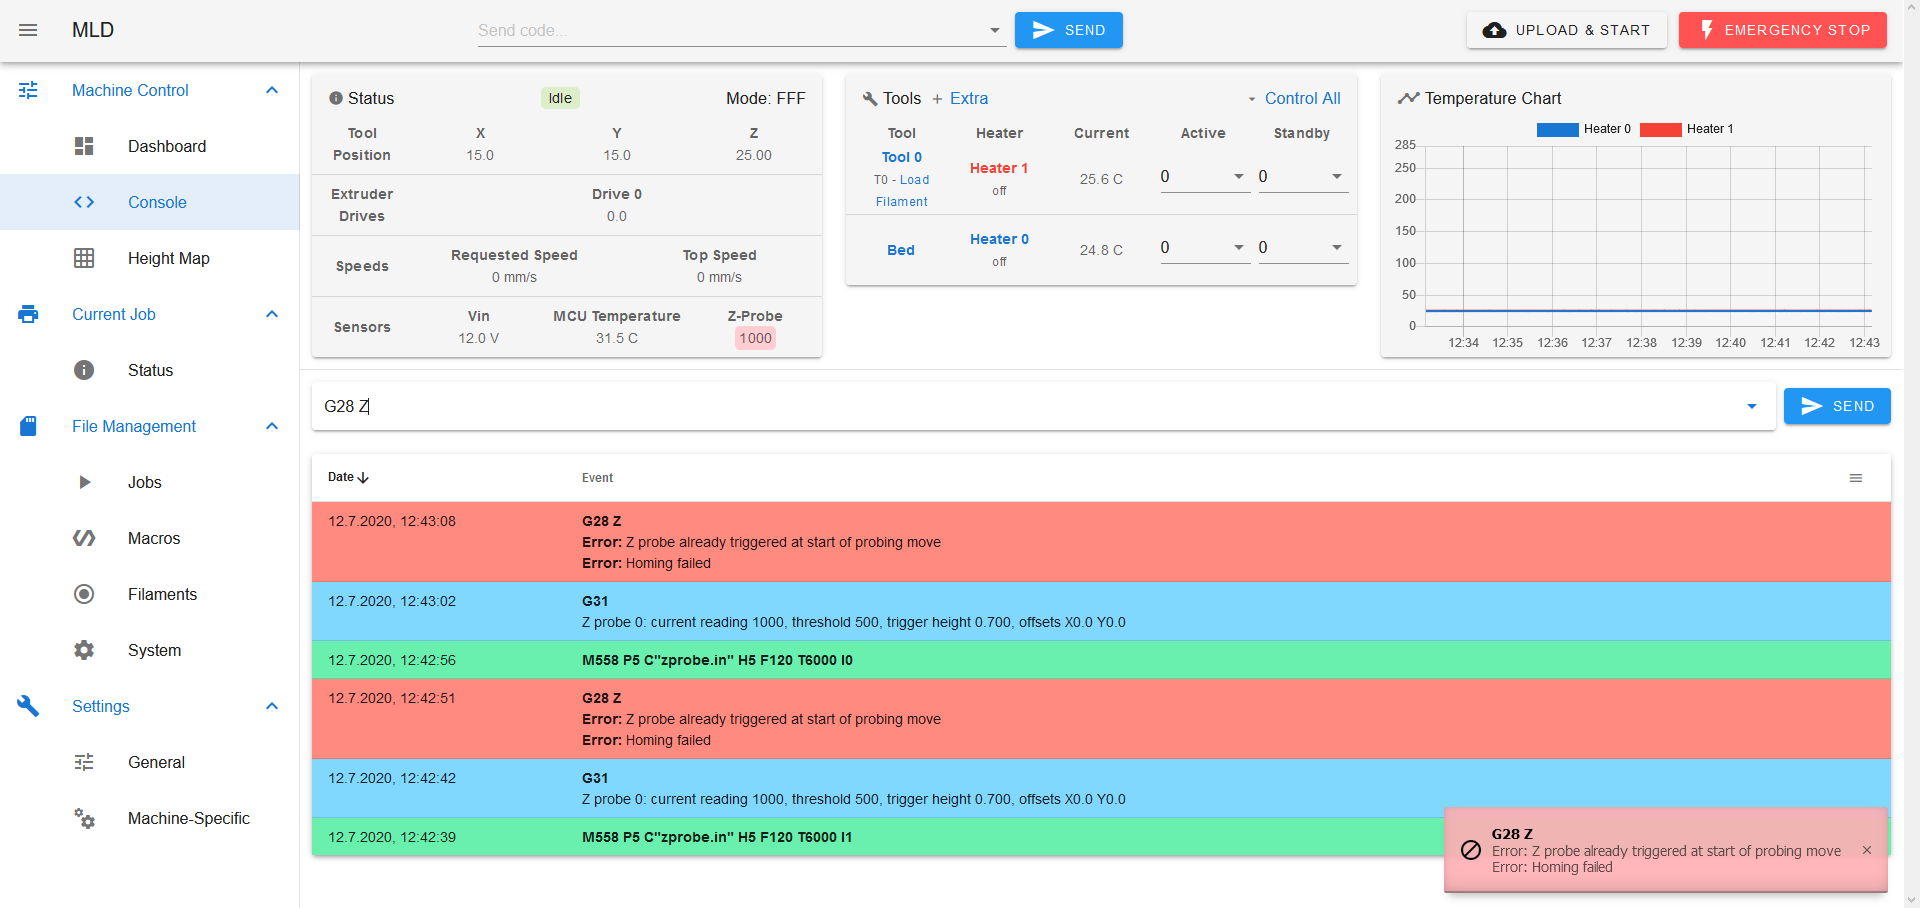
G31 Readings with I0 and I1
