A Repeating Artifact
-
Oh, I should have added the print file for review. Here it is now.0_1566838593982_BM_Fine_RESCALED_0.5mm-thin-wall_100Fan_1-retract_RTRSpeed_30.gcode
-
Did you turn on "relative extrusion" in Cura?
-
Hello. No, I didn't turn on "relative extrusion" in Cura. I hadn't heard of that until you mentioned it. Sorry.
-
RepRap firmware wants relative extrusion gcode, which is the default in Slic3r but an option in Cura.
Try slicing the same object with Slic3r or PrusaSlic3r and print it and compare results. Or just turn on relative extrusion in Cura and run it again.
-
@B0M0A0K
I experienced something similar when I was way overspeed My quess is what happens:
For any reason a small bump is left in layer N
On the next (N+1) layer the head jumps a little from the mentioned bump leaving a small gap and some extra filament after the gap The jump is caused by the insufficent time for the hotend to properely melt the error on the prev layer
...this goes on from layer to layer leaving you with diagonal artifacts on the print eminating from the original error.Oh, and since you introduced an upward force on the hotend, it will resonate up and down for some time, making other gaps.
Please slow down the print, and test your printer if there is any play in the motion system. If there is, then you need to eliminate it.
-
@denke That makes perfect sense. Thanks for the suggestion. I will try and look at all the suggestion here tomorrow and let you know how I get on.
This was my first time trying out "fine" at 0.1, so it may have had a tendency to do this all along and this is my first time experiencing it. I was wondering if this was a red herring in that either it was a bad example to print or that perhaps Cura didn't handle it that well.
Thanks again.
-
So I had another look at this tonight. Checked all belts, rods, fixings and any signs of rubbing, damage or dirt build-up. Tested the X-Axis again and minor adjustment (that seems to need adjusting every time).
There was nothing that seemed out of place or something that might cause binding. I'm not sure if I mentioned this but I removed the filament and refit it just to check that there were not signs of a blockage. Everything was fine there and I also checked that the spool (sits on top of the Wanhao and uses bearings) was not binding and that the filament was not snagging while paying out.
Next I turned my attention to some of the setting changes suggested yesterday. I dropped the speed to 50 and enabled "Relative Extrusion".
I then ran a repeat of yesterday's Calibration Cube.
Firstly, this did not complete. At 80% complete the print came loose from the bed and I had to reach for the emergency stop. I guess I should have cleaned and resprayed the glass plate before starting this one

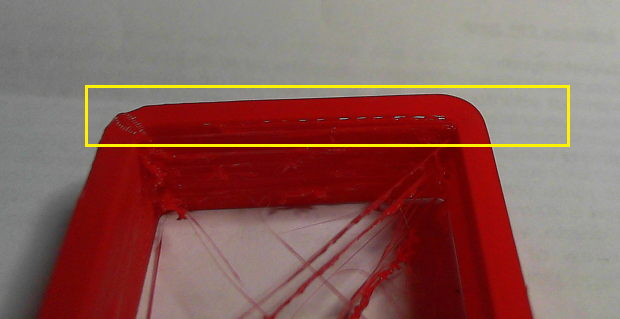
Having said that, the print did not feature the issue I had been seeing (see the attached photo), so I'm not sure whether it was helped by dropping the speed or enabling "Relative Extrusion". It could have been a combination of both.
I am still seeing section that appear to have under-extruded such as in the photo where there is gapping at the join between the brim and the start of the print object. There is still way too much stringing so I need to look at that.

I'm going to have to leave it for now and see if I can make time to look again tomorrow.
-
So I know I said I would try and get back to this tomorrow, but.
I was thinking about the suggestion of using Slic3r instead of Cura as my slicing software. I also thought again about what I was seeing, in particular the amount of material that was getting thrown at the print job.
So I installed Slic3r and looked at MeTube video on how to set it up with the Wanhao Duplicator i3. Then I loaded the print .stl file and checked for the suggested settings the video author was using. I entered the IP address of my printer and was very surprised when it successfully uploaded the new file (the "test" button had stayed grey when I entered the IP address so I assumed that the format of what I had entered was wrong somehow).
Then I cleaned and resprayed the bed and reset the Z-Axis.
Next I sat and stared at the "Machine Control" screen on the Duet3d and realised that I had not played with the Extruder Control settings in a while. I considered the excess material I was seeing and dropped the feedrate.
I started the job half expecting to have to hit the power button, but it laid the brim nicely and moved on immediately to the print job. I was stunned at how quickly this thing was printing. With my old settings each job was taking about 36 minutes, this print took no more than 10 minutes, start to finish.
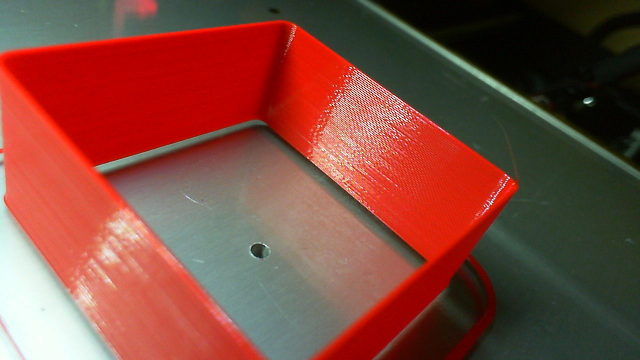
The result was astonishing. There is no stringing and the print is perfectly formed (see attached).
Now I'm definitely going to call it a night and head for a beer.
I think I need to experiment more with Slic3r.
-
Your Cura print seems to have to little retraction/too high temp and probably a line width that is not dividable with the model wall thichness since there is so much travel moves on this simple model, you can check what causes the travel moves in the preview (turn on travel moves).
A slight change in line width can do wonders when you are working with a scaled or a model with a thickness constructed with a different nozzle size in mind.Just as a note on under extrusion the direct extruder on the wanhao i3 2.1 & plus has a quite dull gear as standard, it is a quite easy upgrade to exchanges it for a mk8/mr10 style one, just remember to recalibrate exstruder steps afterwards.
-
@mrsdelish Thanks for this. I had been researching what I could do by way of an upgrade to the extruder or the hotend but was a little undecided because everyone has a different take.
My options so far are;
Micro Swiss Mk10 All Metal Hotend Kit with cooling block. (Straight replacement)
E3D Titan Aero HotEnd and Extruder
Various other suggested mods.
-
@b0m0a0k said in A Repeating Artifact:
@mrsdelish Thanks for this. I had been researching what I could do by way of an upgrade to the extruder or the hotend but was a little undecided because everyone has a different take.
My options so far are;
Micro Swiss Mk10 All Metal Hotend Kit with cooling block. (Straight replacement)
E3D Titan Aero HotEnd and Extruder
Various other suggested mods.
Don't get me wrong, I enthusiastically modded and upgraded my Wanhao (Monoprice Maker Select actually; it's the same printer), but I would like to opine that whatever was causing the behavior you saw in your initial posting would not be improved by upgrading the hotend, or the extruder for that matter. There's nothing wrong with the hotend and extruder (it's direct drive) on that printer, unless you want to print at nozzle temps higher than around 240-245 C or so for very long. I printed tons of PETG on that printer (including all the parts for my initial build of my D-Bot), and eventually replaced the teflon tube in the hotend and found it fairly blackened and charred. The problems you are seeing are 100% settings issues.
To that end, I would recommend against tweaking extrusion multiplier and whatnot as a fix to your problems. That's a kludge that should be used last, after everything else is dialed in to what they should be. I'd set your e-steps back to what they ought to be. Using e-steps to try to "fix" problems is the wrong approach. Do the measurements and actually measure how many steps it takes, and use that value. Measure your filament and input that value. If it's within a couple thousandths of 1.75mm then it doesn't really matter here or there, but I recently was printing with some filament that was so much smaller I could actually see it with my naked eye, and measured it out at 1.62mm, which is definitely enough to make a difference.
Once you're printing with relative extrusion, then dial in your retraction. Once that's done, then modify your acceleration/max speed/jerk settings, and you should be printing really nicely. You can do all this with Cura too. There's nothing magical about Slic3r compared to Cura that caused the massive improvement in results you saw. It's just settings, and you can change whatever you need to in both and get pretty much the same results. Massive tweaking of the extrusion multiplier will just cause havoc from filament to filament and print to print.
Btw, I think I paid like $250-300 for that Maker Select printer, and by the time I was done with little upgrades and mods and whatnot I don't doubt I'd paid upwards of $600-700 total, including the Duet Wifi, which means I could have just bought a $600-700 print to start and probably been better served (other than the Duet Wifi, which I consider mandatory on any printer I will use). Oh well, I learned a massive amount with that printer, and so in the end it served me well.
-
@sethipus Thanks for this, that's a very well reasoned and useful set of instructions. I agreed with what you have said (I don't disagree with any of it) regarding the slicer used. I tried to print the Octopus after the successful cube test and it was so bad I had to stop the print.
I will go back and put everything back how it was, but will use your sequential diagnostic to work through everything else. The printer is in bits at the moment because I took the extruder and the hot end apart whilst checking the condition of the extruder gear and looking for blockages in the hotend. Didn't find anything of note but I am sure I was hearing a click from the extruder gear as it was passing filament and wanted to investigate that.
I'm going to go ahead with the Micro Swiss hot end because most folks seem to support this as a good upgrade.
Thanks again, I very much appreciate you taking the time to put this together.
-
@b0m0a0k I almost got the Micro Swiss hotend at one point, but since I was successfully printing PETG through the stock hotend, I never actually bought it, and once I settled on building a new printer from plans the idea became redundant. There's nothing wrong with the stock hotend though. For people printing just PLA I'm not sure I see the point. I haven't looked at pricing on those things lately, but if the MicroSwiss hotend is in roughly the same ballpark as an E3D like the Titan Aero, I don't think you can beat the E3D. They're the gold standard. For one thing, the nozzles are nearly a universal standard, and the extruder is geared, which means (along with a great controller like the Duet Wifi) more steps/mm for finer and quieter control of extrusion, you can use a lighter extruder stepper, etc.
I read about people getting clogs in their printer, and I simply never get them. I think I've gotten a legit clog maybe once ever in thousands of hours or printing, and if I recall it was an experiment with carbon fiber PETG filament, and the single-drive extruder I was using at the time had stripped out the filament so filament sat in the nozzle and cooked.
I don't know if you've heard of this before, but most times when I'm reloading filament I'll do what's known as the "Atomic Pull." And when I switch between PLA and PETG or some other filament (ASA, nylon, etc.) I do this 100% of the time. Simply, an atomic pull is where I pull the existing filament out (leaving some melted filament down in the melt chamber) and push in a length of cleaning filament, until what's coming out is mostly the clear cleaning filament. It's not necessary for it to be 100% clear. In the Duet Wifi web control set the nozzle temp to 0. As the temperature falls below around 200 or so give one last little short push on the cleaning filament to push through another couple milimeters of it, then let it sit. As the temperature falls to around 90 C or so simply pull the filament out with a pair of pliers or whatever. If you do it with the temperature too high the cleaning filament will break off leaving the filament in the melt chamber, same if you let it cool too far below 90 C. If you pull it out in this sweet spot temperature zone you'll pull the cleaning filament out of the melt chamber, and you'll have a perfect "casting" of the melt chamber that will remove anything and everything in there, so the melt chamber is perfectly clear for putting in the new filament.
Sorry to be so chatty, just got kind of enthused on the topic of that particular type of printer, and all the many upgrades and mods people do on them. With the Duet Wifi you've already done the best possible mod on that printer bar none. No more shuttling an SD card back and forth between the computer and printer, massively quieter printing, nearly unlimited configuration simplicity, etc. Good times.
ETA: one other topic is on the extruder itself. With the Micro Swiss hotend you'd be stuck with the stock extruder, which is functional, or if you went Titan Aero you'd get a nice geared extruder along with the E3D hotend in a nice, compact package, but it's still single drive (one toothed gear pulling on the filament). I'm now using dual drive (two toothed gears pulling on the filament rather than one toothed gear with a flat bearing pushing the filament against it) and dual-drive is quite simply fantastic. I'm using a Bondtech BMG clone that works amaziningly. If you can find or design a print carriage for your printer that combines a Bondtech-style extruder with an E3D hotend in a compact-enough package you'd have the best of all solutions. With the Micro Swiss hotend you're locked in to their nozzles, and it's just a hotend, leaving you with a simplistic stock extruder. If you're gonna go, go big.
-
@sethipus Hey, thanks again for the detailed response. I am aware of the Atomic Pull and have used it before. Your info on the E3D like the Titan Aero is most interesting and I may take another look at that. I have just completed putting everything back together and have re-aligned everything. I am going to go and look again at my config.g and undo the Steps per mm change I made then fire up Cura and start over with attempting to tune my prints.
-
I was wondering if anyone had suggestions for good test print pieces that do not take ages to print and will allow for speedy test prints? I am currently using the Octopus print but it takes over an hour for each test.
-
Some people prefer to test everything (?) at once by printing a tugboat or other objet du jour, and then try to sort out the problems. I usually design test prints to test specific things that I'm trying to test or tune up. The prints get right to the point and often finish quickly. For example, if you want to check squareness of axes, steps/mm calibration, print a large 1/2 cube. For testing seam quality, print multiple small cones or cylinders with the slicer set to align the seam. For bridging performance, print an object that has multiple bridges of different lengths oriented in different directions, printed at different speeds. For testing bed level/flatness, multiple square or circular objects scattered over the bed surface. It helps to get a little familiar with gcode so you can go into and edit the files for specific properties like speed, temperature, etc.
-
@B0M0A0K I agree with @mrehorstdmd and once you have the basics dialied in with cubes etc then there are good objects on thingiverse that have, for example, a bunch of different bridge lengths, or a bunch of different slopes for overhang testing.
-
@mrehorstdmd OK, I took your advice and focused on using calibration cubes to set retraction first. Here are the results and it's clear that the farther away from 1mm the worse it gets.

One strange artifact that appears on all these cubes is the "tail". It typically appears on the first cube and varying lengths in between but always presents again on the last cube.
Any thoughts on what might be causing this?
-
.. And it doesn't actually help if I don't tell you the settings I am using in Cura. Sorry, here are my Cura settings.
Resolution: 0.2mm
Print Temp: 200 and later 195
Print Temp Initial Layer: 200 and later 195
Initial print temp: 190 and later 185
Build Plate Temp: 60
Flow: 100%
Retraction enabled
Retraction Distance: 1mm
Retraction Speed: 25
Print Speed: 60
Travel Speed: 120
Initial Layer Speed: 30.0
Cooling Enabled
FAN Speed: 100
FAN Regular Speed: 100
FAN Max Speed: 100
Support: No
Build Plate Adhesion: Skirt
Skirt Width: 3
Print Sequence: All At Once -
Actually, I kept increasing the retraction and eventually the "tail" disappeared. I needed to increase retraction to 1.3mm before this happened.