Installing Duet Maestro in FlashForge Creator Pro (2016)
-
I got the Duet mounted and almost all the wires connected, but I am not sure what to do with the HeatBed temp sensor, I expected 2 wires and the FFCP has 4 wires. I can't see under the heat bed at this time to see where it's going.
-
@Fireflynj said in Installing Duet Maestro in FlashForge Creator Pro (2016):
I got the Duet mounted and almost all the wires connected, but I am not sure what to do with the HeatBed temp sensor, I expected 2 wires and the FFCP has 4 wires. I can't see under the heat bed at this time to see where it's going.
I remember that! There's a thread on here talking about the exact problem:
https://forum.duet3d.com/topic/7285/flashforge-creator-pro-heat-bed-wiring
PLEASE be aware that the FFCP likely has a heated bed that will, by default, provide entirely too much power to the heated bed given the power supply that it comes with. You'll want to limit it via PWM...
-
Following up on the heated bed... On my machine, I swapped out the power supply with a 450 watt. However, the FFCP usually only has a 320 or 350 watt PSU. To prevent issues, you'll have to limit the bed heater to something around 80% via PWM.
In your config.g, when using M307 to configure the bed heater, you'll want to use something like:
M307 H0 B1 S0.80 ; heater 0 using bang-bang with 80% PWM
If/when you do PID tuning, ensure that you also limit to 80% PWM. For example, to tune the bed to 100C, you'd use something similar to:
M303 H0 P0.8 S100 ; tune heater 0 with 80% PWM to a target temp of 100C
If you don't limit the heater power (or upgrade the PSU), it can overload your power supply. The best possible outcome for that would be the PSU simply shutting down. Other outcomes include smoke, fire and destruction.
-
Thank you for the reply, the wiring does makes sense!
My first DIY printer had an LED on the Heatbed so you know it is heating, what Flashforge did here was ran wires back to Mightyboard to give feedback where it changed the color of RGB when heating.
The 4.7 ohm resistor is exactly the right size for LED on 24v and I will take advantage of that and add a LED.
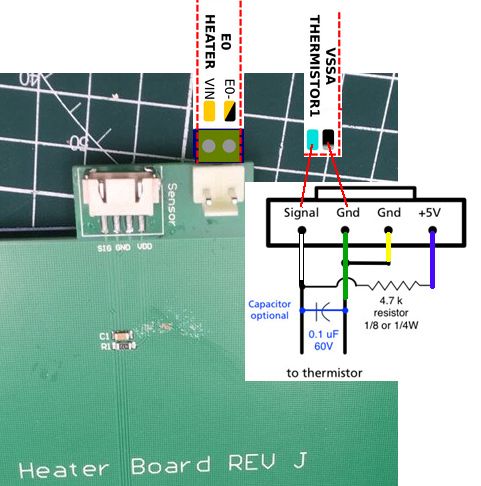
mine is a REV J and white wire is Signal for Thermistor and VSSA goes to ground.as for heatbed PWM or bang bang, my first DIY ramps printer did that and I just assumed the Duet will do that by default, Thank you for the warning!
Edit . . the 4.7 ohm resistor would only make sense to put an LED on if it was connected to Heater, in this case it's not, so I need to look into this more...
-
back from a trip and it continues...
so I am now following the guide for the Ender https://duet3d.dozuki.com/Guide/Ender+3+Pro+and+Duet+Maestro+Guide+Part+1
End switches are working.
Now on step 4 Verify Motor Direction, I sent the Gcode G92 Z50 Y75 X100.
nothing happens, no movements on any of the stepper motors
I suspect the G92 is not working because HOME was not ran yet, so I took a risk and was prepared, I ran 'G28 X' and there it goes!! but wrong way, I turned the power off before it hit.
so looks like the instructions needs to be updated.
I might start working on a guide myself for the FFCP, the web interface changed too. -
@Fireflynj said in Installing Duet Maestro in FlashForge Creator Pro (2016):
G92 Z50 Y75 X100.
i think you are looking for G1 Z50 Y75 X100
-
@Veti ok, I just looked up what G92 is and its for setting zero point, I got this from the guide for setting up an Ender and verifying the stepper motor direction is more complicated than it needs to be.
I found a note in another guide:
*Note that a stepper can't be moved before homing. unless the M564 command is used to override this safety default.I got this step done now, I simply center everything manually and then click the [Home X] button, if it moved away from end switch, I cut the power off and reverse direction in config.g. then I did the 'Y' etc . . .
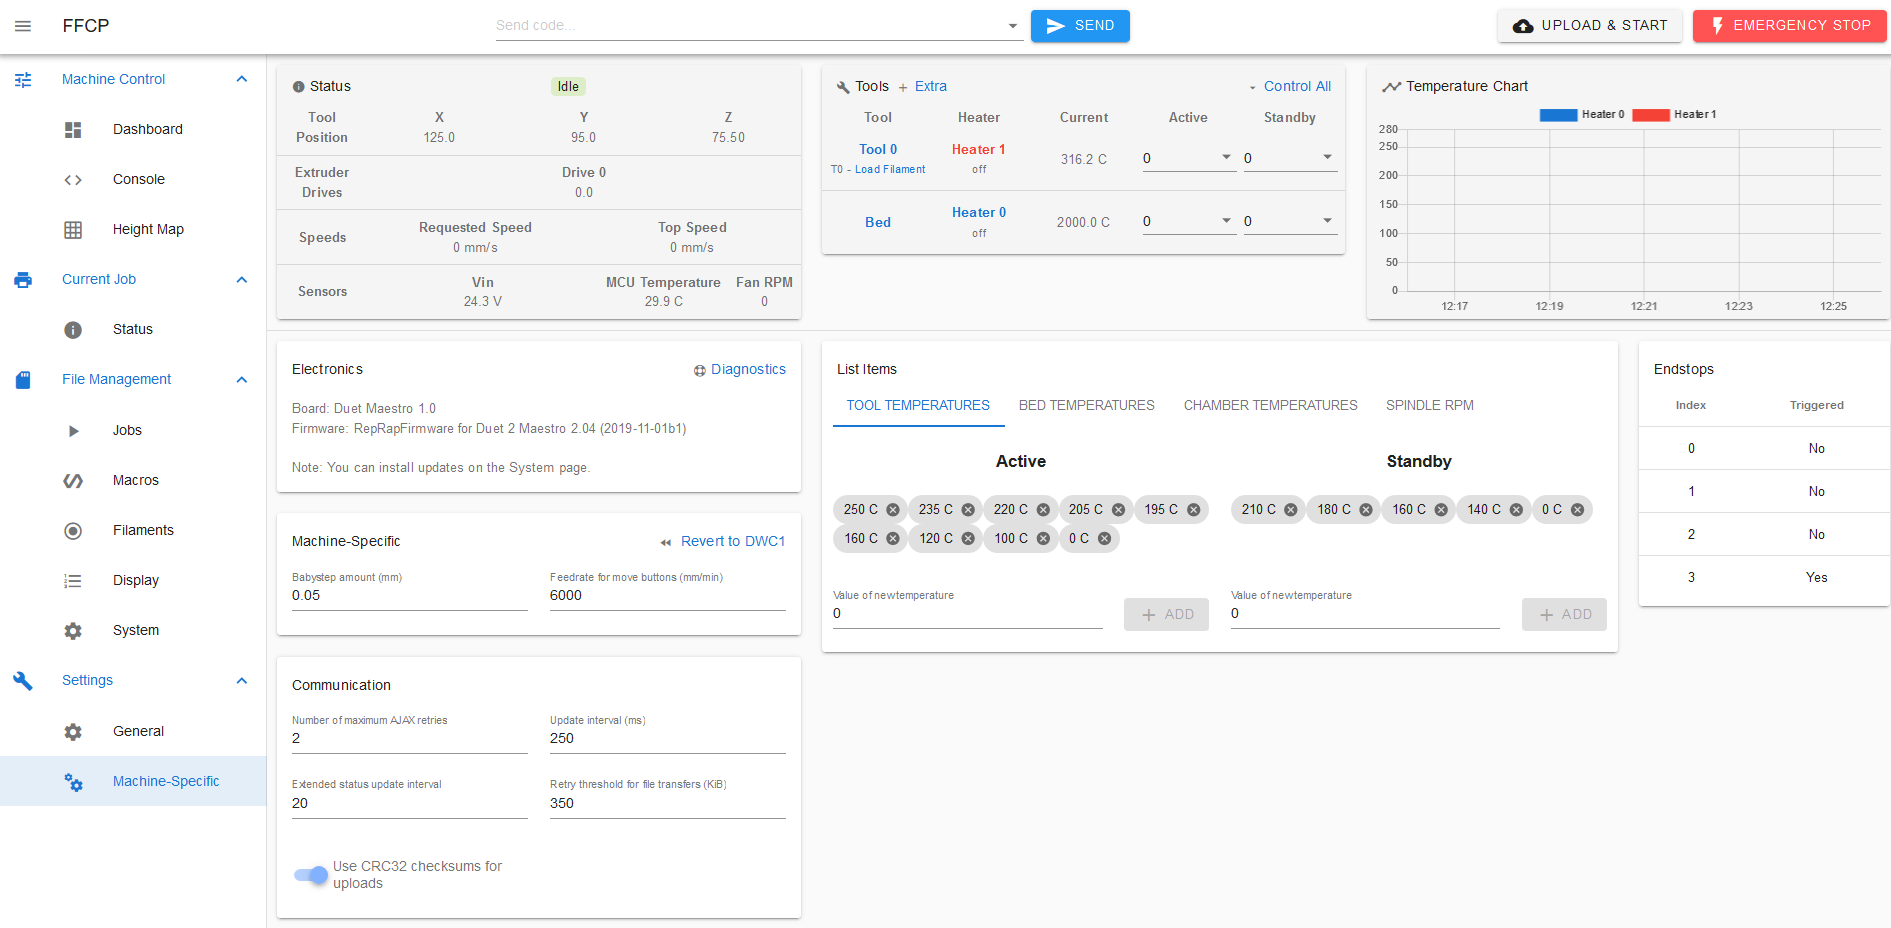
I am now trying to figure out why my temperatures are not working.
-
I think you’re referring to this bit of the instructions: https://duet3d.dozuki.com/Guide/Ender+3+Pro+and+Duet+Maestro+Guide+Part+3:+Commissioning/39#s146
G92 sets the axis position. The instructions say to do this, then nudge the axes to check they are going the right way. Can’t see anything wrong with that, just you didn’t quite follow the instructions through!
It’s always worth checking what the instructions will do when typing them in; use the Gcode dictionary to expand your knowledge: https://duet3d.dozuki.com/Wiki/Gcode
Ian
-
@Fireflynj said in Installing Duet Maestro in FlashForge Creator Pro (2016):
*Note that a stepper can't be moved before homing. unless the M564 command is used to override this safety default.
That’s not quite right. Homing an axis gives it a definitive position, which M92 also does, so also cancels the ‘axis not homed’ error.
Ian
-
@droftarts yes, I misunderstood and expected it to move to center, and nudging did not work either. Maybe because of updated firmware, the M564 command is used to override this safety default was the missing step, but I did not try it since I did it a different way.
I added comment to guide:
*Note that a stepper can't be moved before homing. unless the M564 command is used to override this safety default. -
I really don't like the new Web interface, I need to add second extruder and two more fans and can't figure out how.
I have two extruders and 3 fans in the config.g
; Drives
M569 P0 S0                                         ; physical drive 0 goes backwards
M569 P1 S1                                         ; physical drive 1 goes forwards
M569 P2 S0                                         ; physical drive 2 goes backwards
M569 P3 S1                                         ; physical drive 3 goes forwards
M569 P4 S0                                         ; physical drive 4 goes backwards
M584 X0 Y1 Z2 E3:4                                 ; set drive mapping
M350 X16 Y16 Z16 E16:16 I1                         ; configure microstepping with interpolation
M92 X94.12 Y94.12 Z400.00 E92.60:92.60             ; set steps per mm
M566 X600.00 Y600.00 Z12.00 E120.00:120.00         ; set maximum instantaneous speed changes (mm/min)
M203 X6000.00 Y6000.00 Z180.00 E1200.00:1200.00    ; set maximum speeds (mm/min)
M201 X1000.00 Y1000.00 Z150.00 E2000.00:2000.00    ; set accelerations (mm/s^2)
M906 X700 Y700 Z300 E750:750 I30                   ; set motor currents (mA) and motor idle factor in per cent
M84 S30                                            ; Set idle timeout

; Heaters
M305 P0 T4700 B935 R2200                           ; set thermistor + ADC parameters for heater 0
M143 H0 S120                                       ; set temperature limit for heater 0 to 120C
M305 P1 T4700 B4138 R2200                          ; set thermistor + ADC parameters for heater 1
M143 H1 S280                                       ; set temperature limit for heater 1 to 280C
M305 P2 T4700 B4138 R2200                          ; set thermistor + ADC parameters for heater 2
M143 H2 S280                                       ; set temperature limit for heater 2 to 280C

; Fans
M106 P0 S0 I0 F500 H-1                             ; set fan 0 value, PWM signal inversion and frequency. Thermostatic control is turned off
M106 P1 S0 I0 F500 H1 T45                          ; set fan 1 value, PWM signal inversion and frequency. Thermostatic control is turned on
M106 P2 S0 I0 F500 H2 T45                          ; set fan 2 value, PWM signal inversion and frequency. Thermostatic control is turned on
and yes, I have issues with my temperatures as seen in screen shot.
-
@Fireflynj said in Installing Duet Maestro in FlashForge Creator Pro (2016):
M305 P1 T4700 B4138 R2200 ; set thermistor + ADC parameters for heater 1
M305 P2 T4700 B4138 R2200 ; set thermistor + ADC parameters for heater 2B4138 is the default and almost certainly wrong for your thermistor
-
@Veti yes, it is wrong, researching it now, I did not know what the stock FFCP has.
so far I found some posts, it is a 'K' Thermocoupler in the hotends and need a daughter board to connect it.wish I knew before! I need to order one.
I am also making my own Dozuki guide to help others who may do a FFCP. -
It's not finished but here is the link to the Guide
https://duet3d.dozuki.com/Guide/Duet+2+Maestro+in++FlashForge+Creator+Pro+(2016)+and+a+smart+12864+LCD/57so far I was not able to get smart graphic 12864 LCD to work and my heat bed temperature is off.
Please comment here on corrections for the guide as well.
Thank you.
-
The Duet Maestro was advertised to support 12864 LCD display and I am currently searching on how to get it working.
according to https://duet3d.dozuki.com/Wiki/Gcode#Section_M918_Configure_direct_connect_display
it says "dumb LCD or similar display. Supported on Duet 2 Maestro."
uh oh, so I have a smart graphic 12864 LCD, from sainsmart but similar to https://reprap.org/wiki/RepRapDiscount_Full_Graphic_Smart_Controller.
so I need a dumb one and not a smart?
is there a such thing as a dumb one?, I never seen one, maybe it's a mistake on Duet's guide. -
@Fireflynj the 12864 display is considered "dumb" in the sense that it does not have microprocessor to communicate with the Duet like the PanelDue does. That said the wording was confusing in the documentation so i have updated it. A 12864 based display should work.
Have you seen this:
https://duet3d.dozuki.com/Wiki/Duet_2_Maestro_12864_display_menu_systemAlso when you say it does not work, in what sense does it not work?
Also i note in your guide you have
M918 P1 E1 F2000000a value if E1 is not typical.P.S.Thanks for doing the guide!
-
The display is completely is blank just like it is off.
I got the files for menu from https://github.com/mudcruzr/Duet-Maestro-12864-Menu-Files
the config tool generated > M918 P1 E4 F2000000 ; configure direct-connect display
I think I tried E1 because someone posted it worked for them and I did not put E4 back. -
The smart graphic 12864 LCD works very well on the Maestro.
Maybe you have mixed up connectors for COM1 and COM2?
My code in config.g is:
M918 P1 -
I read EXP1 is for SD card and EXP2 is display, but I did try both. Could you confirm which you used? I know the unit works because I took it off my DIY RAMPS printer that I retired.
https://www.thingiverse.com/thing:1290318 -
some reprap clone lcd have reversed connectors.