Pressure advance doesn't affect the printed model
-
So, I have increased all the settings to the recommended XYZ 6000 speed and 1500 acceleration - layer start started being less noticeable but, most importantly, the pattern still same from layer to layer (printed at 60mm/s):
so, speed seems to be not the case. Any ideas?
PS - G-code reference mentions that pressure advance "Supported by RepRapFirmware-dc42, -ch and -dn." while I have 2.04 without any suffixes, could it be the problem, that I have the wrong version that just doesn't support PA?
-
Could you post your entire config.g
Those steps per mm look kinda odd, only makes sense to me if you're running 1/8 microstepping. Though, seeing as it's lead screw driven, probably for the torque? For the extruder, I'd still set the microstepping to 1/16 and the steps per mm to around 837.
Could you also post the gcode that created that cylinder as well as tell us more about the machine? Motor details, types of rods/effector, etc.
My 3D Printing YouTube Channel
Better Living Through 3D Printing -
@blt3dp hello. So, entire config looks like this:
; General preferences
G90                                         ; Send absolute coordinates...
M83                                         ; ...but relative extruder moves
M665 L209.000 R91.5 H200 B100.0 X0 Y0 Z0.000                    ; Set delta radius, diagonal rod length, printable radius and homed height
M666 X0 Y0 Z0             ; Put your endstop adjustments here, or let auto calibration find them

; Network
M586 P0 S1                                  ; Enable HTTP
M586 P1 S0                                  ; Disable FTP
M586 P2 S0                                  ; Disable Telnet

; Drives
M569 P0 S1                                  ; Drive 0 goes forwards
M569 P1 S1                                  ; Drive 1 goes forwards
M569 P2 S1                                  ; Drive 2 goes forwards
M569 P3 S1                                  ; Drive 3 goes backwards WAS S0
M350 X64 Y64 Z64 E64 I1                     ; Configure microstepping with interpolation
M92 X1600.00 Y1600.00 Z1600.00 E1618.18;         ; Set steps per mm E was 400
M566 X1000.00 Y1000.00 Z1000.00 E3000.00    ; Set maximum instantaneous speed changes (mm/min)
M203 X9000.00 Y9000.00 Z9000.00 E6000.00    ; Set maximum speeds (mm/min) 3000
M201 X1000.00 Y1000.00 Z1000.00 E2500.00            ; Set accelerations (mm/s^2) 250
M906 X2000.00 Y2000.00 Z2000.00 E1500.00 I60 ; Set motor currents (mA) and motor idle factor in per cent
M572 D0 S0.11					; pressure advance
M84 S30                                     ; Set idle timeout

; Axis Limits
M208 Z0 S1                                  ; Set minimum Z

; Endstops
M574 X2 Y2 Z2 S1                               ; Set active high endstops

; Z-Probe
M558 P1 H5 I1 R0.4 F300 T6000                       ; P1, Set Z probe type to unmodulated and the dive height + speeds
G31 Z-0.18 P600              ; Set Z probe trigger value, offset and trigger height
M557 R30 S9                                 ; Define mesh grid

; Heaters
; NEW? B3950
; OLD B4138
M305 P0 T100000 B4138 R4700                 ; Set thermistor + ADC parameters for heater 0
M143 H0 S120                                ; Set temperature limit for heater 0 to 120C
M305 P1 T100000 B3950 R4700                 ; Set thermistor + ADC parameters for heater 1
M143 H1 S280                                ; Set temperature limit for heater 1 to 280C

; Fans
M106 P0 S0.3 I0 F500 H-1                    ; Set fan 0 value, PWM signal inversion and frequency. Thermostatic control is turned off
M106 P1 S1 I0 F500 H1 T45                   ; Set fan 1 value, PWM signal inversion and frequency. Thermostatic control is turned on

; Tools
M563 P0 D0 H1 F2                               ; Define tool 0
G10 P0 X0 Y0 Z0                             ; Set tool 0 axis offsets
G10 P0 R0 S0                                ; Set initial tool 0 active and standby temperatures to 0C

; Automatic saving after power loss is not enabled

; Custom settings are not configured
M557 R60 S20 ; probe within a radius of 25mm from the centre with a mesh spacing of 20mm
M579 X1.007014028 Y1.01156531665572173 ; 1.02
;M915 X Y S40 F0 R2
M501
That's how printer looks like:
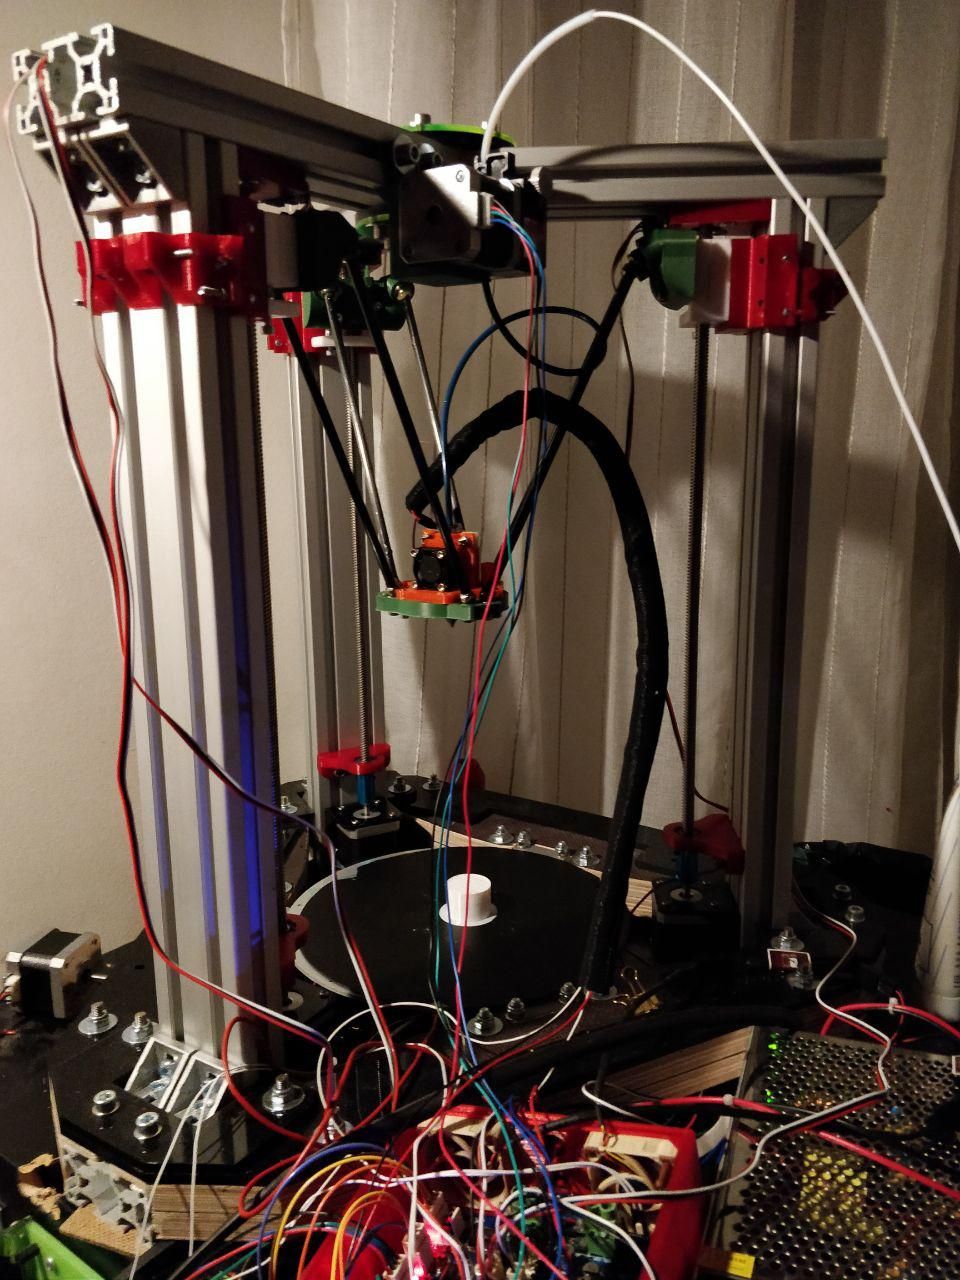
Those steps are set due to interpolation. I didn't find any difference between my current settings and 1/16 to be honest, so I decided to keep them as-is (torque is enough in both cases).Motors are 1.8 degrees 2.5A Nema17, effector and so on is self-designed (this printer is 4 generation so I support some legacy parts there), arm distance is also custom due to my stupidity during initial design.
About cylinder g-code: I have created it using S3D and inserted PA commands before each line:
; layer 100, Z = 20.000
M572 D0:1 S0.297
; feature outer perimeter
G1 Z20.000 F1002
G1 X10.155 Y10.711 F9000
...
I suspect that PA definition in config.g could deny setting the custom PA after but it is anyway high enough for my Bowden tube
-
@skayred said in Pressure advance doesn't affect the printed model:
I suspect that PA definition in config.g could deny setting the custom PA after but it is anyway high enough for my Bowden tube
have you considered that your PA is simply not high enough?
I have had filaments that needed 0.68 with a short 100mm bowden tube, and some that needed 1.0 for a 300 mm bowden tube.
Please try setting it at 0.8 or 1.0 and see what results you get. If the print looks different then you know that PA is definitely working and you just didnt set your settings correctly. -
@NitroFreak will try on the weekend. I didn't try it before due to recommendation in the docs (~0.2 for long Bowden and ~0.1 for 400mm). And filament is PETG from DevilDesign if it matters.
-
@skayred said in Pressure advance doesn't affect the printed model:
@NitroFreak will try on the weekend. I didn't try it before due to recommendation in the docs (~0.2 for long Bowden and ~0.1 for 400mm). And filament is PETG from DevilDesign if it matters.
Yes that documentation needs to be changed ASAP, i dont know how many people already did that mistake.
dc42 did the documentation based on his findings of needing 0.1 for a titan aero; however that one does have an extremely short filament path, and the length of the filament path is directly, loosely linearly related to the amount of pressure advance needed.Your safest bet is to do a Pressure Advance calibration based on this thread,
https://forum.duet3d.com/topic/6698/pressure-advance-calibration
But do it from 0.0 to 1.0.
That way you will get the best result. -
@NitroFreak okay, will try to do. And by the way, I tried to run the gcode generated by the provided script but Duet returns tons of errors and eventually hangs, that's why I insert the commands manually.
-
@skayred said in Pressure advance doesn't affect the printed model:
@NitroFreak okay, will try to do. And by the way, I tried to run the gcode generated by the provided script but Duet returns tons of errors and eventually hangs, that's why I insert the commands manually.
It´s all explained in the thread, you have to use the start and end gcode from another program to set the temperatures etc. otherwise you will get errors. Also you have to make sure that the script doesnt return gcode that sends the print head out of bounds. Best use a slicer to visualize the gcode that the script produced.
-
@NitroFreak well I did use start and end. Interpretation fails on the actual printing code, I suspect, due to Win line endings, but it doesn't really matter as I have own testing model
-
@skayred said in Pressure advance doesn't affect the printed model:
could it be the problem, that I have the wrong version that just doesn't support PA?
No, it should be supported regardless.
Setting pressure advance in config.g and then sending a new command later is fine. The most recent command will take over. When changing PA on the fly there may be a brief pause at the next segment. You can send M572 D0 in the console to get a read back of the currently set value if you want to verify that it's set.
M350 X64 Y64 Z64 E64 I1
Interpolation to x256 microstepping only works when using x16 microsteps on the Duet Wifi. You'll likely notice quieter operation if you switch back to x16 with interpolation. The other benefit is lower overhead on the CPU which could lead to missed steps on high speed moves. You can check if this is effecting you by sending M122 in the console and looking for the hiccup count.
I suggest pushing further with your speed testing and increasing the PA value.
-
So, I made a g-code with PA from 0 to 1, and it finally shows some difference. But my PA should be set to:
M572 D0:1 S0.64So, do I have to worry about such a high value or it is normal?
-
@skayred said in Pressure advance doesn't affect the printed model:
So, do I have to worry about such a high value or it is normal?
Based on your testing it's normal for you. Only way to be sure it to do some more testing of actual models and watch for anomalies.
-
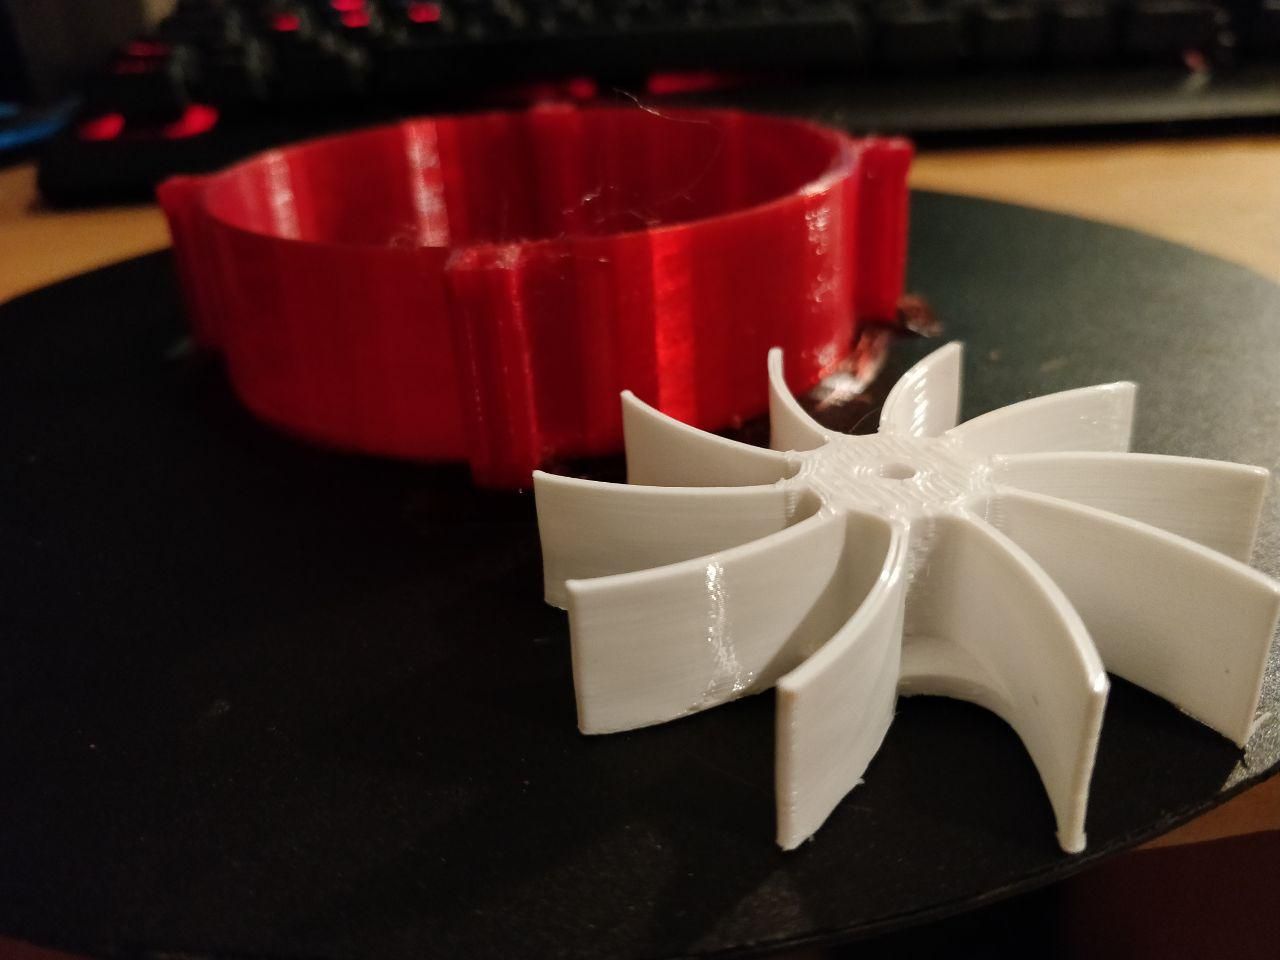
@Phaedrux will try to print the propeller because why not
")
-
Thank you, guys!
The propeller was printed perfectly, with no stringing and blobs so I can fit it to the shaft, finally! -
@skayred said in Pressure advance doesn't affect the printed model:
Thank you, guys!
The propeller was printed perfectly, with no stringing and blobs so I can fit it to the shaft, finally!Great! Photo?
Duet WiFi hardware designer and firmware engineer
Please do not ask me for Duet support via PM or email, use the forum
http://www.escher3d.com, https://miscsolutions.wordpress.com -
@dc42 Can you edit the documentation to say that values of higher than 0.2 is very normal and maybe necessary for bowden setups? I even have some PC filaments that needed 0.68 for a 100mm direct drive setup.
What I have found is that the PA necessary is linearly related to the length of filament between the drive gears and the heat break. I needed pretty much exactly 1/5th the PA when i switched from a 100mm bowden to a 20mm direct drive.
This will reduce confusion with future users. -
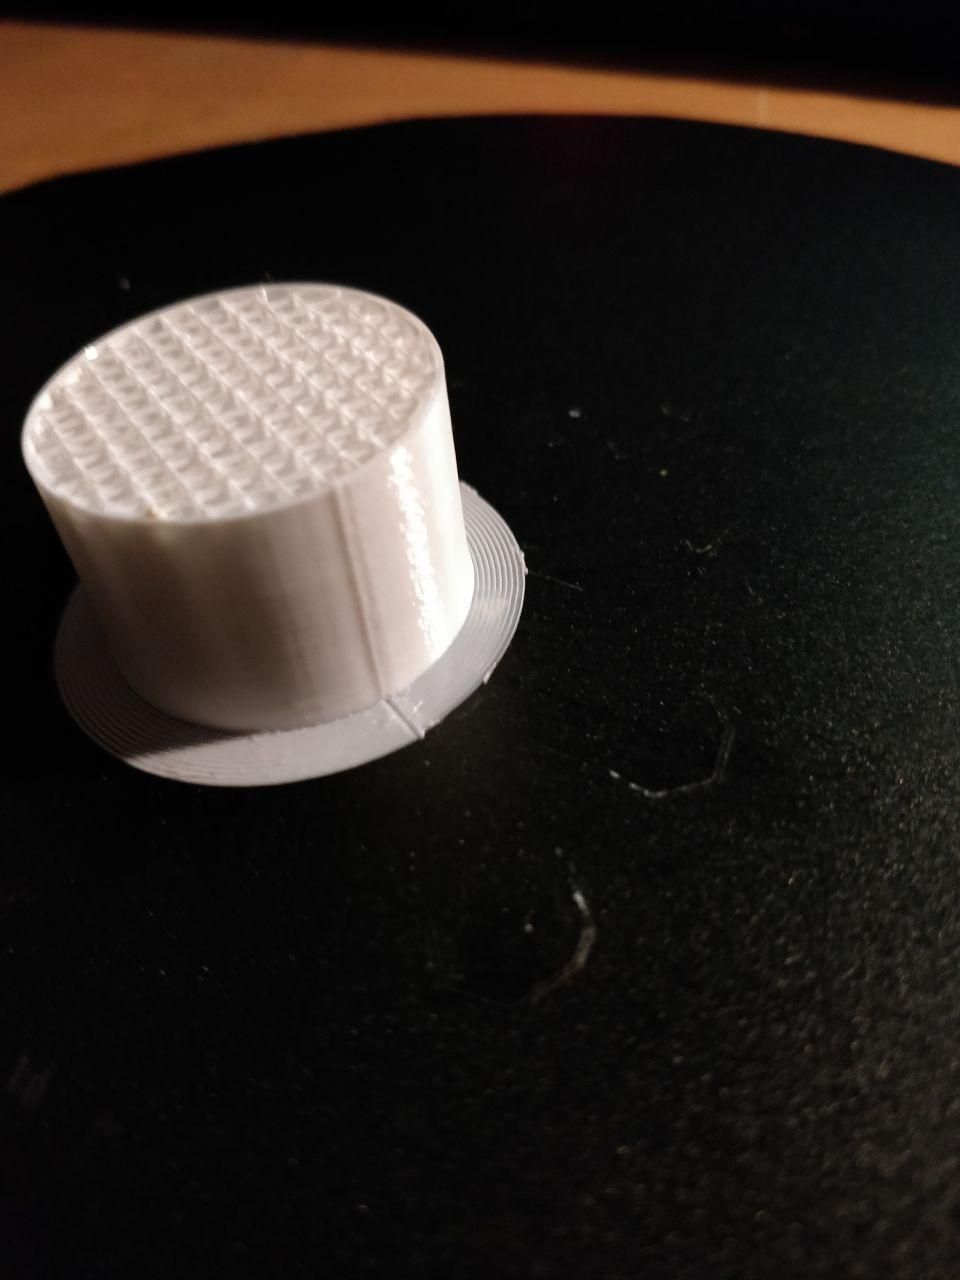
@dc42 hello,
now it looks like this:
This is the propeller side with most retractions between wings. Not really invisible but good enough for me. I think I will need to experiment with retractions but the generally proper value of PA makes everything better.
But, as was said there, documentation is really confusing, I was not even trying to make PA much higher than recommended. -
@NitroFreak said in Pressure advance doesn't affect the printed model:
@dc42 Can you edit the documentation to say that values of higher than 0.2 is very normal and maybe necessary for bowden setups? I even have some PC filaments that needed 0.68 for a 100mm direct drive setup.
What I have found is that the PA necessary is linearly related to the length of filament between the drive gears and the heat break. I needed pretty much exactly 1/5th the PA when i switched from a 100mm bowden to a 20mm direct drive.
This will reduce confusion with future users.Yes I can update the documentation.
-
@NitroFreak I've made some changes to flesh out the documentation a bit. https://duet3d.dozuki.com/Wiki/Pressure_advance any feedback welcome.
-
The PA test procedure with the large cylinder is very interesting. I will give it a try. Possibly it can even be automated with slicer gcode conditions similar the to ones used for heat towers.
{if layer_z==1.6}
; T tower floor 1
M104 S225
{elsif layer_z==11.6}
; T tower floor 2
M104 S220
...
{endif}