Duet3D Logo Duet3D
    • Tags
    • Documentation
    • Order
    • Register
    • Login

    Blobs with PA and w/o

    Scheduled Pinned Locked Moved
    Tuning and tweaking
    6
    27
    1.7k
    Loading More Posts
    • Oldest to Newest
    • Newest to Oldest
    • Most Votes
    Reply
    • Reply as topic
    Log in to reply
    This topic has been deleted. Only users with topic management privileges can see it.
    • felt342undefined
      felt342 @Veti
      last edited by

      @Veti
      There is it, looks the same to me.

      IMG_5824.jpeg

      Industrial 3D printing service in the Netherlands - gagatstudio.com

      1 Reply Last reply Reply Quote 0
      • Vetiundefined
        Veti
        last edited by

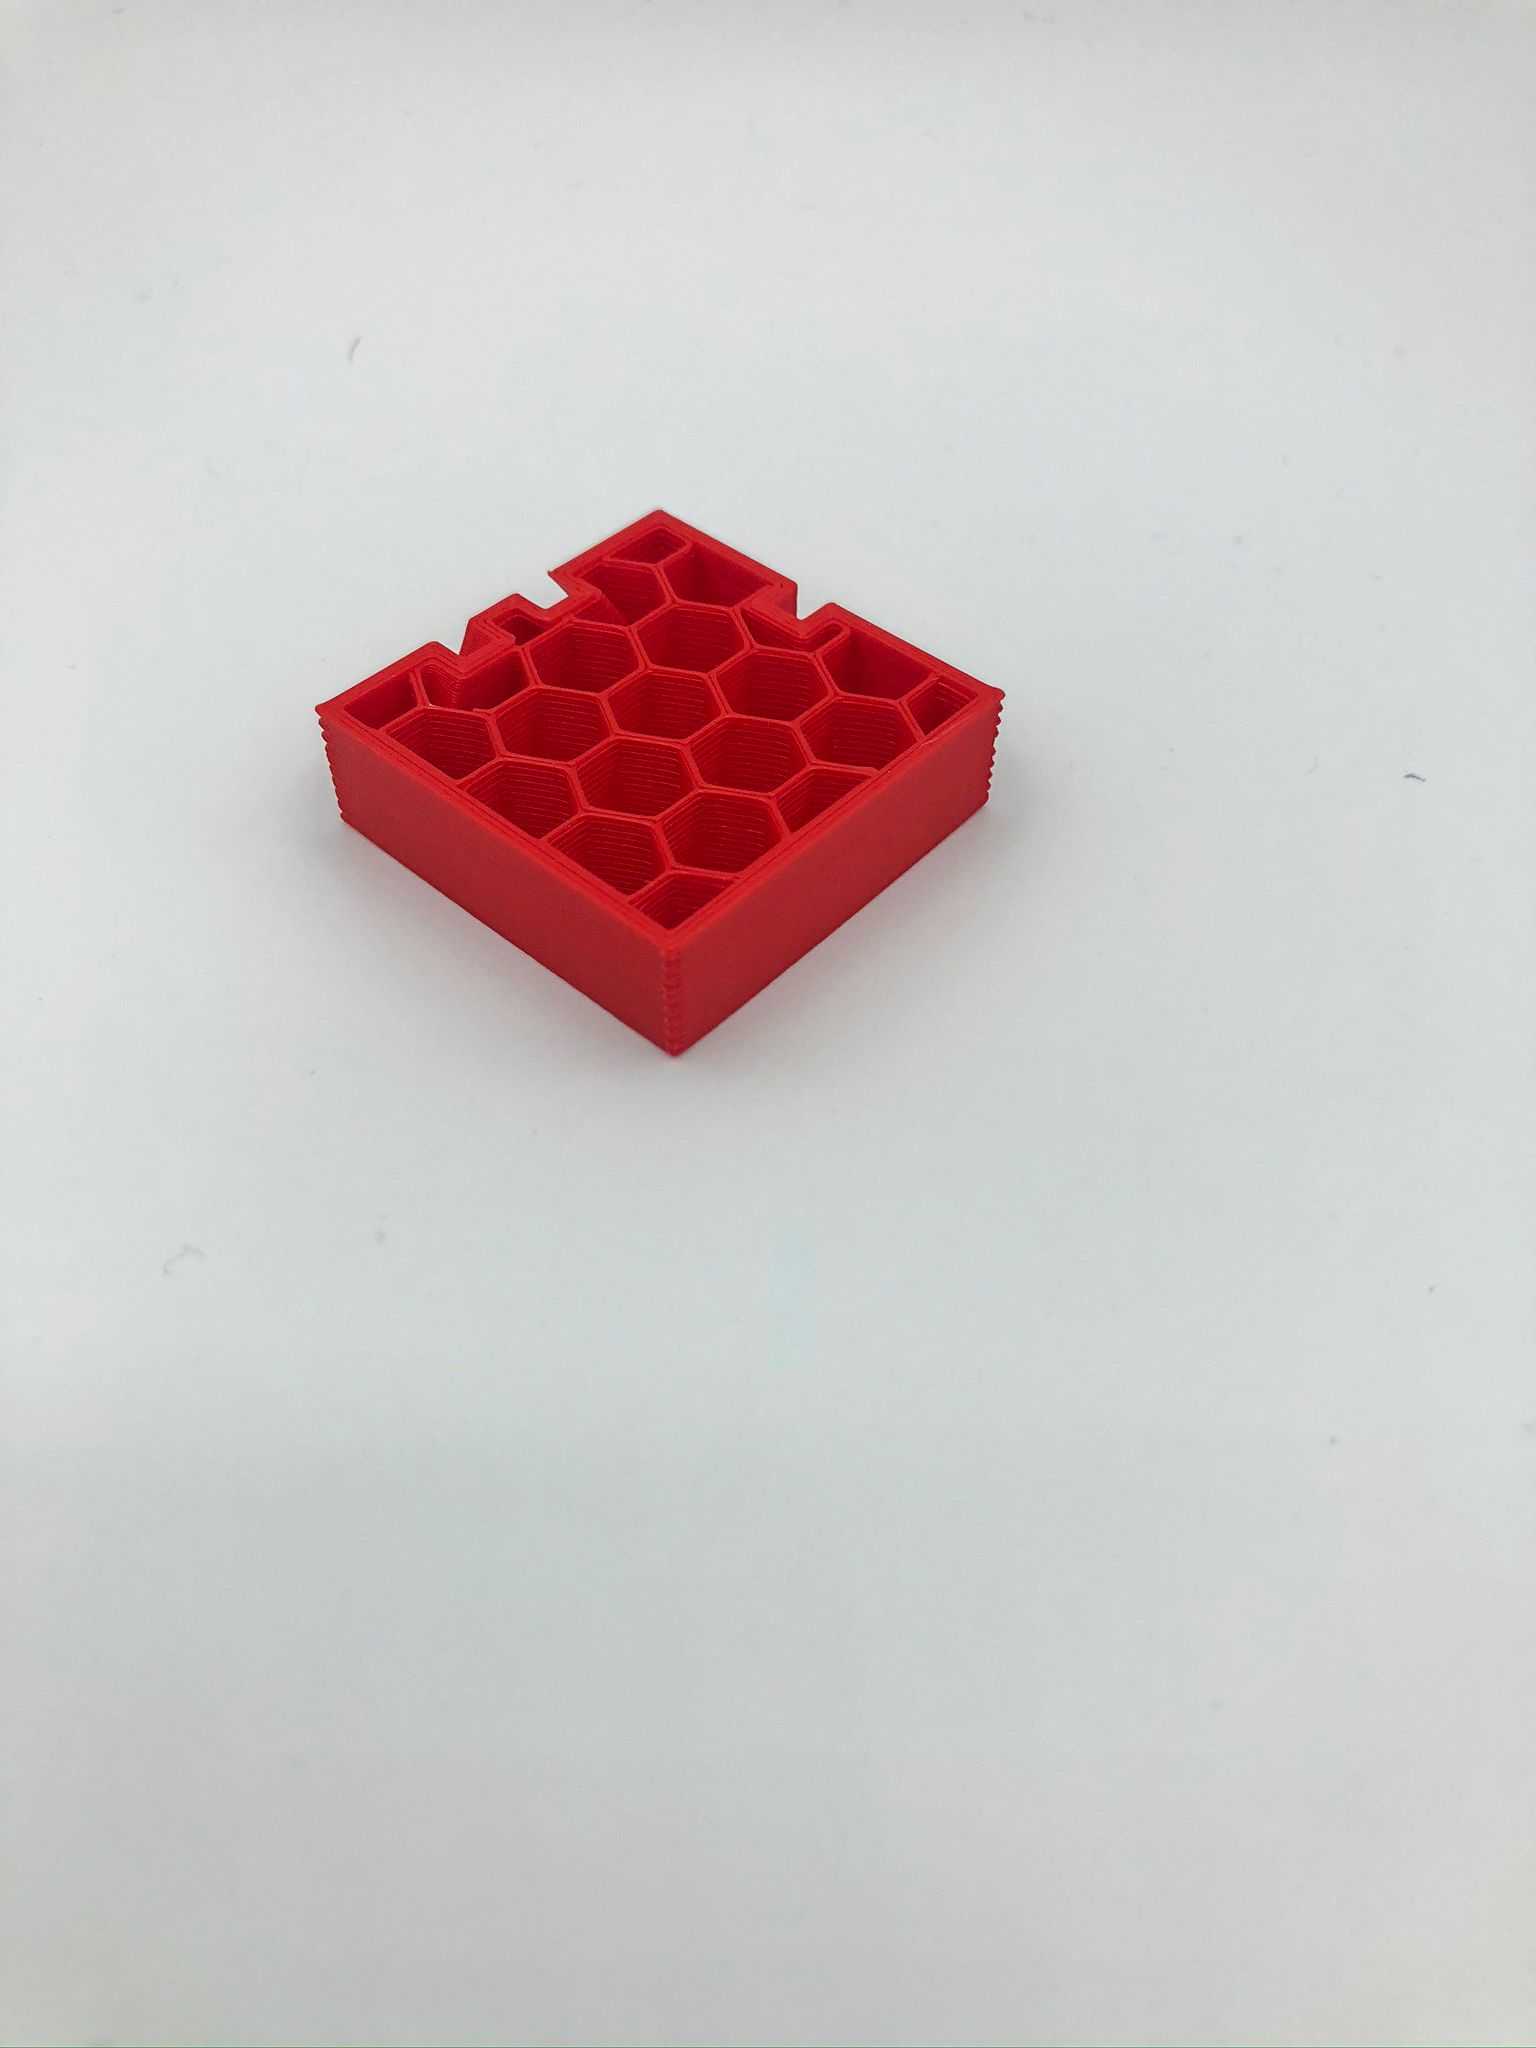
        does the printhead spend a lot of time in those corners?

        felt342undefined 1 Reply Last reply Reply Quote 0
        • Vetiundefined
          Veti
          last edited by

          and to rule out the slicer. can you test with a different slicer. i.e prusaslicer or cura.

          felt342undefined 1 Reply Last reply Reply Quote 0
          • felt342undefined
            felt342 @Veti
            last edited by

            @Veti

            No, It was before until I crank up acceleration and jerk for a extruder. Than it’s start moving instantly but those corners still left. Shall I make a small video?

            Industrial 3D printing service in the Netherlands - gagatstudio.com

            1 Reply Last reply Reply Quote 0
            • felt342undefined
              felt342 @Veti
              last edited by

              @Veti

              Ok I will try Cura!

              Industrial 3D printing service in the Netherlands - gagatstudio.com

              1 Reply Last reply Reply Quote 0
              • felt342undefined
                felt342
                last edited by

                @Veti

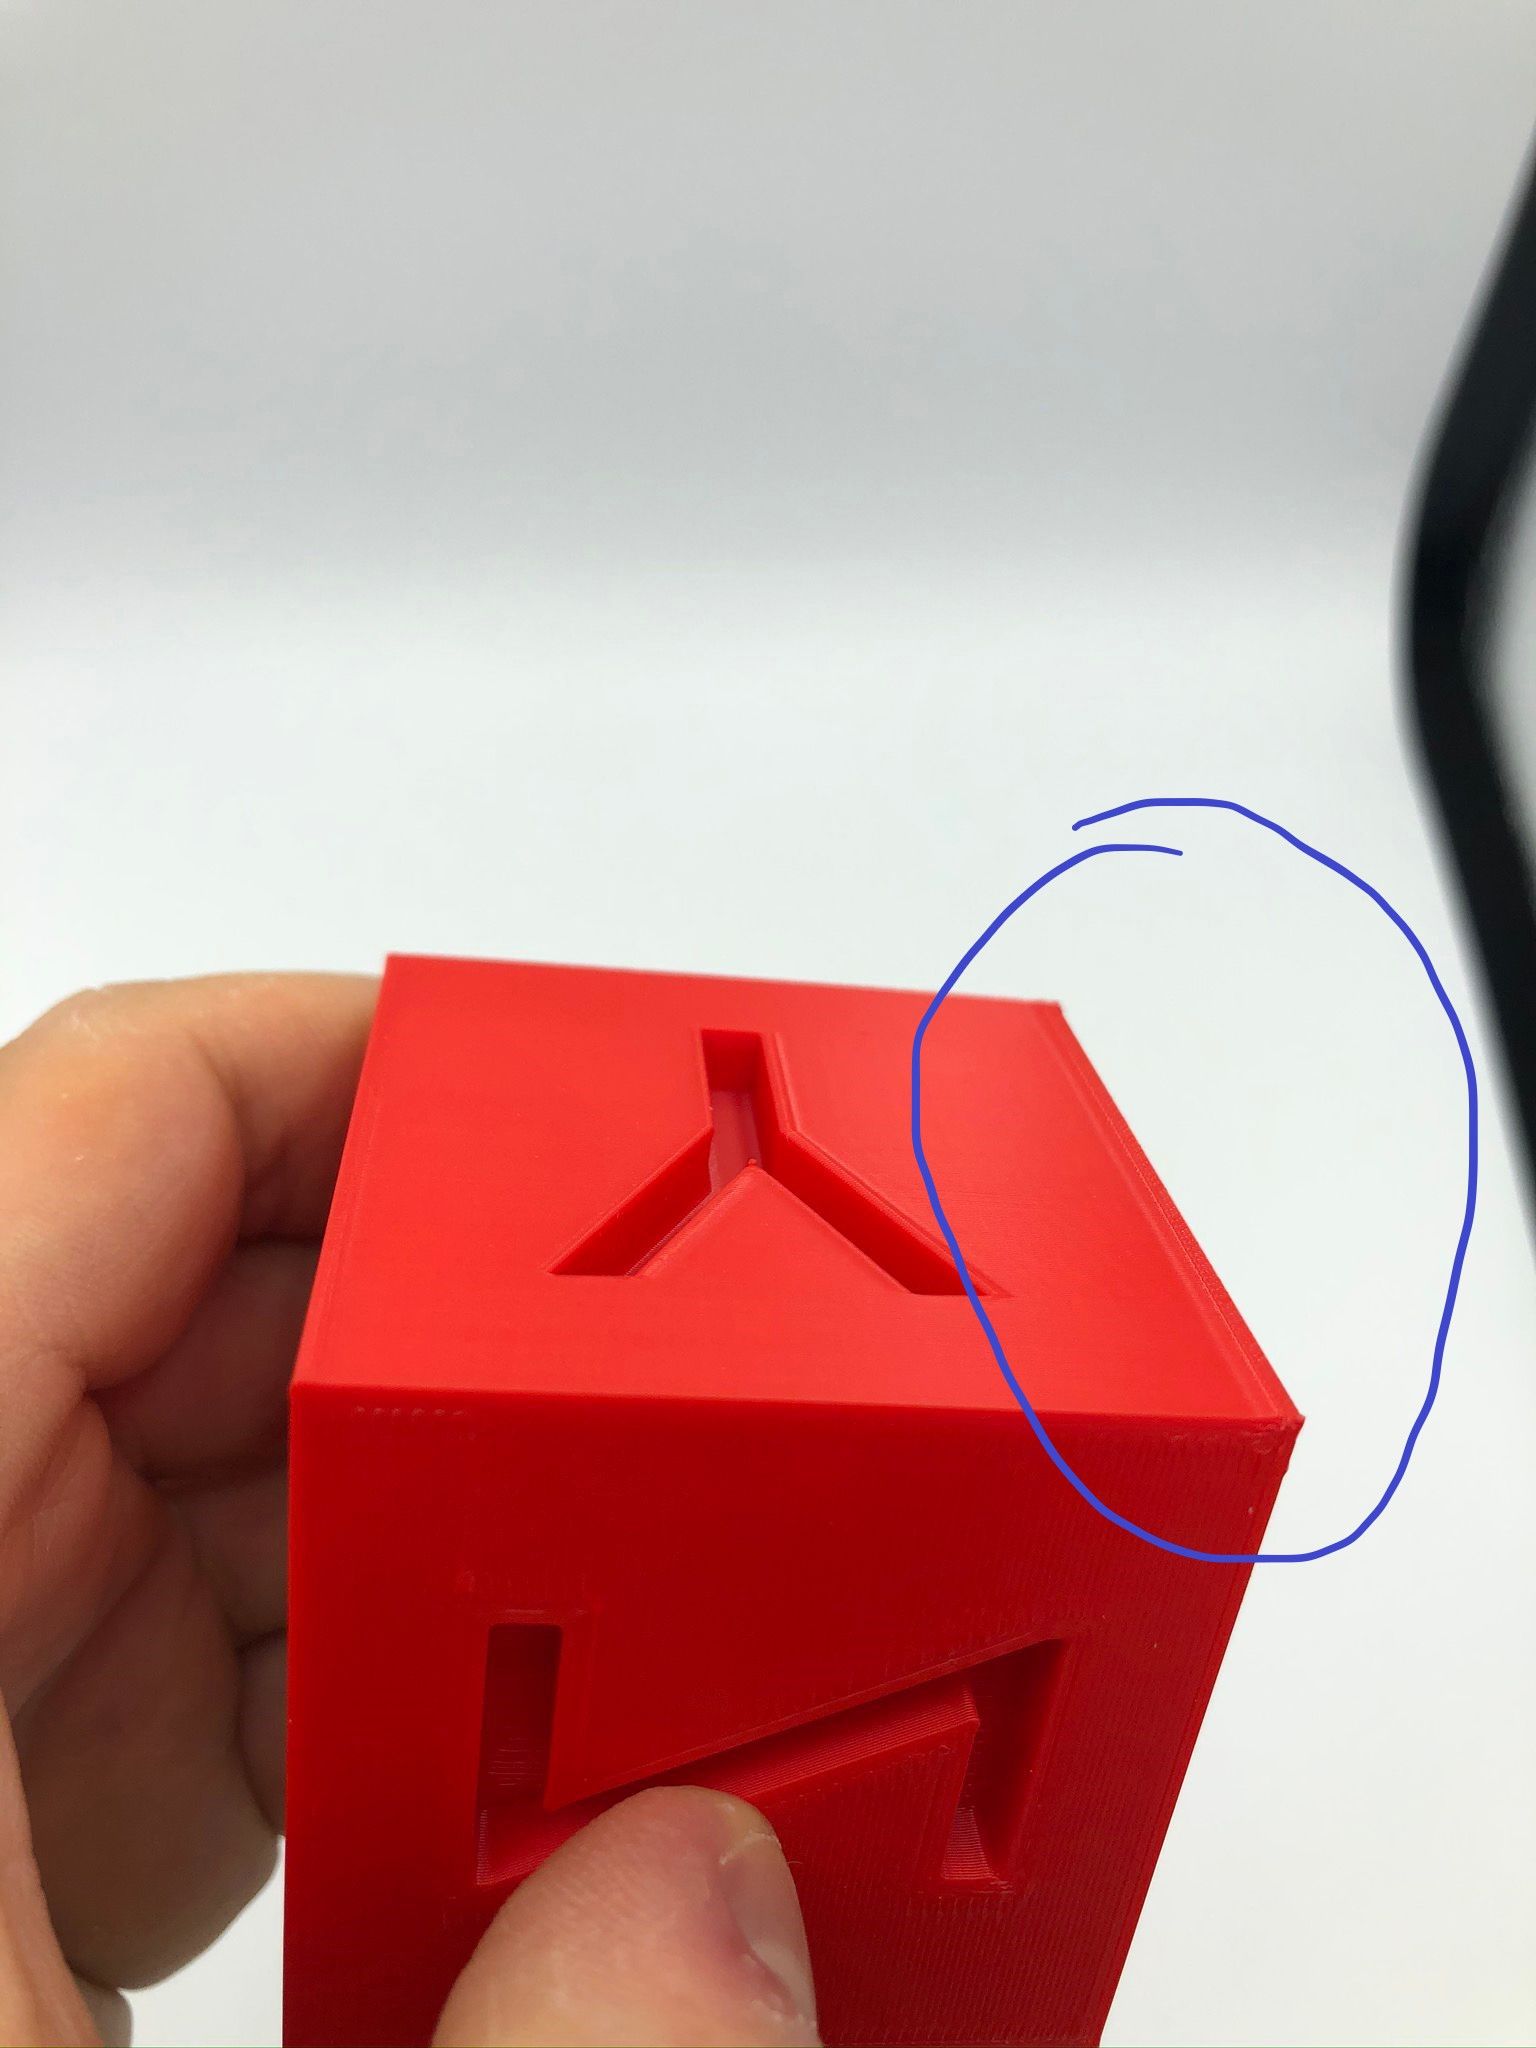
                I did try Cura, was looking the same to me. I switched to Simplify3D back as I am familiar with it. I did turn off retraction completely and PA. Was a lot of oozing but had minimal blobs. Tune retraction to 3.0mm extra restart distance of -0.2 and PA 0.45 lead to those results, which is finally a progress, blobs are getting much less visible, but still there - I guess tweaking retractions and PA next? I have been a bit surprised how it was possible with such a long tube of 850mm to have 3mm retraction only.

                There is a couple of images: first, around 20 layers was without PA just retraction of 3.mm. After PA was set to 0.45.

                IMG_5826.jpeg IMG_5825.jpeg

                Industrial 3D printing service in the Netherlands - gagatstudio.com

                1 Reply Last reply Reply Quote 0
                • Phaedruxundefined
                  Phaedrux Moderator @felt342
                  last edited by Phaedrux

                  @felt342 said in Blobs with PA and w/o:

                  I did try PA 0.25-0.8 with no luck. Bowden tube is 850mm.

                  You should try more PA with such a long bowden tube. Some people are using 1 or more.

                  https://duet3d.dozuki.com/Wiki/Pressure_advance#Section_How_much_pressure_advance_to_use

                  Use the test procedure described here to test values from 0.8 up to 1 and see if you can start to notice a difference. Disable wipe and coast when using pressure advance.

                  Z-Bot CoreXY Build | Thingiverse Profile

                  1 Reply Last reply Reply Quote 0
                  • felt342undefined
                    felt342
                    last edited by felt342

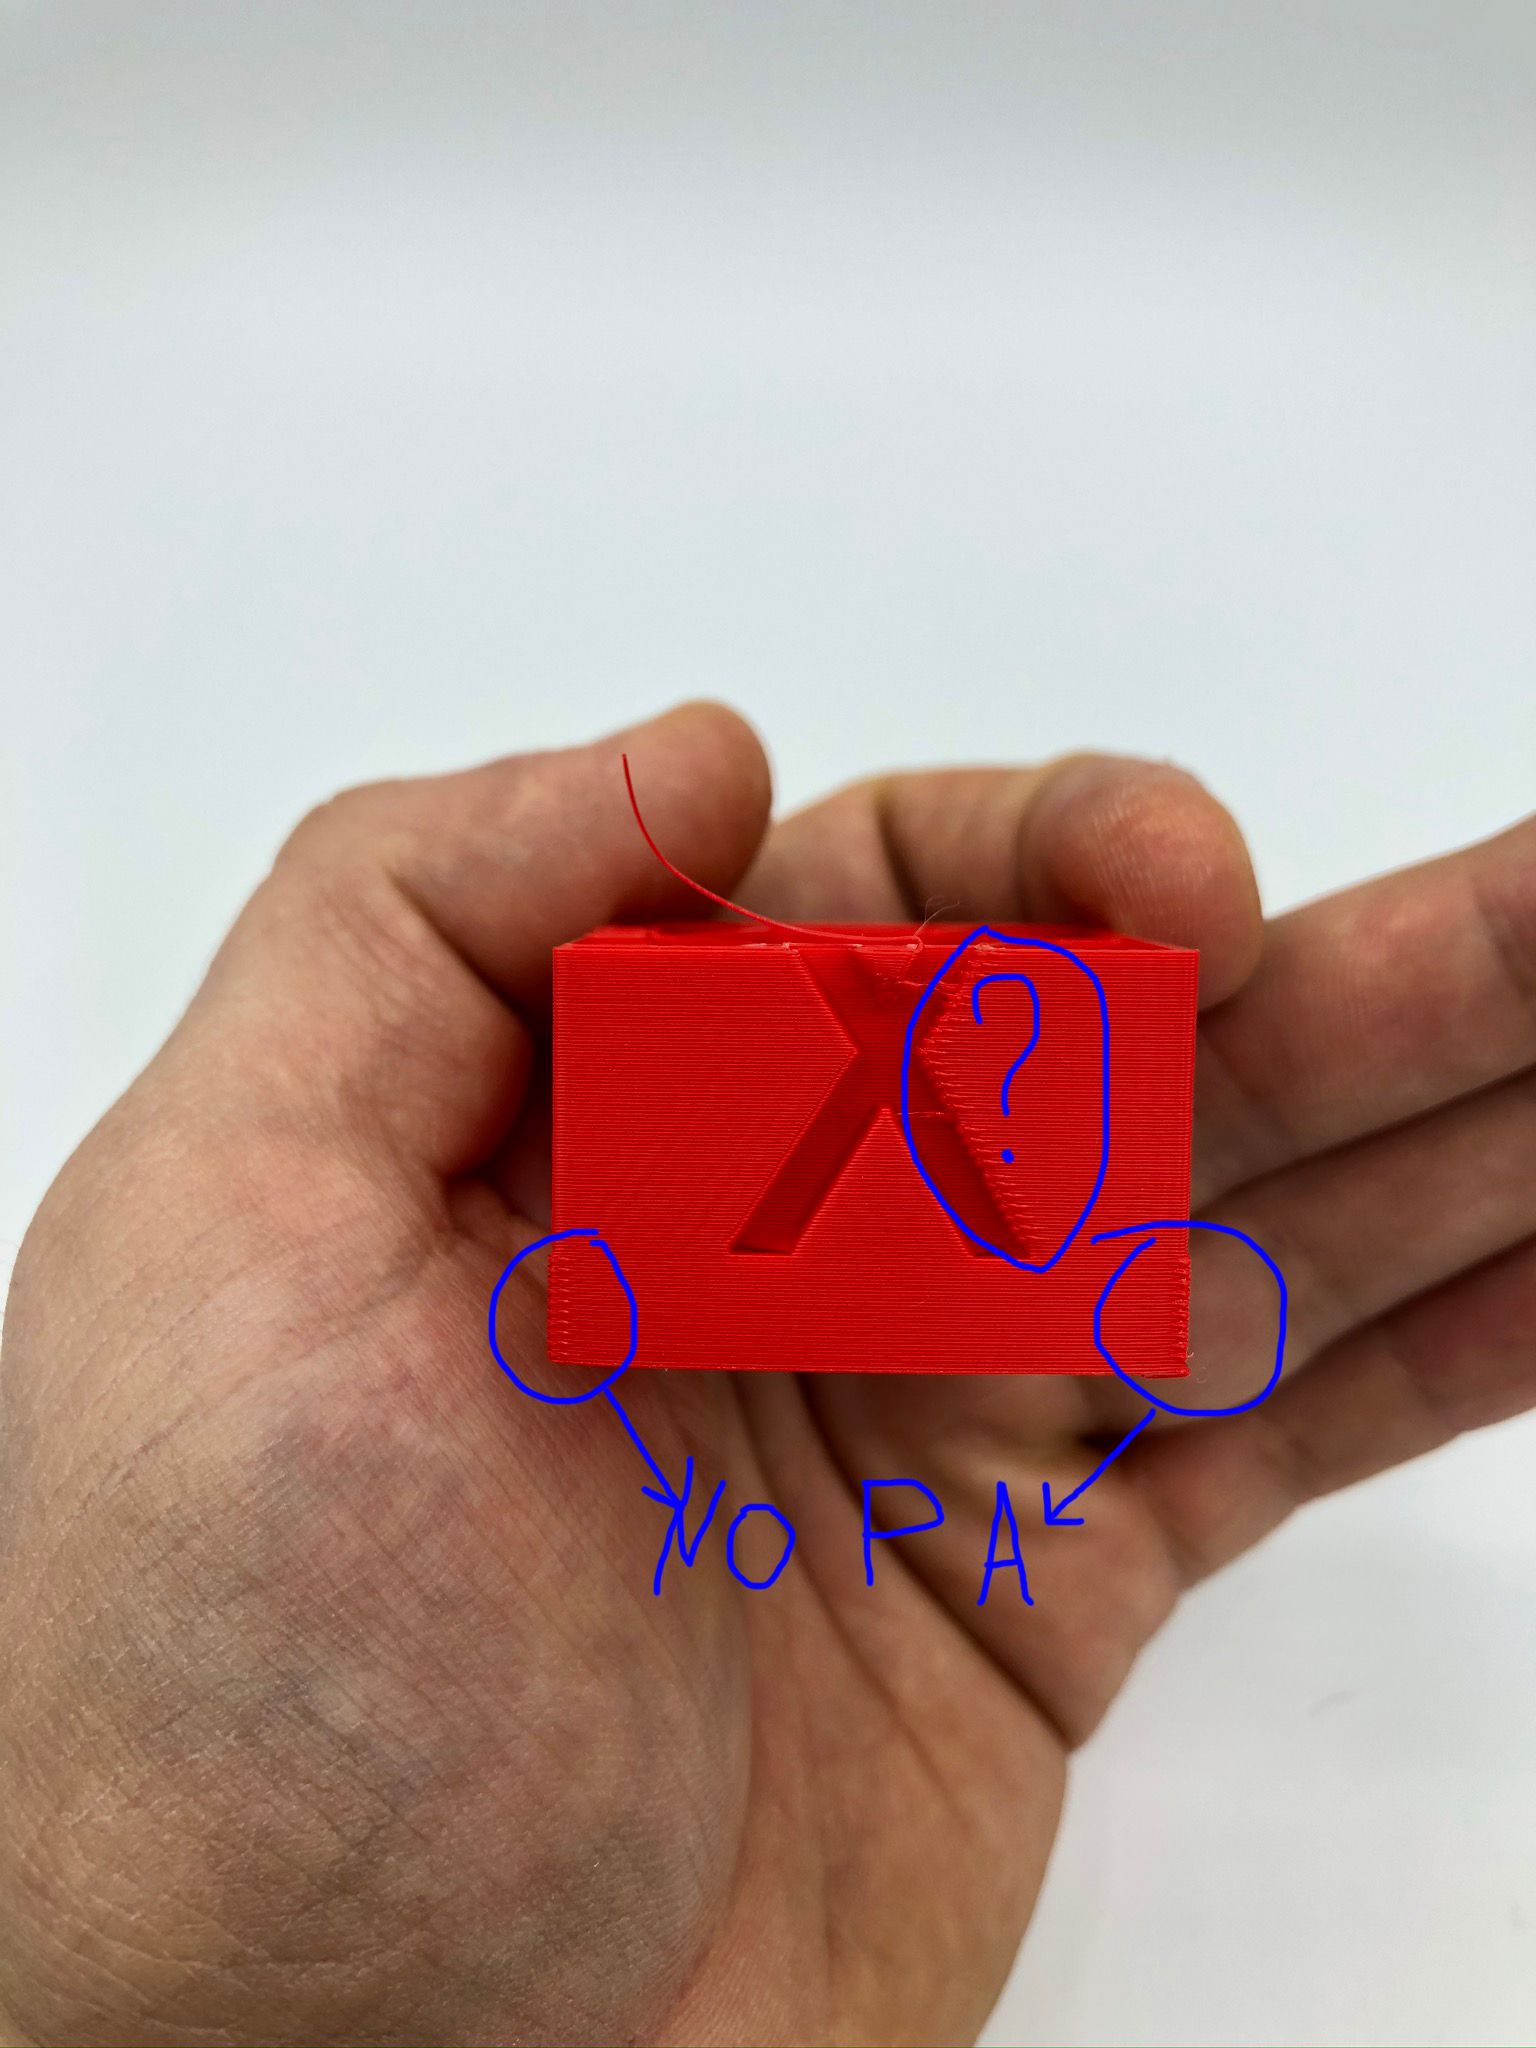
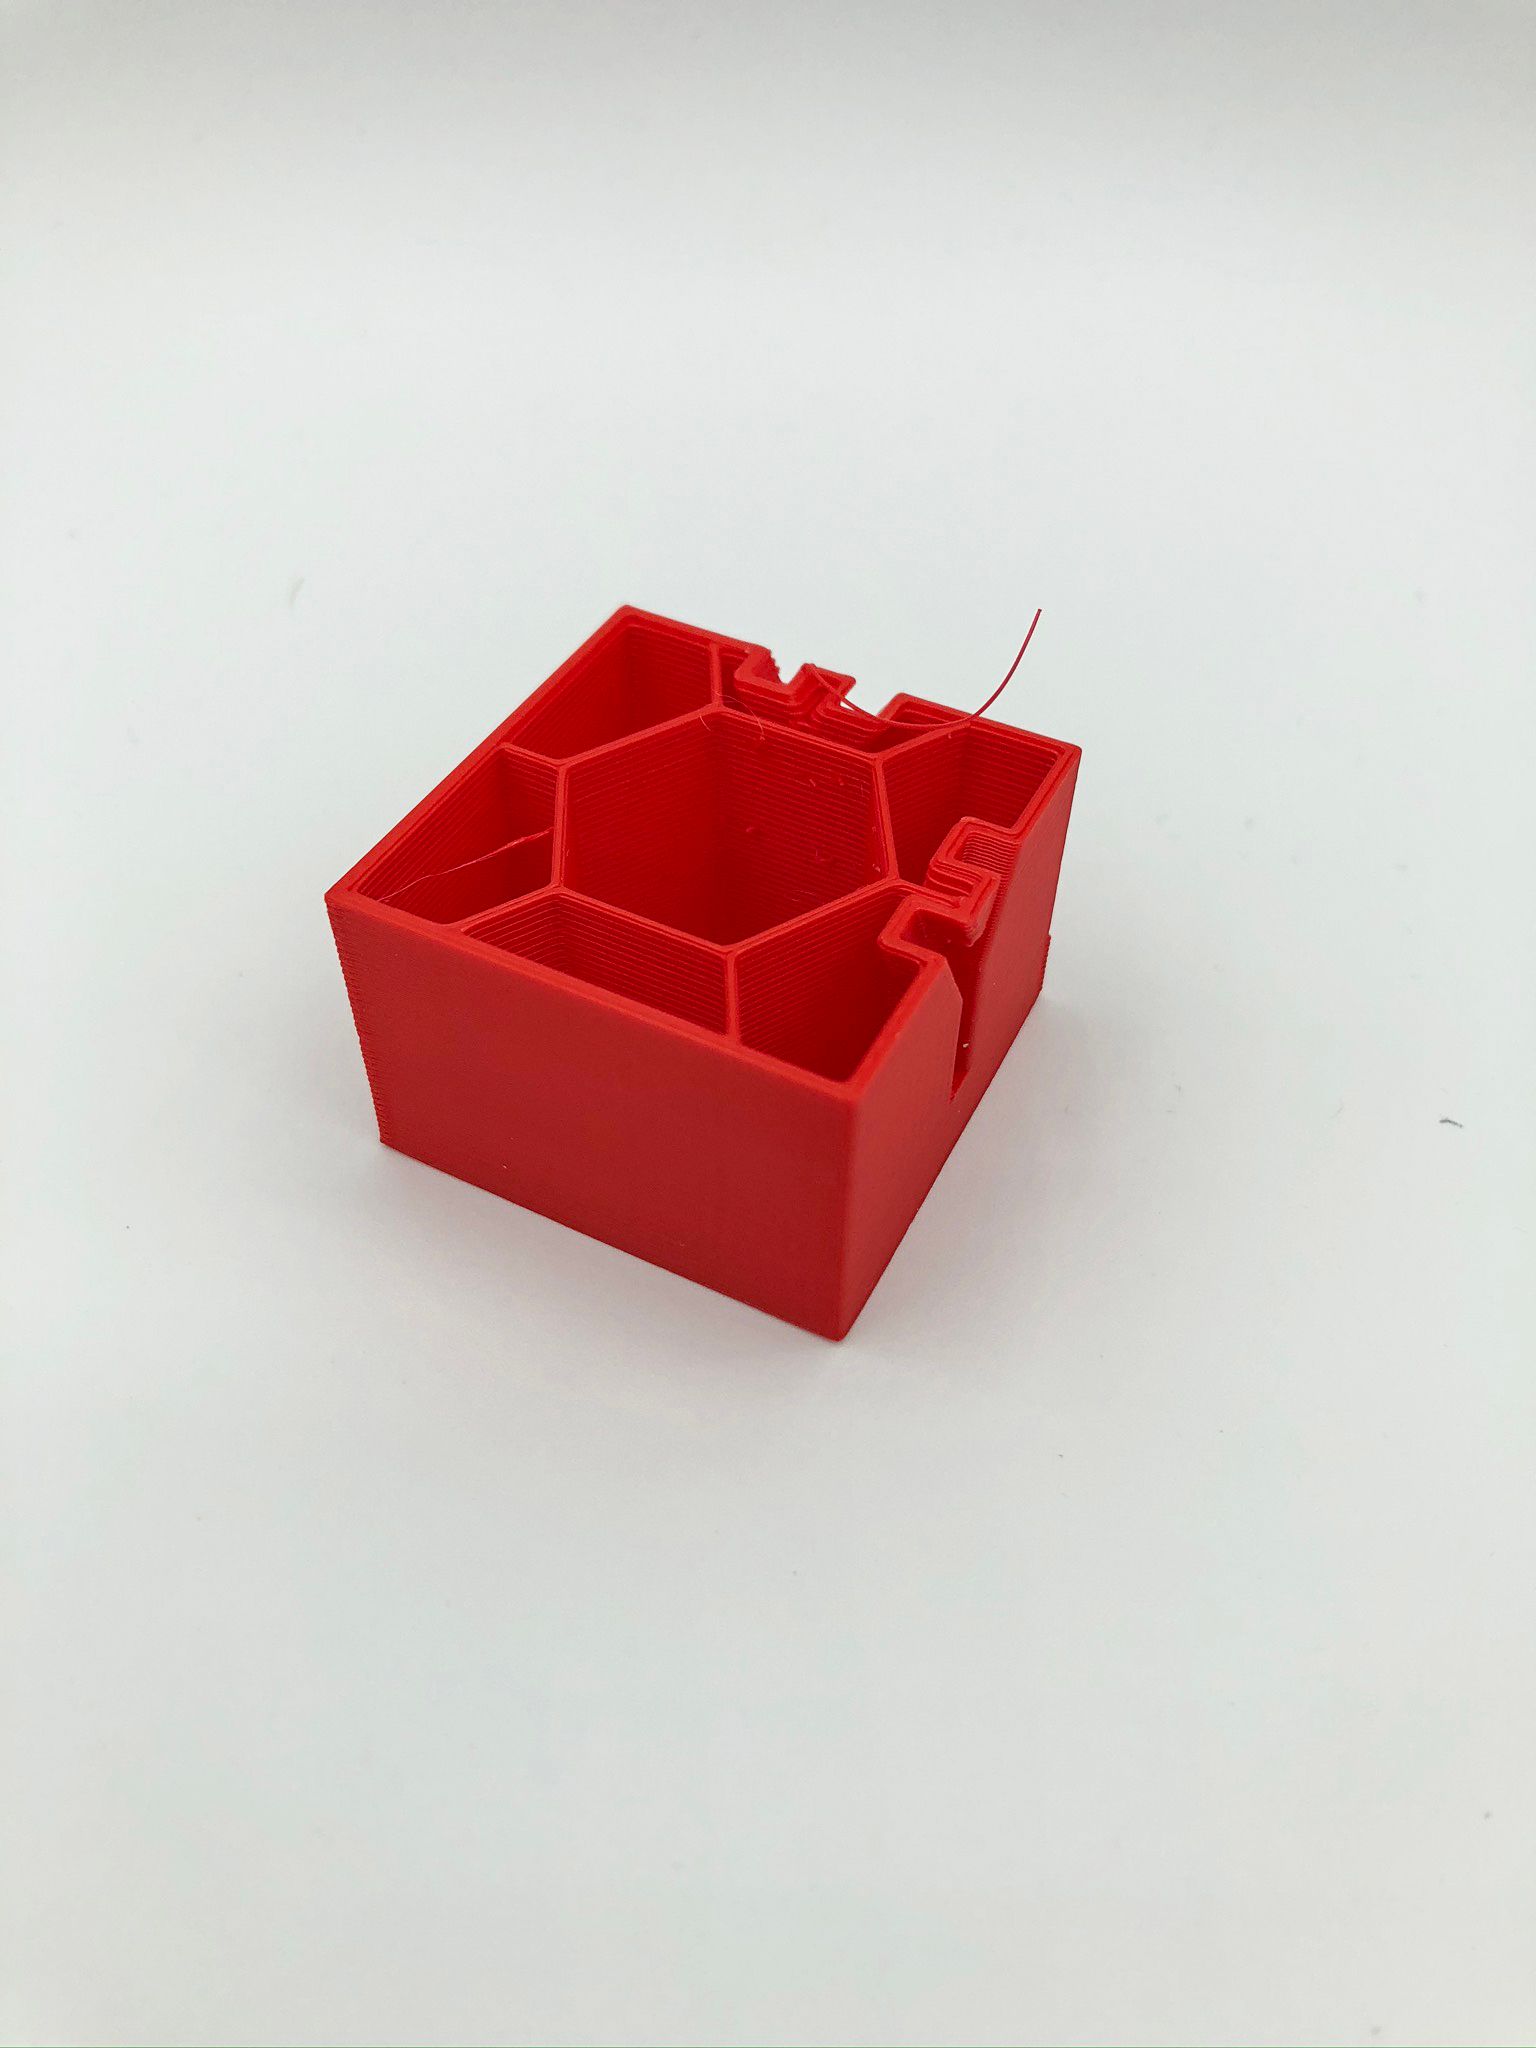
                    I did try out PA till 2.0 with 0.10 steps with wipe and coast disabled. I could not reach the desired effect and I could not see any difference higher than 0.7 to be honest. I turned off PA completely switched back to coast and wipe set in Simplify3D:

                    So far these settings gave me the best result - I would say almost perfect. I do have high-speed settings a bit- therefore there is ringing. Now it's a time to tweak it and hopefully not produce blobs again... πŸ™‚

                    M350 X16 Y16 Z16 E16:16 I1                      ; configure microstepping with interpolation
                    M92 X201.207 Y201.207 Z400.00 E415:415		; set steps per mm
                    M566 X2000 Y2000 Z350 E3000.00:3000.00      	; set maximum instantaneous speed changes (mm/min)
                    M203 X10000 Y10000.00 Z400 E10000.00:10000.00   ; set maximum speeds (mm/min)
                    M201 X900 Y900 Z600 E4000.00:4000.00      	; set accelerations (mm/s^2)
                    M906 X800 Y800 Z1300 E700:700 I30               ; set motor currents (mA) and motor idle factor in per cent
                    M84 S90                                         ; Set idle timeout
                    

                    Capture.JPG

                    IMG_5833.jpeg IMG_5834.jpeg IMG_5831.jpeg IMG_5832.jpeg

                    Industrial 3D printing service in the Netherlands - gagatstudio.com

                    1 Reply Last reply Reply Quote 0
                    • Phaedruxundefined
                      Phaedrux Moderator
                      last edited by

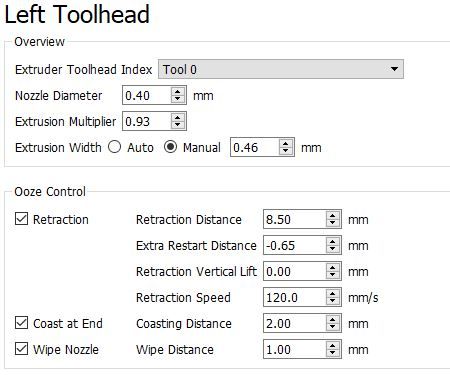
                      Good stuff. Very long bowden setups are hard to tune. That's looking quite good.

                      Z-Bot CoreXY Build | Thingiverse Profile

                      felt342undefined 2 Replies Last reply Reply Quote 1
                      • felt342undefined
                        felt342 @Phaedrux
                        last edited by

                        @Phaedrux

                        Yeah after reading a bunch of forums and blobs related issue I start to regret about using bowden, until now... will see, keep tweaking. Still thinking would be better to come back on using PA, just need more time for tweaking I guess.

                        Industrial 3D printing service in the Netherlands - gagatstudio.com

                        1 Reply Last reply Reply Quote 0
                        • felt342undefined
                          felt342 @Phaedrux
                          last edited by

                          @Phaedrux

                          My next problem appears to be - ringing!
                          I just changed my jerk and acceleration of XYZ back to more or less normal values from

                          M350 X16 Y16 Z16 E16:16 I1                      ; configure microstepping with interpolation
                          M92 X201.207 Y201.207 Z400.00 E415:415		; set steps per mm
                          M566 X2000 Y2000 Z350 E3000.00:3000.00      	; set maximum instantaneous speed changes (mm/min)
                          M203 X10000 Y10000.00 Z400 E10000.00:10000.00   ; set maximum speeds (mm/min)
                          M201 X900 Y900 Z600 E4000.00:4000.00      	; set accelerations (mm/s^2)
                          M906 X800 Y800 Z1300 E700:700 I30               ; set motor currents (mA) and motor idle factor in per cent
                          M84 S90                                         ; Set idle timeout
                          

                          to

                          M92 X201.207 Y201.207 Z400.00 E415:415		; set steps per mm
                          M566 X700 Y700 Z250 E3000.00:3000.00      	; set maximum instantaneous speed changes (mm/min)
                          M203 X10000 Y10000.00 Z300 E10000.00:10000.00   ; set maximum speeds (mm/min)
                          M201 X800 Y800 Z400 E4000.00:4000.00      	; set accelerations (mm/s^2)
                          M906 X800 Y800 Z1300 E700:700 I30               ; set motor currents (mA) and motor idle factor in per cent
                          M84 S90                                         ; Set idle timeout
                          

                          And got this huge ringing effect, is that normal? I would prefer to use lower values of jerk/acceleration, as my printer works quiter with those values. Does it mean what higher jerk can solve some of ring effects?

                          IMG_5839.jpeg

                          Industrial 3D printing service in the Netherlands - gagatstudio.com

                          1 Reply Last reply Reply Quote 0
                          • DocTruckerundefined
                            DocTrucker
                            last edited by DocTrucker

                            Have a read up on Dynamic Acceleration Adjustment, or DAA for short. Do a search for that in the duet gcode wiki. It helped my machines.

                            Edit: https://duet3d.dozuki.com/Wiki/Gcode#Section_M593_Configure_Dynamic_Acceleration_Adjustment

                            Running 3 P3Steel with Duet 2. Duet 3 on the shelf looking for a suitable machine. One first generation Duet in a Logo/Turtle style robot!

                            felt342undefined 1 Reply Last reply Reply Quote 1
                            • felt342undefined
                              felt342 @DocTrucker
                              last edited by

                              @DocTrucker

                              Thats a lot looks promising. I will give an try tomorrow after work.
                              Really surprised how many cool features those Duet boards have...!

                              Industrial 3D printing service in the Netherlands - gagatstudio.com

                              1 Reply Last reply Reply Quote 0
                              • grizewaldundefined
                                grizewald
                                last edited by

                                @felt342 That's a very impressive tune for such a long Bowden tube. I gave up trying to get such a long tube to work on my CoreXY and converted it to direct drive instead.

                                It wasn't that I couldn't get the machine to print nice cubes (and without the warping you have on the bottom of yours), but what worked for one print wouldn't work for the next one.

                                Direct drive fixed all that and made the printer much more consistent.

                                Ringing is fixed in two ways: slow down or stiffen up!

                                If there is a resonance problem, DAA can fix that. If there are other problems with the mechanics or simply exceeding the acceleration that the frame can tolerate, then DAA will not help you.

                                If slowing down doesn't cure the problem, then you need to look hard at the motion system.

                                If it helps, these are my settings for the motion system from my V-Core CoreXY. It can print close to 300x300x300mm and runs on 24V with beefy 2A 4.8Kg/cm NEMA17 stepper motors which drive 9mm wide belts.

                                The theoretical maximums were calculated using wilriker's Maximun Accelleration calculator and other calculators available at reprapfirmware.org and reprap.org

                                ; Motion settings
                                ;
                                ; The V-Core is theoretically capable of the following settings:
                                ; M566 X1200.00 Y1200.00 Z100.00 E3600.00     ; Maximum instantaneous speed changes (mm/min)
                                ; M203 X18000.00 Y18000.00 Z600.00 E3600.00   ; Maximum speeds (mm/min)
                                ; M201 X5800.00 Y5800.00 Z180.00 E3600.00     ; Maximum accelerations (mm/s^2) for X and Y. Z and E are best guesses
                                
                                M566 X600.00 Y600.00 Z100.00 E3600.00       ; Set maximum instantaneous speed changes (mm/min)
                                M203 X18000.00 Y18000.00 Z600.00 E3600.00   ; Set maximum speeds (mm/min)
                                M201 X600.00 Y600.00 Z180.00 E3600.00       ; Set accelerations (mm/s^2)
                                M906 X1600.00 Y1600.00 Z1800.00 E595.00 I30 ; Set motor currents (mA) and motor idle factor as percentage of normal current
                                

                                My print speeds are dynamic and depend on things like if the printer is printing infill, outer perimeters or bridges. Print speeds range from 30 - 100mm/s with travel moves at 200mm/s. I use Prusa Slicer and take advantage of the volumetric speed limit to restrict the maximum volumetric speed when slicing to what I know the particular filament is capable of. I find this gives me much more consistent dimensions and interlayer adhesion.

                                felt342undefined 1 Reply Last reply Reply Quote 2
                                • grizewaldundefined
                                  grizewald
                                  last edited by

                                  Forgot one thing,

                                  With direct drive, I use a PA setting of 0.06 with a 0.4mm nozzle and 0.03 for a 0.5mm nozzle.

                                  1 Reply Last reply Reply Quote 0
                                  • DocTruckerundefined
                                    DocTrucker
                                    last edited by

                                    Regards DAA this was the level of improvement I saw. My initial issue wasn't as defined as yours and to be hones the mechanics of your system appear better dialled in. DAA on the left, not on the right.

                                    DSC_1225_red.JPG

                                    Super rigid is thought of as the ideal, but compliance can often smooth over underlying issues. I've had frustrations where the better I've made my system in comparison to my original Ormerod (which is still running) the worse (or more pronounced) some surface artefacts have become.

                                    Direct Drive, PLA, 210C:
                                    Pressure Advance: 0.044

                                    Similar setup 300mm bowden:
                                    Pressure advance: 0.4

                                    Running 3 P3Steel with Duet 2. Duet 3 on the shelf looking for a suitable machine. One first generation Duet in a Logo/Turtle style robot!

                                    1 Reply Last reply Reply Quote 0
                                    • felt342undefined
                                      felt342 @grizewald
                                      last edited by

                                      @grizewald

                                      Thanks for sharing!
                                      I did fix ringing seems, for now - I had loose belt... πŸ˜„ I don`t know what happened but might be I should put some Loctite on screws what holds belts...
                                      I also found a way to shorten my bowden tube by around 10cm. But would be surer on the last stage of assembling the printer.
                                      Mine jerk and acceleration values are very close to yours - but thinking of tweaking them a bit higher. However, I can't lower my extruder acceleration and jerk as those values help me with retraction a lot, the big downside is probably it will wear out quicker gears in the extruder, but will see. Glad Bondtech sells them separately..
                                      That warp what I have on all my cubes - its because I don't have heated bed and printing on just normal painters tape. That tape just delaminates from aluminum bed with the object. Hopefully this week I should receive a silicone heater. πŸ™‚

                                      @DocTrucker

                                      I did try DAA, man that just smoothes out all small issues with ringing! Thanks!
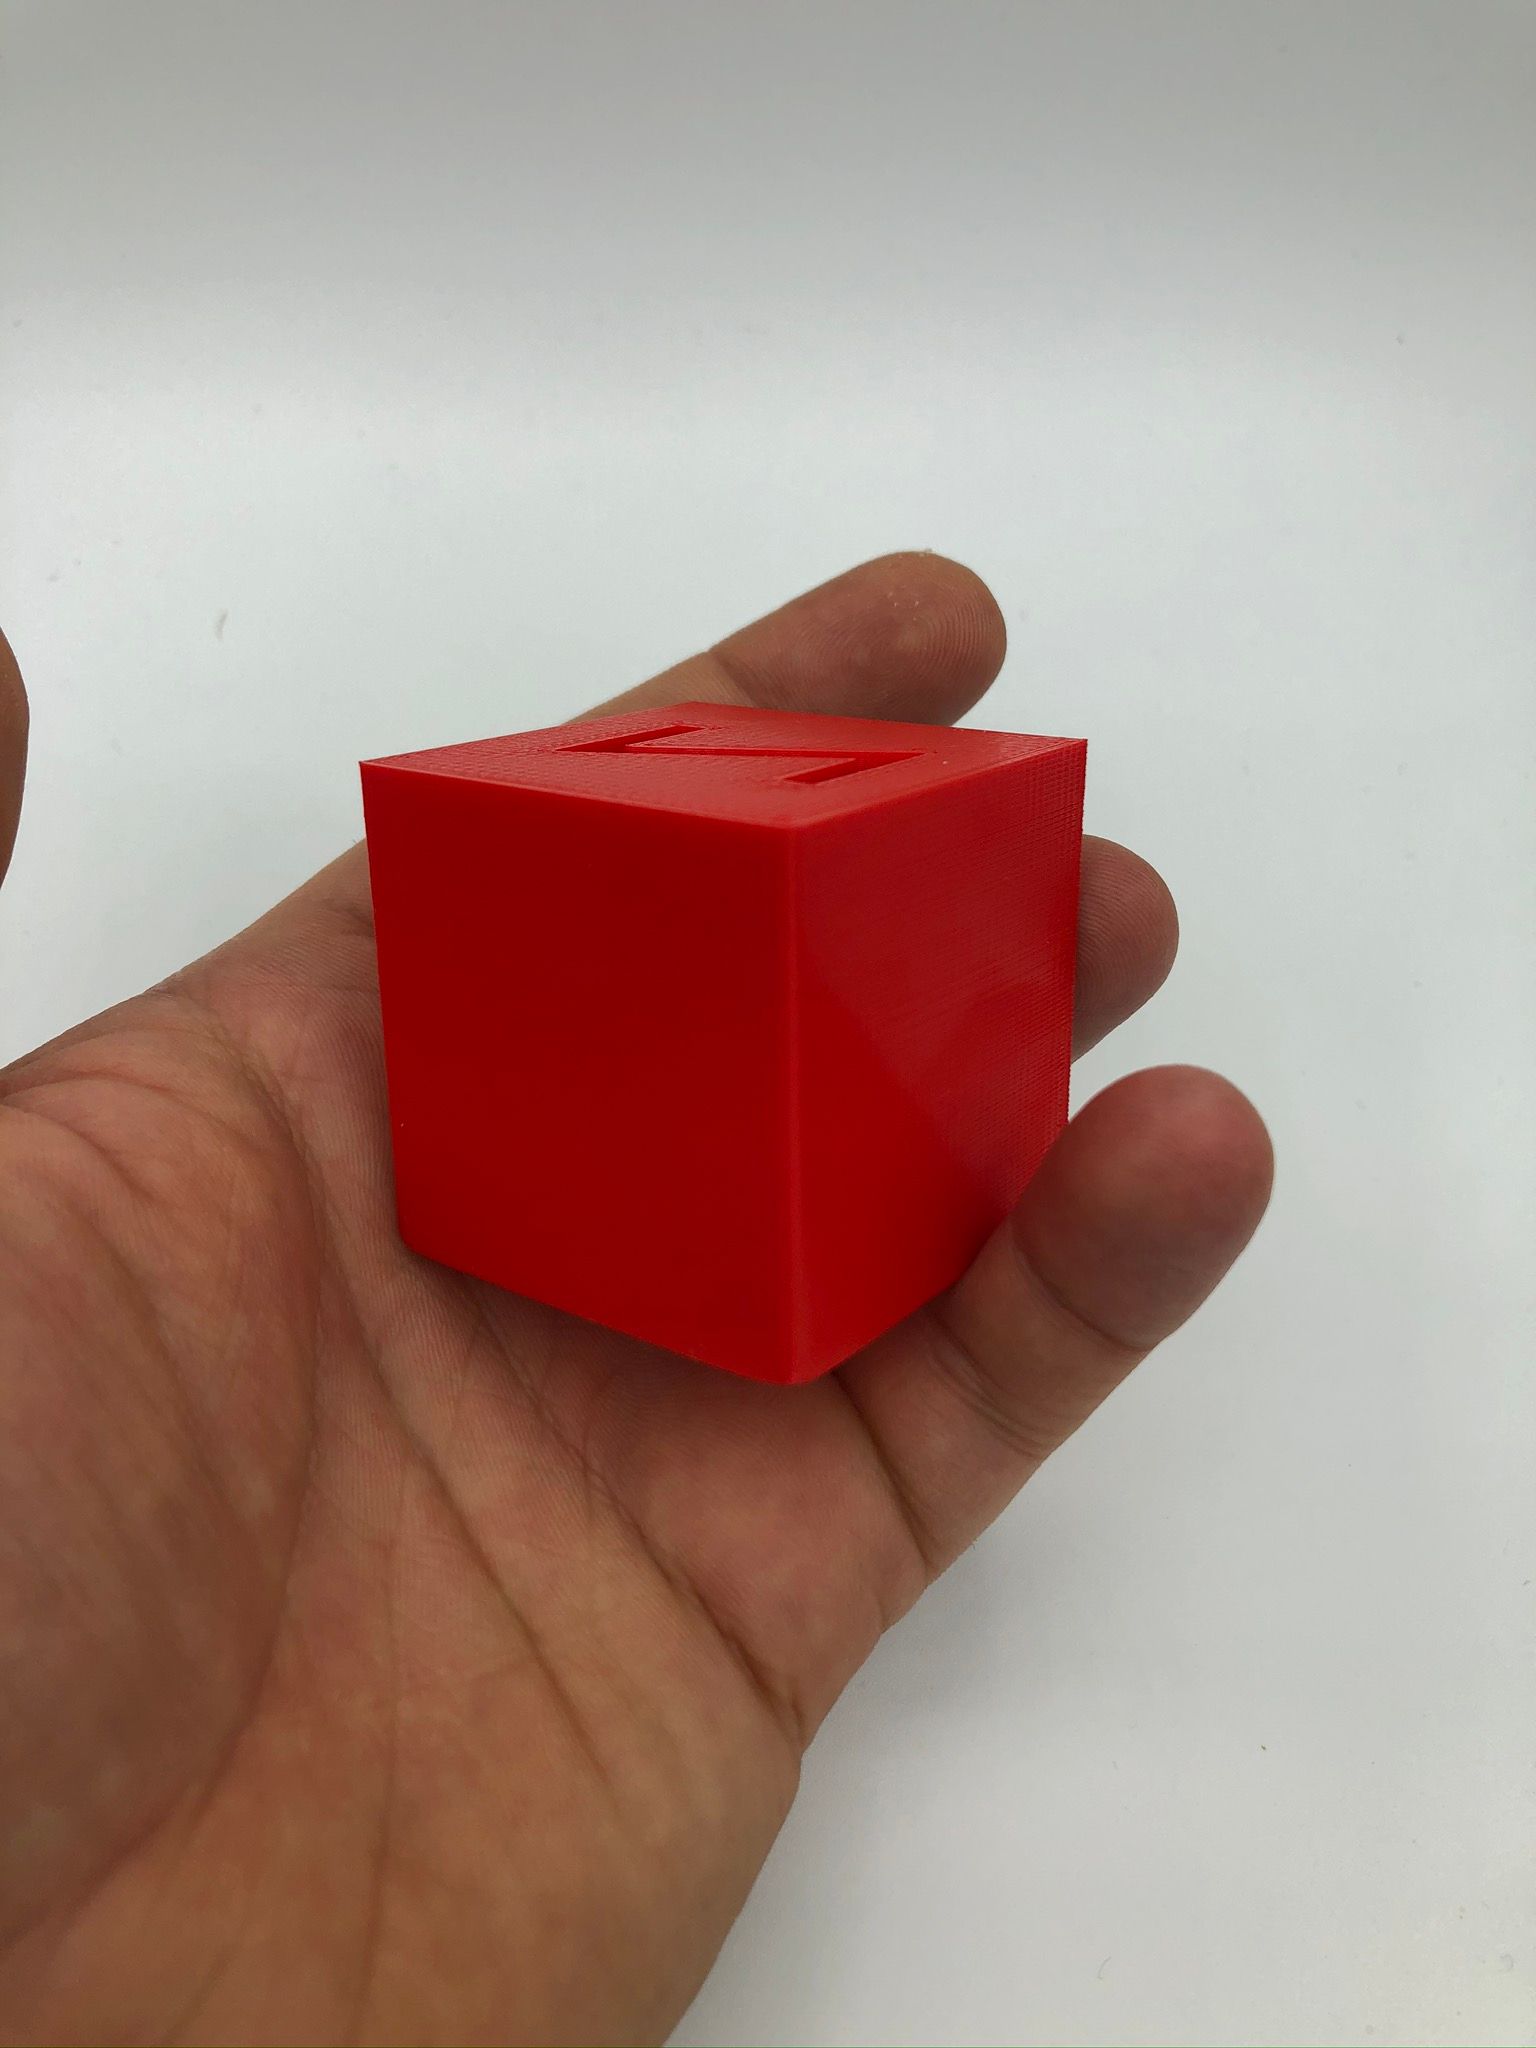
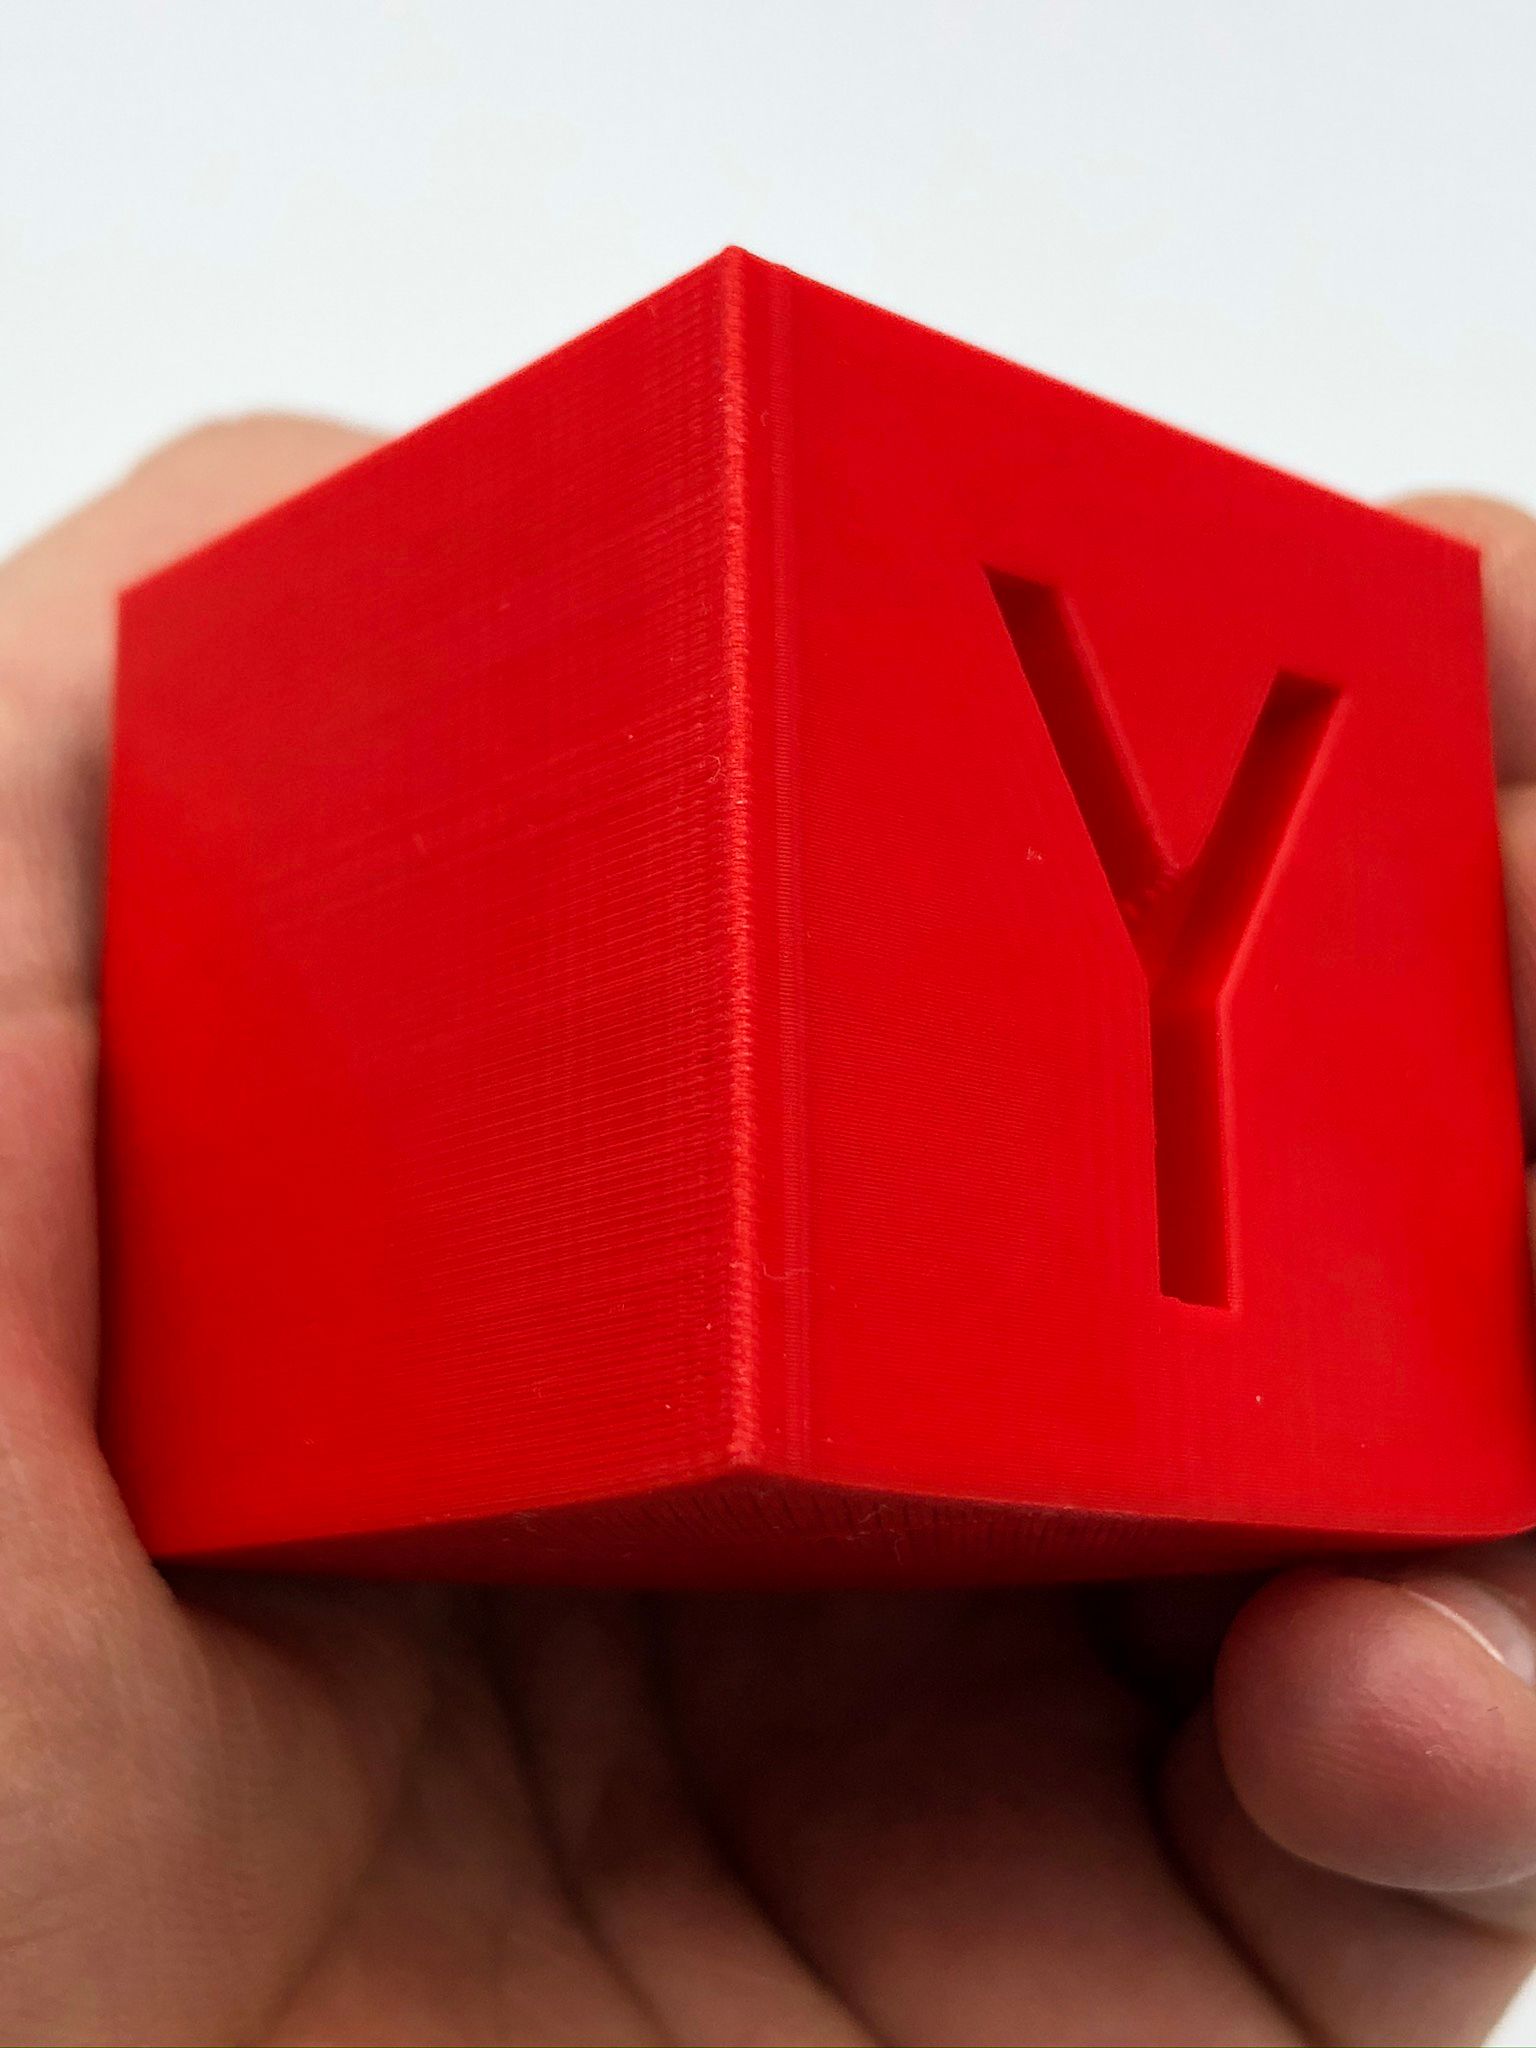
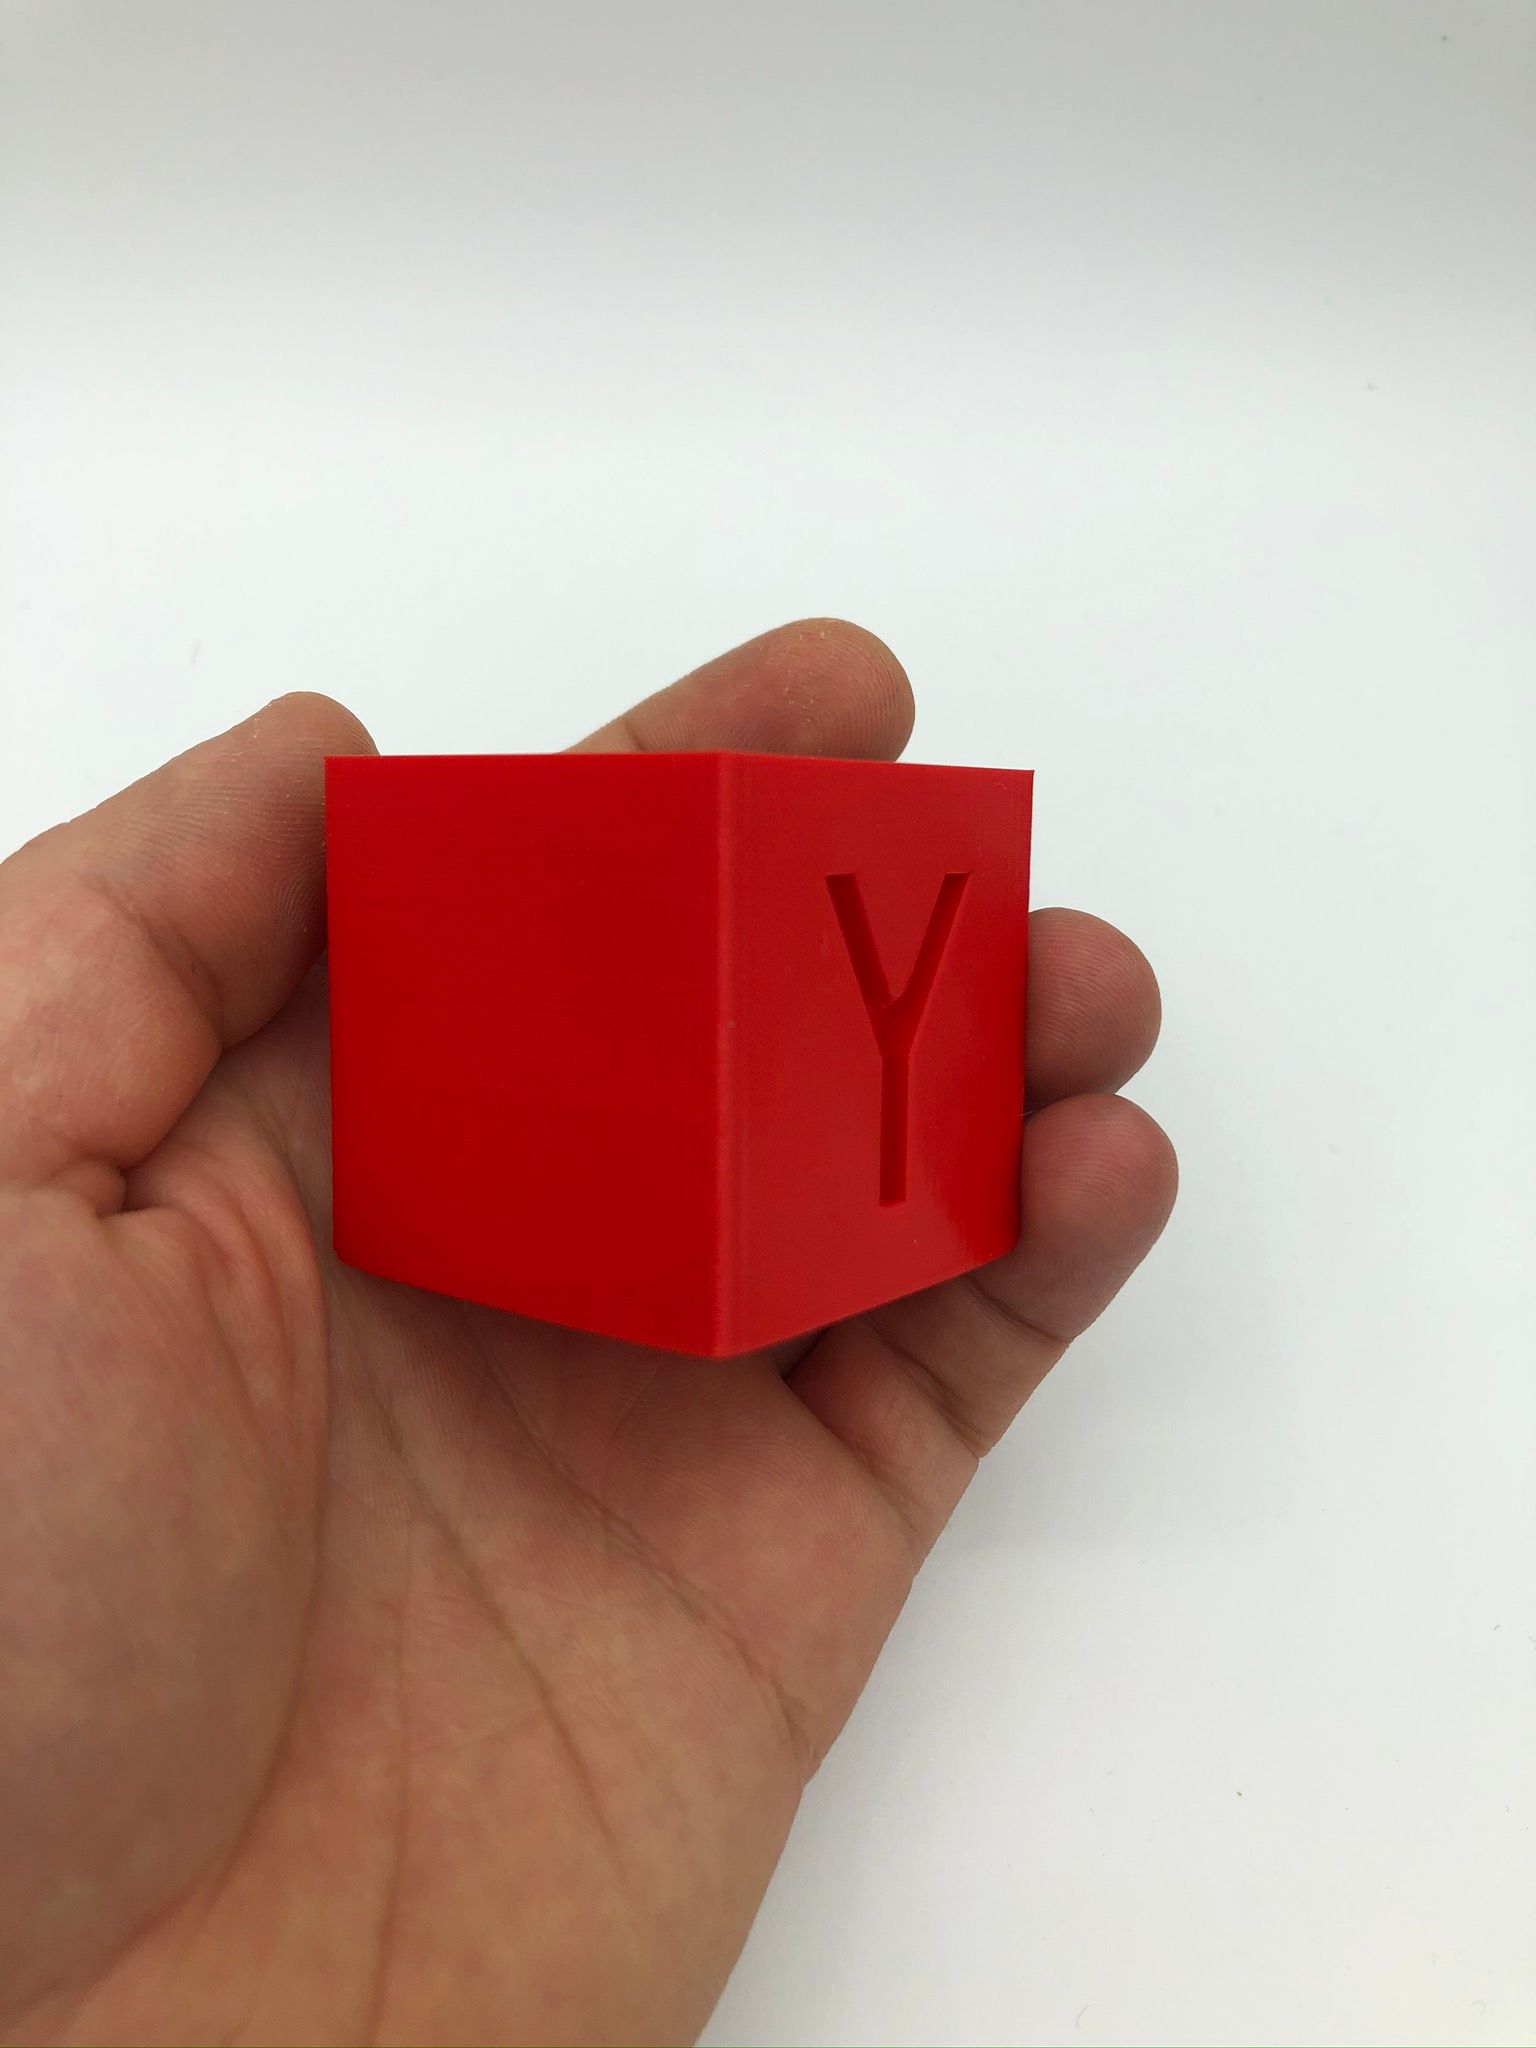
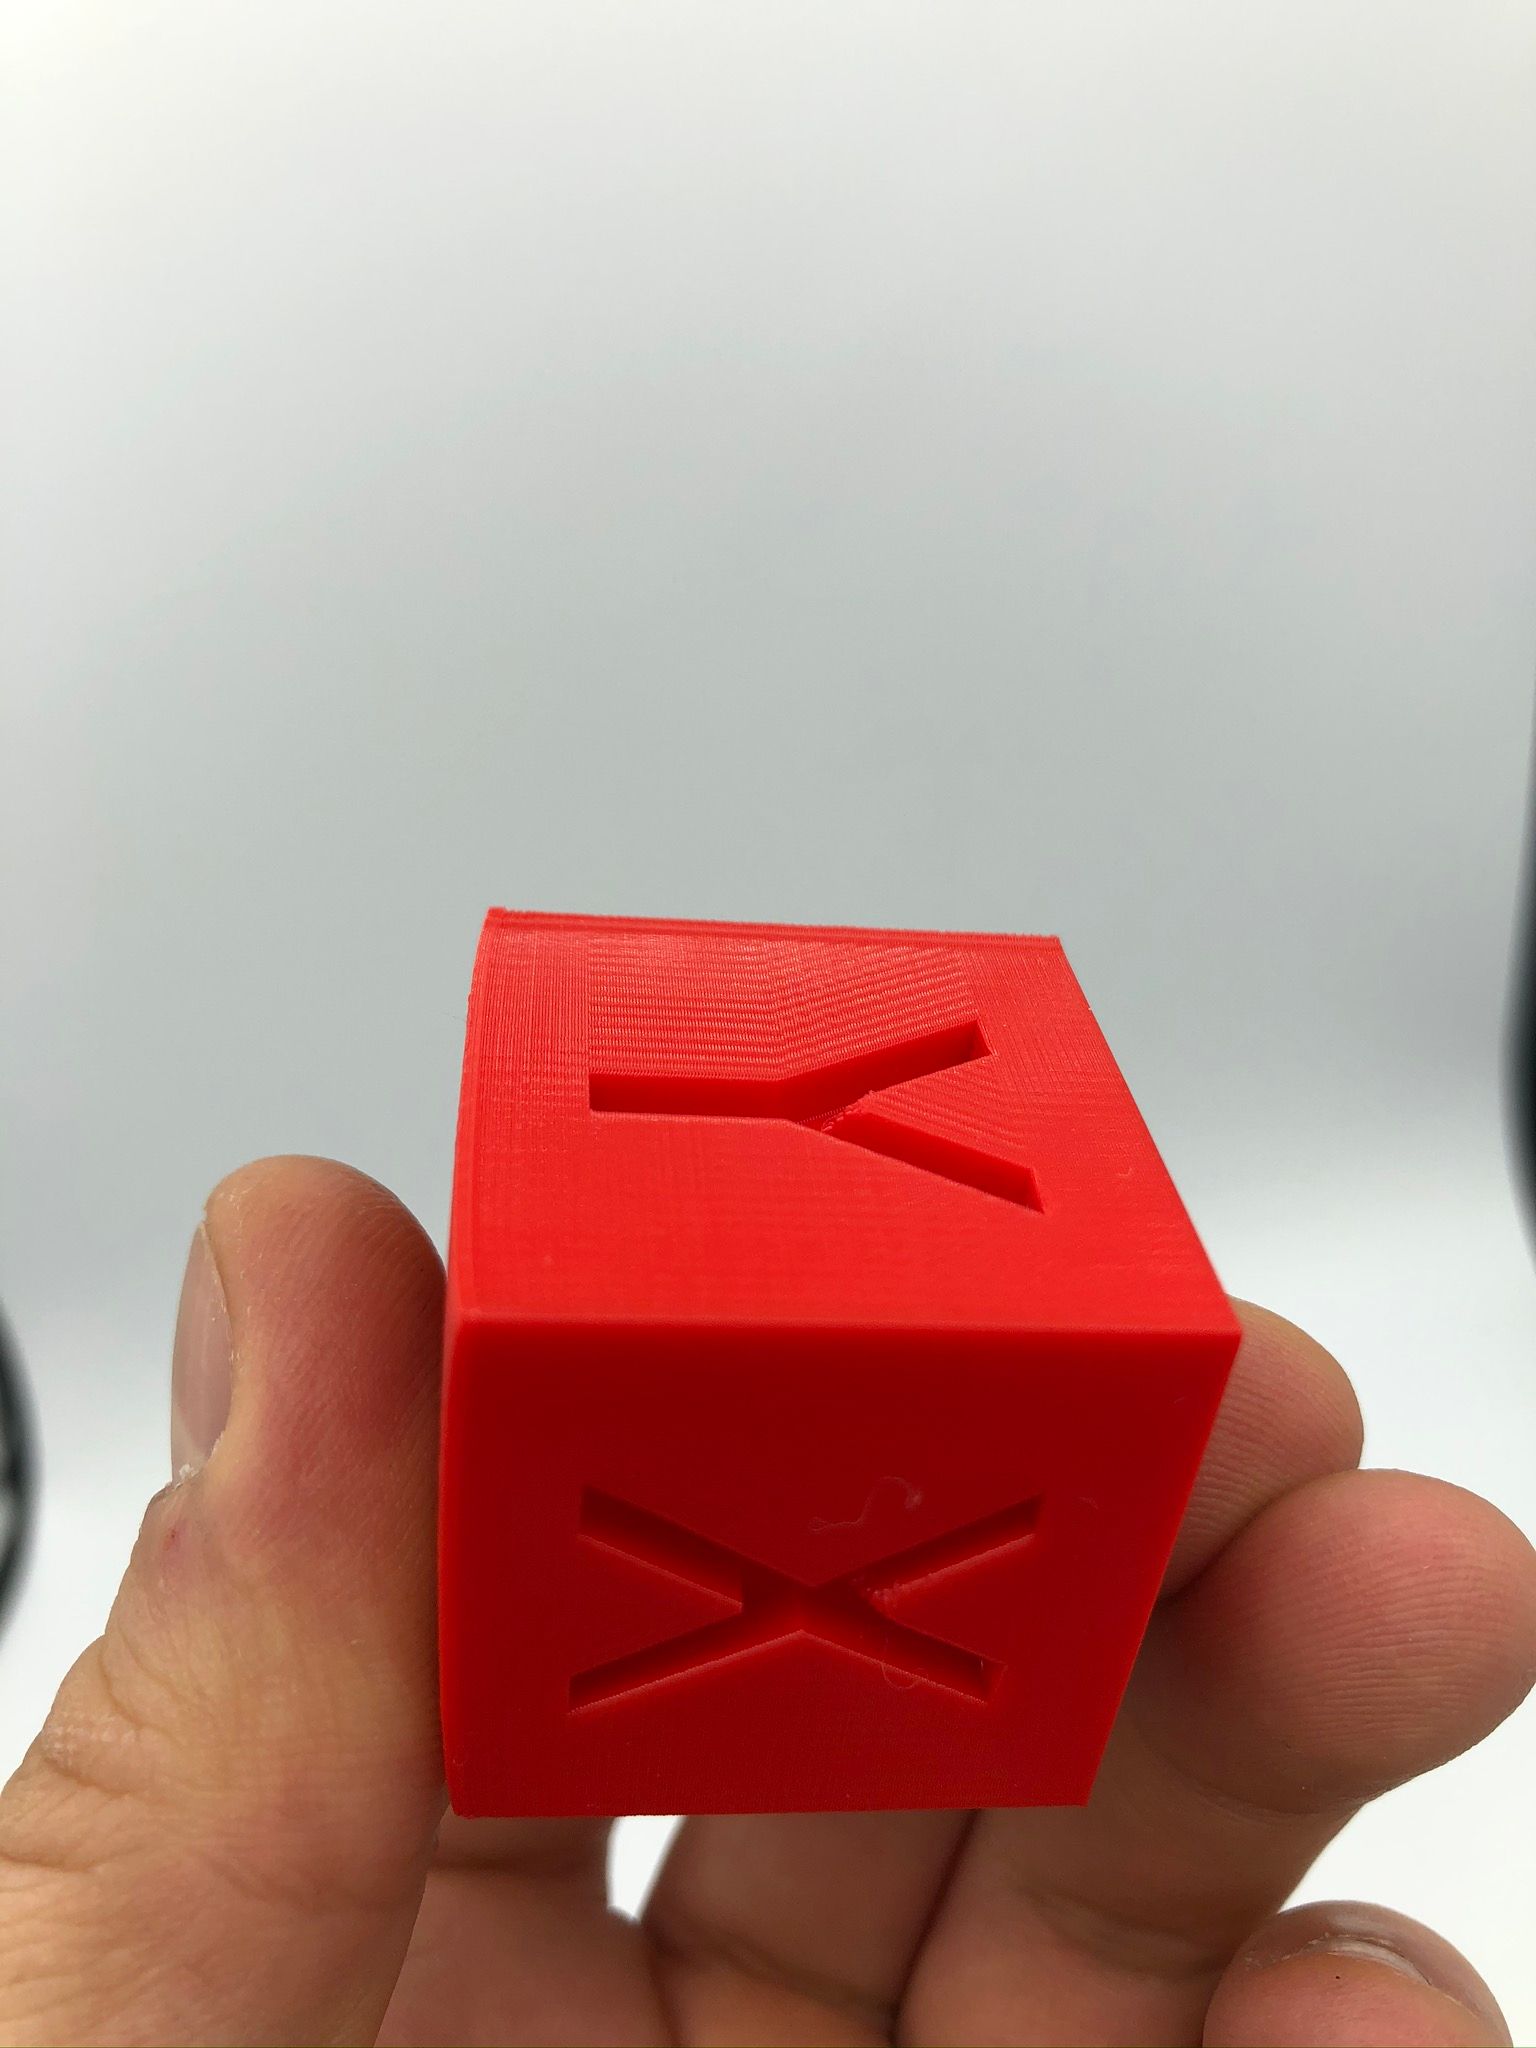
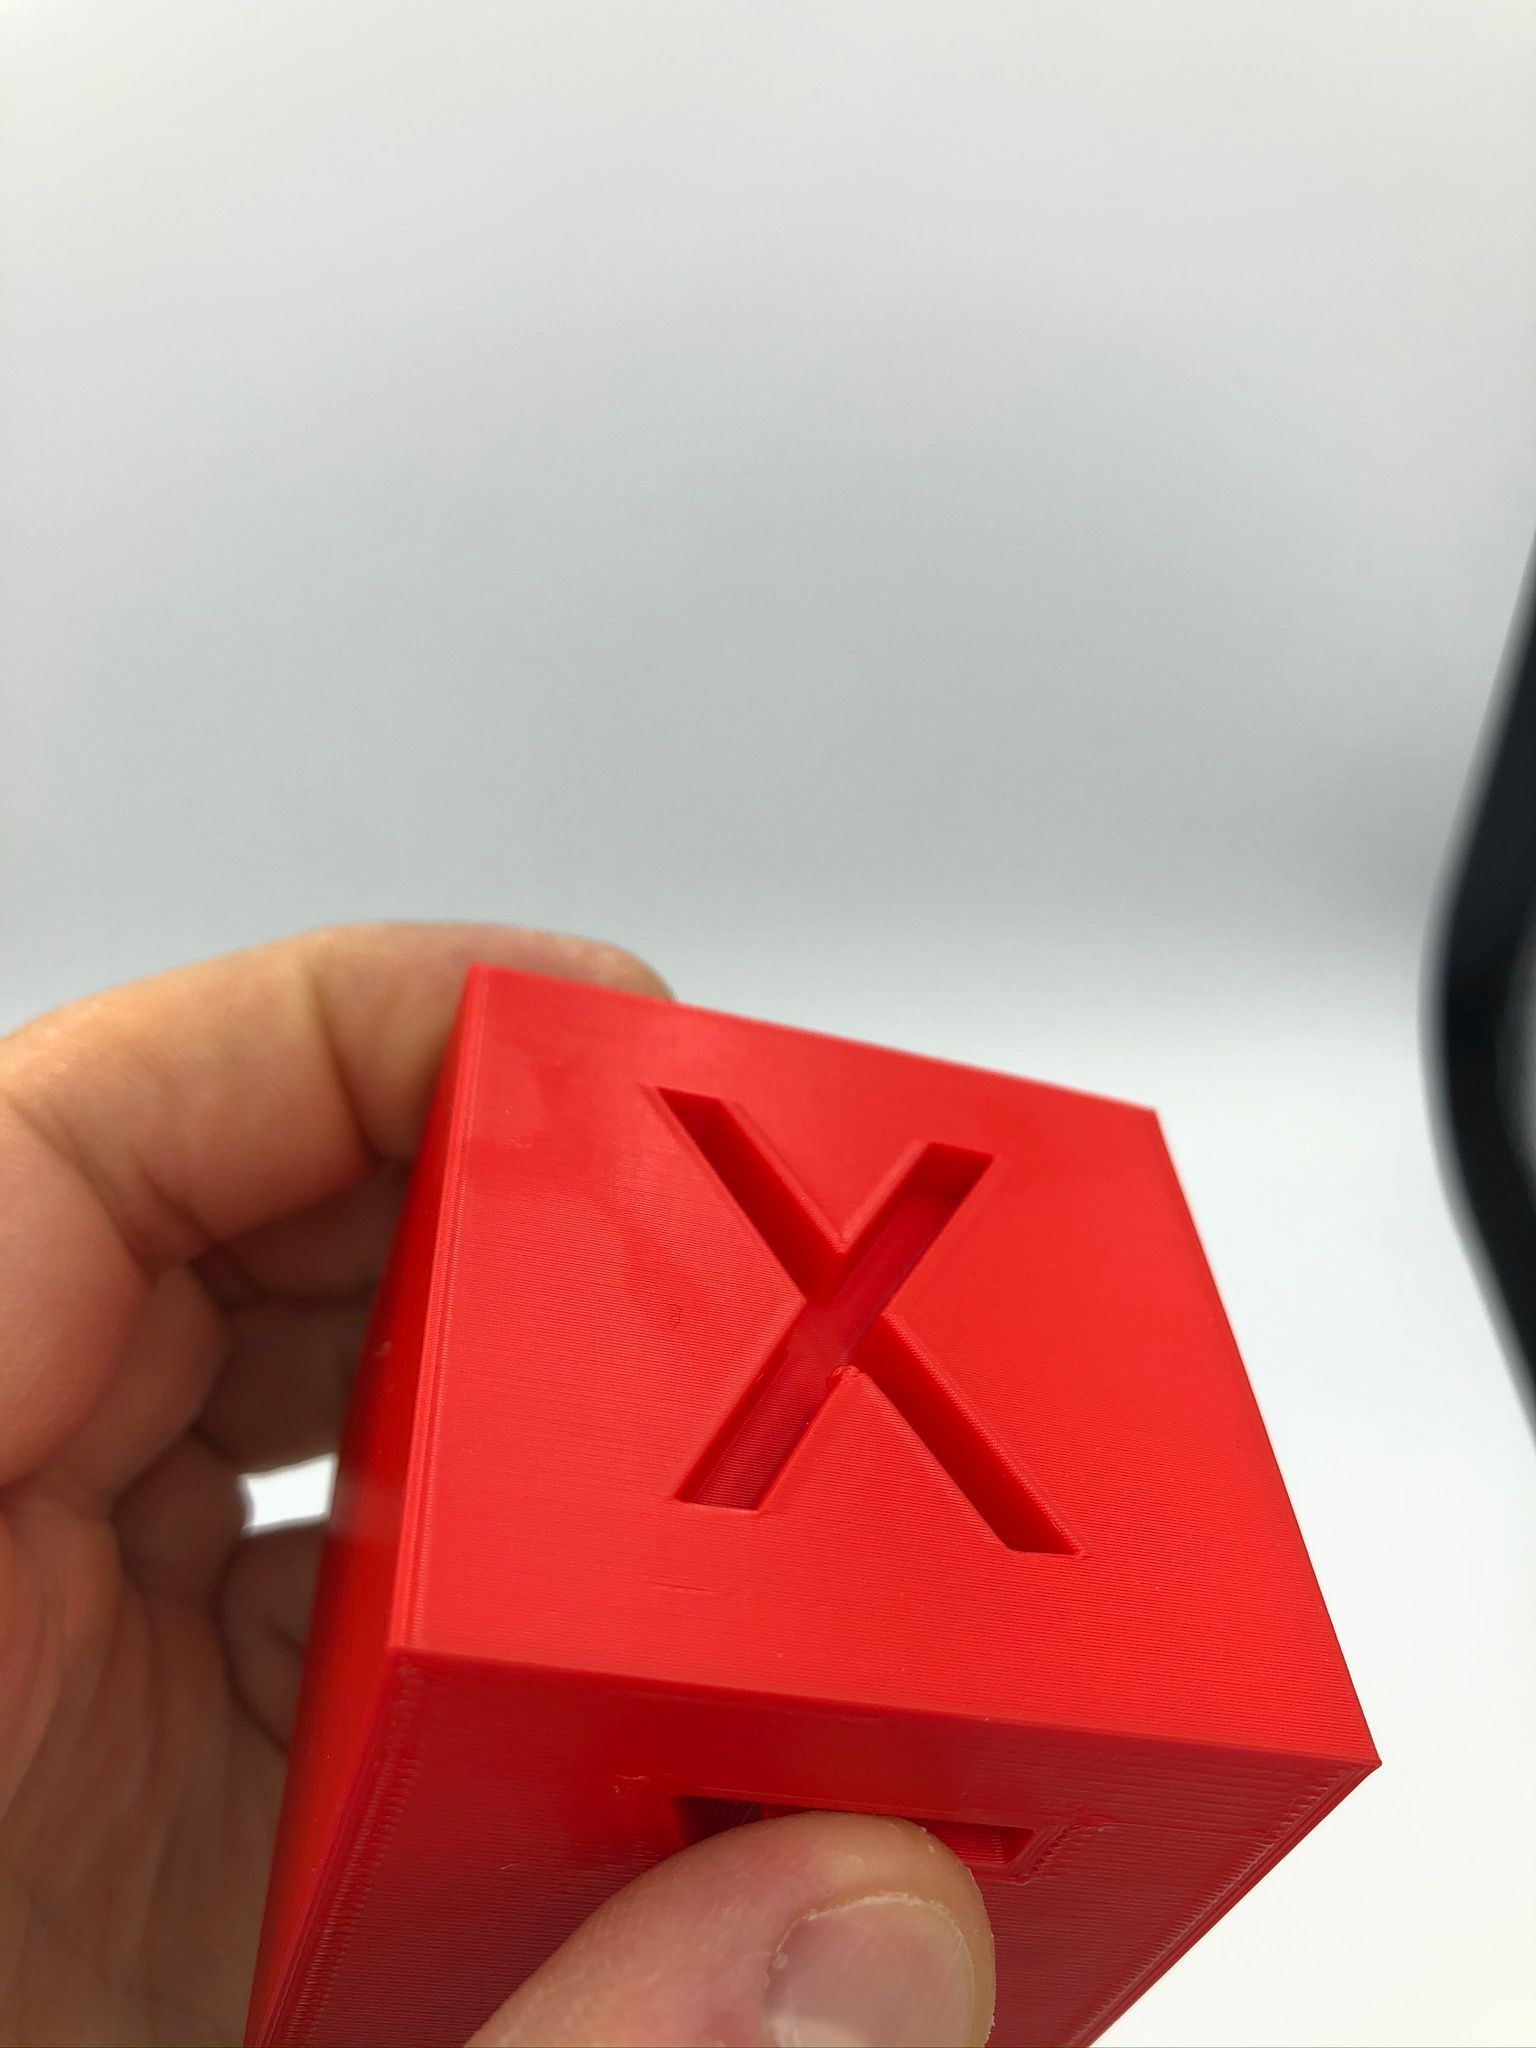
                                      The cube is 50x50;

                                      IMG_5852.jpeg IMG_5846.jpeg

                                      Industrial 3D printing service in the Netherlands - gagatstudio.com

                                      1 Reply Last reply Reply Quote 0
                                      • OBELIKSundefined
                                        OBELIKS
                                        last edited by

                                        Is the line on the left of Y the seam? Did you change the Start Points setting on Layer tab? Because in the first prints the start points were in the corners and in the ones where you have no issues they are in a line.
                                        I am asking, because I need to tune the settings to get rid of the same issues.

                                        P3Steel Toolson mk2 - Duet 2 WiFi --> RatRig V-Core with Duet WiFi 1.03
                                        Original Prusa i3 MK3S

                                        felt342undefined 1 Reply Last reply Reply Quote 0
                                        • felt342undefined
                                          felt342 @OBELIKS
                                          last edited by felt342

                                          @OBELIKS

                                          Seam is here, and I didnt change location of seam from begining;

                                          1579681415893-img_5852.jpeg

                                          Industrial 3D printing service in the Netherlands - gagatstudio.com

                                          1 Reply Last reply Reply Quote 0
                                          • OBELIKSundefined
                                            OBELIKS
                                            last edited by

                                            It could be you still have the issue and it is only hidden in the seam. On the first pictures the slicer was "hiding" the seam on the corners (either the X or Y letter or the corner of the cube).

                                            P3Steel Toolson mk2 - Duet 2 WiFi --> RatRig V-Core with Duet WiFi 1.03
                                            Original Prusa i3 MK3S

                                            felt342undefined 1 Reply Last reply Reply Quote 0
                                            • First post
                                              Last post
                                            Unless otherwise noted, all forum content is licensed under CC-BY-SA