Duet3D Logo Duet3D
    • Tags
    • Documentation
    • Order
    • Register
    • Login

    Very Strange Mesh map

    Scheduled Pinned Locked Moved Solved
    My Duet controlled machine
    4
    16
    765
    Loading More Posts
    • Oldest to Newest
    • Newest to Oldest
    • Most Votes
    Reply
    • Reply as topic
    Log in to reply
    This topic has been deleted. Only users with topic management privileges can see it.
    • droftartsundefined
      droftarts administrators @PaulHew
      last edited by

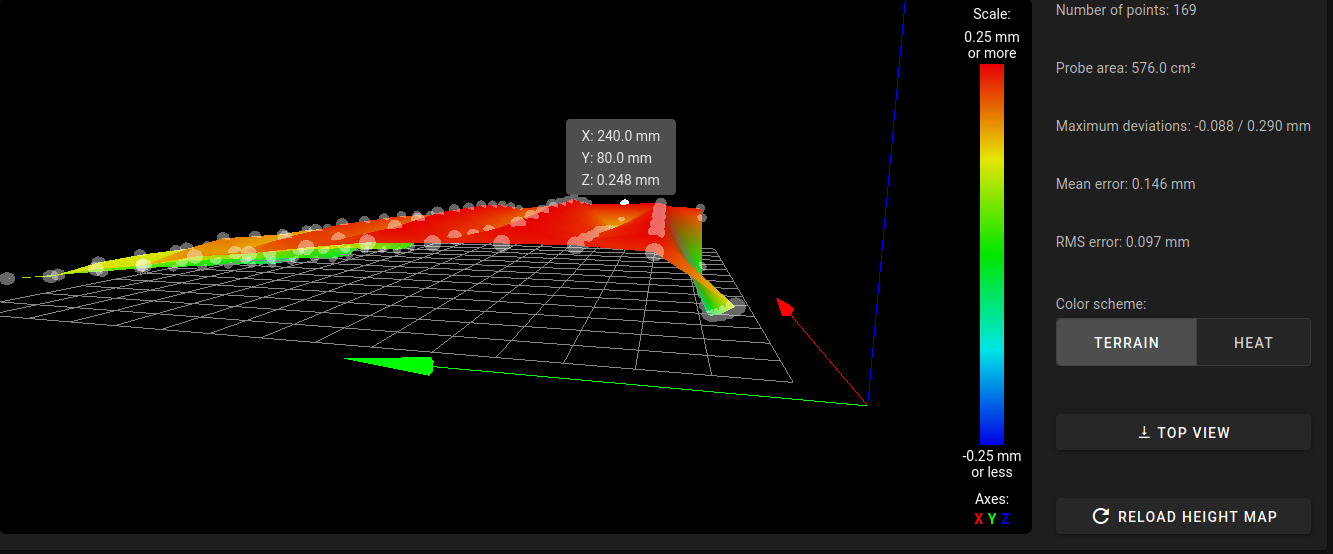
      @PaulHew how much offset on the probe? Most likely is that the carriage is rocking as it’s pulled in different directions, and if the probe has a large offset, this amplifies it.

      Maybe post config and M115 response, too?

      Ian

      Bed-slinger - Mini5+ WiFi/1LC | RRP Fisher v1 - D2 WiFi | Polargraph - D2 WiFi | TronXY X5S - 6HC/Roto | CNC router - 6HC | Tractus3D T1250 - D2 Eth

      1 Reply Last reply Reply Quote 0
      • PaulHewundefined
        PaulHew
        last edited by

        @droftarts As requested

        m115
        FIRMWARE_NAME: RepRapFirmware for Duet 2 Maestro FIRMWARE_VERSION: 3.0 ELECTRONICS: Duet Maestro 1.0 FIRMWARE_DATE: 2020-01-03b3
        

        and

        ; Configuration file for RailCore II 300 ZLT
        ; Communication and general
        M111 S0                             	; Debug off
        
        ;Network
        M550 P"RailCore II"                       ; Set machine name
        M552 P192.168.0.7 S1                     ; Enable network and set IP address
        M553 P255.255.255.0                      ; Set netmask
        M554 P192.168.0.1                        ; Set gateway
        M586 P0 S1                               ; Enable HTTP
        M586 P1 S0                               ; Disable FTP
        M586 P2 S1                               ; Enable Telnet
        
        M575 P1 B57600 S1					; Comms parameters for PanelDue
        
        G21                                 	; Work in millimetres
        G90                                		; Send absolute coordinates...
        M83                                 	; ...but relative extruder moves
        
        ; Axis and motor configuration
        M669 K1								; CoreXY mode
        
        ; Drives
        M584 X0 Y1 Z5:6:7 E3:4:8:9 		       ; Map Z to drivers 5, 6, 7. Define unused drivers 3,4,8 and 9 as extruders
        M569 P0 S1                                     ; Drive 0 goes forwards (change to S0 to reverse it) X stepper (Rear)
        M569 P1 S0                                     ; Drive 1 goes backwards	Y Stepper (Front)
        M569 P2 S1                                     ; Drive 2 goes forwards Unused
        M569 P3 S1                                     ; Drive 3 goes forwards Extruder 
        M569 P4 S1                                     ; Drive 4 goes forwards Extruder (unused)
        M569 P5 S1			  	                       ; Drive 5 goes backwards	Front Left Z
        M569 P6 S1				                       ; Drive 6 goes backwards	Rear Left Z
        M569 P7 S1				                       ; Drive 7 goes backwards	Right Z
        M84 S30                                        ; Set idle timeout
        
        ;Leadscrew locations
        M671 X-10:-10:333 Y22.5:277.5:150 S7.5  ;Front left, Rear Left, Right  S7.5 is the max correction - measure your own offsets, to the bolt for the yoke of each leadscrew
        
        ; Axis and motor configuration
        M350 X16 Y16 Z16 E16 I1	                 ; set 16x microstepping for axes& extruder, with interpolation
        
        ;Endstop Configuration
        M574 X1 S1 P"xstop"			             ; _RRF3
        M574 Y1 S1 P"ystop"			             ; _RRF3
        
        ;Speeds
        M906 X1400 Y1400 Z2400 E700 I60	         ; Set motor currents (mA)
        M201 X3000 Y3000 Z100 E1500              ; Accelerations (mm/s^2)
        M203 X24000 Y24000 Z900 E3600            ; Maximum speeds (mm/min)
        M566 X1000 Y1000 Z100 E10                ; Maximum jerk speeds mm/minute
        M92 X200 Y200 
        M92 Z1600 
        M92 E407	             ; steps/mm
        ;
        M204 P1500 T1500
        ;
        
        M208 X-10:310 Y-8:293 Z-0:550                 ; set axis minima and low homing switch positions (adjust to make X=0 and Y=0 the edges of the bed)
        
        ; Thermistors
        ;Bed Configuration
        M308 S0 P"bedtemp" Y"thermistor" A"Bed-Top" T100000 B3950 R4700 H0 L0
        M950 H0 C"bedheat" T0
        M143 H0 S120
        M307 H0 A481.6 C758.5 D11.3 V24.2 B0
        ;HotEnd Configuration
        M308 S1 P"e0temp" Y"thermistor" A"E3Dv6" T100000 B4725 R4700 C7.06e-8 H0 L0	;
        M950 H1 C"e0heat" T1				;
        M143 H1 S280
        M307 H1 A503.9 C237.3 D4.9 V24.2 B0        ;
        
        ; Other Tempreture Inputs
        M308 S6 P"exp.thermistor6" Y"thermistor" A"Keenovo" T100000 B3950 R4700
        M308 S7 P"exp.thermistor7" Y"thermistor" A"RoomTemp" T100000 B3950 R4700
        
        ; Fans
        M950 F0 C"fan0"						;Part Cooling Fan
        M106 P0 H-1 				
        ;
        M950 F1 C"fan1" Q500                           ;Hotend Fan
        M106 P1 S1 H1 T40
        ;
        M950 F2 C"fan2"						;_RRF3_ define fan2
        M106 P2 H-1
        ;
        M106 P0 S0 				; turn off fans
        	
        ; Tool definitions
        M563 P0 D0 H1                       	; Define tool 0
        G10 P0 S0 R0                        	; Set tool 0 operating and standby temperatures
        
        ; Z probe and compensation definition
        M558 P9 C"^zprobe.in" H5 R1 F120 T6000 A5 S0.02  ;BLTouch connected to Z probe IN pin
        M950 S0 C"duex.pwm1"				             ;BLTouch Servo (S0) on duet pwm1
        G31 X2 Y42 Z1.422 P25                            ; Customize your offsets appropriately - do a paper test, and put the probed value in the Z value here
        M557 X30:280 Y30:280 S20
        
        T0					; select first hot end


        Thanks for looking.

        P.

        RailCore II - Duet Mini + 1LC, Voron V0.1 - Duet Mini
        Voron 2.4 disassembled..... Waiting for the RailCore Mini....

        droftartsundefined 1 Reply Last reply Reply Quote 0
        • droftartsundefined
          droftarts administrators @PaulHew
          last edited by

          @PaulHew yes, 40mm X offset on probe. All points on the mesh in one direction are high, and low in the other direction, so the carriage is rotating in the XZ plane. What’s the X axis? Linear rail? HiWin or cheaper Chinese copy? I’d guess latter, and tolerances aren’t great, causing lateral movement. Alex Kenis has done some great YouTube videos on these, worth watching.

          You may be able to reduce this by tightening the belts, but I’m not sure.

          Ian

          Bed-slinger - Mini5+ WiFi/1LC | RRP Fisher v1 - D2 WiFi | Polargraph - D2 WiFi | TronXY X5S - 6HC/Roto | CNC router - 6HC | Tractus3D T1250 - D2 Eth

          1 Reply Last reply Reply Quote 0
          • PaulHewundefined
            PaulHew
            last edited by

            @droftarts All axis have original HiWin rails, 3 on Z, 2 on Y and 1 on X.

            I will check the belt tension.

            Could a slight wobble on one of the Z leadscrews cause this too?

            Thanks again Ian

            RailCore II - Duet Mini + 1LC, Voron V0.1 - Duet Mini
            Voron 2.4 disassembled..... Waiting for the RailCore Mini....

            Phaedruxundefined 1 Reply Last reply Reply Quote 0
            • Phaedruxundefined
              Phaedrux Moderator @PaulHew
              last edited by

              @PaulHew said in Very Strange Mesh map:

              Could a slight wobble on one of the Z leadscrews cause this too?

              I wouldn't think so. Seems like a case of backlash though. Are you able to wiggle the print carriage by hand? Are the belts equally tensioned?

              Z-Bot CoreXY Build | Thingiverse Profile

              PaulHewundefined 1 Reply Last reply Reply Quote 0
              • PaulHewundefined
                PaulHew @Phaedrux
                last edited by

                @Phaedrux The print head is solid, I purchased all of the aluminium upgrade parts so there is no plastic.I will check the belt tension, again as I have just plucked the belts and one sounds higher than the other.

                Belts were about 60-60hz. Have tweaked them down to 50hz and running a mesh now.

                Thanks @Phaedrux and @droftarts

                Paul

                RailCore II - Duet Mini + 1LC, Voron V0.1 - Duet Mini
                Voron 2.4 disassembled..... Waiting for the RailCore Mini....

                1 Reply Last reply Reply Quote 0
                • PaulHewundefined
                  PaulHew
                  last edited by

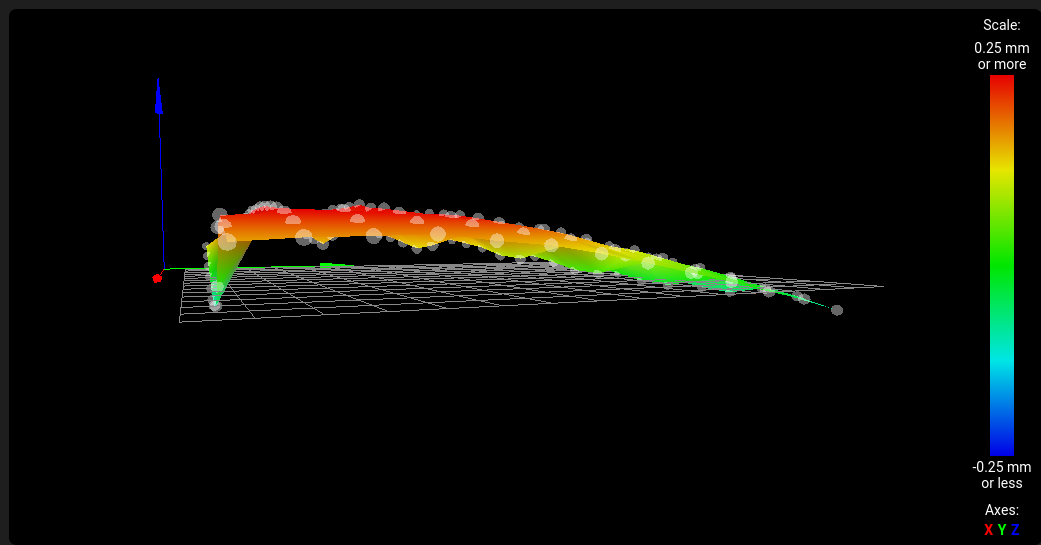
                  Latest mesh after re-tuning the belts

                  796c981b-8b27-42c3-87ad-707111080b34-image.png

                  and another angle

                  a00f32b6-982f-4cc0-ab19-326c435dddb6-image.png

                  RailCore II - Duet Mini + 1LC, Voron V0.1 - Duet Mini
                  Voron 2.4 disassembled..... Waiting for the RailCore Mini....

                  1 Reply Last reply Reply Quote 0
                  • Phaedruxundefined
                    Phaedrux Moderator
                    last edited by

                    So... better?

                    Z-Bot CoreXY Build | Thingiverse Profile

                    1 Reply Last reply Reply Quote 0
                    • PaulHewundefined
                      PaulHew
                      last edited by

                      I was expecting something better than this, This is on my Ender3
                      e3633c6c-dd18-4370-a00b-f8159bcbfe11-image.png

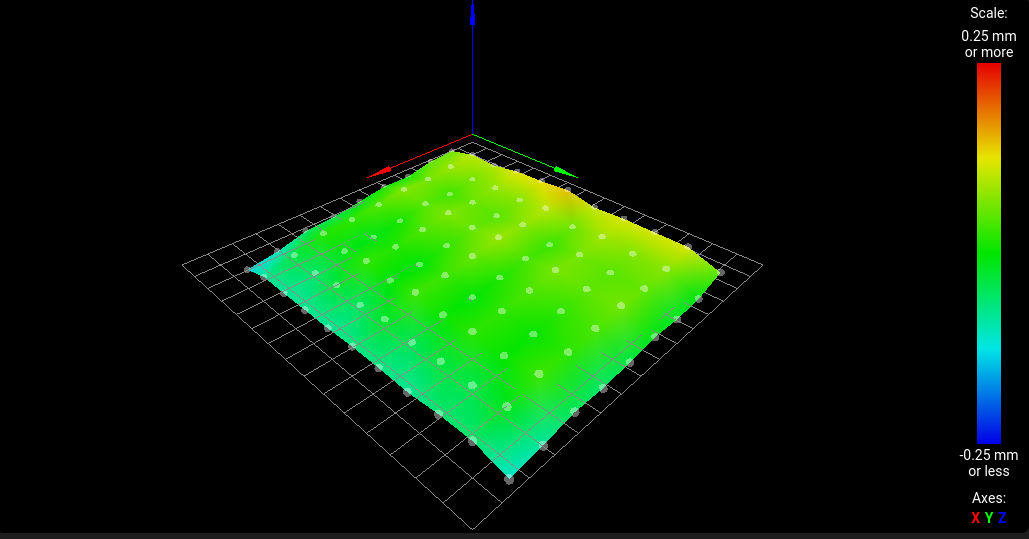
                      Considering the cost and only putting premium parts in it, I was expecting or hoping to get it green all the way.
                      This is the latest from my Railcore with a 9 point grid.
                      003b6b86-bbd1-46ec-9e38-3f5456e8c509-image.png

                      I have a 4mm glass mirror tile on a 6mm machined bed.

                      Maybe I should take the glass off and probe the bed.

                      RailCore II - Duet Mini + 1LC, Voron V0.1 - Duet Mini
                      Voron 2.4 disassembled..... Waiting for the RailCore Mini....

                      Phaedruxundefined 1 Reply Last reply Reply Quote 0
                      • Phaedruxundefined
                        Phaedrux Moderator @PaulHew
                        last edited by

                        @PaulHew said in Very Strange Mesh map:

                        Maybe I should take the glass off and probe the bed.

                        Would be interesting to see the difference. Is it possible the bed was damaged in shipping or that it came with some waves?

                        Z-Bot CoreXY Build | Thingiverse Profile

                        1 Reply Last reply Reply Quote 0
                        • PaulHewundefined
                          PaulHew
                          last edited by

                          I have changed to a 4 point probe and adjusting the rails as I need.
                          Its looking better than the previous posts.
                          Long process, but getting there!

                          RailCore II - Duet Mini + 1LC, Voron V0.1 - Duet Mini
                          Voron 2.4 disassembled..... Waiting for the RailCore Mini....

                          1 Reply Last reply Reply Quote 0
                          • Phaedruxundefined
                            Phaedrux Moderator
                            last edited by

                            Ah yes, the rails. Should have thought of that.

                            Z-Bot CoreXY Build | Thingiverse Profile

                            1 Reply Last reply Reply Quote 0
                            • jens55undefined
                              jens55
                              last edited by

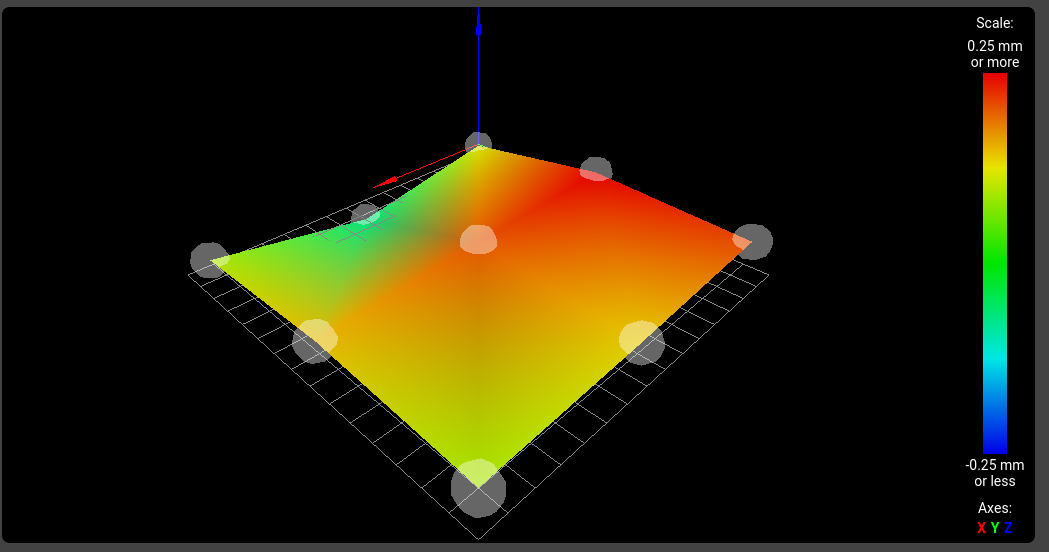
                              Your bed map looks very good with just a slight tilt. I'd be extremely happy to have something that smooth.
                              Going to 9 point is like trying to look at a picture with the vast majority of it's pixels removed and substituted with average values - useless. 4 point and 9 point meshes are good for the very initial steps of leveling the bed but nothing beyond that.

                              1 Reply Last reply Reply Quote 0
                              • PaulHewundefined
                                PaulHew
                                last edited by

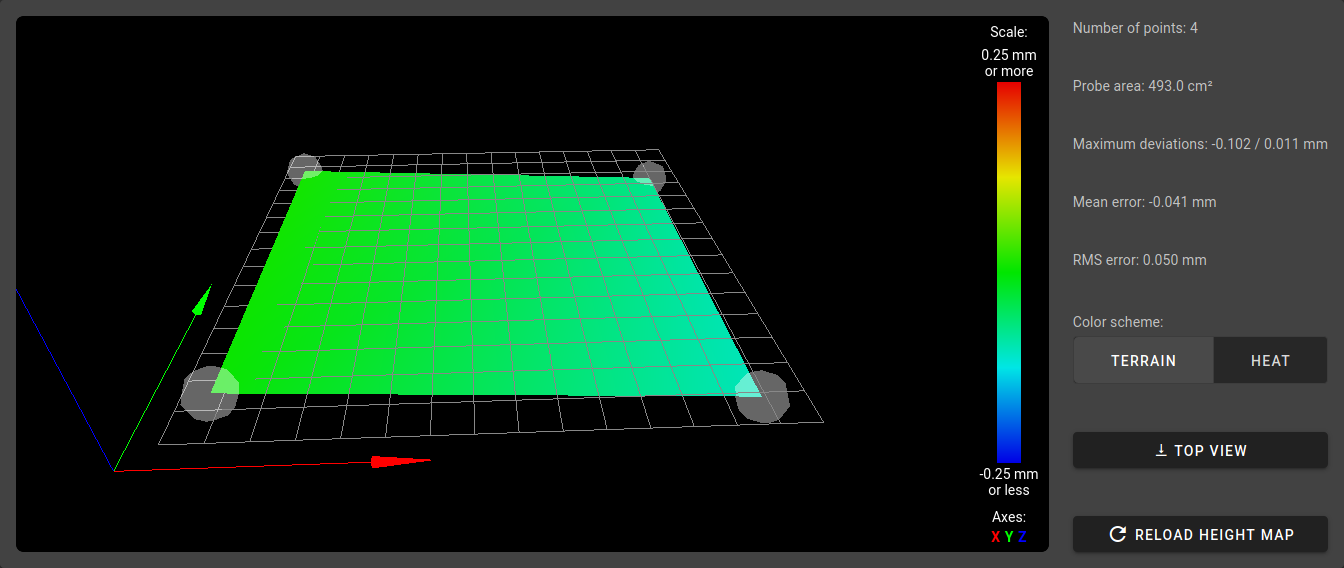
                                So after adjusting rails and tweaking things, I am now here.
                                I thought I would update so others could benefit.

                                08c5b5e0-a7cd-46ec-8c30-7c4e8dfd4e1a-image.png

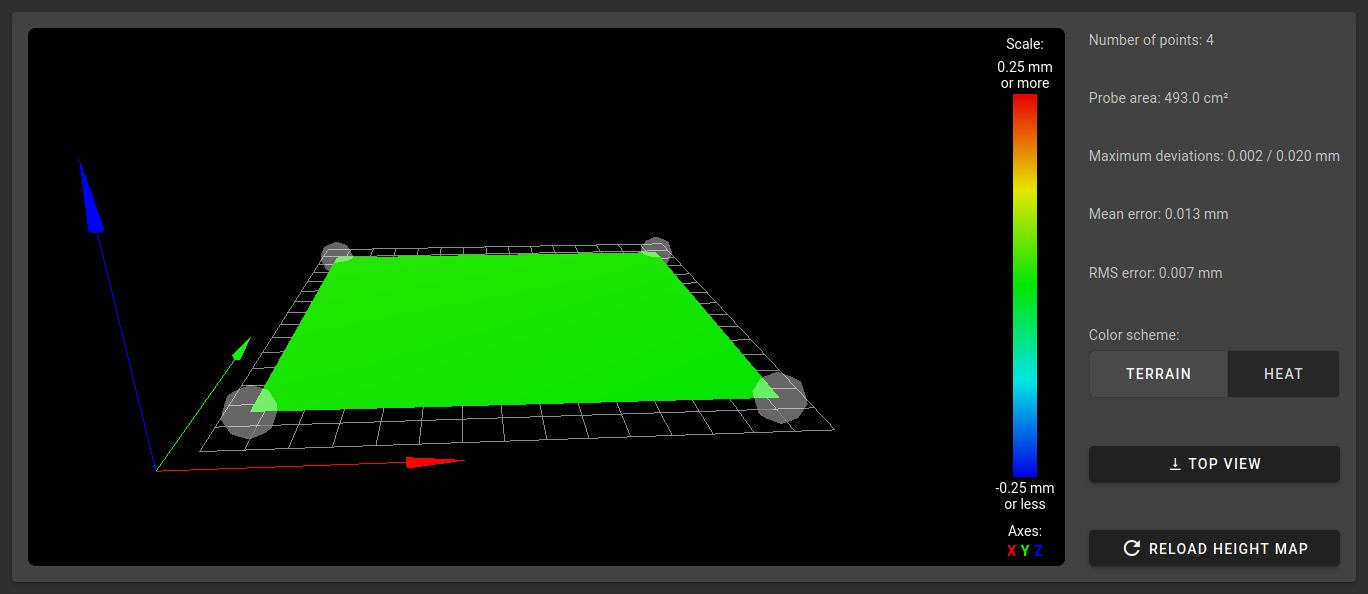
                                I was close before, but one corner was not right, front right. Back right was OKish
                                ed4d9881-b27c-4e35-9985-842ce88de8f5-image.png

                                Satre on the Railcore discord forum asked me to try something.

                                Originally I was running a 3 point levelling routine, near the leadscrews.
                                He suggested I use a 4 point, so changed my bed.g to

                                M561                         ; clear any existing bed transform
                                G1 Z5                         ; RRF3 remove S2 
                                G30 P0 X15 Y45 Z-99999
                                G30 P1 X15 Y275 Z-99999
                                G30 P2 X275 Y275 Z-99999
                                G30 P3 X275 Y45 Z-99999 S3
                                G1 X0 Y0 F5000               ; move the head to the corner (optional)
                                

                                Power off then on, (I wait at least 15secs before powering back on)
                                I ran G32 5 times to get the bed as near as level then ran a 4 point mesh and ended up with a nigh on perfect mesh.

                                So pleased and can get printing now that I have all of the niggles ironed out.
                                Issues were bad idlers, cheap belt, belt tension was also toooooo high - 65hz, at about 50hz now.

                                Thanks to all who suggested brilliant ideas, everything on here and discord got me to this place.

                                Kind Regards,

                                Paul.

                                RailCore II - Duet Mini + 1LC, Voron V0.1 - Duet Mini
                                Voron 2.4 disassembled..... Waiting for the RailCore Mini....

                                1 Reply Last reply Reply Quote 0
                                • jens55undefined
                                  jens55
                                  last edited by

                                  While you certainly have done a great job levelling the bed, you do NOT have a mesh map!
                                  Your printer has exactly ZERO information about what is going on in the middle of the bed. All it knows is that the 4 corners are looking good.
                                  If you are happy printing without mesh bed compensation then you are golden but you are wasting a great feature and doing yourself a dis-service by not going to the highest resolution mesh.

                                  1 Reply Last reply Reply Quote 1
                                  • First post
                                    Last post
                                  Unless otherwise noted, all forum content is licensed under CC-BY-SA