• Tags
  • Documentation
  • Order
  • Register
  • Login
Duet3D Logo Duet3D
  • Tags
  • Documentation
  • Order
  • Register
  • Login

Another Predator

Scheduled Pinned Locked Moved
Duet Hardware and wiring
11
204
13.2k
Loading More Posts
  • Oldest to Newest
  • Newest to Oldest
  • Most Votes
Reply
  • Reply as topic
Log in to reply
This topic has been deleted. Only users with topic management privileges can see it.
  • undefined
    Carlo @Danal
    last edited by Carlo 17 Mar 2020, 09:07

    @Danal

    I did an M500 this is the result from config_override.g and now removed M501 from the config.g file

    ; config-override.g file generated in response to M500 at 2020-03-17 08:37
    ; This is a system-generated file - do not edit
    ; Delta parameters
    M665 L440.470:440.470:440.470 R221.526 H414.033 B185.0 X0.120 Y0.069 Z0.000
    M666 X0.008 Y-1.014 Z1.006 A0.00 B0.00
    ; Heater model parameters
    M307 H0 A90.0 C700.0 D10.0 S1.00 V0.0 B0
    M307 H1 A340.0 C140.0 D5.5 S1.00 V0.0 B0
    M307 H2 A340.0 C140.0 D5.5 S1.00 V0.0 B0
    M307 H3 A340.0 C140.0 D5.5 S1.00 V0.0 B0
    M307 H4 A340.0 C140.0 D5.5 S1.00 V0.0 B0
    M307 H5 A340.0 C140.0 D5.5 S1.00 V0.0 B0
    M307 H6 A340.0 C140.0 D5.5 S1.00 V0.0 B0
    M307 H7 A340.0 C140.0 D5.5 S1.00 V0.0 B0
    G10 L2 P1 X0.00 Y0.00 Z0.00
    G10 L2 P2 X0.00 Y0.00 Z0.00
    G10 L2 P3 X0.00 Y0.00 Z0.00
    G10 L2 P4 X0.00 Y0.00 Z0.00
    G10 L2 P5 X0.00 Y0.00 Z0.00
    G10 L2 P6 X0.00 Y0.00 Z0.00
    G10 L2 P7 X0.00 Y0.00 Z0.00
    G10 L2 P8 X0.00 Y0.00 Z0.00
    G10 L2 P9 X0.00 Y0.00 Z0.00

    Cheers

    1 Reply Last reply Reply Quote 0
    • undefined
      Danal
      last edited by 17 Mar 2020, 13:04

      Thanks, excellent stuff, I will take a look at all of that.

      Delta / Kossel printer fanatic

      1 Reply Last reply Reply Quote 0
      • undefined
        Danal @Carlo
        last edited by 17 Mar 2020, 13:06

        @Carlo said in Another Predator:

        These are commented out in the home file for Delta Calibration as per the documentation they are not always commented just at the point of posting.

        Just to triple confirm: The running file on the printer is going to end with the carriages (approximately) 5mm below the endstop switches, correct?

        Delta / Kossel printer fanatic

        undefined 1 Reply Last reply 17 Mar 2020, 13:57 Reply Quote 0
        • undefined
          Carlo @Danal
          last edited by 17 Mar 2020, 13:57

          @Danal

          Hi Danal,

          That's what it's supposed to do but I cant confirm as it homes to the below error so it doesn't bounce.
          It used to do as intended but I rolled the firmware back redid the configs via the online tool since these errors.
          Note* the height Z-50 is myself trying to move the effector after homing.

          homeerror.png

          Not sure this helps.

          Thanks I know its a lot to scan through it is appreciated.

          undefined undefined 2 Replies Last reply 17 Mar 2020, 14:03 Reply Quote 0
          • undefined
            Danal @Carlo
            last edited by 17 Mar 2020, 14:03

            @Carlo said in Another Predator:

            Thanks I know its a lot to scan through it is appreciated.

            We will get it going. I appreciate your patience in re-posting stuff for the "new guy" looking into this.

            Delta / Kossel printer fanatic

            1 Reply Last reply Reply Quote 1
            • undefined
              boldnuts @Carlo
              last edited by boldnuts 17 Mar 2020, 14:32

              @Carlo Your active high endstops are incorrect, should be M574 X2 Y2 Z2 S1 ; Set active high endstops.
              It also looks like you have both RR3 and RR2 configs in your config.g ? file

              undefined 1 Reply Last reply 17 Mar 2020, 14:49 Reply Quote 0
              • undefined
                droftarts administrators @boldnuts
                last edited by 17 Mar 2020, 14:49

                @boldnuts said in Another Predator:

                @Carlo Your active high endstops are incorrect, should be M574 X2 Y2 Z2 S1 ; Set active high endstops.
                It also looks like you have both RR3 and RR2 configs in your config.g ? file

                Good catch! Though you mean 'high end' endstops, as in their position on the printer; the S parameter is for active high/low (describes how the microswitch works).

                Ian

                Bed-slinger - Mini5+ WiFi/1LC | RRP Fisher v1 - D2 WiFi | Polargraph - D2 WiFi | TronXY X5S - 6HC/Roto | CNC router - 6HC | Tractus3D T1250 - D2 Eth

                undefined 1 Reply Last reply 17 Mar 2020, 15:11 Reply Quote 0
                • undefined
                  boldnuts
                  last edited by boldnuts 17 Mar 2020, 14:52

                  yes correct, which version of the firmware is being used? as it's confusing

                  undefined 1 Reply Last reply 17 Mar 2020, 15:14 Reply Quote 0
                  • undefined
                    Carlo @droftarts
                    last edited by 17 Mar 2020, 15:11

                    @droftarts said in Another Predator:

                    M574 X2 Y2 Z2 S1

                    Great stuff homing now works and endstops offsets now look... correct also
                    Quick calibrate returns:
                    M665
                    Diagonals 440.470:440.470:440.470, delta radius 221.612, homed height 414.196, bed radius 185.0, X 0.073°, Y 0.055°, Z 0.000°
                    M666
                    Endstop adjustments X-0.03 Y-0.29 Z0.32, tilt X0.00% Y0.00%

                    Thank you!

                    1 Reply Last reply Reply Quote 0
                    • undefined
                      Carlo @boldnuts
                      last edited by 17 Mar 2020, 15:14

                      @boldnuts

                      Hi Ian,

                      M115
                      FIRMWARE_NAME: RepRapFirmware for Duet 2 WiFi/Ethernet FIRMWARE_VERSION: 2.05 ELECTRONICS: Duet Ethernet 1.02 or later FIRMWARE_DATE: 2019-12-13b1

                      If that still needed.

                      Thanks

                      undefined 1 Reply Last reply 17 Mar 2020, 15:27 Reply Quote 0
                      • undefined
                        boldnuts @Carlo
                        last edited by 17 Mar 2020, 15:27

                        @Carlo can we see your start gcode from your slicer?, you using G32 (calibrate) before printing?, maybe G29 S1 to load the bed mesh?

                        undefined 1 Reply Last reply 17 Mar 2020, 15:31 Reply Quote 1
                        • undefined
                          Carlo @boldnuts
                          last edited by Carlo 17 Mar 2020, 15:31

                          @boldnuts
                          I have no start code yet having failed to get a layer down yet didn't want to add any complications,
                          However I have been doing G92 Z0 with paper G32 before attempting aprint ..I never home after probe and always with heated bed and nozzle, bed @ 70c nozzle @ 220c.
                          I have done the mesh but don't use it .. more to know it's flat..ish I think?? height maps are above in previous post.

                          If that help ?

                          Thanks

                          1 Reply Last reply Reply Quote 0
                          • undefined
                            boldnuts
                            last edited by 17 Mar 2020, 15:35

                            You need to run G32 in your start gcode before every print and it might be a good idea to run G29 to load the bed mesh as well, then recall it with G29 S1

                            undefined undefined 2 Replies Last reply 17 Mar 2020, 15:36 Reply Quote 0
                            • undefined
                              Danal @boldnuts
                              last edited by 17 Mar 2020, 15:36

                              @boldnuts said in Another Predator:

                              You need to run G32 in your start gcode before every print

                              YES!

                              This is one of the big keys to running a delta. Let it find the bed, every time.

                              Delta / Kossel printer fanatic

                              undefined 1 Reply Last reply 17 Mar 2020, 16:02 Reply Quote 0
                              • undefined
                                Carlo @boldnuts
                                last edited by 17 Mar 2020, 15:42

                                @boldnuts

                                I'll try the mesh I do G32 before every print attempt.
                                dc42 commented a well built delta doesn't need bed mesh so not wanted to ..because I want a well built delta printer 🙂

                                Thanks

                                1 Reply Last reply Reply Quote 0
                                • undefined
                                  Carlo @Danal
                                  last edited by 17 Mar 2020, 16:02

                                  @Danal @boldnuts
                                  This is the height map it just finished ...is it ok?

                                  Mesh.png

                                  Thanks

                                  1 Reply Last reply Reply Quote 0
                                  • undefined
                                    Danal
                                    last edited by 17 Mar 2020, 16:13

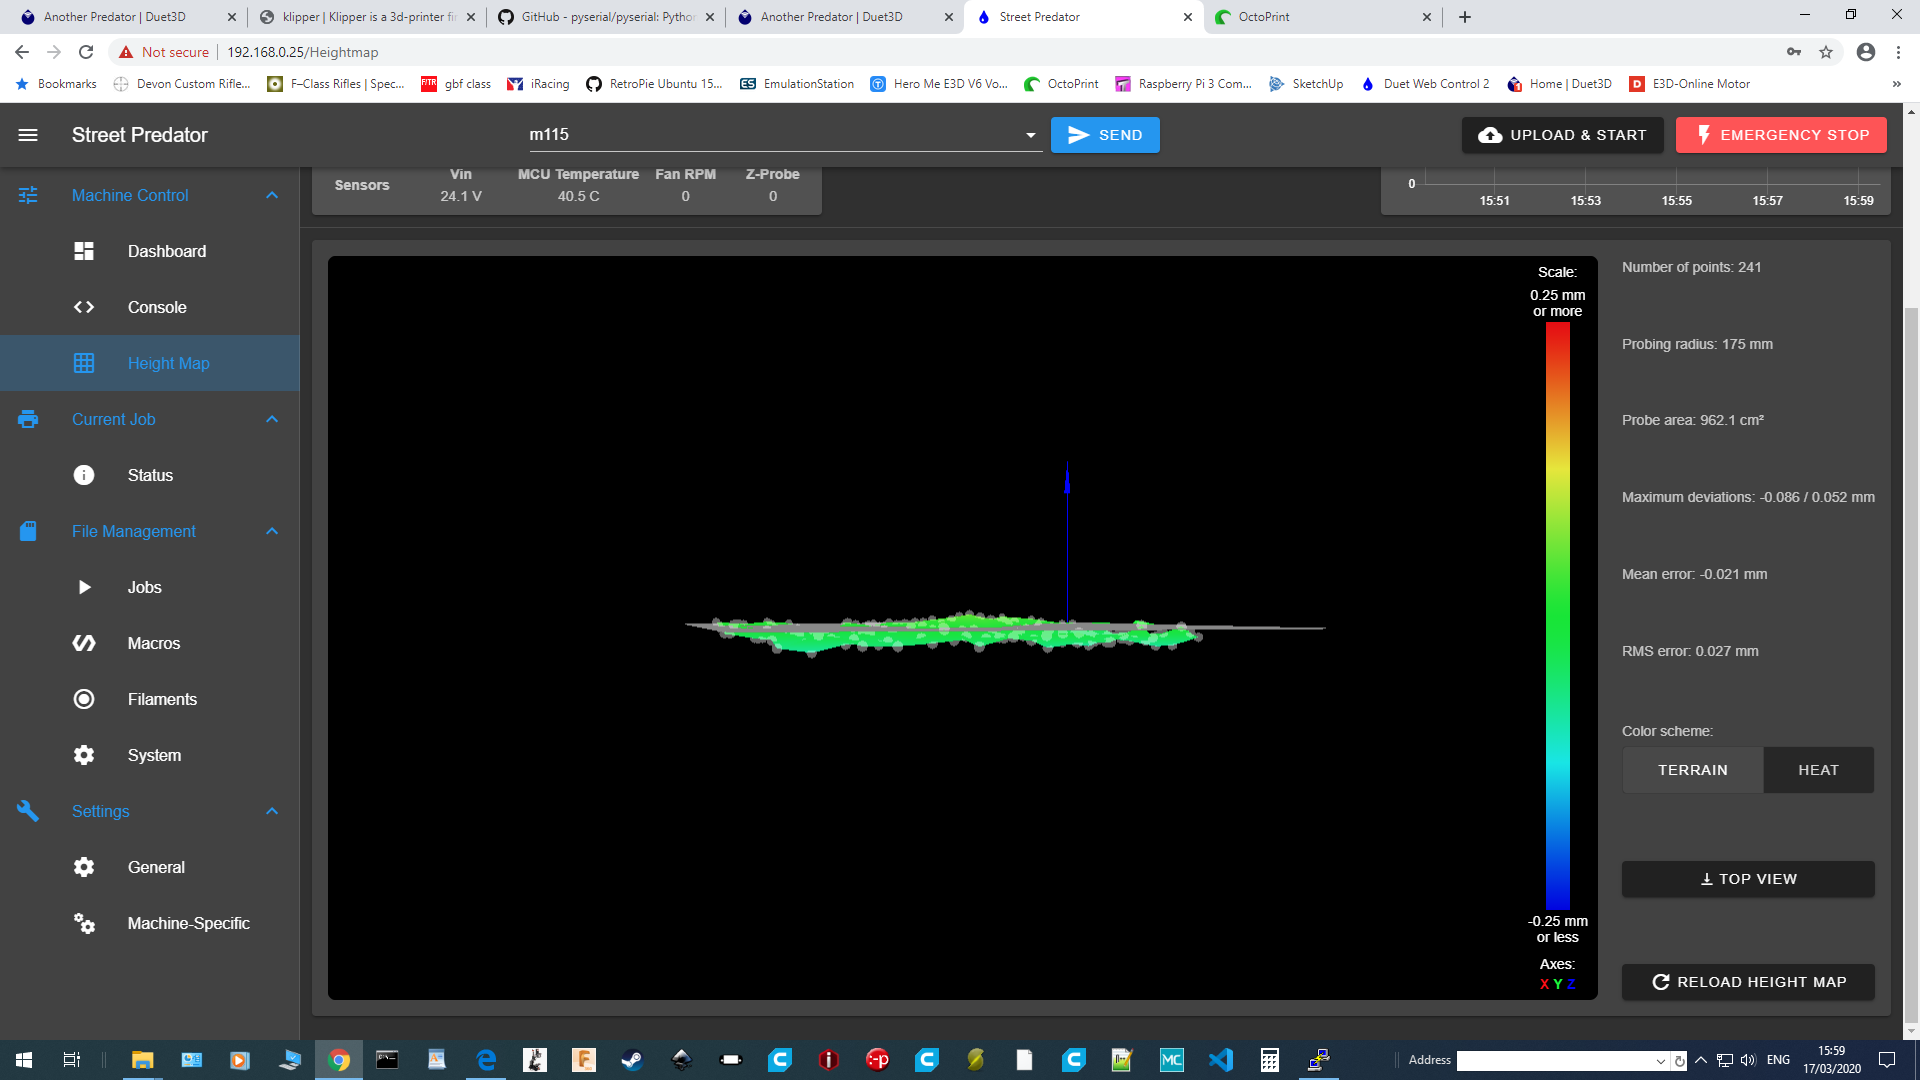
                                    Yes, that's great. Very flat. RMS error .027.

                                    You can probably skip mesh, if you wish. I would still run a simple probe before every print to set bed height. They run very quickly, in the grand scheme of things.

                                    Here's my bed.g (invoked by G32 in slicer startup code). Note: The M106 commands turn off (and back on) the hotend fan. Mine vibrates enough to cause false triggers. It doesn't hurt for it to be off for the one minute or so all the probes take.

                                    Build one for you here http://escher3d.com/pages/wizards/wizardbed.php The big key is to do a 6 or 8 factor, so as not to adjust diagonal rod length. (Do NOT do a 7 or 9, at least not before every print). More info here: https://duet3d.dozuki.com/Wiki/Calibrating_a_delta_printer#Section_Setting_up_the_bed_g_file

                                    ; bed.g file for RepRapFirmware, generated by Escher3D calculator
                                    ; 16 points, 8 factors, probing radius: 280, probe offset (0, 0)
                                    G28
                                    M106 P1 S0
                                    G30 P0 X0.00 Y280.00 Z-99999 H0
                                    G30 P1 X140.00 Y242.49 Z-99999 H0
                                    G30 P2 X242.49 Y140.00 Z-99999 H0
                                    G30 P3 X280.00 Y0.00 Z-99999 H0
                                    G30 P4 X242.49 Y-140.00 Z-99999 H0
                                    G30 P5 X140.00 Y-242.49 Z-99999 H0
                                    G30 P6 X0.00 Y-280.00 Z-99999 H0
                                    G30 P7 X-140.00 Y-242.49 Z-99999 H0
                                    G30 P8 X-242.49 Y-140.00 Z-99999 H0
                                    G30 P9 X-280.00 Y-0.00 Z-99999 H0
                                    G30 P10 X-242.49 Y140.00 Z-99999 H0
                                    G30 P11 X-140.00 Y242.49 Z-99999 H0
                                    G30 P12 X0.00 Y140.00 Z-99999 H0
                                    G30 P13 X121.24 Y-70.00 Z-99999 H0
                                    G30 P14 X-121.24 Y-70.00 Z-99999 H0
                                    G30 P15 X0 Y0 Z-99999 S8
                                    G29 S1
                                    M106 P1 S1 I0 F500 H1 T40

                                    Delta / Kossel printer fanatic

                                    undefined 1 Reply Last reply 17 Mar 2020, 16:27 Reply Quote 1
                                    • undefined
                                      Carlo @Danal
                                      last edited by Carlo 17 Mar 2020, 16:27

                                      @Danal

                                      I need to try something as mesh didn't work...Did probe then ran mesh then ran probe then invoked G29 S1 and loaded the print file and,

                                      latest failure.jpg

                                      I'll play with the probe G31 Z height a little I guess ? ...changed the print file got sick of the other one.
                                      Also I've just redone my bed file I'll try that first before making any other changes
                                      Thanks

                                      undefined 1 Reply Last reply 17 Mar 2020, 16:29 Reply Quote 0
                                      • undefined
                                        droftarts administrators @Carlo
                                        last edited by 17 Mar 2020, 16:29

                                        @Carlo Any reason you didn't baby step down 0.1 or 0.2mm or so? After all this, that would tell you if it's just a probe height problem.

                                        Ian

                                        Bed-slinger - Mini5+ WiFi/1LC | RRP Fisher v1 - D2 WiFi | Polargraph - D2 WiFi | TronXY X5S - 6HC/Roto | CNC router - 6HC | Tractus3D T1250 - D2 Eth

                                        undefined 1 Reply Last reply 17 Mar 2020, 16:30 Reply Quote 0
                                        • undefined
                                          Danal
                                          last edited by 17 Mar 2020, 16:30

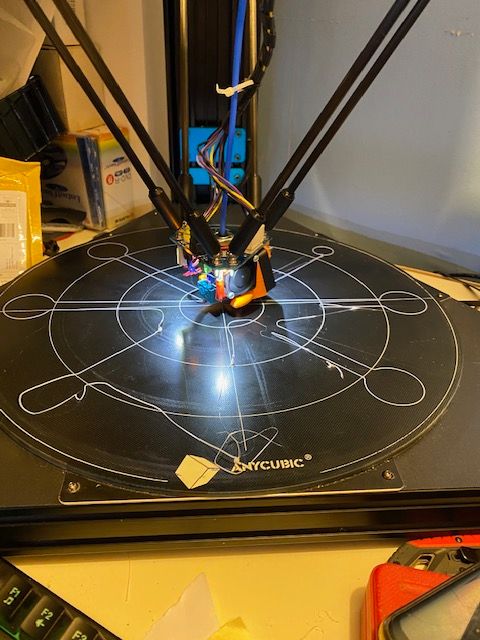
                                          How does the effector actually probe?

                                          Example: The smart effector flexes the circuit board just slightly when the nozzle presses on something, and a strain gauge reads this to trigger the probe output. The strain gauge is a long "spiral" (spiral triangle) of very thin circuit traces that surround the mounting point of the hot end. Because of all of this, the Z offset for a smart effector probe is often right at -0.1

                                          What does your hotend do? Piezo? Slight movement? Etc. What offsets have you used?

                                          Delta / Kossel printer fanatic

                                          undefined 2 Replies Last reply 17 Mar 2020, 16:39 Reply Quote 0
                                          77 out of 204
                                          • First post
                                            77/204
                                            Last post
                                          Unless otherwise noted, all forum content is licensed under CC-BY-SA