Creality BLtouch kit compatibility and wiring
-
@JoergS5 No, just metal clips that came with printer originally. On the metal plate itself is a 4mm sheet of borosilicate glass and a 1 mm thick sheet of smooth pei.
-
@usescoasters I started looking at your config and saw you have set 256 microsteps without interpolation for x and y for 2560 steps per mm and 100 mm per second max speed which makes 256000 pulses per second, which is above maximum. You should make some long curves and call M122 and look whether high hiccups are reported. This may not help with bltouch, but the printing.
-
@JoergS5 I'll do that but a thought just occurred to me.
At one point (as stated above) I sent out the M280 P3 S140 I1 command through the gcode console to put it into 5v logic mode. I only turned the metal screw after doing so.
It may be possible that that screw being too close was the problem preventing the pin from moving in the first place and now it won't move because it's receiving the wrong signal.
In any event, my multimeter still only shows slightly less than 2 mA coming from the pwm pin. Is that the normal current draw when not receiving a pulse responds to the psuedo servo inside the bltouch?
I haven't tried holding the meter onto the wires at the instant I issue the deploy/retract command. Would the current spike for a second and then return to 2 mA? In my limited electrical knowledge I don't really know how pwm actually works.
-
@usescoasters pwm are on and off signals and the amperemeter will only measure the average. An oscilloscope would show the max values.
-
@usescoasters your M558 has H0 set, where the doc says H5
-
@usescoasters I dont know which screw you mean. But I expect that the important part is a magnet and the hall sensor, which are both "undamagable". Electronics should reset with every turning off and on.
-
@usescoasters the deployprobe and retractprobe dont need the I1 Parameter if you use the bltouch on the duex
You have two M280 on deployprobe and a I! on retractprobe, you need only one M280 in every file.
To find the solution, I would disconnect everything not needed and only use the bltouch connected to zstop, not using Duex. When this works, reconnect until you find the point of the error. Otherwise you will always have multiple possible reasons and it is difficult to find the reason. I would use the Bltouch seperated from the hotend also to exclude disturbing reasons. I would make pictures of cabling and config files, so you can find out exactly what was the reason.
I would update to 2.0.5 or 3.1.1 because older firmware could have a bug where youre stumbling over.
-
@JoergS5 Changed the H5 parameter in config.g but it didn't help.
In regards to the I1 paramter on the M280 command, for some reason the bltouch won't turn on, deploy, or report any value unless both are included. This may be because it is failing the self test on startup and I have to clear the alarm. If I try a normal command without inverting it I get nothing at all-just a reported value of 1000 in the z probe box which is the same as when the pins are completely disconnected so I interpret as open circuit or the bltouch being powered off. Also the LED doesn't light up without the I1.
I seem to have solved (or at least determined) the cause of the oversensitivity. I have to turn the bracket at a slight angle so it is just barely askew. I noticed the one I have mounted is extremely sensitive to being perpendicular or horizontal to the ground in the slightest degree.
The screw I was talking about earlier was the one you mentioned could be turned with an allen wrench at the top of the bltouch. As I understand it, this is supposed to be able to come out so one can replace the plastic pin itself if it becomes dirty or damaged.
Before I even tried mounting it to the hotend I tested turning it on (because of the trouble with the first one). Again, I noticed sensitivity to whether or not it was perfectly perpendicular to the ground or not but it was never able to extend the pin even on its own. This has been consistent with both bltouch's I've had.
On both units, I have been able to turn on both red and blue warning LEDs (with the newer cord on the standard color scheme) as well as the orange main power LED. I can successfully call a single probe with the G30 command to home the z axis and at least start probing the bed for point by point mesh compensation heightmap. However it stop and gives me the warning "z probe not triggered at first probing point"
Thanks for your comment on the plug looking loose. By playing around with it with my hand I have determined it's coming off the pins and that is sometimes the reason the probe value triggers early. I'll have to find a better way of making that plug stick more firmly and snuggly.
As for the other firmware I've systematically gone through all versions from 2.0 - 3 in the configurator. I issued the M280 deploy command to turn on the probe without telling it to home.
Strangely, despite setting the printer up as a normal cartesian style printer, the files the tool generated were flawed and defined my printer as another type. I fixed this by going in a changing the printer type to S2 at the start of the config.g file.
By doing those two things I was able to at least install and test all the firmware versions with the M280 P3 S10 I1 command. Doing this the bltouch successfully turn on and became sensitive to touch with the power LED turned on and corresponding to whether it was triggered or not. But in no case did any version of the firmware make the pin deploy.
So at this point everything works and I can tell the printer to home the z axis if I manually pull the pin out with my hand. Doing so it successfully hits the bed and stops the x bar from lowering any further.
I think I can rule out the probe being broken or defective since most of it is working and the error is consistent across two units from two different sellers. It must be a problem on my end in the code, something I'm doing or the environment I'm in
once I find a way to secure the plugin on the probe I'll make a video of the homeing sequence to show what happens more precisely.
-
Tried zip ties to hold the wires but that didn't work. Anyone got any ideas? At this point I'm almost considering try to bend the pins outward and solder the wire leads directly onto them.
-
@JoergS5 I gone so far as to take the entire hotend assembly and fan shroud off the x carriage and now it triggers much more reliably. I guess I'll have to think of a better mounting solution or some kind of EMI filtering to prevent the sensor from triggering early like it has been.
Ironically I switched back to using the Creality cable that gave me so much trouble in the first place and now it's not giving me any trouble at all. It wired up exactly as you would expect the color combos to be and as the documentation suggests.
So at least now I'm back to the point where I can reliably home to a single probe point. Still have to sort out the pin not extending or retracting.
-
@usescoasters said in Creality BLtouch kit compatibility and wiring:
The brown wire had a tear in the lining so I cut, spliced, and twist tied it for good contact
Are you sure you have continuity on that brown wire?
@usescoasters said in Creality BLtouch kit compatibility and wiring:
i'm not absolutely sure what firmware version I have running
Please send M122 and post the result. We really need to know what firmware version you are using. And it should be either 2.05.1 or 3.1.1.
from config.g
M558 P9 H0 F120 T6000                   ; set Z probe type to bltouch and the dive height + speeds
G31 P40 X-44.25 Y-7 Z-1.5                     ; set Z probe trigger value, offset and trigger height
Dive height must be a positive value larger than your trigger height. 5mm is a good start.
You have your G31 Z trigger height as negative. It must be positive as it is the distance of the nozzle ABOVE the bed when the probe triggers.
For the deployprobe.g Since you are using the Duet you MUST remove the
I1. The signal is already inverted on the Duex. It will not deploy or retract if you haveI1.Also, remove
M280 P3 S160 I1for the alarm release. If you really must, add it to the start of homeall, but the deploy and retract macro should only have the command to deploy and retract.From from retractprobe.g you have
M280 P3 S90 I!; retract BLTouchThe letter i followed by exclamation mark isn't valid at all. Remove that.Next, your homeall doesn't actually contain any command to use the BLTouch. It's configured to use an endstop z move.
G91                     ; relative positioning
G1 H1 X-505 Z-505 F1800 ; move quickly to X or Z endstop and stop there (first pass)
G1 H1 X-505             ; home X axis
G1 H1 Z-505             ; home Z axis
G1 X5 Z5 F6000          ; go back a few mm
G1 H1 X-505 F360        ; move slowly to X axis endstop once more (second pass)
G1 H1 Z-505             ; then move slowly to Z axis endstop
G1 H2 Z0 F6000          ; lift Z relative to current position
G1 H1 Y-505 F1800       ; move Y down stopping at the endstop
G90                     ; absolute positioning
G1 H1 Z-505 ; then move slowly to Z axis endstopReplace this with a G1 X Y move to position the probe, followed by G30 to probe. That should also be at the end of the file after X and Y are homed.For homez
G91               ; relative positioning
G1 H2 Z0 F6000    ; lift Z relative to current position
G90               ; absolute positioning
G1 X40.25 Y7 F6000 ; go to first probe point
M280 P3 S10 I1
M280 P3 S160 I1
G30               ; home Z by probing the be
; Uncomment the following lines to lift Z after probing
G91              ; relative positioning
G1 Z0.5 F100       ; lift Z relative to current position
G90              ; absolute positioning
M280 P3 S10 I1
G92 Z8
Remove all the M280 commands. They don't belong there. Also, don't use G92 Z to force a position when using the probe.
Things should start working a lot better when you make those changes, provided that wire still works and you're using a v2x firmware.
-
@usescoasters aside from all the good tips of Phaedrux which you should try I have only one additional comment on the screw. I have found very little information about it, but the one image may explain:
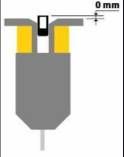
from the document https://www.reprap.me/media/support/BLTouch-Classic1122.pdf
The screw moves the black part - which is called core - up and down and influences the working of the BLTouch. In the clone I bought from Geeetech it evens restricts or frees the moving of the pin from 0 to full movement. (Geetech has only the pin moving, the Smart 2.0 has a green plastic part attached to the pin which is also moving and the core is movable much less).The document itself is too old to be valid for your Smart 3.1, e.g. the 3.3 and 5V doesn't matter because electronics on the BLTouch corrects it automatically. This was described on the Antclabs page.
-
@usescoasters I have a little correction to your homeall:
G1 H2 Z0 F6000
after homing Z, and before homing Y, Z0 should be something like Z5 or more, otherwise your Y homing will scrub on the bed and the probing of Z which comes next may have problems also. -
@Phaedrux According to the config.g file it says its running firmware 2.03 so I'll try updating it. I have one question though sinch the user interface of the configurator of that version is slightly different.
It asks for a modulation pin input for the z probe. If my wiring is exactly the same as this, what should I set this to? I assume either zprobe.mod or zprobe.mod(inverted).
EDIT: I tentatively install version 3 firmware with what I think are the right settings and now it gives me an error when I type in the M280 P3 S10 I1 command.
It says "invalid servo index 3 in M280 command".
-
@Phaedrux I had a chance to look through the gcode documentation on the duet3d website and I see I have to assign a GPIO port in servo mode to the duex pwm 1 channel for RRF3.
After looking through the new config.g the tool gave me I can see it assigned M950 S0 C"deux.pwm1", so the pwm channel is defined as port 0. But when I Input M280 P0 S10 into the gcode console I still recieve the error.
Error: M280: Invalid servo index 0 in M280 command
Here's the new files
homez.g
homeall.g
deployprobe.g
config.g -
In config.g in your M558 remove
+!zprobe.modand add a ^ in front of zprobe.inM558 P9 C"^zprobe.in" H5 F120 T6000The rest looks correct now if you're actually plugged into Duex PWM1 and you're using version 3.1.1.
Please send M115 in the console to confirm the firmware version and send M98 Pconfig.g and report back with any errors.
-
@Phaedrux Now something strange is happening. I'm certain I selected version 3 software and even looking back at my config.g is says it was generated by Configuration Tool v3.1.3:
; Configuration file for Duet WiFi (firmware version 3)
; executed by the firmware on start-up
;
; generated by RepRapFirmware Configuration Tool v3.1.3 on Fri Jun 19 2020 13:20:18 GMT-0400 (Eastern Daylight Time)
But the M115 command returns this:
M115
FIRMWARE_NAME: RepRapFirmware for Duet 2 WiFi/Ethernet FIRMWARE_VERSION: 2.05 ELECTRONICS: Duet WiFi 1.02 or later + DueX5 FIRMWARE_DATE: 2019-12-13b1
Either it's not updating the system files when I upload the zip folder or I'm not understanding something. Is it refering to the same thing or another piece of firmware?
-
Yes it appears that the firmware update was unsuccessful. Going from 2.05 will require updating to 3.0 first, and then 3.1.1. The intermediate upgrade to 3.0 is required to update the programing files before you can go to 3.1.1.
From the release notes: https://github.com/Duet3D/RepRapFirmware/releases/tag/3.1.1
Back up the contents of your /sys folder before upgrading to RRF 3.x in case you need to revert to RRF 2
Many changes to config.g are needed when upgrading from RRF 2.x to 3.x. See https://duet3d.dozuki.com/Wiki/RepRapFirmware_3_overview#Section_Summary_of_what_you_need_to_do_to_convert_your_configuration_and_other_files for a summary. It may be simpler to use the online configurator to generate new files for scratch.Users of RepRapFirmware 2.x cannot upgrade directly to this release because the binaries for the Duet 2 series are too large for the Duet 2 IAP programs. So you must upgrade to RepRapFirmware 3.0 first, then you can upgrade immediately to version 3.1.1. Alternatively, you can use Bossa over USB to upgrade directly to RepRapFirmware 3.1.1 but in this case you will need to upload DWC 3.1.1 and the appropriate IAP file separately.
Once you are actually updated to 3.1.1 your config should work.
-
Could someone please summarize, how to properly connect the Creality BLTouch (Red, Blue, Yellow, Black, White cables) to the Duet 2? I'm still not able to get it running and all the pists about the different colors are quite confusing.
Thanks, Martin
-