Creality BLtouch kit compatibility and wiring
-
@usescoasters said in Creality BLtouch kit compatibility and wiring:
The brown wire had a tear in the lining so I cut, spliced, and twist tied it for good contact
Are you sure you have continuity on that brown wire?
@usescoasters said in Creality BLtouch kit compatibility and wiring:
i'm not absolutely sure what firmware version I have running
Please send M122 and post the result. We really need to know what firmware version you are using. And it should be either 2.05.1 or 3.1.1.
from config.g
M558 P9 H0 F120 T6000                   ; set Z probe type to bltouch and the dive height + speeds
G31 P40 X-44.25 Y-7 Z-1.5                     ; set Z probe trigger value, offset and trigger height
Dive height must be a positive value larger than your trigger height. 5mm is a good start.
You have your G31 Z trigger height as negative. It must be positive as it is the distance of the nozzle ABOVE the bed when the probe triggers.
For the deployprobe.g Since you are using the Duet you MUST remove the
I1. The signal is already inverted on the Duex. It will not deploy or retract if you haveI1.Also, remove
M280 P3 S160 I1for the alarm release. If you really must, add it to the start of homeall, but the deploy and retract macro should only have the command to deploy and retract.From from retractprobe.g you have
M280 P3 S90 I!; retract BLTouchThe letter i followed by exclamation mark isn't valid at all. Remove that.Next, your homeall doesn't actually contain any command to use the BLTouch. It's configured to use an endstop z move.
G91                     ; relative positioning
G1 H1 X-505 Z-505 F1800 ; move quickly to X or Z endstop and stop there (first pass)
G1 H1 X-505             ; home X axis
G1 H1 Z-505             ; home Z axis
G1 X5 Z5 F6000          ; go back a few mm
G1 H1 X-505 F360        ; move slowly to X axis endstop once more (second pass)
G1 H1 Z-505             ; then move slowly to Z axis endstop
G1 H2 Z0 F6000          ; lift Z relative to current position
G1 H1 Y-505 F1800       ; move Y down stopping at the endstop
G90                     ; absolute positioning
G1 H1 Z-505 ; then move slowly to Z axis endstopReplace this with a G1 X Y move to position the probe, followed by G30 to probe. That should also be at the end of the file after X and Y are homed.For homez
G91               ; relative positioning
G1 H2 Z0 F6000    ; lift Z relative to current position
G90               ; absolute positioning
G1 X40.25 Y7 F6000 ; go to first probe point
M280 P3 S10 I1
M280 P3 S160 I1
G30               ; home Z by probing the be
; Uncomment the following lines to lift Z after probing
G91              ; relative positioning
G1 Z0.5 F100       ; lift Z relative to current position
G90              ; absolute positioning
M280 P3 S10 I1
G92 Z8
Remove all the M280 commands. They don't belong there. Also, don't use G92 Z to force a position when using the probe.
Things should start working a lot better when you make those changes, provided that wire still works and you're using a v2x firmware.
-
@usescoasters aside from all the good tips of Phaedrux which you should try I have only one additional comment on the screw. I have found very little information about it, but the one image may explain:
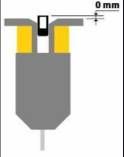
from the document https://www.reprap.me/media/support/BLTouch-Classic1122.pdf
The screw moves the black part - which is called core - up and down and influences the working of the BLTouch. In the clone I bought from Geeetech it evens restricts or frees the moving of the pin from 0 to full movement. (Geetech has only the pin moving, the Smart 2.0 has a green plastic part attached to the pin which is also moving and the core is movable much less).The document itself is too old to be valid for your Smart 3.1, e.g. the 3.3 and 5V doesn't matter because electronics on the BLTouch corrects it automatically. This was described on the Antclabs page.
-
@usescoasters I have a little correction to your homeall:
G1 H2 Z0 F6000
after homing Z, and before homing Y, Z0 should be something like Z5 or more, otherwise your Y homing will scrub on the bed and the probing of Z which comes next may have problems also. -
@Phaedrux According to the config.g file it says its running firmware 2.03 so I'll try updating it. I have one question though sinch the user interface of the configurator of that version is slightly different.
It asks for a modulation pin input for the z probe. If my wiring is exactly the same as this, what should I set this to? I assume either zprobe.mod or zprobe.mod(inverted).
EDIT: I tentatively install version 3 firmware with what I think are the right settings and now it gives me an error when I type in the M280 P3 S10 I1 command.
It says "invalid servo index 3 in M280 command".
-
@Phaedrux I had a chance to look through the gcode documentation on the duet3d website and I see I have to assign a GPIO port in servo mode to the duex pwm 1 channel for RRF3.
After looking through the new config.g the tool gave me I can see it assigned M950 S0 C"deux.pwm1", so the pwm channel is defined as port 0. But when I Input M280 P0 S10 into the gcode console I still recieve the error.
Error: M280: Invalid servo index 0 in M280 command
Here's the new files
homez.g
homeall.g
deployprobe.g
config.g -
In config.g in your M558 remove
+!zprobe.modand add a ^ in front of zprobe.inM558 P9 C"^zprobe.in" H5 F120 T6000The rest looks correct now if you're actually plugged into Duex PWM1 and you're using version 3.1.1.
Please send M115 in the console to confirm the firmware version and send M98 Pconfig.g and report back with any errors.
-
@Phaedrux Now something strange is happening. I'm certain I selected version 3 software and even looking back at my config.g is says it was generated by Configuration Tool v3.1.3:
; Configuration file for Duet WiFi (firmware version 3)
; executed by the firmware on start-up
;
; generated by RepRapFirmware Configuration Tool v3.1.3 on Fri Jun 19 2020 13:20:18 GMT-0400 (Eastern Daylight Time)
But the M115 command returns this:
M115
FIRMWARE_NAME: RepRapFirmware for Duet 2 WiFi/Ethernet FIRMWARE_VERSION: 2.05 ELECTRONICS: Duet WiFi 1.02 or later + DueX5 FIRMWARE_DATE: 2019-12-13b1
Either it's not updating the system files when I upload the zip folder or I'm not understanding something. Is it refering to the same thing or another piece of firmware?
-
Yes it appears that the firmware update was unsuccessful. Going from 2.05 will require updating to 3.0 first, and then 3.1.1. The intermediate upgrade to 3.0 is required to update the programing files before you can go to 3.1.1.
From the release notes: https://github.com/Duet3D/RepRapFirmware/releases/tag/3.1.1
Back up the contents of your /sys folder before upgrading to RRF 3.x in case you need to revert to RRF 2
Many changes to config.g are needed when upgrading from RRF 2.x to 3.x. See https://duet3d.dozuki.com/Wiki/RepRapFirmware_3_overview#Section_Summary_of_what_you_need_to_do_to_convert_your_configuration_and_other_files for a summary. It may be simpler to use the online configurator to generate new files for scratch.Users of RepRapFirmware 2.x cannot upgrade directly to this release because the binaries for the Duet 2 series are too large for the Duet 2 IAP programs. So you must upgrade to RepRapFirmware 3.0 first, then you can upgrade immediately to version 3.1.1. Alternatively, you can use Bossa over USB to upgrade directly to RepRapFirmware 3.1.1 but in this case you will need to upload DWC 3.1.1 and the appropriate IAP file separately.
Once you are actually updated to 3.1.1 your config should work.
-
Could someone please summarize, how to properly connect the Creality BLTouch (Red, Blue, Yellow, Black, White cables) to the Duet 2? I'm still not able to get it running and all the pists about the different colors are quite confusing.
Thanks, Martin
-
-
OMG...why they are not just stick to a standard

Thanks for that!!!
-
Sorry, but I need to double check. It is still confusing to me because the picture show colors in a different order than my Creality BLTouch. Mine has Red, Blue, Yellow, Black, White from richt to left.
Just want to make sure that I don't cable it wrong and damage the Duet 2 board.
Thanks, Martin
-
@MartinNYHC I saw a lot of different combinations.
I expect the best chance of correct assignment is to check the order at the connector and deciding from that which single cable and color is which connection.
My Geetech clone, Smart 2.0 and Smart 3.1, all cables have colors brown-red-yellow-black-white and at all three the 5-pin connector have the same order, so chances are high that when you look at the 5-pin connector, you can find out the correct color-function assignment.
For Duet wiring, please check https://duet3d.dozuki.com/Wiki/Connecting_a_Z_probe#Section_BLTouch then.
-
For those of you who have a beautiful "Red, Blue, Yellow, Black, White"-cable-BLTouch:
Blue goes to expansion pin 1 (+5V)
Red goes to expansion pin 2 (GND)
Yellow goes to expansion pin HEATERx
White goes to Z_PROBE_IN
Black goes to GND on ZPROBE portMaybe this can also be added to the documentation.