Tevo Little Monster scratches print
-
About a year a go I bought a Tevo Little Monster second hand. It was a little dirty but (as far as I could see) unmodified. I put away that noisy "MKS SBASE"-board with smoothieware and installed a nice Duet 2 Ethernet board. I tried for weeks to get it going but without success, then decided to try it again later.
Now I am on it again and already put a lot more effort in it than last time. Anyway, the problem persists and it is really driving me nuts!Out there on the internet are several people who succeeded with a duet board on the same printer, so it must be possible. For Example this one.
My Background
I am doing 3D printing for a while now. Besides the Little Monster I own a Makerbot Replicator 2X (running latest Sailfish), a Anycubic Delta Linear Plus (Running on a Duet 2 Ethernet with RRF 3.1.1) and – for four weeks now – a Two Trees Sapphire Pro (running self-compiled Marlin 2.x). All these printers are running absolutely fine.
Problem
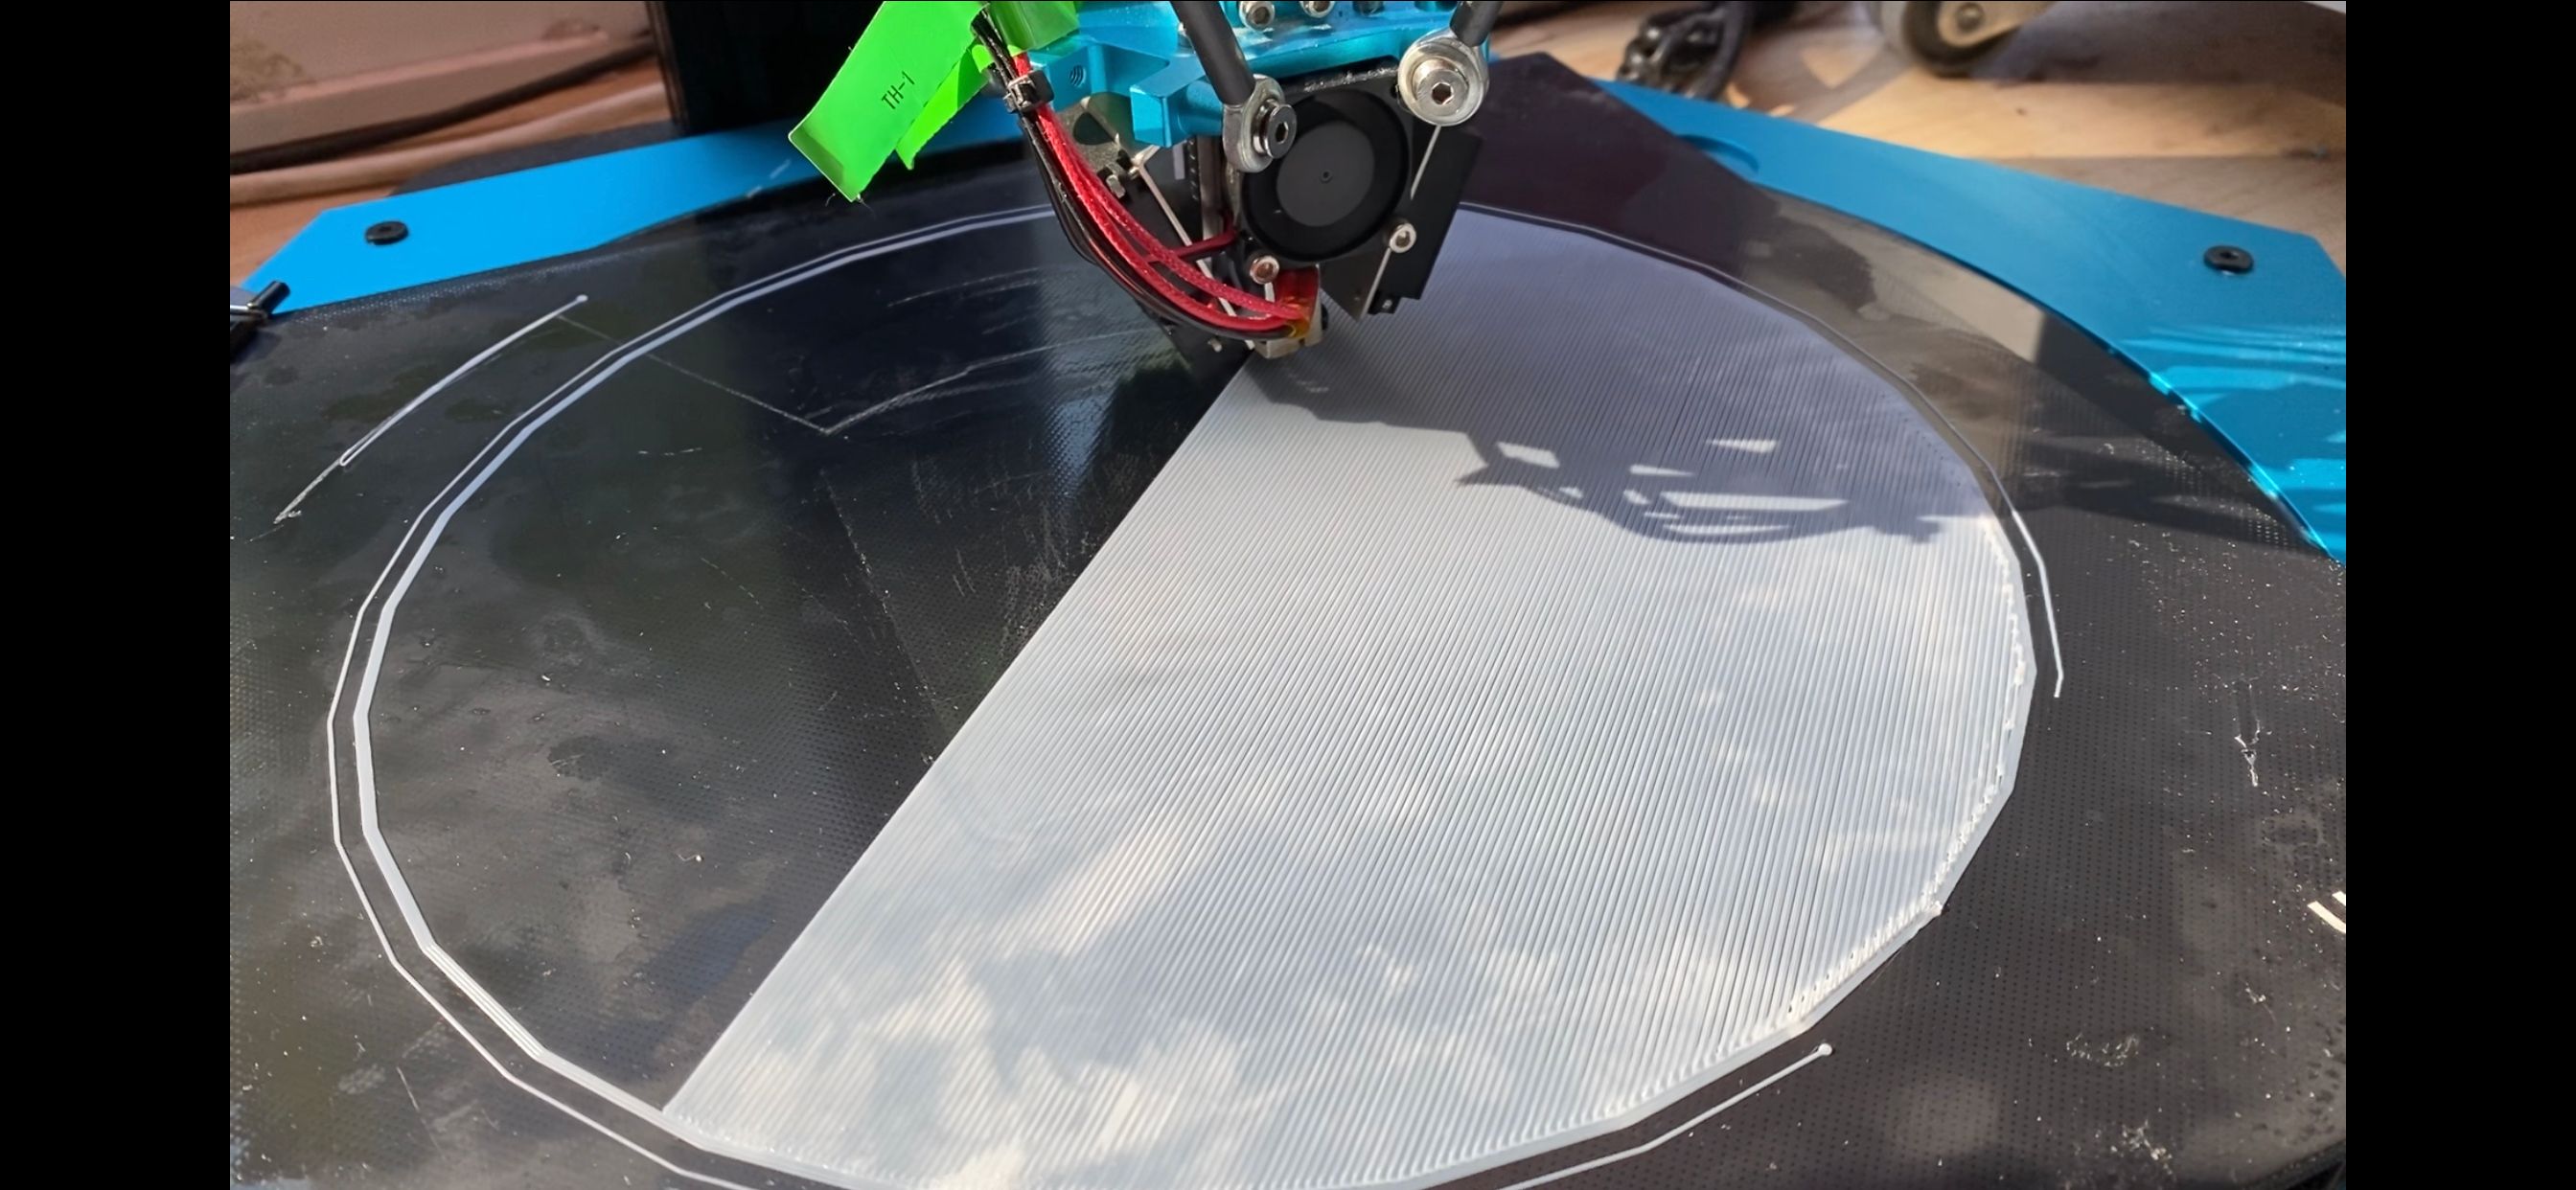
As far as I can tell, my problem boils down to inaccurate z positioning of the nozzle.
This makes the nozzle (heavily) scratch on printed parts of the same layer. Small parts are often ripped of the bed by the nozzle before the print is finished. Practically I cannot use the printer in its current state.Here is a video of the printer scratching
I really do not know what I should try to make the printer work properly or how to narrow down the cause of my problem anyhow. I can not even tell if my problem is hardware or software related. Any help is very appreciated!
Note: Category of this question was chosen wrong by accident. Smart Effector is not used. I don't know how to change category now.
Test setup
My usual test scenario is a 100 x 100 x 20 mm box with 3 walls, 2 top/bottom-layers and 45% Cubic Infill, sliced by slic3r. Maximum Speed 80 mm/s. The speed should be fine, as the printer is advertised with 300 mm/s.
What I changed from stock:
- Install genuine BL Touch
- Changed controller board from stock "MKS SBASE" to Duet 2 Ethernet
- Removed sticker from printbed and placed a UltraBase (310 x 310 mm) on top of the stock glas plate
- Replaced stock titan-ish extruder by cloned BMG dual drive Extruder (same extruder as on all of my other printers)
- Replaced full-metal hotend by a hotend with PTFE liner
What I already tried to solve the problem:
Hypothesis: Bad config of duet board
Actions: see separate section
Hypothesis: Narrow nosed nozzle does not smooth the printed line enough
Actions: replaced narrow-nosed nozzle (0.6mm) by broad-nosed nozzle (0.4mm) and adjusted cura accordingly
Result: No difference
Hytothesis: There is something wrong with the firmware
Action: Upgraded duet board from RepRap 2.0 to 3.0
Result: No difference
Hyptothesis: Geometrical inaccurate build
Actions: Measured arm space on effector and carriages (by caliper), "measured" rod lengths by eye (b/c my caliper can only measure about 150mm), checked towers by eye for bending.
Result: Arm spacing on effector and carriage is the same down to 0.19mm. Rod lengths have no noticeable difference, towers seem to be straight.
Hypothesis: Joints on delta Rods have play
Actions: Tried to shake/move/wiggle the effector by hand
Result: No noticeable play
Hypothesis: Overextrusion
Action: Intentionally underextruded (80% flow) for testing
Result: Printed lines became noticeable more narrow (not even touch each other in solid layers), but scratching persists.
Hypothesis: Rubber wheels of the carriages running too rough and are worn out
Action: Replaced rubber wheels by linear Rails. (Thingiverse)
Result: Carriages run much smoother, but this change does not help with my problem
Hypothesis: Belt tension is bad
Action: Tensioned the belts thoroughly
Result: No noticable difference
Hypothesis: Tooth belts are worn out
Action: Replaced tooth-belt with new GT-2 Belt. Tensioned again thoroughly
Result: Belts look more regular when moving, does not help with my problem
Hypothesis: Pulleys and Idlers are worn out or not sufficiently round
Action: Replaced Pulleys and Idlers
Result: No noticable difference
Hypothesis: One or more of the stepper motors are not working properly
Action: Replaced all tower motors (incl. wiring) with brand new ones
Result: No noticable difference
Hypothesis: One of the stepper drivers is not working correctly
Action1: Investigation of signals on the motor-wires by oscilloscope
Result1: They all looked about the same (short square pulses), in principal no difference between all motor wires. (I do not know how these signals should look like. I just tried to spot differences.)
Action2: Changed the drivers for the tower motors one by one with the unused E1-driver
Result2: No noticable difference
Hypothesis: Leveling is bad due bad probing
Action1: Checked leveling manually (with feeler gauge) and checked BL-Touch repeatability.
Result1: Found deviation of 0.2mm on some points between automated and manual leveling. Repeatability is good (accurate to 0.02mm)
Action2: Leveling is now done by a DF9-40 weight-resistor (and a voltage divider). This sensor is mounted (manually every time) directly under the nozzle.
Result2: The first layer is next to perfect. To my understanding that means a correct calibration of Delta Parameters.
Hypothesis: Flying extruder is too heavy and impacts the accuracy of the carriage movement
Action: changed extruder from flying to remote, mounted on one of the towers
Result: Problem seems to hit maybe a little less. I am not entirely sure about this.
Hypothesis: My problem is no problem, a little scratching is nothing unusual
Action: Tried the same print on my smaller Delta printer
Result: No scratching on the other printer. Hence it seems not to be usual.
Hypothesis: Scratching is related partial overextrusion due to "extrusion delay" caused by bowden system
Action: Tested linear advance between 0 to 1.2
Result: linear advance seems to work as intended (watching the extruder), but does not change anything on my problem
Hypothesis: There is something wrong with my duet board.
Action: Replaced Duet Ethernet board with a brand new Duet Wifi Board (yes, I bought a new one) and installed RRF 3.1.1
Result: no noticeable difference
Configuration
I tried to transfer the settings from the original smoothieware config-files as good as possible. Original smoothieware files can be found here on github
To have a consistent config, I used the RRF Browser Config Tool.
Motor Current:
There is no advice printed on the original motors concerning the current. Smoothieware config file says 1.5 Amp. Thats what I configured. The Replacement-Motors came with a data sheet, they can take 2 Amp. So they got 2 Amp. As this does not seem to make any difference, I went down to 1000 mA again.Steps per mm:
On all tower motors there are 20-tooth-GT2-pulleys. RRF Config tool suggests 80 steps/mm (with 16x microstepping). I tried it with and without interpolation from 16x to 256x and with "native" 256x microstepping (1280 steps/mm). Also tried native 32x microstepping with 159.53 steps/mm (like in the smoothieware config) and 160 steps/mm. Does not change anything on the problem.Delta Parameters:
Original Smoothieware config suggests:arm_length 397.1900 # This is the length of an arm from hinge to hinge arm_radius 157.0741 # This is the horizontal distance from hinge to hinge when the effector is centeredThat seems to be (roughly) consistent with what I measure by folding ruler. So that is what I put in my config right away.
Auto Calibration:
Tried 4,6,7,8 and 9 factors (using the force-sensor, not BL Touch) and put the results into splunk. Each data point is averaged over 3 calibration runs with exactly the same settings, every time starting from the smoothieware stock-values. (First run was with 159.53 steps/mm, second with 160 steps/mm)
Surprisingly the auto calibration finds reliably the same parameters, which differ from the stock-config ones. I have no Idea why, but similar things happen on my smaller delta printer. Hence I do not consider this a problem.
Speed and acceleration:
Lowering acceleration (down to 300 mm/s) does not change anything. Lowering speed makes scratching less loud, but still hearable/feelable rumble from the nozzle on the print. Prints are still ripped of the print bed.config.g:; Configuration file for Duet WiFi (firmware version 3) ; executed by the firmware on start-up ; ; generated by RepRapFirmware Configuration Tool v3.1.1 on Wed Jun 03 2020 19:59:35 GMT+0200 (CEST) ; General preferences G90 ; send absolute coordinates... M83 ; ...but relative extruder moves M550 P"jKossel19" ; set printer name M665 R157.0741 L397.19 B140 H521 ; Set delta radius, diagonal rod length, printable radius and homed height ; Values from original smoothieware firmware, height -4mm b/c glass plate M666 X0 Y0 Z0 ; put your endstop adjustments here, or let auto calibration find them ; Network M552 S1 ; enable network ; Drives M569 P0 S1 ; physical drive 0 goes forwards M569 P1 S1 ; physical drive 1 goes forwards M569 P2 S1 ; physical drive 2 goes forwards M569 P3 S0 ; physical drive 3 goes forwards M584 X0 Y1 Z2 E3 ; set drive mapping M350 X16 Y16 Z16 E16 I1 ; configure microstepping with interpolation M92 X80.00 Y80.00 Z80.00 E415.00 ; set steps per mm M566 X1200.00 Y1200.00 Z1200.00 E1200.00 ; set maximum instantaneous speed changes (mm/min) M203 X18000.00 Y18000.00 Z18000.00 E1200.00 ; set maximum speeds (mm/min) , should be 300mm/s for tower axis M201 X5000.00 Y5000.00 Z5000.00 E1000.00 ; set accelerations (mm/s^2) M906 X1500 Y1500 Z1500 E800 I30 ; set motor currents (mA) and motor idle factor in per cent M84 S30 ; Set idle timeout ; Axis Limits M208 Z0 S1 ; set minimum Z ; Endstops M574 X2 S1 P"xstop" ; configure active-high endstop for high end on X via pin xstop M574 Y2 S1 P"ystop" ; configure active-high endstop for high end on Y via pin ystop M574 Z2 S1 P"zstop" ; configure active-high endstop for high end on Z via pin zstop ; Z-Probe M558 P1 C"zprobe.in" H5 F120 T3600 A5 ; set Z probe type to unmodulated and the dive height + speeds G31 P200 X0 Y0 Z-0.2 ; set Z probe trigger value, offset and trigger height M557 R110 S20 ; define mesh grid ; Heaters M308 S0 P"bedtemp" Y"thermistor" T100000 B4138 ; configure sensor 0 as thermistor on pin bedtemp M950 H0 C"bedheat" T0 Q2 ; create bed heater output on bedheat and map it to sensor 0 M307 H0 B0 S1.00 ; disable bang-bang mode for the bed heater and set PWM limit M140 H0 ; map heated bed to heater 0 M143 H0 S120 ; set temperature limit for heater 0 to 120C M308 S1 P"e0temp" Y"thermistor" T100000 B4138 ; configure sensor 1 as thermistor on pin e0temp M950 H1 C"e0heat" T1 ; create nozzle heater output on e0heat and map it to sensor 1 M307 H1 B0 S1.00 ; disable bang-bang mode for heater and set PWM limit ; Fans M950 F0 C"fan0" Q500 ; create fan 0 on pin fan0 and set its frequency M106 P0 C"HeatSinkFan" S0 H1 T45 ; set fan 0 name and value. Thermostatic control is turned on M950 F1 C"fan1" Q500 ; create fan 1 on pin fan1 and set its frequency M106 P1 C"NozzleFan" S0 H-1 ; set fan 1 name and value. Thermostatic control is turned off ; Tools M563 P0 S"volcano" D0 H1 F0 ; define tool 0 G10 P0 X0 Y0 Z0 ; set tool 0 axis offsets G10 P0 R0 S0 ; set initial tool 0 active and standby temperatures to 0C ; Custom settings are not defined M501 ; load config overwritesconfig-override.g:; config-override.g file generated in response to M500 at 2020-06-06 14:43 ; This is a system-generated file - do not edit ; Delta parameters M665 L408.096:408.096:408.096 R158.865 H516.822 B140.0 X0.043 Y0.615 Z0.000 M666 X1.288 Y-0.412 Z-0.876 A-0.42 B-0.20 ; Heater model parameters M307 H0 A159.3 C519.1 D2.2 S1.00 V24.4 B0 M307 H1 A670.6 C238.0 D7.9 S1.00 V24.2 B0 ; Pressure Advance M572 D0 S0.5 ; pressure advance ; Workplace coordinates G10 L2 P1 X0.00 Y0.00 Z0.00 G10 L2 P2 X0.00 Y0.00 Z0.00 G10 L2 P3 X0.00 Y0.00 Z0.00 G10 L2 P4 X0.00 Y0.00 Z0.00 G10 L2 P5 X0.00 Y0.00 Z0.00 G10 L2 P6 X0.00 Y0.00 Z0.00 G10 L2 P7 X0.00 Y0.00 Z0.00 G10 L2 P8 X0.00 Y0.00 Z0.00 G10 L2 P9 X0.00 Y0.00 Z0.00
Workarounds:
- Yes Z-hop helps, but only with travel moves. That is no solution, only a partly working workaround.
- No infill with crossing lines: makes infill less scratchy, but no: i want a sturdy infill.
What I still do not understand:
-
Does a perfect first layer really mean accurate calibration of the delta-parameters? Is there any other way i can be sure?
-
I really would like to know more about the effector tilt. But a bubble level does not offer enough accuracy. Is there any good way to measure this?
-
I am absolutely not sure about this, but I remember very faintly not to have this problem when printing with the original smoothie board on a completely unmodified printer. But I only made one or two test prints with it. Sadly I cannot test it anymore, because I do not have the smoothie board anymore.
-
There are parameters in the smoothie config that I cannot find in the duet config. Neither could I find why the duet config does not need these parameters.
- mm_max_arc_error
- mm_per_arc_segment
-
Auto calibration finds (repeatable) delta parameters that do not match the smoothieware config, mainly rod length and delta radius. Is there any difference in definition? The numbers from the original smoothieware definition seem to be more consistent with my (quite unprecise) measurements (down to 1-2 mm). I actually know this behavior of "too long" calibrated push rods from my Anycubic Delta. But it does not seem to cause any problems there.
-
I've moved to the tuning and tweaking forum, might get more eyes.
I'm not a delta user, so I haven't got much insight, unfortunately. If the first layer is perfect, that would seem to indicate the calibration is good.
Please share your config.g and config override and bed.g and your slicer start gcode. Include the results of a M122 for good measure.
Are you using mesh compensation?
What does your height map look like?
What does the print surface of solid infill look like?
Does the Z axis move the expected amount? If you command to go to Z0, does it touch the bed? If you raise it to 100mm does it actually move up exactly 100mm?With 2a motors, the current should be set to 1500-1800ma for printing ideally.
x16 microstepping with interpolation to x256 is recommended.
And finally, have you been through this? https://duet3d.dozuki.com/Wiki/Calibrating_a_delta_printer
My first instinct is that it's either over extrusion, or a mechanical issue.
-
Thank you, @Phaedrux for moving my question!
@Phaedrux said in Tevo Little Monster scratches print:
Please share your config.g and config override and bed.g and your slicer start gcode. Include the results of a M122 for good measure.
config.gandconfig-override.gcan already be found in my first post.Here is the
bed.g:; bed.g ; called to perform automatic delta calibration via G32 ; ; generated by RepRapFirmware Configuration Tool v3.1.1 on Wed Jun 03 2020 19:59:35 GMT+0200 (CEST) M561 ; clear any bed transform ; Probe the bed at 12 peripheral and 3 halfway points, and perform 9-factor auto compensation ; Before running this, you should have set up your Z-probe trigger height to suit your build, in the G31 command in config.g. G30 P0 X0 Y109.9 H0 Z-99999 G30 P1 X54.95 Y95.18 H0 Z-99999 G30 P2 X95.18 Y54.95 H0 Z-99999 G30 P3 X109.9 Y0 H0 Z-99999 G30 P4 X95.18 Y-54.95 H0 Z-99999 G30 P5 X54.95 Y-95.18 H0 Z-99999 G30 P6 X0 Y-109.9 H0 Z-99999 G30 P7 X-54.95 Y-95.18 H0 Z-99999 G30 P8 X-95.18 Y-54.95 H0 Z-99999 G30 P9 X-109.9 Y0 H0 Z-99999 G30 P10 X-95.18 Y54.95 H0 Z-99999 G30 P11 X-54.95 Y95.18 H0 Z-99999 G30 P12 X0 Y54.9 H0 Z-99999 G30 P13 X47.54 Y-27.45 H0 Z-99999 G30 P14 X-47.54 Y-27.45 H0 Z-99999 G30 P15 X0 Y0 H0 Z-99999 S9 ; Use S-1 for measurements only, without calculations. Use S4 for endstop heights and Z-height only. Use S6 for full 6 factors ; If your Z probe has significantly different trigger heights depending on XY position, adjust the H parameters in the G30 commands accordingly. The value of each H parameter should be (trigger height at that XY position) - (trigger height at centre of bed)And here is what the
M122-Command says (after startup and calibration, not printed yet):=== Diagnostics === RepRapFirmware for Duet 2 WiFi/Ethernet version 3.1.1 running on Duet WiFi 1.02 or later Board ID: 08DLM-*****-*****-*****-*****-***** Used output buffers: 3 of 24 (12 max) === RTOS === Static ram: 27980 Dynamic ram: 93152 of which 44 recycled Exception stack ram used: 552 Never used ram: 9344 Tasks: NETWORK(ready,384) HEAT(blocked,1224) MAIN(running,612) IDLE(ready,80) Owned mutexes: WiFi(NETWORK) === Platform === Last reset 01:14:58 ago, cause: power up Last software reset at 2020-06-05 18:54, reason: User, spinning module GCodes, available RAM 9632 bytes (slot 2) Software reset code 0x0003 HFSR 0x00000000 CFSR 0x00000000 ICSR 0x0441f000 BFAR 0xe000ed38 SP 0xffffffff Task MAIN Error status: 0 MCU temperature: min 28.8, current 32.5, max 34.9 Supply voltage: min 24.1, current 24.3, max 24.5, under voltage events: 0, over voltage events: 0, power good: yes Driver 0: standstill, SG min/max 0/1023 Driver 1: standstill, SG min/max 0/197 Driver 2: standstill, SG min/max 0/198 Driver 3: standstill, SG min/max not available Driver 4: standstill, SG min/max not available Date/time: 2020-06-10 22:08:11 Cache data hit count 4294967295 Slowest loop: 884.98ms; fastest: 0.12ms I2C nak errors 0, send timeouts 0, receive timeouts 0, finishTimeouts 0, resets 0 === Storage === Free file entries: 10 SD card 0 detected, interface speed: 20.0MBytes/sec SD card longest read time 1.8ms, write time 309.9ms, max retries 0 === Move === Hiccups: 0(0), FreeDm: 169, MinFreeDm: 163, MaxWait: 319042ms Bed compensation in use: mesh, comp offset 0.000 === MainDDARing === Scheduled moves: 1634, completed moves: 1634, StepErrors: 0, LaErrors: 0, Underruns: 0, 0 CDDA state: -1 === AuxDDARing === Scheduled moves: 0, completed moves: 0, StepErrors: 0, LaErrors: 0, Underruns: 0, 0 CDDA state: -1 === Heat === Bed heaters = 0 -1 -1 -1, chamberHeaters = -1 -1 -1 -1 === GCodes === Segments left: 0 Movement lock held by null HTTP is idle in state(s) 0 Telnet is idle in state(s) 0 File is idle in state(s) 0 USB is idle in state(s) 0 Aux is idle in state(s) 0 Trigger is idle in state(s) 0 Queue is idle in state(s) 0 Daemon is idle in state(s) 0 Autopause is idle in state(s) 0 Code queue is empty. === Network === Slowest loop: 1220.40ms; fastest: 0.00ms Responder states: HTTP(2) HTTP(0) HTTP(0) HTTP(0) FTP(0) Telnet(0), 0 sessions HTTP sessions: 1 of 8 - WiFi - Network state is active WiFi module is connected to access point Failed messages: pending 0, notready 0, noresp 0 WiFi firmware version 1.23 WiFi MAC address **:**:**:**:**:** WiFi Vcc 3.35, reset reason Unknown WiFi flash size 4194304, free heap 20992 WiFi IP address 192.168.1.15 WiFi signal strength -56dBm, reconnections 0, sleep mode modem Socket states: 0 4 0 0 0 0 0 0@Phaedrux said in Tevo Little Monster scratches print:
Are you using mesh compensation?
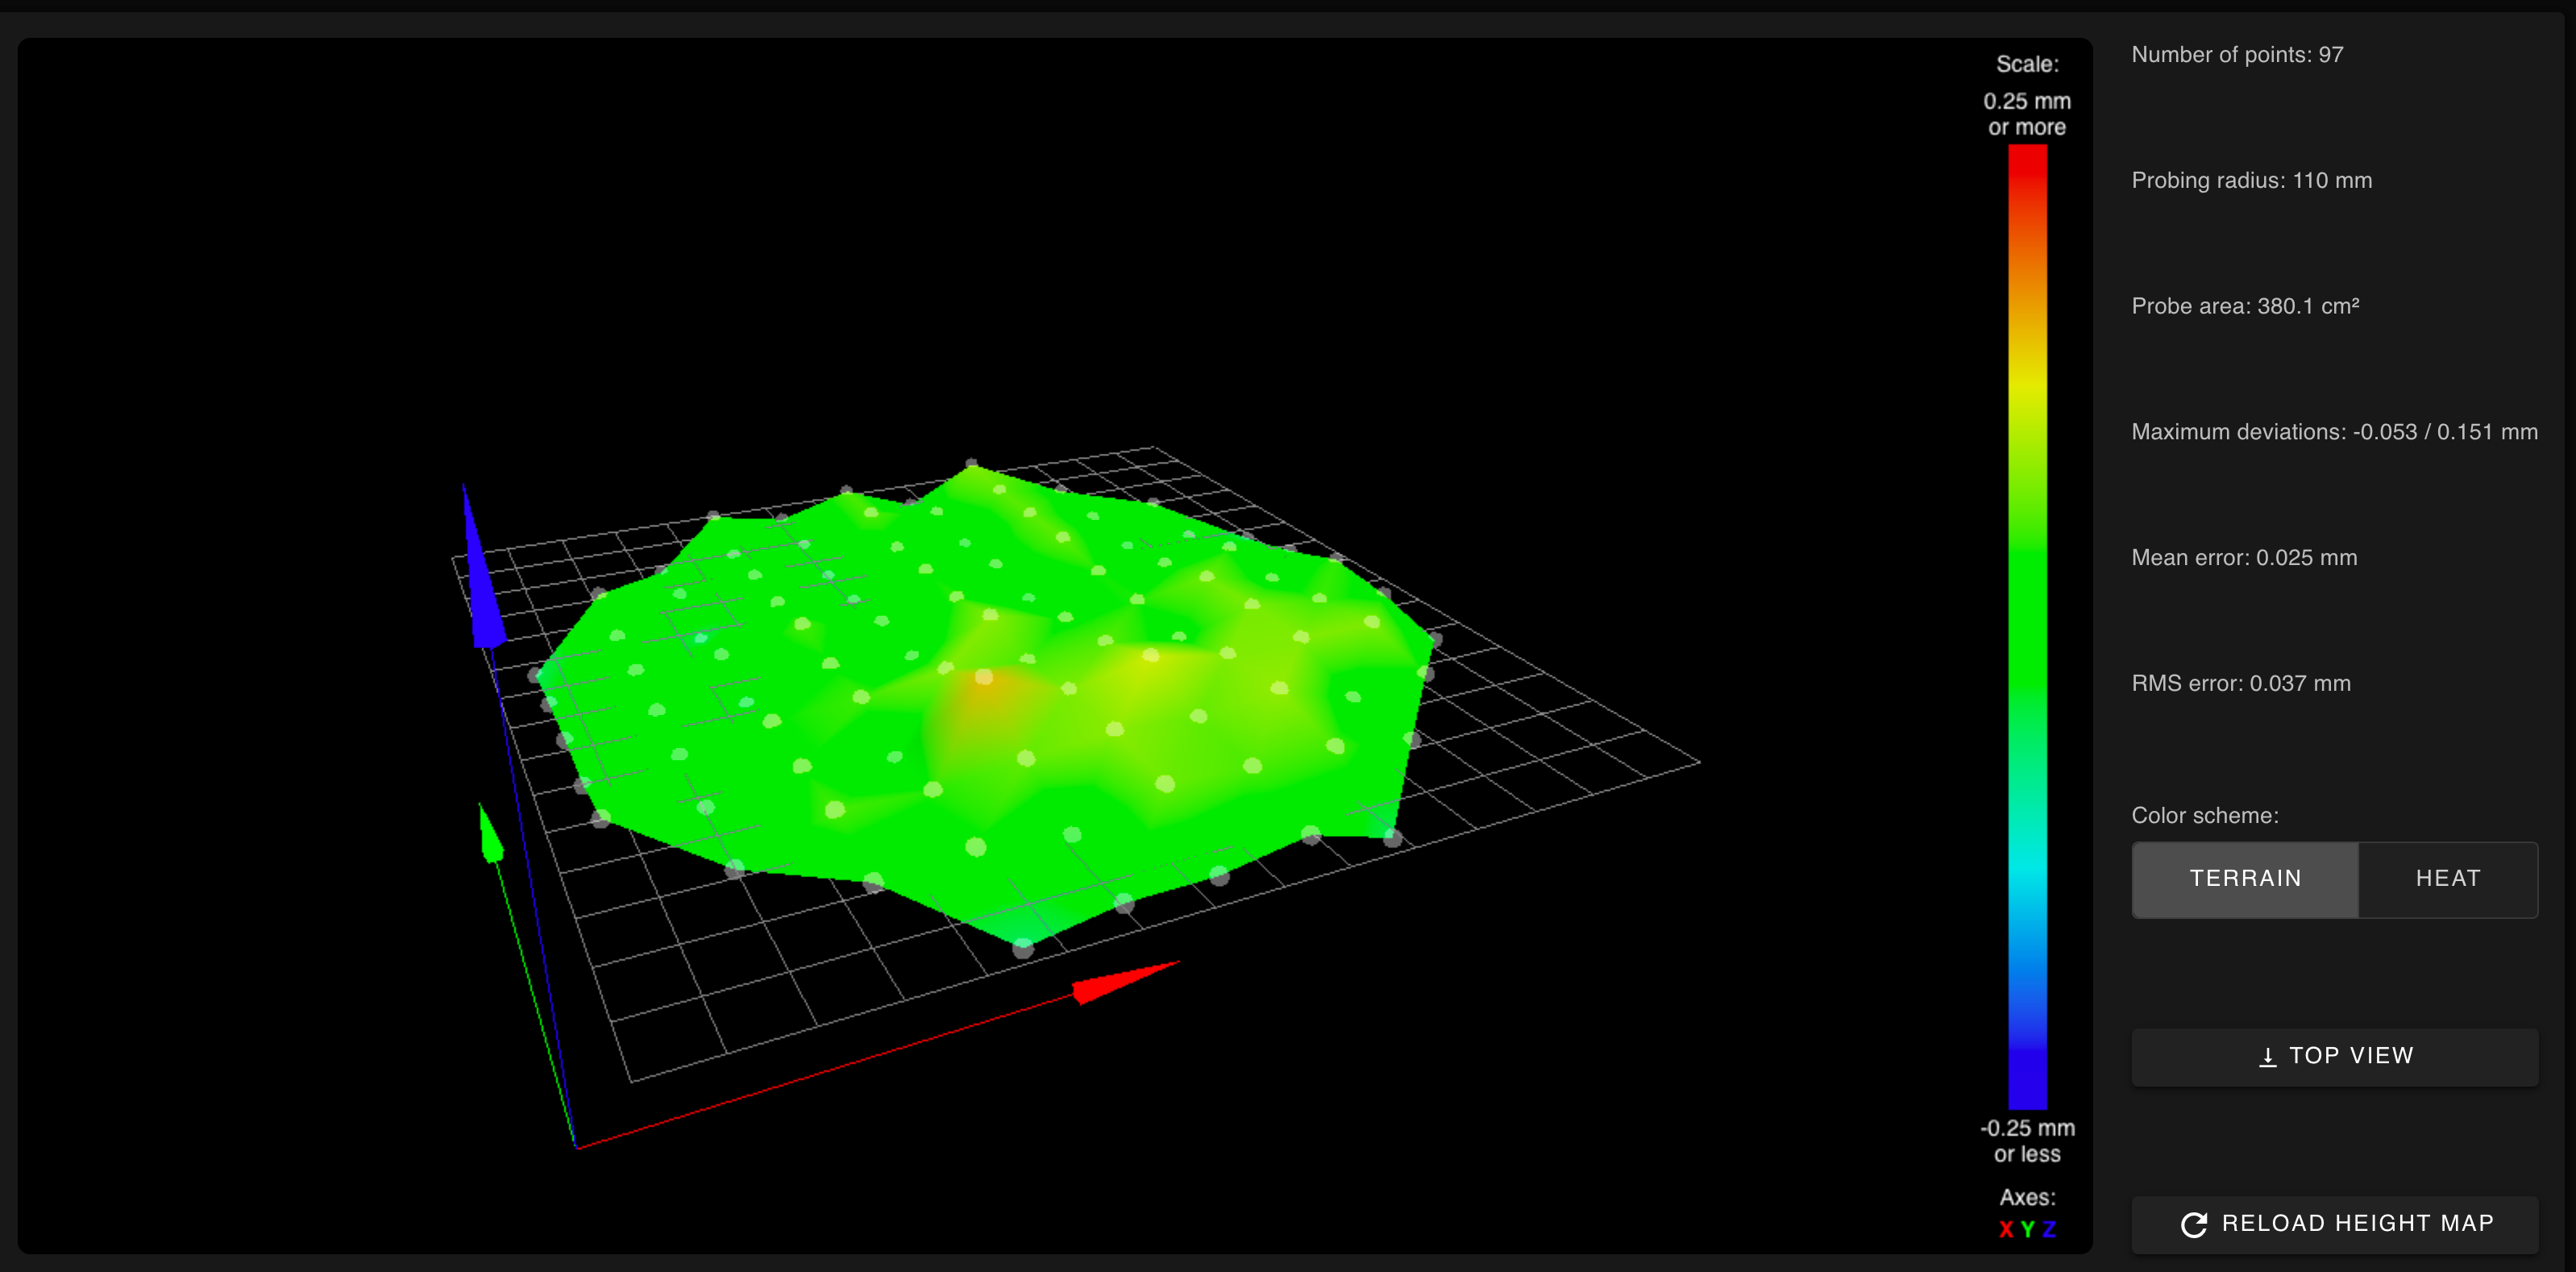
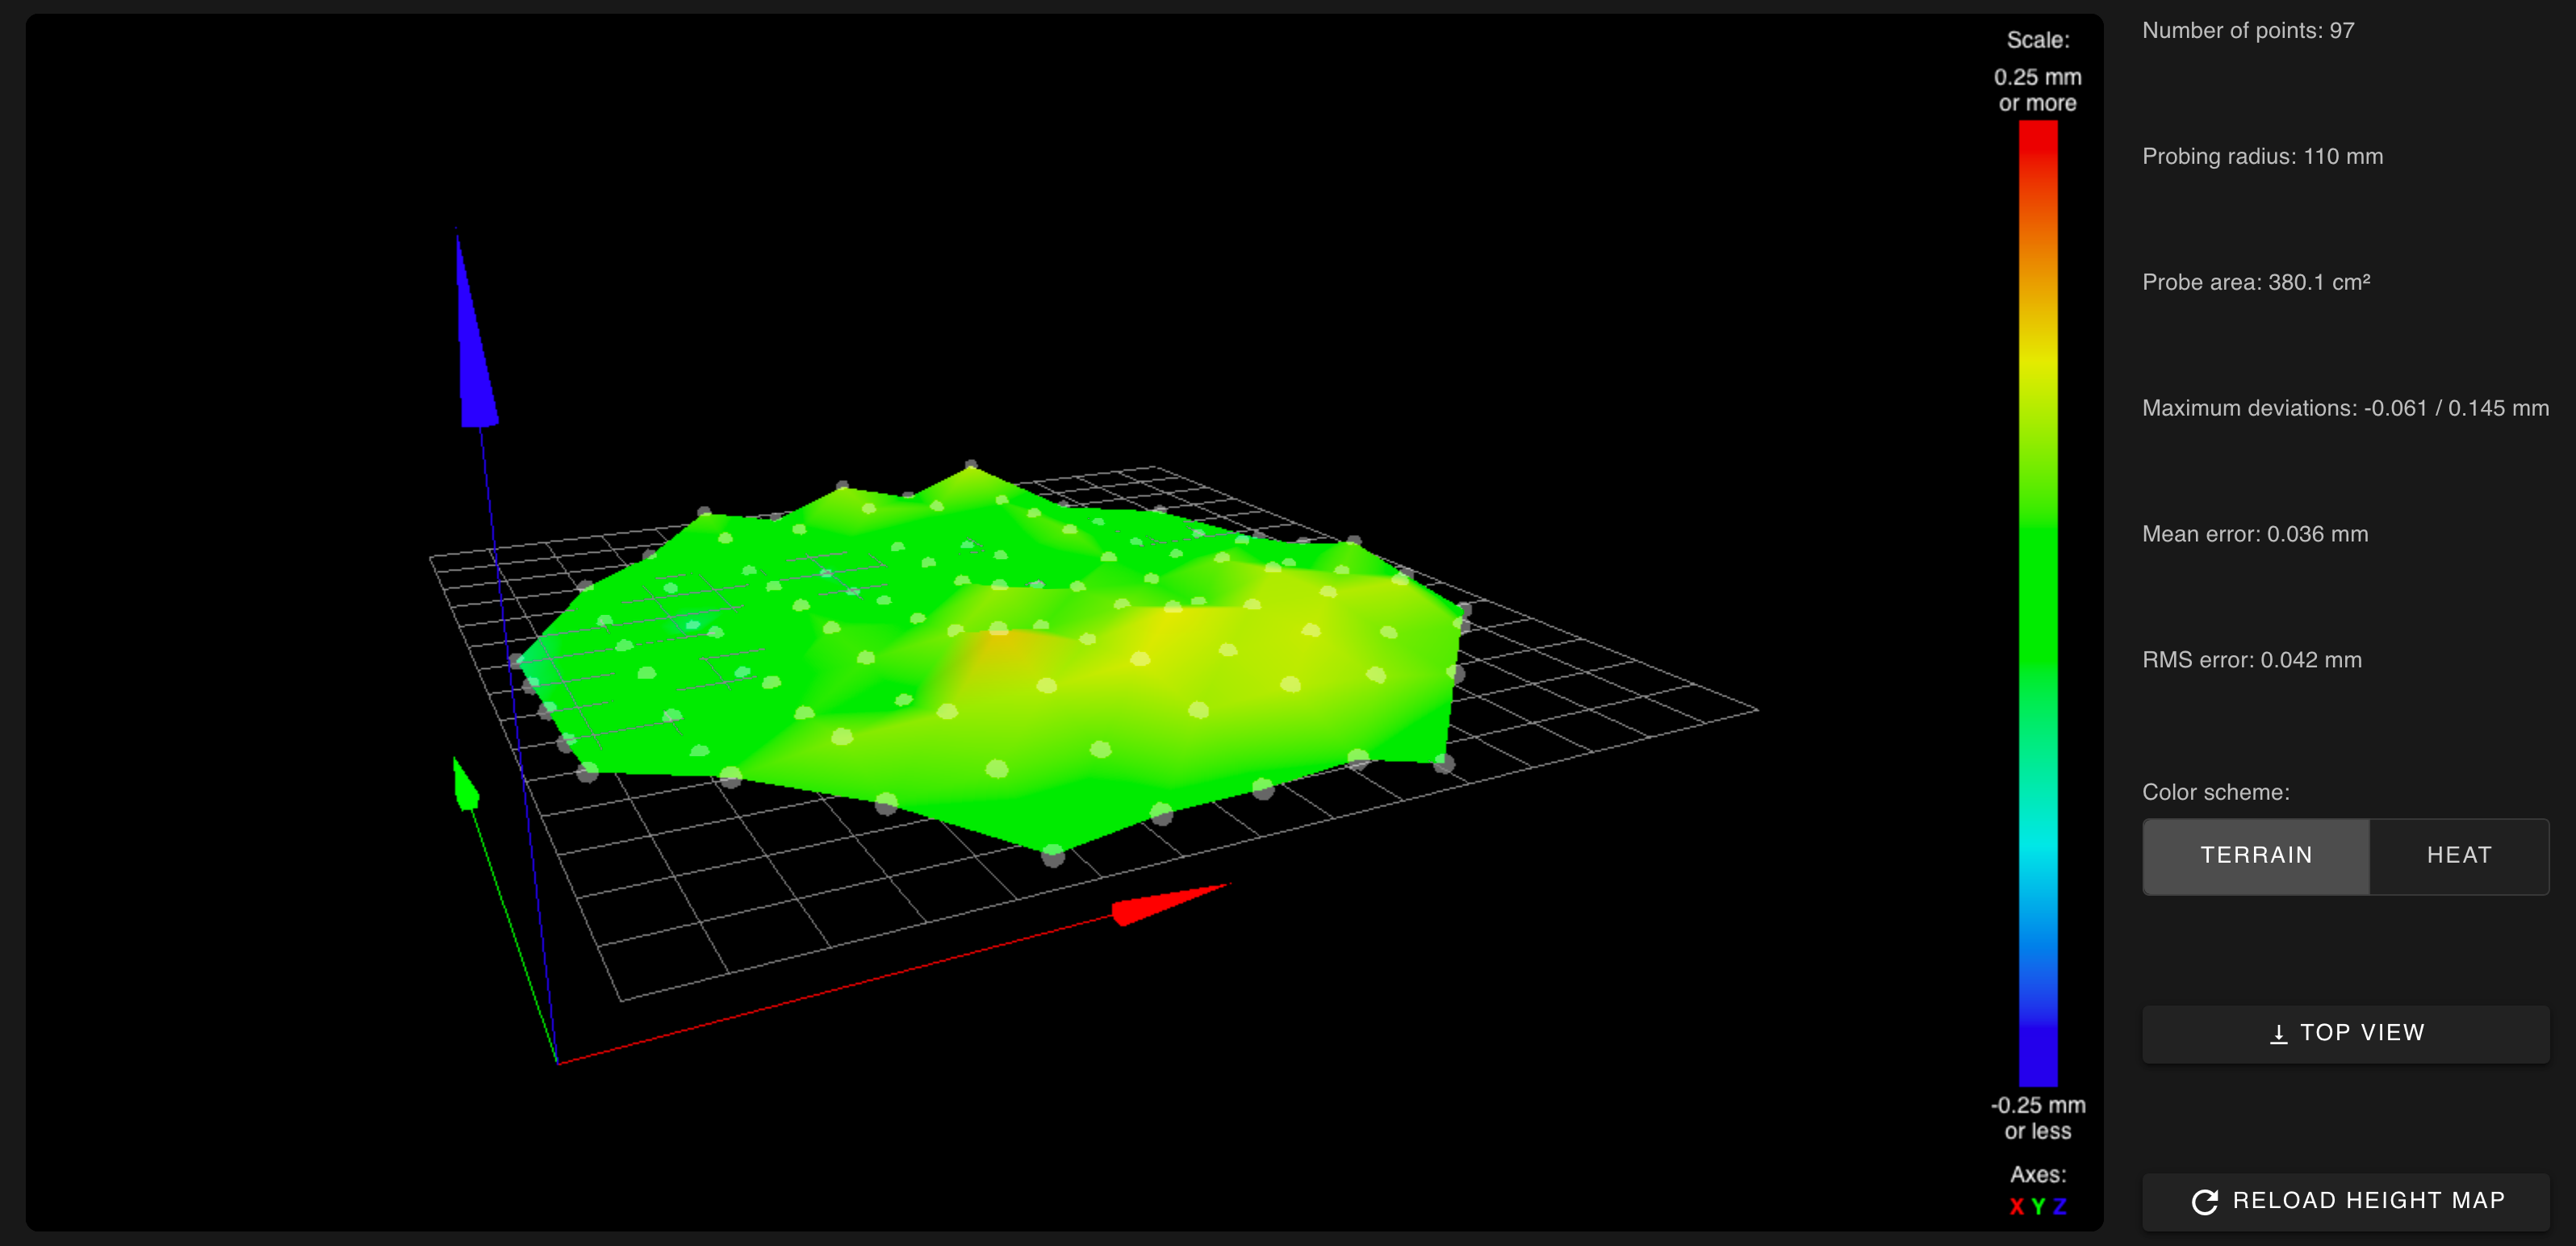
What does your height map look like?Actually I tried with and without mesh compensation – no difference. But indeed the mesh itself is quite interesting. It seems to change more than it should from calibration run to calibration run.
Here are two runs of
G29(without homing in between or Delta Calibration):First run


Second run


@Phaedrux said in Tevo Little Monster scratches print:
What does the print surface of solid infill look like?

To my understanding the first layer is quite perfect.@Phaedrux said in Tevo Little Monster scratches print:
Does the Z axis move the expected amount? If you command to go to Z0, does it touch the bed? If you raise it to 100mm does it actually move up exactly 100mm?
The tower axis move exactly the expected amount, measurement-Limit 0,02% (80cm movement, 1mm measurement precision).
G0 Z0.3brings it repeatable to 0.3mm height, measured by feeler gauge.A word more on that. The repeatability I am talking about is not really consistent. Measuring repeatingly one XY-Coordinate yields quite good results. But when moving the effector in XY and then moving it back again it is not that consistent anymore. It seems a little like the Z-height is dependent on the direction of the last move in the XY-plane.
But I cannot think of any reason for this. Backlash should be no issue, at least not between the motors and the carriages.
@Phaedrux said in Tevo Little Monster scratches print:
With 2a motors, the current should be set to 1500-1800ma for printing ideally.
Thank you for this clarification. I testet it, no change so far.
@Phaedrux said in Tevo Little Monster scratches print:
x16 microstepping with interpolation to x256 is recommended.
So nothing to change in my config concerning microstepping.
@Phaedrux said in Tevo Little Monster scratches print:
My first instinct is that it's either over extrusion, or a mechanical issue.
I also think that it really behaves like a mechanical issue. But I have to Idea what to check or what to change.
@Phaedrux said in Tevo Little Monster scratches print:
And finally, have you been through this? https://duet3d.dozuki.com/Wiki/Calibrating_a_delta_printer
Yes, I have been through this multiple times. The only thing that makes me think a little is the statement on Carriages must not be rotated or warped about the Z axis. In fact the joints on the carriages are not perfectly on the same height. But we are talking about less than 1 degree.
-
@justus2342 said in Tevo Little Monster scratches print:
Measuring repeatingly one XY-Coordinate yields quite good results. But when moving the effector in XY and then moving it back again it is not that consistent anymore. It seems a little like the Z-height is dependent on the direction of the last move in the XY-plane.
That would definitely indicate backlash. Unfortunately I'm not sure what exactly to check at this point.
-
I managed to solve my Problem. I switched to a Smart Effector, Haydn Huntleys Magballarms and light self-printed carriages (Thingiverse).
Actually the problem is not entirely gone. But it became so faint that it does not really matter at all anymore.
Tevo Little Monster (Duet2, Smart Effector, lin Rails, Magb. Arms)
Anycubic Delta Linear Plus (Duet2, Smart Effector, Magb. Arms)
Two Trees Sapphire Pro (MKS Robin, Marlin 2.x, D. Extruder) -
@justus2342
The frame of this printer is really crap. I'm managing to rebuilt it with a CNC machine for eradicate all the mechanical issues.
Those of the the Tevo really steal nonsense amount of time to so much people. By the way after 2 years on the delta I could build it by my self and it will be ! -
@justus2342 said in Tevo Little Monster scratches print:
I managed to solve my Problem. I switched to a Smart Effector, Haydn Huntleys Magballarms and light self-printed carriages (Thingiverse).
Actually the problem is not entirely gone. But it became so faint that it does not really matter at all anymore.
If you haven't already done so, lubricate the magnetic joints with some light grease to reduce the backlash.
-
@dc42 said in Tevo Little Monster scratches print:
light grease
With "light grease" What do you mean?
I'm using this grease of Teflub (PTFE) : http://82.185.148.242/B2C/SchedeTecniche/Cat_Generale/Cat_Gen2016_ristampa/CatGen_ristampa016017_15.pdf
Is it good? Or I should use the silicon one instead? -
It probably doesn't matter exactly what lubricant you use, as long as you use one.
-
@giostark Why do you consider the frame "really crap"? What exactly did you change/rebuild with your CNC machine?
-
https://forum.duet3d.com/topic/6951/not-yet-solved-tevo-little-monster-duetwifi-errors/139
1)In my case the top frame had holes not aligned with the extrusion holes same as the bottom frame.
2)the 3 extrusion (tower) are bended.
3)bars have different length (six time the maximum allowed)
4)the glass bed is not glued planar in the aluminium socket.
I'll redraw with Freecad the top/bottm frame and some lateral connection for make the build very rigid. (all will be CNC milled)
Also I'll use the 8x2 extrusion for leave the linear rail the right space to be mounted...
I'm building a pretty amazing (for my standard) CoreXY 300ZL and at the same time I'll rebuild my delta.
I'll post all the stuffs here
-
Hello folks,
I'm a real newby in the "world of codes".
Lately i bought a tevo little Monster (occasion) to build some bigger parts i need for my gollowing project.
Now: i had to make several changes to make the printer work again. Additionally a added 3 springs under the bed for manual leveling.
This set the bad heigher than before.
Auto calibration still works with this height of the bed.
BUT now: I'd likd to add a new plate onto the bed. Again 4mm of material.
These 4mm would make the hotend crash into the bed while auto leveling.What/Where can I change a Z-setting, so this could be fixed?
Thank you very much for your help!
-
@manuel
Hi ,
At this page you can find the delta printer calibration full explanation:
https://duet3d.dozuki.com/Wiki/Calibrating_a_delta_printerIf you are sure about the numbers that you added (thickness of the glass) you can just modify the "System > config-override.g" file in the M665 line at the H parameter (subtracting the mm you added).
If this will go fine you can change the H parameter also in the config.gIn general for see the height of the printer:
1- power on the printer
2- home the printer
3- lower the head till the glass
4- when you are at the zero send in console G92 Z0 (to define the new zero level)
5- home the printer and read the new height value in the duet dashboard (Status > Z position) after the endstop are triggered. Keep in mind that the home position is lowered of 5mm (you can find your value in the homedelta.g , so you have to add also those mm to the height value you read in the Status > Z position.
6- write this new height in the config-override.g (and config.g)If you dont have changed also the nozzle height modifying the head of the printer , should be enough adjust the height as above.