Duet3D Logo Duet3D
    • Tags
    • Documentation
    • Order
    • Register
    • Login

    Smart effector first layer issues

    Scheduled Pinned Locked Moved
    Tuning and tweaking
    4
    94
    4.6k
    Loading More Posts
    • Oldest to Newest
    • Newest to Oldest
    • Most Votes
    Reply
    • Reply as topic
    Log in to reply
    This topic has been deleted. Only users with topic management privileges can see it.
    • Lakemanundefined
      Lakeman
      last edited by

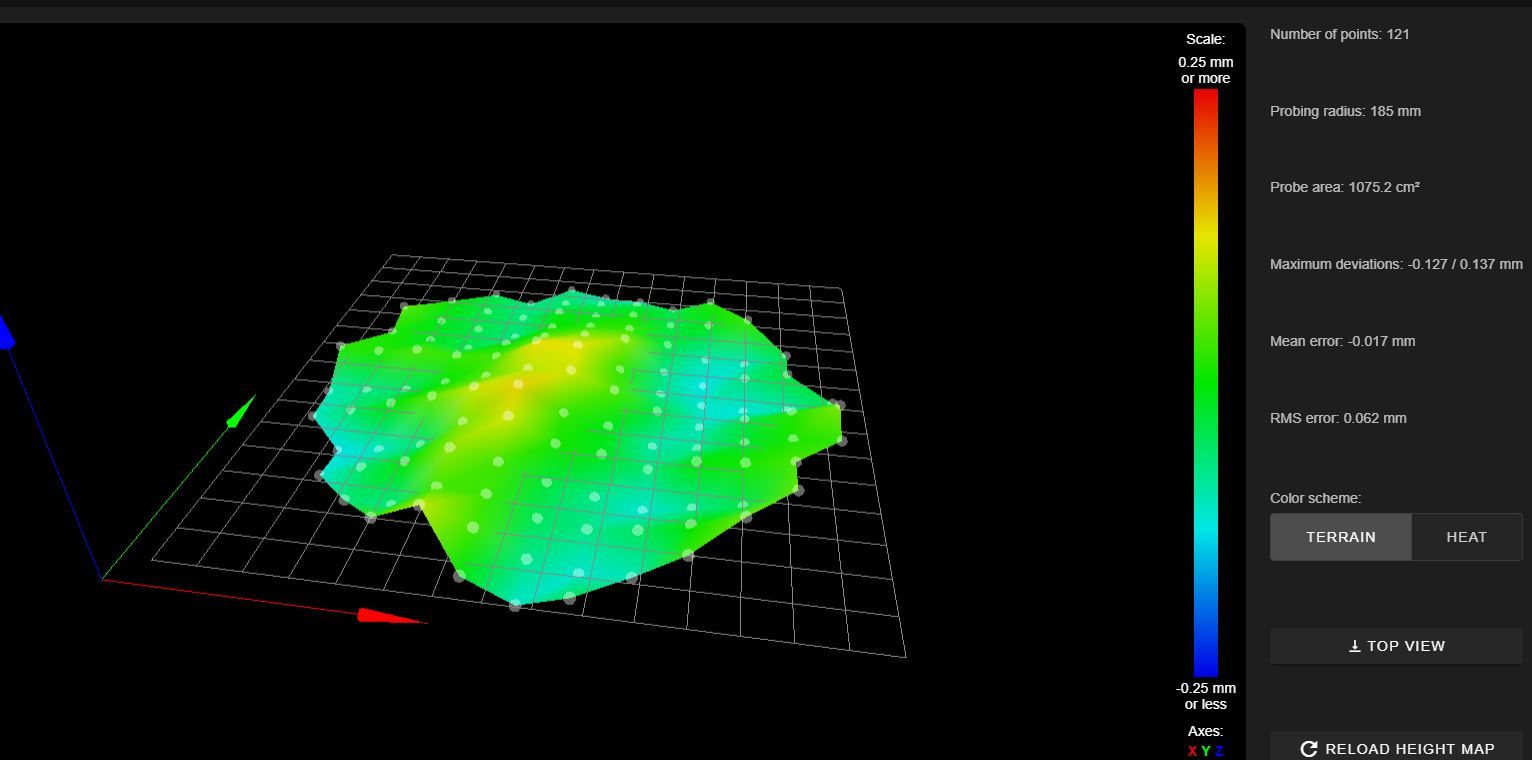
      I entered the values of the delta calibration in the config file, ran the macro and G29:
      level.JPG

      1 Reply Last reply Reply Quote 0
      • Carloundefined
        Carlo @Lakeman
        last edited by Carlo

        @Lakeman
        that looks better notice your radius is some 8mm bigger
        I would think about resetting your sensitivity back to default also
        M672 S131:131 up to you but I've never seen any benefit to adjusting it with the stock bed
        or of a config-override on a delta when you do a calibration before a print
        Try a print ? fingers crossed ?

        1 Reply Last reply Reply Quote 0
        • Lakemanundefined
          Lakeman
          last edited by

          I tried printing after this, no succes...
          I will set the sensetivity back and try again

          Carloundefined 1 Reply Last reply Reply Quote 0
          • Carloundefined
            Carlo @Lakeman
            last edited by

            @Lakeman
            Where are you based in the world ?

            1 Reply Last reply Reply Quote 0
            • Lakemanundefined
              Lakeman
              last edited by

              Germany

              first layer.jpg

              Failed again. The weird thing for me is that is is to close at one point, and to high 5mm further. It is so local that calibrition can hardly be a problem. Maybe I should go with an even finer mesh setting, but the original predator did not have a super fine mesh and had no problems at all....

              Carloundefined droftartsundefined 2 Replies Last reply Reply Quote 0
              • Carloundefined
                Carlo @Lakeman
                last edited by Carlo

                @Lakeman

                Long shot...
                Can you measure the carriage spacing and then effector spacing of the ball joints

                or unclip the effector and line it up it to the carriage on all towers ?

                Carloundefined 1 Reply Last reply Reply Quote 0
                • Carloundefined
                  Carlo @Carlo
                  last edited by

                  @Carlo

                  If they are fine
                  Heat bed to 60c 130c hotend home then calibrate Z0.1 see if it goes to that position after calibration.

                  Carloundefined 1 Reply Last reply Reply Quote 0
                  • Carloundefined
                    Carlo @Carlo
                    last edited by

                    @Carlo
                    Not my creation thanks to another user
                    macro name Prime nozzle also you can add to your start gcode for pla or change the temps for any filament S70 S220 in slicer
                    So home then delta calibrate first, then run the this macro
                    G90
                    M83
                    M207
                    T0
                    M116
                    G29 S1
                    M190 S70
                    M104 S220
                    M109 S220
                    ; Draw arc to prime the nozzle between 6PM and 9PM on the bed edge

                    G1 X0 Y-175 Z0.25 F6000

                    G2 X-175 Y0 I0 J175 E30 F1500

                    G1 X-174.52

                    G3 X0 Y-174.52 I174.52 J0 E28 F1500

                    G1 Z1 E-0.25 F6000

                    1 Reply Last reply Reply Quote 0
                    • Lakemanundefined
                      Lakeman
                      last edited by

                      Measured the spacing on the carriages and on the effector: Effector 64.6mm carriges 64.1mm
                      So there is room for improvement..

                      Carloundefined 1 Reply Last reply Reply Quote 0
                      • droftartsundefined
                        droftarts administrators @Lakeman
                        last edited by

                        @Lakeman On my delta, I've always had issues with mesh calibration. I only use it to check the bed level, then turn it off for printing. When you're doing the delta calibration, is it turned off? Check there's an M561 and G29 S2 at the beginning of bed.g (assuming that's where you delta calibration is), then if you do a mesh calibration afterwards, cancel it before trying to print.

                        Ian

                        Bed-slinger - Mini5+ WiFi/1LC | RRP Fisher v1 - D2 WiFi | Polargraph - D2 WiFi | TronXY X5S - 6HC/Roto | CNC router - 6HC | Tractus3D T1250 - D2 Eth

                        1 Reply Last reply Reply Quote 0
                        • Carloundefined
                          Carlo @Lakeman
                          last edited by

                          @Lakeman

                          Did you change your belts? or tighten them as adjuster is touching the pulley plate so no more adjustment available mine have 15mm ish between them

                          1 Reply Last reply Reply Quote 0
                          • Lakemanundefined
                            Lakeman
                            last edited by

                            It seems to be making the same mistake with or without mesh, I just tried a very fine mesh and without after with no succes
                            But maybe I have to fix the 0.5 mm in the spacing...

                            Carloundefined 1 Reply Last reply Reply Quote 0
                            • Carloundefined
                              Carlo @Lakeman
                              last edited by

                              @Lakeman
                              would be good to rule it out .5mm when your talking 0.12 -0.3mm layers?

                              1 Reply Last reply Reply Quote 0
                              • Lakemanundefined
                                Lakeman
                                last edited by

                                I think ruling it out is the best plan, just not entirely sure if it will work if I just scale the printed parts a bit and hopefully end up exactly 0.5mm wider 😛

                                Carloundefined 1 Reply Last reply Reply Quote 0
                                • Lakemanundefined
                                  Lakeman
                                  last edited by

                                  I am printing a 0.2mm first layer by the way and I do not know how much effect spacing between the balls has on the height,

                                  1 Reply Last reply Reply Quote 0
                                  • Carloundefined
                                    Carlo @Lakeman
                                    last edited by

                                    @Lakeman

                                    have you got the link to the ones you printed as there are afew and I found these to be best
                                    Used with the PCB ball mount supplied with the smart effector
                                    anycubic_predator_carriage_SE-PCB_withoutFE.stl

                                    Carloundefined 1 Reply Last reply Reply Quote 0
                                    • Carloundefined
                                      Carlo @Carlo
                                      last edited by

                                      @Carlo

                                      Link here for flying extruder version also
                                      https://www.thingiverse.com/thing:356764
                                      using the pcb supplied guarantees perfect spacing

                                      1 Reply Last reply Reply Quote 0
                                      • Lakemanundefined
                                        Lakeman
                                        last edited by

                                        Haydn_Carriage_Adapter_Remix_v4.stl
                                        This is what I used, I will try the stl file you send me, probebly the safest option to use the pcb's. Your second link goes to a tray, not sure what to do with that 😉

                                        Carloundefined 2 Replies Last reply Reply Quote 0
                                        • Carloundefined
                                          Carlo @Lakeman
                                          last edited by Carlo

                                          @Lakeman

                                          Make sure that the spacing between each pair of towers is the same at the top, the bottom, and half way between top and bottom from duets website

                                          The spacing between the bearings at the top of a pair of rods must be exactly the same as the spacing between the bearings at the bottom

                                          1 Reply Last reply Reply Quote 0
                                          • Carloundefined
                                            Carlo @Lakeman
                                            last edited by

                                            @Lakeman

                                            get the linked version with the flying extruder mounting holes easier to mount the extruder

                                            1 Reply Last reply Reply Quote 0
                                            • First post
                                              Last post
                                            Unless otherwise noted, all forum content is licensed under CC-BY-SA