• Tags
  • Documentation
  • Order
  • Register
  • Login
Duet3D Logo Duet3D
  • Tags
  • Documentation
  • Order
  • Register
  • Login

Improving mesh bed compensation with M558 HX

Scheduled Pinned Locked Moved
General Discussion
7
40
1.8k
Loading More Posts
  • Oldest to Newest
  • Newest to Oldest
  • Most Votes
Reply
  • Reply as topic
Log in to reply
This topic has been deleted. Only users with topic management privileges can see it.
  • undefined
    Phaedrux Moderator @deonholt
    last edited by 7 Sept 2020, 18:11

    @deonholt said in Improving mesh bed compensation with M558 HX:

    @sykb what settings do you use to tell the probing to only probe 9 points? I would like to have that as well. Mine is currently probing about 42 points and I have a glass bed.

    In M557 you use either S or P parameters to tell it the spacing of the points, or the number of points. So if you want 9 points, use P3:3 which will probe a 3x3 grid.

    Z-Bot CoreXY Build | Thingiverse Profile

    undefined 2 Replies Last reply 7 Sept 2020, 18:13 Reply Quote 1
    • undefined
      deonholt @Phaedrux
      last edited by 7 Sept 2020, 18:13

      @Phaedrux said in Improving mesh bed compensation with M558 HX:

      @deonholt said in Improving mesh bed compensation with M558 HX:

      @sykb what settings do you use to tell the probing to only probe 9 points? I would like to have that as well. Mine is currently probing about 42 points and I have a glass bed.

      In M557 you use either S or P parameters to tell it the spacing of the points, or the number of points. So if you want 9 points, use P3:3 which will probe a 3x3 grid.

      Great! Thank you so much.

      1 Reply Last reply Reply Quote 0
      • undefined
        deonholt @Phaedrux
        last edited by 7 Sept 2020, 18:26

        @Phaedrux said in Improving mesh bed compensation with M558 HX:

        In M557 you use either S or P parameters to tell it the spacing of the points, or the number of points. So if you want 9 points, use P3:3 which will probe a 3x3 grid.

        I tried this but it gave some error:
        M557 P3:3 ; define mesh grid 3x3
        I think I' missing something to tell it to save it. (I'm learning.)

        Thanks.

        undefined undefined 2 Replies Last reply 7 Sept 2020, 18:57 Reply Quote 0
        • undefined
          fcwilt @deonholt
          last edited by 7 Sept 2020, 18:57

          @deonholt said in Improving mesh bed compensation with M558 HX:

          I tried this but it gave some error:
          M557 P3:3 ; define mesh grid 3x3
          I think I' missing something to tell it to save it. (I'm learning.)

          Thanks.

          You still have to include the X and Y min/max values.

          Frederick

          Printers: a small Utilmaker style, a small CoreXY and a E3D MS/TC setup. Various hotends. Using Duet 3 hardware running 3.4.6

          1 Reply Last reply Reply Quote 0
          • undefined
            Phaedrux Moderator @deonholt
            last edited by Phaedrux 9 Jul 2020, 19:00 7 Sept 2020, 19:00

            @deonholt When in doubt check the gcode wiki.

            https://duet3d.dozuki.com/Wiki/Gcode#Section_M557_Set_Z_probe_point_or_define_probing_grid

            https://duet3d.dozuki.com/Wiki/Using_mesh_bed_compensation#Section_Define_the_mesh_size_and_spacing

            Z-Bot CoreXY Build | Thingiverse Profile

            undefined 1 Reply Last reply 7 Sept 2020, 21:47 Reply Quote 0
            • undefined
              peter247 @Phaedrux
              last edited by 7 Sept 2020, 21:47

              @Phaedrux

              Not seen sykb on , But I can see lots of faults .
              Can't tell what printer he has , but to me the off sets or wrong , the homing files are wrong , and he is not probing the centre of the bed.

              Ender 5 plus linear rail and hemera powered by duet 2 wifi , CR10s pro v1 with bltouch mostly stock , BLV mgn Cube slowly being built powered by duet 3 mini 5+

              1 Reply Last reply Reply Quote 1
              • undefined
                illy
                last edited by 8 Sept 2020, 06:29

                Thank you everyone for your response and sorry for my slow response. I'll try all your suggests.

                @peter247 yes, the off set is correct. I can show you a picture.

                InkedWhatsApp Image 2020-09-08 at 08.11.17_LI.jpg

                @Veti yes, I have not changed it. I just wanted to show you how it looks with 9 points. I'll update the firmware first to 2.05.1 and try with S10 or S15, as you suggested.

                @Phaedrux I've tried adding M558 A parameter in 2.02 and didn't get a better result. I'll try it again but in 2.05.1.

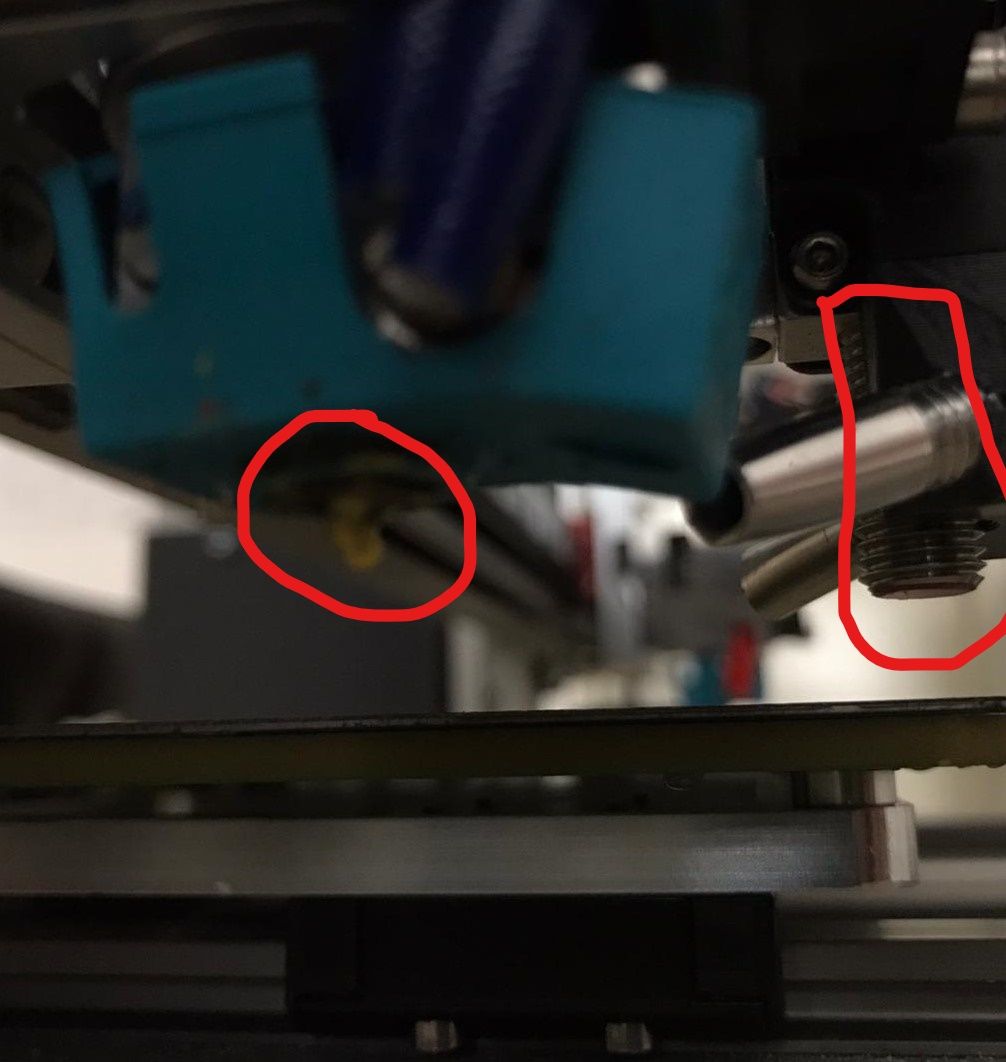
                I'm using an inductive sensor as probe. You can also see it on the picture above.

                @deonholt yes, you also have to define the X and Y min and max values, as @fcwilt said.

                undefined 1 Reply Last reply 8 Sept 2020, 08:54 Reply Quote 0
                • undefined
                  illy
                  last edited by 8 Sept 2020, 08:51

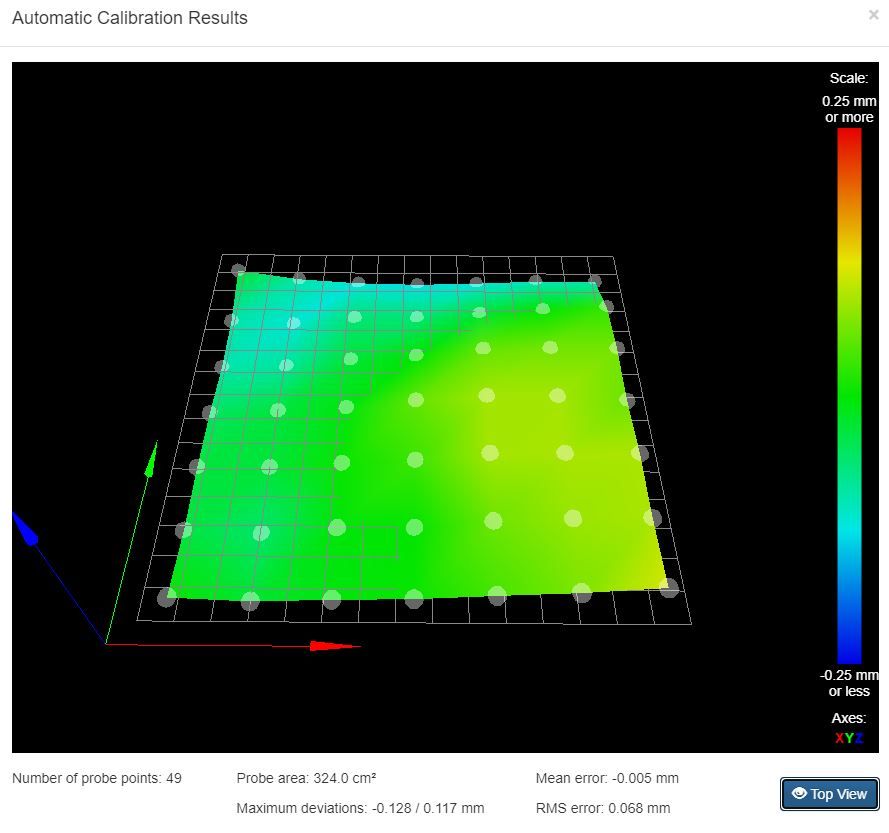
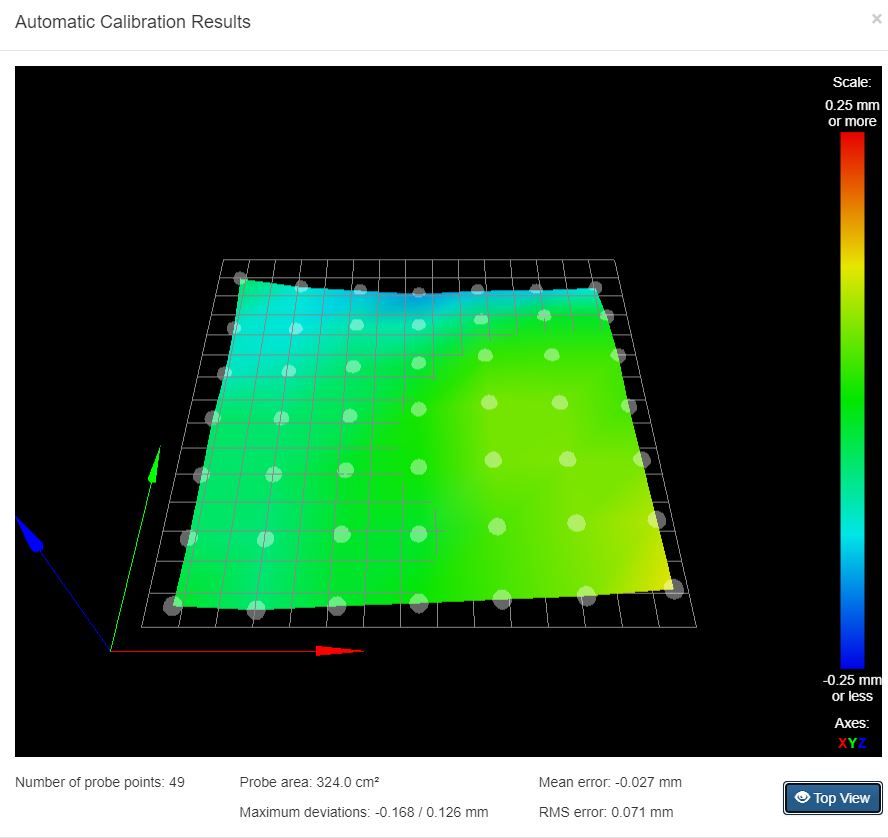
                  @Veti I've tried S30 (49 points) in RRF 2.05.1 and this is the result:

                  s30a3.JPG

                  And then I did a test print but got the same result as before.

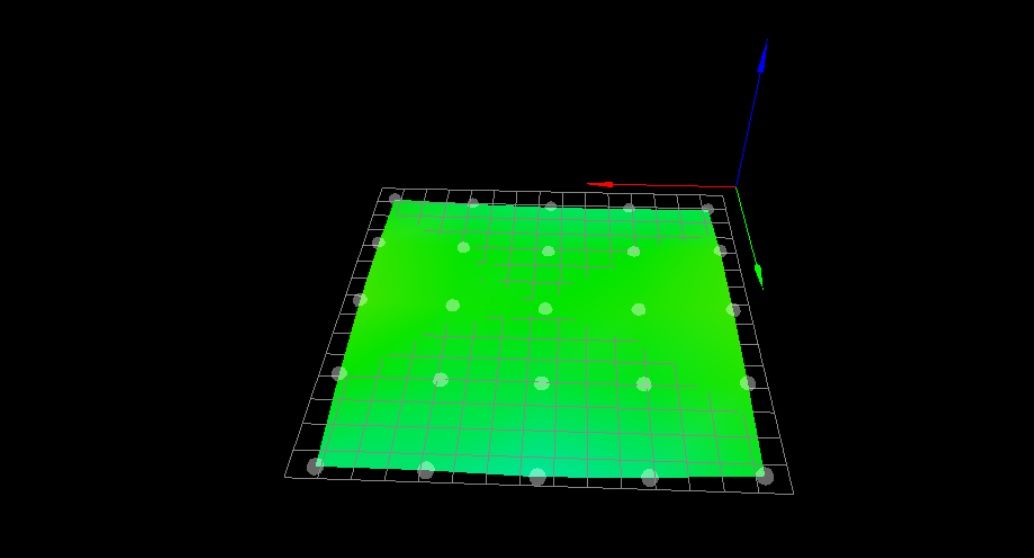
                  @Phaedrux I've changed the code to S30 in the M557 command and to H10 A6 S0.01 in the M558 command, but there is still no improvement. I've also tried removing the M564 commands in the homing files, as you suggested, but after that I could not home Z at all and got an error report saying: Error: G0/G1: insufficient axes homed.

                  And this the height map with the changed parameter:

                  s30,h10a6s0.01.JPG

                  undefined 1 Reply Last reply 8 Sept 2020, 09:35 Reply Quote 0
                  • undefined
                    peter247 @illy
                    last edited by peter247 9 Aug 2020, 08:56 8 Sept 2020, 08:54

                    @sykb

                    Your homing could be simpler :-
                    This is mine !!!

                    ; homeall.g
                    ; called to home all axes
                    ;
                    G91 ; relative positioning
                    G1 H2 Z5 F6000 ; lift Z relative to current position
                    G1 H1 X 355 F3000 ; move quickly to X axis endstop and stop there (first pass)
                    G1 H1 Y 355 F3000 ; move quickly to Y axis endstop and stop there (first pass)
                    G90 ; absolute positioning
                    G1 X220 Y175 F4000 ; Move probe to middle of bed 350 x 350
                    G30

                    I only do a single pass homing on X and Y , don't care if it is a fraction out.

                    What is your printing area ? , and can the probe go to the edges of the printing area without hitting the sides or hitting the limits ?

                    Ender 5 plus linear rail and hemera powered by duet 2 wifi , CR10s pro v1 with bltouch mostly stock , BLV mgn Cube slowly being built powered by duet 3 mini 5+

                    1 Reply Last reply Reply Quote 0
                    • undefined
                      illy
                      last edited by 8 Sept 2020, 09:10

                      @peter247 250x210x325 mm. Yes, the probe can go outwards without hitting anything.

                      1 Reply Last reply Reply Quote 0
                      • undefined
                        peter247 @illy
                        last edited by peter247 9 Aug 2020, 09:40 8 Sept 2020, 09:35

                        @sykb

                        I can't see anything wrong with your height map .

                        First you do need to level your bed , and after looking at your height map do a little adjusting to get it right.

                        Mesh levelling looks at your bed and adjusts while printing , it does not level your bed !!!!

                        This is my map .
                        level6.jpg

                        Ender 5 plus linear rail and hemera powered by duet 2 wifi , CR10s pro v1 with bltouch mostly stock , BLV mgn Cube slowly being built powered by duet 3 mini 5+

                        1 Reply Last reply Reply Quote 0
                        • undefined
                          illy
                          last edited by illy 9 Aug 2020, 11:25 8 Sept 2020, 11:16

                          @peter247 the problem is the mesh bed compensation. It seems to not be working correctly or maybe not working at all. I've tried varying the H parameter in the M558 command but I always got the same test print result. No improvement. "A large dive height could tolerate a very uneven bed or poor calibration". But it doesn't work for me.

                          undefined 1 Reply Last reply 8 Sept 2020, 11:53 Reply Quote 0
                          • undefined
                            peter247 @illy
                            last edited by peter247 9 Aug 2020, 12:19 8 Sept 2020, 11:53

                            @sykb

                            M558 command but I always got the same test print result. No improvement.

                            What do you mean by a print a real physical print with filament or running the mesh bed compensation routine ?

                            What is wrong with your test print can you show a picture so we can see what your problem is ? ( the first layer )

                            I've tried varying the H parameter in the M558

                            The wind direction outside or your house number will do the same affect as the H in the M558 , the H is just the height it will go to after each probe.

                            Mesh levelling looks at your bed and adjusts while printing , it does not level your bed !!!!

                            Ender 5 plus linear rail and hemera powered by duet 2 wifi , CR10s pro v1 with bltouch mostly stock , BLV mgn Cube slowly being built powered by duet 3 mini 5+

                            1 Reply Last reply Reply Quote 0
                            • undefined
                              Veti
                              last edited by 8 Sept 2020, 13:21

                              @peter247 said in Improving mesh bed compensation with M558 HX:

                              Mesh levelling looks at your bed and adjusts while printing , it does not level your bed !!!!

                              given a head with enough force it might be possible to physically level the bed 🙂

                              undefined 1 Reply Last reply 8 Sept 2020, 13:31 Reply Quote 0
                              • undefined
                                peter247 @Veti
                                last edited by peter247 9 Aug 2020, 13:35 8 Sept 2020, 13:31

                                @Veti

                                Not funny , I've done that once !!!!
                                o.k more than once . 😀

                                Ender 5 plus linear rail and hemera powered by duet 2 wifi , CR10s pro v1 with bltouch mostly stock , BLV mgn Cube slowly being built powered by duet 3 mini 5+

                                1 Reply Last reply Reply Quote 0
                                • undefined
                                  illy
                                  last edited by illy 9 Aug 2020, 14:29 8 Sept 2020, 14:26

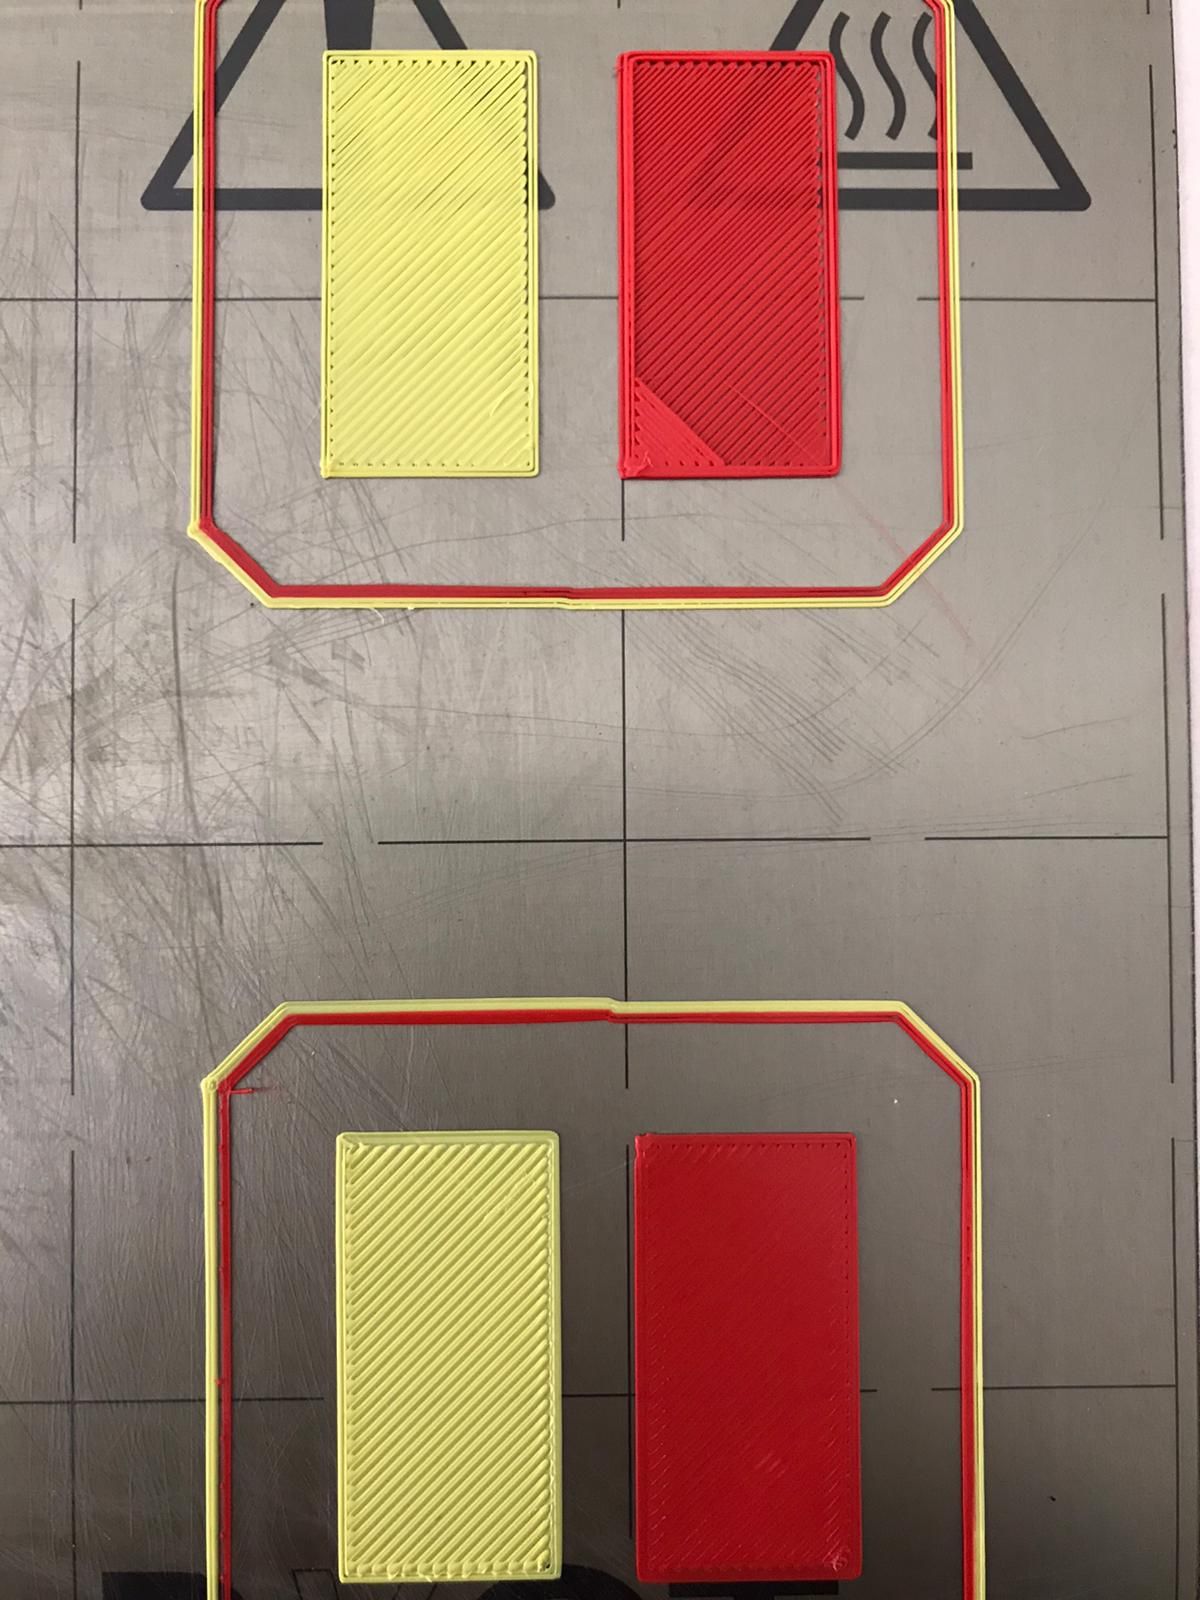
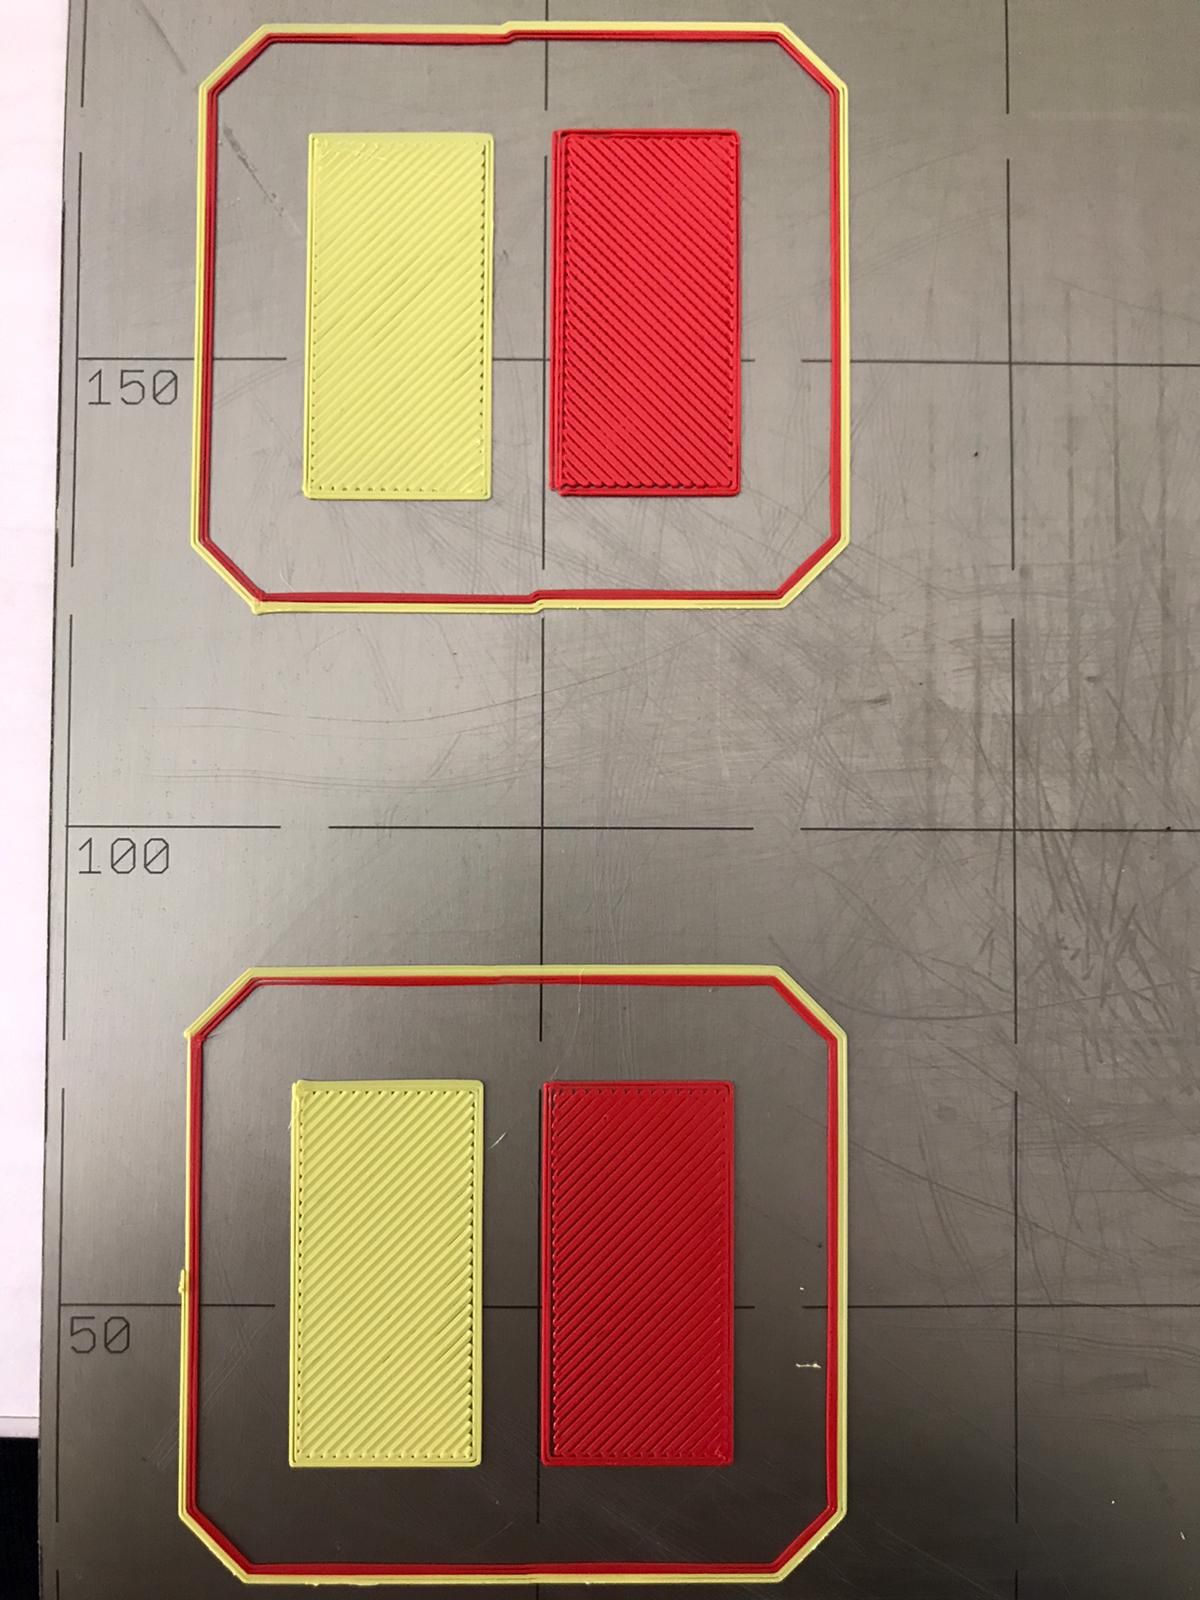
                                  @peter247 yes a real physical print with filament. This is the test print of the first layer. Thank you for your support so far, I really appreciate it 🙂

                                  You can see the print quality difference in some position in the pictures below. I did not see any mesh bed compensation applied there that compensated the uneven bed. (please tell me, if I'm wrong)

                                  As you can see in the first picture (right side), there is a huge quality difference between above and below.

                                  Right side:

                                  WhatsApp Image 2020-09-08 at 16.06.44 (1).jpeg

                                  left side:
                                  WhatsApp Image 2020-09-08 at 16.06.44.jpeg

                                  1 Reply Last reply Reply Quote 0
                                  • undefined
                                    peter247
                                    last edited by peter247 9 Aug 2020, 15:47 8 Sept 2020, 15:29

                                    I think it is working due to the stagger in the skirt !!!!
                                    The bigger the stagger the bigger the fault , so it is working but getting it wrong.

                                    one point are you running the mesh bed compensation at full working temp eg a bed temperature of 60c

                                    Ender 5 plus linear rail and hemera powered by duet 2 wifi , CR10s pro v1 with bltouch mostly stock , BLV mgn Cube slowly being built powered by duet 3 mini 5+

                                    undefined 1 Reply Last reply 9 Sept 2020, 06:19 Reply Quote 0
                                    • undefined
                                      Phaedrux Moderator @illy
                                      last edited by 8 Sept 2020, 20:43

                                      @sykb said in Improving mesh bed compensation with M558 HX:

                                      homeall.g:
                                      G91 ; relative positioning
                                      G1 Z5 F6000 S2 ; lift Z relative to current position
                                      G1 S1 X-382 Y-457 F1800 ; move quickly to X and Y axis endstops and stop there (first pass)
                                      G1 X5 Y5 F6000 ; go back a few mm
                                      G1 S1 X-382 Y-457 F360 ; move slowly to X and Y axis endstops once more (second pass)
                                      G90 ; absolute positioning
                                      M564 S0 H0
                                      G1 X33.5 Y27 Z15 F6000 ; go to first bed probe point and home Z
                                      M564 S0 H1
                                      G30 ; home Z by probing the bed
                                      homez.g:
                                      G91 ; relative positioning
                                      G1 Z5 F6000 S2 ; lift Z relative to current position
                                      G90 ; absolute positioning
                                      M564 S0 H0
                                      G1 X33.5 Y27 Z15 F6000 ; go to first probe point
                                      M564 S0 H1
                                      G30 ; home Z by probing the bed

                                      @sykb said in Improving mesh bed compensation with M558 HX:

                                      I've also tried removing the M564 commands in the homing files, as you suggested, but after that I could not home Z at all and got an error report saying: Error: G0/G1: insufficient axes

                                      At what point are you getting the insufficient axes homed error? It's basically telling you that you are trying to move an axis before it is homed. The proper way to do this, is to either home the axis first, or if it's for something like a Z axis lift to clear the nozzle and the bed you can use an S2/H2 switch on the G1 command to allow an unhommed move. Much safer than just a blanket allow unhomed moves with M564.

                                      If the error is happening before that G1 move to place the probe in the center of the bed something is wrong because in homeall the x and Y axis should already be homed. If it's from using homez by itself, then yes, it will give an error if the X and Y aren't already homed. You can't guarantee the position so it's not going to let you move to an absolute position if it doesn't know where it is in absolute coordinate space. Forcing to allow it to move is just asking for a crash.

                                      Also, your homing files are still using S1. Now that you've updated the firmware you should switch to using H1/H2 (S is being used for laser power when in laser mode.)

                                      Can you post your full config.g?

                                      Z-Bot CoreXY Build | Thingiverse Profile

                                      undefined 1 Reply Last reply 9 Sept 2020, 06:45 Reply Quote 0
                                      • undefined
                                        illy @peter247
                                        last edited by illy 9 Sept 2020, 06:44 9 Sept 2020, 06:19

                                        @peter247 I always ran G29 S0 at full working temperature. 220c extruder temperature and 60c bed temperature. That's correct, right?
                                        @Phaedrux I tried to home Z with G28 Z command and it reported an error. This is my full config.g:

                                        ; Communication and general
                                        M575 P1 B57600 S0 ; Baud rate
                                        M111 S0 ; Debug off
                                        M550 PDISCOVERY ; Machine name

                                        ; Networking
                                        M552 S0
                                        M586 P0 S1 ; Enable HTTP
                                        M586 P1 S0 ; Disable FTP
                                        M551 Preprap ; Machine password
                                        M586 P2 S0 ; Disable Telnet

                                        ; Ethernet networking: Adjust the IP address and gateway in the following 2 lines to suit your network
                                        M552 P0.0.0.0 ; (0 = DHCP)
                                        M554 P192.168.169.255 ; Gateway
                                        M553 P255.255.255.0 ; Netmask

                                        ; Basic Settings
                                        M555 P0 ; Set output to look like RepRap_Firmware
                                        G21 ; Work in millimetres
                                        G90 ; Send absolute coordinates
                                        M83 ; but relative extruder moves

                                        M208 X-39 Y-10 Z0.0 S1 ; Set axis minima
                                        M208 X300 Y220 Z320 S0 ; Set axis maxima

                                        M143 H1 S295 ; Max. Extruder temp
                                        M143 H0 S125 ; Max. Heatbed temp

                                        ; Endstops
                                        M574 X1 Y1 S1 ; Set endstops at low side, active high endstop input
                                        M574 Z0 S2 ; Z endstop at low end, Z probe is used

                                        M558 P5 X0 Y0 Z1 I0 H5 A3 F120 T6000 ; Set Z probe type

                                        G31 P600 X32.7 Y35 Z0.5 ; Set Z probe trigger NEW
                                        M557 X67:270 Y75:265 S101.5:90 ; Define mesh grid NEW

                                        ; Axis and motor configuration
                                        M667 S0 ; Set Cartesian Mode

                                        ; Achsen Motor Richtung
                                        M569 P0 S0 ; Drive 0 goes backwards
                                        M569 P1 S1 ; Drive 1 goes forwards
                                        M569 P2 S1 ; Drive 2 goes forwards

                                        ; Extruder Motor Richtung
                                        M569 P3 S1 ; Drive 3 goes forwards
                                        M569 P4 S1 ; Drive 4 goes forwards

                                        M350 X256 Y256 Z256 E16:16 I1 ; Set 16x microstepping with interpolation
                                        M92 X1600 Y1600 Z8533 U1600 ; Set axis steps/mm
                                        M92 E2700:2700
                                        ;M92 E1800:1800
                                        M906 X1100 Y1100 Z900 E500 I30 ;E855 I30 ; Set motor currents (mA) and motor idle factor to 30%
                                        M201 X2000 Y2000 Z500 E120 ; Accelerations (mm/s^2)
                                        M203 X30000 Y30000 Z1200 E1200;E3000 ; Maximum speeds (mm/min)
                                        M566 X900 Y900 Z12 E40:40 ; Maximum instant speed changes mm/minute

                                        ; Thermistors
                                        M307 H0 A86.5 C432.2 D6.4 I0 B0 S1.0 V12.0

                                        ;M140 H-1 ;tells the firmware, there is no bed termistor

                                        ; Put your own H and/or L values here to set the bed thermistor ADC correction
                                        M305 P0 T100000 B3950 R4700 H30 L0

                                        ; Put your own H and/or L values here to set first nozzle thermistor ADC correction
                                        M305 S"Extruder0" P1 T100000 B4725 R4700 H30 L0 C7.06e-8

                                        ; Put your own H and/or L values here to set 2nd nozzle thermistor ADC correction
                                        M305 S"Extruder1" P2 T100000 B4725 R4700 H30 L0 C7.06e-8

                                        ; Fans
                                        M106 P0 S1.0 I0 H1 T45 ; Set fan 0 value, PWM signal inversion and frequency. Thermostatic control is turned on; davor 500
                                        M106 P1 S1.0 I0 H2 T45 ; Set fan 1 value, PWM signal inversion and frequency. Thermostatic control is turned on

                                        M106 P2 S1.0 I0 F500 H-1 ; Set fan 2 value, PWM signal inversion and frequency. Thermostatic control is turned off
                                        M106 P3 S1.0 I0 F500 H-1 ; Set fan 3 value, PWM signal inversion and frequency. Thermostatic control is turned off

                                        M106 P4 S1.0 I0 F500 H-1 ; Set fan 4 value, PWM signal inversion and frequency. Thermostatic control is turned off

                                        M106 P2 S0
                                        M106 P3 S0

                                        ; Tool definitions
                                        M563 P0 D0 H1 F2 S"Extruder0" ; Define tool 0
                                        G10 P0 R0 S0 ; Set tool 0

                                        M563 P1 D1 H2 F3 S"Extruder1" ; Define tool 1
                                        G10 P1 R0 S0 ; Set tool 1

                                        ; Definiert den X Offset
                                        G10 P0 X-32.7 L1 ; tool 0 offset
                                        G10 P1 X32.7 L1 ; tool 1 offset

                                        ; Prepare magnet control pins
                                        ;M307 H4 A-1 C-1 D-1 ; Heater 4 off for freeing the pin
                                        ;M307 H5 A-1 C-1 D-1 ; Heater 4 off for freeing the pin
                                        ;M42 P4 S0 ; switch on the magnet
                                        ;M42 P5 S0

                                        M208 S1 Z-0.2 ; set minimum Z

                                        ; Filament Sensor 0
                                        M591 D0 P2 S1 C3

                                        ; Filament Sensor 1
                                        M591 D1 P2 S1 C4

                                        ; SERVOS SETUP
                                        M307 H6 A-1 C-1 D-1
                                        M307 H7 A-1 C-1 D-1
                                        M42 P6 S0
                                        M42 P7 S0

                                        M570 H1 P3000 T50
                                        M570 H2 P3000 T50

                                        M98 P/macros/OVERRIDE_CFG_MACRO ;Run override macro of webinterface

                                        M98 P/macros/OVERRIDE_EXTRUDER_MACRO_0 ;Run override macro of webinterface for tools

                                        M98 P/macros/OVERRIDE_EXTRUDER_MACRO_1 ;Run override macro of webinterface for tools

                                        M572 D0:1 S0.2 ;Pressure advance

                                        G28

                                        M98 P/macros/T_freeAll ;Free all Tools

                                        M98 P/macros/OVERRIDE_NETWORK_MODE ;Run override macro for network

                                        undefined 2 Replies Last reply 9 Sept 2020, 06:23 Reply Quote 0
                                        • undefined
                                          Phaedrux Moderator @illy
                                          last edited by 9 Sept 2020, 06:23

                                          @sykb said in Improving mesh bed compensation with M558 HX:

                                          I tried to home Z with G28 Z command and it reported an error.

                                          Yes trying to home just Z without first homing X and Y will lead to an error as I described. Does it give the error if you have X and Y homed prior?
                                          Z-Bot CoreXY Build | Thingiverse Profile

                                          undefined 1 Reply Last reply 9 Sept 2020, 06:37 Reply Quote 0
                                          21 out of 40
                                          • First post
                                            21/40
                                            Last post
                                          Unless otherwise noted, all forum content is licensed under CC-BY-SA