Duet 3 - New user - few quires
-
Hello everyone, I'm a new user of duet 3 and have few queries to ensure my understanding of the guide.
-
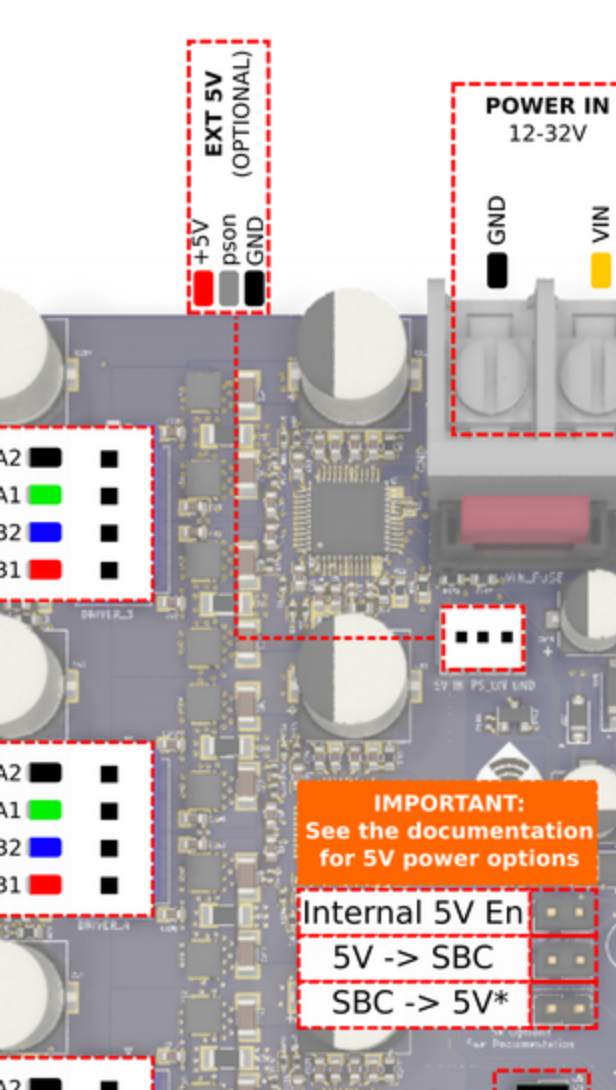
I would like to connect an external power supply. I have a 5V 7 amp power supply that powering up the SBC and I would like to connect that to the duet3. I must remove the jumper from 5V->SBC and leave it one on Internal 5V EN. Then connect external 5V power supply to EXT 5V?
-
My printer has dual z-axis and I would like to define that in duet. On the RRF config tool, there is no such option to do it. Do I have to do it via macros or g-code?
-
I have micro endstops that are NO. Connected them to IO_0 black to ground and red to 3.3V. Is that correct?
-
I have a heated chamber that has a heating element connected to SSR. So:
a) The wires to control SSR are connected to IO_3. Is that correct or it must be connected to OUT_2?
b) I want to have an additional relay that will disconnect the heating element power supply. Can I connect that to IO_4? This is a typical Arduino relay.
Thank you for all your answers in advance.
Cheers
Dan -
-
@Dan1990 said in Duet 3 - New user - few quires:
My printer has dual z-axis and I would like to define that in duet. On the RRF config tool, there is no such option to do it. Do I have to do it via macros or g-code?
see
https://duet3d.dozuki.com/Wiki/Bed_levelling_using_multiple_independent_Z_motorsI have micro endstops that are NO. Connected them to IO_0 black to ground and red to 3.3V. Is that correct?
no. if they are not powered and have just two wired you connect gnd and io.in. otherwise you are shorting 3.3v to ground.
a) The wires to control SSR are connected to IO_3. Is that correct or it must be connected to OUT_2?
see
https://duet3d.dozuki.com/Wiki/Choosing_a_bed_heaterb) I want to have an additional relay that will disconnect the heating element power supply. Can I connect that to IO_4? This is a typical Arduino relay.
see
https://duet3d.dozuki.com/Wiki/Power_Wiring#Section_Controlling_the_external_power_supply -
Veti, thanks for the answer.
@Veti said in Duet 3 - New user - few quires:
see
https://duet3d.dozuki.com/Wiki/Bed_levelling_using_multiple_independent_Z_motorsUnderstood, thank you.
no. if they are not powered and have just two wired you connect gnd and io.in. otherwise you are shorting 3.3v to ground.
Understood, thank you.
I understood that I must connect that to the OUT_2. Thanks
b) I want to have an additional relay that will disconnect the heating element power supply. Can I connect that to IO_4? This is a typical Arduino relay.
see
https://duet3d.dozuki.com/Wiki/Power_Wiring#Section_Controlling_the_external_power_supplyRegarding that, I am not sure, I must connect the relay to pson pin? Does not make sense to me. I thought that 3 pins are to connect the external supply to power on the duet.
Any advice regarding the first question?
Thanks
Dan -
@Dan1990 said in Duet 3 - New user - few quires:
- I would like to connect an external power supply. I have a 5V 7 amp power supply that powering up the SBC and I would like to connect that to the duet3. I must remove the jumper from 5V->SBC and leave it one on Internal 5V EN. Then connect external 5V power supply to EXT 5V?
Also, what I have read on the forum is that I have to remove all the jumpers if I want to connect the 5v ext supply. Therefore, there will be no jumpers on the 5V headers? Is that correct?
Can't edit my previous post.
-
-
@Dan1990 said in Duet 3 - New user - few quires:
I understood that I must connect that to the OUT_2. Thanks
Bed heater should be connected to OUT0 unless you are using an external SSR or mosfet switch to control it.
-
That question was related to the chamber heater but I have solved it - thanks to the very rich documentation that has been made from you.
If the sensor is a 2-wire microswitch, we recommend that you use the normally-closed contacts, which are the two outermost tags on the switch (leave the centre tag not connected).
However, I am facing another issue a the moment, I have read that Duet recommends having endstops (the very simple one, with two wires) to be wired NC but I have another way around and I wonder if is possible to change that in firmware?
I have tried to change the S value from 1 to 0 and from 1 to 2 but that did not work.
-
@Dan1990 said in Duet 3 - New user - few quires:
I have tried to change the S value from 1 to 0 and from 1 to 2 but that did not work.
In RRF3 you would use M574 S1 but invert the signal by adding a ! to the pin name.
ex M574 Z1 S1 P"!zstop"
https://duet3d.dozuki.com/Wiki/Gcode#Section_M574_RepRapFirmware_Num_3
-
Thank you, that worked!
One more question - how I can change the safety values for heaters? My chamber heater is not powerful enough to reach 1,7oC/ sec.
-
Usually running a PID auto tune on the heaters is all that's needed to resolve those errors since it gives the firmware an expectation of performance.
https://duet3d.dozuki.com/Wiki/Tuning_the_heater_temperature_control
-
I have done that, hopefully will help.
-
Make sure you remember to use M500 to save the results to confif-override.g and add M501 to the end of config.g to load those results at startup.
-
Did that, the RRF notified me after PID tuning!
I am so amazed by the firmware!
Worth the money!
-
@Dan1990 said in Duet 3 - New user - few quires:
My chamber heater is not powerful enough to reach 1,7oC/ sec.
Can you share the tuned results for the chamber heater? Increasing the dead time value can sometimes help.
Share the entire config.g as well.
-
; Configuration file for Duet 3 (firmware version 3)
; executed by the firmware on start-up
;
; generated by RepRapFirmware Configuration Tool v3.2.1 on Sun Jan 10 2021 17:23:39 GMT+0000 (GMT); General preferences
G90 ; send absolute coordinates...
M83 ; ...but relative extruder moves
M550 P"Duet 3" ; set printer name; Drives
M569 P0.0 S0 ; physical drive 0.0 goes backwards
M569 P0.1 S1 ; physical drive 0.1 goes forwards
M569 P0.2 S0 ; physical drive 0.2 goes backwards
M569 P0.3 S1 ; physical drive 0.3 goes forwards
M584 X0.0 Y0.1 Z0.2 E0.3 ; set drive mapping
M350 X16 Y16 Z16 E16 I1 ; configure microstepping with interpolation
M92 X201.27 Y201.23 Z800.00 E420.00 ; set steps per mm
M566 X900.00 Y900.00 Z60.00 E120.00 ; set maximum instantaneous speed changes (mm/min)
M203 X6000.00 Y6000.00 Z180.00 E1200.00 ; set maximum speeds (mm/min)
M201 X500.00 Y500.00 Z20.00 E250.00 ; set accelerations (mm/s^2)
M906 X800 Y800 Z800 E800 I30 ; set motor currents (mA) and motor idle factor in per cent
M84 S30 ; Set idle timeout
M584 X0 Y1 Z2:4 E3 ; two Z motors connected to driver outputs Z and E1
M671 X-20:220 Y0:0 S0.5 ; leadscrews at left (connected to Z) and right (connected to E1) of X axis
M208 X-5:205 Y0:200 ; X carriage moves from -5 to 205, Y bed goes from 0 to 200; Axis Limits
M208 X0 Y0 Z0 S1 ; set axis minima
M208 X220 Y220 Z240 S0 ; set axis maxima; Endstops
M574 X1 S1 P"!io0.in" ; configure active-high endstop for low end on X via pin io0.in
M574 Y1 S1 P"!io1.in" ; configure active-high endstop for low end on Y via pin io1.in
M574 Z1 S1 P"!io2.in" ; configure active-high endstop for low end on Z via pin io2.in; Z-Probe
;;M558 P5 C"^io3.in" H5 F120 T6000 ; set Z probe type to switch and the dive height + speeds
;G31 P500 X0 Y0 Z2.5 ; set Z probe trigger value, offset and trigger height
;M557 X15:215 Y15:195 S20 ; define mesh grid; Heaters
M308 S0 P"temp0" Y"thermistor" T100000 B4138 ; configure sensor 0 as thermistor on pin temp0
M950 H0 C"out0" T0 ; create bed heater output on out0 and map it to sensor 0
M307 H0 B0 S1.00 ; disable bang-bang mode for the bed heater and set PWM limit
M140 H0 ; map heated bed to heater 0
M143 H0 S120 ; set temperature limit for heater 0 to 120C
M308 S1 P"temp1" Y"thermistor" T100000 B4725 C7.06e-8 ; configure sensor 1 as thermistor on pin temp1
M950 H1 C"out1" T1 ; create nozzle heater output on out1 and map it to sensor 1
M307 H1 B0 S1.00 ; disable bang-bang mode for heater and set PWM limit
M143 H1 S280 ; set temperature limit for heater 1 to 280CM308 S2 P"temp2" Y"thermistor" T100000 B4138 ; configure sensor 2 as thermistor on pin temp2
M950 H2 C"out2" T2 ; create chamber heater output on out2 and map it to sensor 2
M307 H2 B0 S1.00 ; disable bang-bang mode for the chamber heater and set PWM limit
M141 H2 ; map chamber to heater 2
M143 H2 S100 A0 ; set temperature limit for heater 2 to 100C
M301 H2 B1; Fans
M950 F0 C"out7" Q500 ; create fan 0 on pin out7 and set its frequency
M106 P0 S1 H1 T45 ; set fan 0 value. Thermostatic control is turned on
M950 F1 C"out8" Q500 ; create fan 1 on pin out8 and set its frequency
M106 P1 S0 H-1 ; set fan 1 value. Thermostatic control is turned off; Tools
M563 P0 D0 H1 F0 ; define tool 0
G10 P0 X0 Y0 Z0 ; set tool 0 axis offsets
G10 P0 R0 S0 ; set initial tool 0 active and standby temperatures to 0C; Custom settings are not defined
; Miscellaneous
M911 S10 R11 P"M913 X0 Y0 G91 M83 G1 Z3 E-5 F1000" ; set voltage thresholds and actions to run on power lossThe PID as below:
Heater 2 model: gain 340.0, time constant 140.0, dead time 5.5, max PWM 1.oo, calibration voltage 0.0, mode PID
Computed PID parameters for setpoint change P13.4, I0, 482, D51,4
Computed PID parameters for load change P13.4 i0.949, D51.4Could you advise me on how to invert the Z2 motor, I did the Z1.
-
@Dan1990 said in Duet 3 - New user - few quires:
Could you advise me on how to invert the Z2 motor, I did the Z1.
I don't know what you mean by this.
-
@Dan1990 said in Duet 3 - New user - few quires:
Heater 2 model: gain 340.0, time constant 140.0, dead time 5.5, max PWM 1.oo, calibration voltage 0.0, mode PID
Computed PID parameters for setpoint change P13.4, I0, 482, D51,4
Computed PID parameters for load change P13.4 i0.949, D51.4Share the contents of your config-override.g so we can see the actual formatted M307 commands
-
I am sorry for not being clear enough,
I have two Z-axis, I have changed the rotation of Z1 (rotating anticlockwise) but Z2 rotating clockwise
-
; config-override.g file generated in response to M500 at 2021-01-05 16:33
; Heater model parameters
M307 H0 R0.000 C495.100:140.000 D0.80 S1.00 V24.0 B0
M307 H1 R0.000 C140.000:140.000 D5.50 S1.00 V0.0 B0
M307 H2 R0.000 C140.000:140.000 D5.50 S1.00 V0.0 B0
; Workplace coordinates
G10 L2 P1 X0.00 Y0.00 Z0.00
G10 L2 P2 X0.00 Y0.00 Z0.00
G10 L2 P3 X0.00 Y0.00 Z0.00
G10 L2 P4 X0.00 Y0.00 Z0.00
G10 L2 P5 X0.00 Y0.00 Z0.00
G10 L2 P6 X0.00 Y0.00 Z0.00
G10 L2 P7 X0.00 Y0.00 Z0.00
G10 L2 P8 X0.00 Y0.00 Z0.00
G10 L2 P9 X0.00 Y0.00 Z0.00 -
@Dan1990 said in Duet 3 - New user - few quires:
M569 P0.0 S0 ; physical drive 0.0 goes backwards
M569 P0.1 S1 ; physical drive 0.1 goes forwards
M569 P0.2 S0 ; physical drive 0.2 goes backwards
M569 P0.3 S1 ; physical drive 0.3 goes forwards
M584 X0.0 Y0.1 Z0.2 E0.3 ; set drive mappingYou only have a single Z driver defined, so I'm surprised the other is turning at all. Which driver are you using for Z1 and which for Z2?