Haq XY
-
Ah sorry about that - Please see this photo.
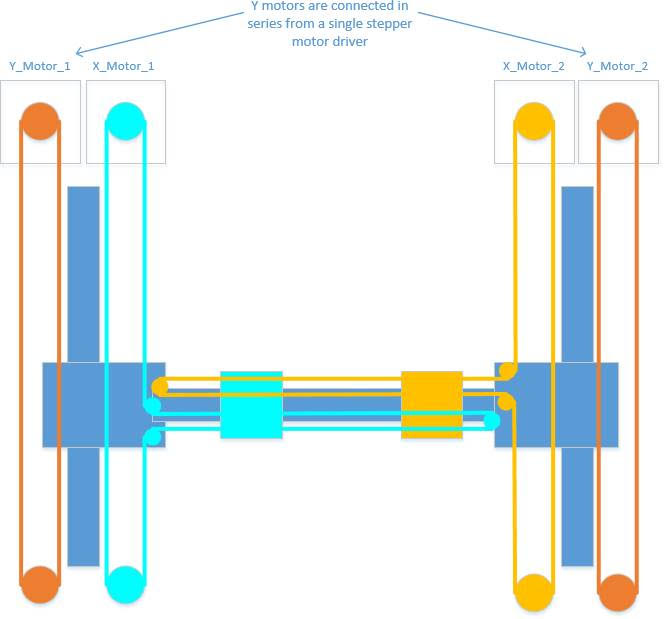
I currently have two motors driving the Y axis - these shall be configured in a series configuration.
then two independent carriages driven from independent steppers.
Does that help?
Thanks
")
-
@RootCNC Aha I see!
I routed my 2 X belts on the same route but at different heights instead")
And I used one stepper for the Y axis but with a rod connecting both sides of the Y axis.But the kinematics are exactly the same.
Btw, are you stepper mounted in the bottom with rods going to the top?
-
Yeah, to keep its low profile and symmetrical I went this way with the belts.
I plan in the future to try a heated chamber, so keeping the motors below the 6mm plate seemed a good idea.
I just purchased my Duet 3 and LCD, hopefully it'll turn up soon and then we can get this printer moving!
Was the setup difficult?
-
@dc42 I just reversed the Y motor and when I do G1 X10 F1000 S2 the Y axis moves in the right direction (+10).
But I've noticed a new thing when homing.
This is my homeall.g now:G91 ; relative positioning G1 Z5 F6000 S2 ; lift Z relative to current position G1 S1 Y550 U540 X-540 F2500 ; move quickly to Y axis endstops and stop there (first pass) G1 S1 Y550 F2500 ; Home Y seperate G1 S1 X-540 F2500 ; Home X seperate G1 S1 U540 F2500 ; Home U seperate G1 Y-5 X5 U-5 F2000 ; Go back 5mm on all axis G1 S1 Y550 F600 ; slowly home Y G1 S1 X-100 F600 ; Slowly home X G1 S1 U100 F600 ; Slowly home U G90 ; absolute positioning G1 X300 Y310 F2500 ; go to first bed probe point and home Z G30 ; home Z by probing the bed G91 ; relative positioning G1 S2 Z5 F100 ; lift Z relative to current position G90 ; absolute positioningBut when it comes to G1 X300 Y310 F2500 the X axis just smashes into it's endstop.
It seems like both U and X looses their position somehow, or that X and U switches...so X becomes U and U becomes X.If I manually home Y first and then try to home X the U axis moves.
If I manually home U and X first, their postion is X0 U550.
If I then home Y manually X position is X1100.3 and U is U-560.Does this make any sense at all?
I am still having this bug, even after updating from the latest beta to 3.2 stable.
When I home one axis, the other two lose their position. Although I think the correct axis are moving when they are homing. -
I had problem where when doing homing U and X axes lost position during all axis homing. Those axes moved against endstops and lost steps/belt skipped.
This was because homeall.g included wrong move type: 1 motor move -type move (H2-command)
I switched it to H0. I think that you are also suppose to use H-command instead of S-commands.check: https://duet3d.dozuki.com/Wiki/Gcode#Section_G0_G1_Move
My corrected homeall.g
; Haq xy homing, U and X axes concurrently, Y axis after that and Z axis last
G91
G1 H2 Z7 F200 					; raise head 7mm to keep it clear of the bed
G1 H1 X-405 U405 F3000 			 ; coarse home X and U
G1 H2 X5 U-5 F600              ; move 4mm away from the homing switches
G1 H1 X-10 U10 F600           			; fine home X and U
G1 H1 Y-420 F2000
G1 H0 Y5 F600
G1 H0 Y-5.5 F600
G1 H1 Z-380 F360                ; move Z down stopping at the endstop
G90
Main printer: 3-5 Axis, 400x400x450 Duet 6HC || https://grabcad.com/eetu-4/models
-
@Visionary
Would you do me a favour and post your config file? I think with my setup there is more wrong than just the homing file.
-Cheers
Max -
@dc42 I just reversed the Y motor and when I do G1 X10 F1000 S2 the Y axis moves in the right direction (+10).
That will have changed the direction of X axis movement too.Duet WiFi hardware designer and firmware engineer
Please do not ask me for Duet support via PM or email, use the forum
http://www.escher3d.com, https://miscsolutions.wordpress.com -
Hey everyone,
last night I got my HAQ XY or markforged IDEX printer moving and homing correctly last night.
you can see it moving here: https://fb.watch/38agipCwQx/
Here is my config, once you get your head around the matrix manipulation it was easy to ensure it was moving in the correct direction.
The magic happens on M669 command....
; Configuration file for Duet 3 (firmware version 3)
; executed by the firmware on start-up
;
; generated by RepRapFirmware Configuration Tool v3.2.2 on Tue Jan 19 2021 18:42:53 GMT+0000 (Greenwich Mean Time)

; General preferences
G90                                     ; send absolute coordinates...
M83                                     ; ...but relative extruder moves
M550 P"Duet3"                          ; set printer name

; Drives
M569 P0.0 S0                            ; (Y)  physical drive 0.0 goes forwards
M569 P0.1 S0                            ; (X1) physical drive 0.1 goes forwards
M569 P0.2 S1                            ; (X2) physical drive 0.2 goes forwards
M569 P0.3 S1                            ; (Z)  physical drive 0.3 goes forwards
M569 P0.4 S1                            ; (E1) physical drive 0.4 goes forwards
M584 X0.1 U0.2 Y0.0 Z0.3 E0.4           ; set drive mapping
M350 X64 U64 Y64 Z64 E16 I1                 ; configure microstepping with interpolation
M669 K1 X1:0:0:0 Y1:-1:0:1 Z0:0:1:0 U0:0:0:1; Matrix mapping for Axis - X:Y:Z:U
M92 X400.00 U400.00 Y400.00 Z1600.00 E420.00    ; set steps per mm
M566 X900.00 U900.00 Y900.00 Z180.00 E120.00    ; set maximum instantaneous speed changes (mm/min)
M203 X6000.00 U6000.00 Y6000.00 Z180.00 E1200.00 ; set maximum speeds (mm/min)
M201 X500.00 U500.00 Y500.00 Z20.00 E250.00     ; set accelerations (mm/s^2)
M906 X1200 U1200 Y1200 Z1200 E800 I30         ; set motor currents (mA) and motor idle factor in per cent
M84 S30                                 ; Set idle timeout

; Axis Limits
M208 X-45 U45 Y0 Z0 S1                        ; set axis minima
M208 X220 U310 Y215 Z200 S0                  ; set axis maxima

; Endstops
M574 X1 S3                              ; configure sensorless endstop for low end on X
M574 Y1 S3                              ; configure sensorless endstop for low end on Y
M574 Z1 S3                              ; configure sensorless endstop for low end on Z
M574 U2 S3                              ; configure sensorless endstop for high end on U
M915 X U Y Z R0 F0						; Configure motor stall detection

; Z-Probe
M558 P0 H5 F120 T6000                   ; disable Z probe but set dive height, probe speed and travel speed
M557 X15:215 Y15:195 S20                ; define mesh grid

; Heaters

; Fans
M950 F0 C"out8" Q500                    ; create fan 0 on pin out8 and set its frequency
M106 P0 S0 H-1                          ; set fan 0 value. Thermostatic control is turned off
M950 F1 C"out9" Q500                    ; create fan 1 on pin out9 and set its frequency
M106 P1 S1 H-1                          ; set fan 1 value. Thermostatic control is turned off

; Tools
M563 P0 D0 F0                           ; define tool 0
G10 P0 X0 Y0 Z0                         ; set tool 0 axis offsets
G10 P0 R0 S0                            ; set initial tool 0 active and standby temperatures to 0C

; Custom settings are not defined

; Miscellaneous
M575 P1 S1 B57600                       ; enable support for PanelDue
Homing wise:
here is an example of my homing script (the standard IDEX setup guild is very good); homex.g ; called to home the X axis M400 M913 X50 U50 Y50 ; drop motor current to 70% M400 G91; relative positioning ;G1 H2 Z10 F12000 ; lift Z relative to current position G1 H1 X-320.5 F10000 ; move quickly to X axis endstop and stop there (first pass) G1 H2 X5 F12000 ; go back a few mm G1 H1 X-320.5 F7000 ; move slowly to X axis endstop once more (second pass) ;G1 H2 Z-10 F6000 ; lower Z again G90 ; absolute positioning M400 M913 X100 U100 Y100 ; return current to 100% M400Please note I'm doing sensorless homing
-
@dc42 I just reversed the Y motor and when I do G1 X10 F1000 S2 the Y axis moves in the right direction (+10).
That will have changed the direction of X axis movement too.
I'm sorry, that would have been correct for CoreXY kinematics, not MarkForged kinematics. HaqXY is dual MarkForged.
-
Note that I'am too trying to get my printer working correctly. I have some problems for example with tool offsets. Please make sure that any parameters you take from it are correct for your machine.
my config at the moment:
; General preferences G90 ; send absolute coordinates... M83 ; ...but relative extruder moves M550 P"My Printer" ; set printer name M669 K11 Y-1:-1:0:1 ; Network M552 P0.0.0.0 S1 ; enable network and acquire dynamic address via DHCP M586 P0 S1 ; enable HTTP M586 P1 S0 ; disable FTP M586 P2 S0 ; disable Telnet ; Drives M569 P0.0 S1 ; physical drive 0.0 goes forwards X M569 P0.1 S1 ; physical drive 0.1 goes forwards U M569 P0.2 S1 ; physical drive 0.2 goes forwards Y M569 P0.3 S1 ; physical drive 0.3 goes forwards Z M569 P0.4 S1 ; physical drive 0.4 goes forwards E0 M569 P0.5 S1 ; physical drive 0.5 goes forwards E1 M584 X0.1 U0.0 Y0.2 Z0.3 E0.4:0.5 ; set drive mapping M350 X16 U16 Y16 Z16 E16:16 I1 ; configure microstepping without interpolation M92 X80.00 U80.00 Y80.00 Z640.00 E2700:208 ; set steps per mm M566 X600.00 U600.00 Y600.00 Z60.00 E40.00:300 ; set maximum instantaneous speed changes (mm/min) M203 X12000.00 U12000.00 Y12000.00 Z180.00 E1800.00:1000 ; set maximum speeds (mm/min) M201 X1000.00 U1000.00 Y1000.00 Z20.00 E120.00:600 ; set accelerations (mm/s^2) M906 X1200 U1200 Y1000 Z1000 E980:980 I45 ; set motor currents (mA) and motor idle factor in per cent M84 S30 ; Set idle timeout M569 P0.0 V25 H25 D3 M569 P0.1 V25 H25 D3 M569 P0.2 V25 H25 D3 M915 P0.0 S3 R0 H134 T25 F1 M915 P0.1 S3 R0 H134 T25 F1 M915 P0.2 S3 R0 H134 T25 F1 ; Axis Limits M208 X-42.3 U41 Y0 Z0 S1 ; set axis minima M208 X400 U439.6 Y400 Z375 S0 ; set axis maxima ; Endstops M574 X1 S1 P"!^io1.in" ; configure active-high endstop for low end on X via pin !^io2.in M574 U2 S1 P"!^io2.in" ; configure active-high endstop for high end on U via pin !^io1.in M574 Y1 S1 P"io5.in" ; configure active-high endstop for low end on Y via pin !^io3.in M574 Z1 S1 P"!^io4.in" ; configure active-high endstop for low end on Z via pin !^io4.in ; Z-Probe M558 P0 H5 F120 T6000 ; disable Z probe but set dive height, probe speed and travel speed M557 X15:215 Y15:195 S20 ; define mesh grid ; Heaters M308 S0 P"temp0" Y"thermistor" T100000 B3974 ; configure sensor 0 as thermistor on pin temp0 M950 H0 C"out0" T0 ; create bed heater output on out0 and map it to sensor 0 M307 H0 B1 S1.00 ; enable bang-bang mode for the bed heater and set PWM limit M140 H0 ; map heated bed to heater 0 M143 H0 S130 ; set temperature limit for heater 0 to 120C M308 S1 P"temp1" Y"thermistor" T100000 B4725 C7.06e-8 ; configure sensor 1 as thermistor on pin temp2 M950 H1 C"out1" T1 ; create nozzle heater output on out1 and map it to sensor 1 M307 H1 B0 S1.00 ; disable bang-bang mode for heater and set PWM limit M307 H1 R2.399 C262.2 D5.02 S1 V23.8 M143 H1 S280 ; set temperature limit for heater 1 to 280C M308 S2 P"temp2" Y"thermistor" T100000 B4725 C7.06e-8 ; configure sensor 1 as thermistor on pin temp2 M950 H2 C"out2" T2 ; create nozzle heater output on out1 and map it to sensor 1 M307 H2 B0 S1.00 ; disable bang-bang mode for heater and set PWM limit M307 H2 R2.125 C261.6 D5.93 S1.00 V23.8 M143 H2 S280 ; set temperature limit for heater 1 to 280C M307 H0 A110 C180 D5 B1 ; Bed slow temperature rise ; Fans M950 F0 C"out7" Q500 ; create fan 0 on pin out7 and set its frequency M106 P0 S0 H-1 ; set fan 0 value. Thermostatic control is turned off M950 F1 C"out8" Q500 ; create fan 1 on pin out8 and set its frequency M106 P1 S0 H-1 ; set fan 1 value. Thermostatic control is turned off ; Tools ; tool 0, X-axis M563 P0 D0 H1 X0 F0 ; define tool 0 G10 P0 R0 S0 X0 Y0 Z0 ; set tool 0 axis offsets ; tool 1, U-axis M563 P1 D1 H2 X3 F1 G10 P1 R0 S0 Y-0.1 U0 Z0 ; set initial tool 1 active and standby temperatures to 0C ; Custom settings are not defined ; Miscellaneous M575 P1 S1 B57600 ; enable support for PanelDue M911 S10 R11 P"M913 X0 Y0 G91 M83 G1 Z3 E-5 F1000" ; set voltage thresholds and actions to run on power loss T0 ; select tool -
I have tested multiple configurations, but the issue is persistent.
Every time I home Y-Axis, the distance the axis has to travel to hit the end stop minus the amount it is allowed to travel is added to X and U.
Example:
-
I set the Y-Axis at a distance of 100mm from the endstop and restart the printer to set everything to zero.
-
I run homey.g
G91 ; relative positioning G1 H1 Y-330 F2500 ; coarse home Y G90 ; absolute positioning- Y is now 0, X is -230 and U is at 230
(-230mm = 100mm distance to Endstop -330mm maximum homing distance as specified homey.g)
I don't know what I am missing here...
; Configuration file for Duet 3 (firmware version 3) ; executed by the firmware on start-up ; generated by RepRapFirmware Configuration Tool v3.1.4 on Wed Aug 05 2020 11:42:30 GMT+0200 (Mitteleuropäische Sommerzeit) ; General preferences G90 ; send absolute coordinates... M83 ; ...but relative extruder moves M550 P"Duet 3" ; set printer name ; Chamer Fan M950 F2 C"!out5" F25000 M106 P2 S0 B0 L0.20 X0.5 H1 T40:200 M80 ; Power ON M669 K11 Y1:-1:0:-1 ;M669 K1 X1:0:0:0 Y1:-1:0:1 Z0:0:1:0 U0:0:0:-1 ; Matrix mapping for Axis - X:Y:Z:U M569 P0.0 S1 ; Drive 0.0/Z1 M569 P0.1 S1 ; Drive 0.1/Z2 M569 P0.2 S1 ; Drive 0.2/Z3 M569 P0.3 S1 ; Drive 0.3/Z4 M569 P0.4 S0 ; Drive 0.4/Y1 M569 P0.5 S1 ; Drive 0.5/Y2 M569 P1.0 S0 ; Drive 1.0/X M569 P1.1 S0 ; Drive 1.1/U M569 P1.2 S0 ; Drive 1.2/E0 M584 Z0.0:0.1:0.2:0.3 Y0.4:0.5 X1.0 U1.1 E1.2 ; set 4 Z drivers and add one U driver -> Must come earlier than M350,M906,M92, M201, M203, M208, M350, M566, M574, M667 and M669 M671 X-49:498:498:-39 Y-21:-21:309:309 S10 ; lead screw positions M350 U16 X16 Y16 Z16 I1 ; Configure microstepping with interpolation M350 E16 I0 ; Configure microstepping with interpolation M92 U80 X80 Y80 Z800 V2500 W2500 E455 ;476.5 ; Set steps per mm M203 U48000 X48000 Y48000 V1000 W1000 Z2000 E6000 ; Set maximum speeds (mm/min) M566 U800 X800 Y800 V50 W50 Z300 E3000 ; set maximum instantaneous speed changes (mm/min) M201 U2500 X2500 Y2500 V250 W250 Z200 E3000 ; Set accelerations (mm/s^2) M906 U1500 X1500 Y1500 V1000 W1000 Z1500 E800 I30 ; Set motor currents (mA) and motor idle factor in per cent M84 S10 ; Set idle timeout ; Axis Limits ;M208 U-30:400 X430:0 Y0:320 Z0:337.5 V-9999:9999 W-9999:9999 ; Set axis minima:maxima ; Axis Limits M208 X0 U0 Y0 Z0 S1 ; set axis minima M208 X430 U430 Y320 Z337.5 S0 ; set axis maxima ; Endstops ;M574 X1 U2 Y2 Z1.5 S1 ; Set active high endstops M574 X2 S1 P"io0.in" ; configure active-high endstop for high end on X via pin io1.in M574 Y1 S1 P"io1.in" ; configure active-high endstop for low end on Y via pin io1.in M574 U1 S1 P"io2.in" ; configure active-high endstop for low end on U via pin io3.in M574 Z2 S1 P"io3.in" ; configure active-high endstop for high end on Z via pin io0.in ; Servo ;M950 S0 C"io4.out" ;M280 P0 S0 ; Bed Heater M308 S0 P"temp0" A"Bed" Y"thermistor" T100000 B3950 ; define bed temperature sensor M950 H0 C"out8" T0 ; create bed heater output on bed output and map it to sensor 0 M143 H0 S120 ; set temperature limit for heater 0 to 120C M307 H0 B1 S1.00 ; enable bang-bang mode for the bed heater and set PWM limit M140 H0 ; map heated bed to heater 0 ; Hotend1 Heater M308 S1 P"temp1" A"Extruder1" Y"pt1000" ; configure sensor 1 as PT1000 on pin temp1 M950 H1 C"out1" T1 ; create nozzle heater output on out1 and map it to sensor 1 M143 H1 S280 ; set temperature limit for heater 1 to 280C M307 H1 B0 S1.00 ; disable bang-bang mode for heater and set PWM limit M307 H1 A765.9 C354.3 D4.8 S1.0 V23.8 B0 M307 H0 A103.3 C269.6 D1.6 S1.0 V23.9 B0 ; Temperature Sensors ;M308 S3 P"temp2" Y"pt1000" A"Chamber" M308 S2 P"temp3" Y"pt1000" A"Chamber" ; Fans M950 F0 C"out7" A"Hotend Fan" ; create fan 0 on pin out7 and set its frequency M106 P0 S1 H1 T65 L1 ; set fan 0 value. Thermostatic control is turned on M950 F1 C"out3" Q-1 A"Part Fan" ; create fan 1 on pin out8 and set its frequency M106 P1 S0 H-1 ; set fan 1 value. Thermostatic control is turned off ; MCU Fan ;M308 S4 Y"drivers" ; configure sensor 4 as temperature warning and overheat flags on the TMC2660 on Duet M308 S4 Y"mcu-temp" A"MCU" ; configure sensor5 as thermistor on pin e1temp for left stepper M950 F4 C"out4" Q100 ; create fan 4 on out4 and set its frequency M106 P4 S0 B1 H4 L0.3 X1 T40:60 ; set fan 4 value ; Tools M563 P0 D0 H1 F1 ; define tool 0 G10 P0 X0 Y0 Z0 R0 S0 ; LED M950 P3 C"1.out0" M42 P3 S1 ; Air Cooler M950 F5 C"out6" ;M106 P5 L0.2 X1 H2 T18:20 M106 P5 S1 H1 ;Pressure Advance M572 D0 S0.025 ; Extruder Drive Number, Pressure advance amount ;Dynamic acceleration adjustment ;M593 F50 ; cancel ringing at 40.5Hz ; Miscellaneous ; M911 S22 R23 P"M18 M106 P1 S0 M42 P3 S0" ; set voltage thresholds and actions to run on power loss G91 M83 G1 Z1 E-1 F1000 T0 ; select first tool M501 ; set the active parameters to those stored in sys/config-override.g -
-
In my HaqXY I have X-, Y- and Z-axes endstops at low end of the axes, but in your config.g you have Z- and X-axis endstops at high end. Is this on purpose? Only axis that I home to high end is U-axis.
-
Every time I home Y-Axis, the distance the axis has to travel to hit the end stop minus the amount it is allowed to travel is added to X and U.
That's either a firmware bug that nobody else has reported, or an incorrect matrix, or an incorrect homing file.
After homing both X and Y (or sending G92 X0 Y0 to pretend they are homed), do normal G1 Xxx and G1 Yyy moves with no H parameter work correctly?
Duet WiFi hardware designer and firmware engineer
Please do not ask me for Duet support via PM or email, use the forum
http://www.escher3d.com, https://miscsolutions.wordpress.com -
@Visionary Yes, this is correct. I have my XUY zero at the rear right-hand side of my printer with the first extruder on the left (X-Axis) and the second on the right (U-Axis).
@dc42 Yes, these moves are executed correctly. I am using this printer for quite a while now. Most of the time this issue is not a problem since I rehome all axes before starting prints or executing macros. But If I don't rehome all axis in the correct order it leads to crashes.
-
@Visionary Yes, this is correct. I have my XUY zero at the rear right-hand side of my printer with the first extruder on the left (X-Axis) and the second on the right (U-Axis).
@dc42 Yes, these moves are executed correctly. I am using this printer for quite a while now. Most of the time this issue is not a problem since I rehome all axes before starting prints or executing macros. But If I don't rehome all axis in the correct order it leads to crashes.
Thans, I'll log this as a bug to be fixed in RRF 3.3.
-
Hi @MaxGyver, I have reproduced this and tracked down two issues that are causing it:
- The first issue (the main one) is that when the homing move stops, the firmware needs to retrieve the number of steps taken by the X, Y and U motors. This data is not currently available for the X and U motors because they are CAN-connected and the move has been terminated early.
- The second issue is that in config.g the M584 command should precede the M669 command, so that the U axis exists when you use M669 and in consequence it builds and inverts a 4x4 matrix instead of a 3x3 matrix.
I will work on a solution to the first issue.
Duet WiFi hardware designer and firmware engineer
Please do not ask me for Duet support via PM or email, use the forum
http://www.escher3d.com, https://miscsolutions.wordpress.com -
-
 undefined sonderzug referenced this topic
-
 undefined RogerPodacter referenced this topic
-
undefined RogerPodacter referenced this topic
-
undefined RogerPodacter referenced this topic
-
undefined RogerPodacter referenced this topic
-
undefined RogerPodacter referenced this topic
-
undefined RogerPodacter referenced this topic
-
undefined RogerPodacter referenced this topic
-
undefined RogerPodacter referenced this topic
-
undefined RogerPodacter referenced this topic
-
undefined RogerPodacter referenced this topic
-
undefined RogerPodacter referenced this topic
-
undefined RogerPodacter referenced this topic