Tevo Little Monster stepper motor move only in one direction
-
@phaedrux
Thank you very much for your prompt reply, please find below the
required information:config.g :
; Configuration file for Duet WiFi (firmware version 3)
; executed by the firmware on start-up
;
; generated by RepRapFirmware Configuration Tool v3.3.0 on Sun Aug 08 2021 03:13:57 GMT+0200 (Central European Summer Time); General preferences
G90 ; send absolute coordinates...
M83 ; ...but relative extruder moves
M550 P"TLM" ; set printer name
M665 R155 L397.19 B155 H520 ; Set delta radius, diagonal rod length, printable radius and homed height
M666 X0 Y0 Z0 ; put your endstop adjustments here, or let auto calibration find them; Network
M552 S1 ; enable network
M586 P0 S1 ; enable HTTP
M586 P1 S1 ; enable FTP
M586 P2 S1 ; enable Telnet; Drives
M569 P0 S1 ; physical drive 0 goes forwards
M569 P1 S1 ; physical drive 1 goes forwards
M569 P2 S1 ; physical drive 2 goes forwards
M569 P3 S1 ; physical drive 3 goes forwards
M584 X0 Y1 Z2 E3 ; set drive mapping
M350 X16 Y16 Z16 E16 I1 ; configure microstepping with interpolation
M92 X80.00 Y80.00 Z80.00 E663.00 ; set steps per mm
M566 X1200.00 Y1200.00 Z1200.00 E1200.00 ; set maximum instantaneous speed changes (mm/min)
M203 X18000.00 Y18000.00 Z18000.00 E1200.00 ; set maximum speeds (mm/min)
M201 X1000.00 Y1000.00 Z1000.00 E1000.00 ; set accelerations (mm/s^2)
M906 X1400 Y1400 Z1400 E1400 I30 ; set motor currents (mA) and motor idle factor in per cent
M84 S30 ; Set idle timeout; Axis Limits
M208 Z0 S1 ; set minimum Z; Endstops
M574 X1 S1 P"xstop" ; configure active-high endstop for low end on X via pin xstop
M574 Y1 S1 P"ystop" ; configure active-high endstop for low end on Y via pin ystop
M574 Z1 S1 P"zstop" ; configure active-high endstop for low end on Z via pin zstop; Z-Probe
M950 S0 C"exp.heater3" ; create servo pin 0 for BLTouch
M558 P9 C"^zprobe.in" H5 F120 T6000 ; set Z probe type to bltouch and the dive height + speeds
G31 P500 X0 Y0 Z2.5 ; set Z probe trigger value, offset and trigger height
M557 R150 S45 ; define mesh grid; Heaters
M308 S0 P"bedtemp" Y"thermistor" T100000 B4138 ; configure sensor 0 as thermistor on pin bedtemp
M950 H0 C"bedheat" T0 ; create bed heater output on bedheat and map it to sensor 0
M307 H0 B1 S1.00 ; enable bang-bang mode for the bed heater and set PWM limit
M140 H0 ; map heated bed to heater 0
M143 H0 S120 ; set temperature limit for heater 0 to 120C
M308 S1 P"e0temp" Y"thermistor" T100000 B4138 ; configure sensor 1 as thermistor on pin e0temp
M950 H1 C"e0heat" T1 ; create nozzle heater output on e0heat and map it to sensor 1
M307 H1 B0 S1.00 ; disable bang-bang mode for heater and set PWM limit
M143 H1 S280 ; set temperature limit for heater 1 to 280C; Fans
M950 F0 C"fan0" Q500 ; create fan 0 on pin fan0 and set its frequency
M106 P0 S0 H-1 ; set fan 0 value. Thermostatic control is turned off
M950 F1 C"fan1" Q500 ; create fan 1 on pin fan1 and set its frequency
M106 P1 S1 H1 T45 ; set fan 1 value. Thermostatic control is turned on
M950 F2 C"fan2" Q500 ; create fan 2 on pin fan2 and set its frequency
M106 P2 S1 H1 T45 ; set fan 2 value. Thermostatic control is turned on; Tools
M563 P0 D0 H1 F0 ; define tool 0
G10 P0 X0 Y0 Z0 ; set tool 0 axis offsets
G10 P0 R0 S0 ; set initial tool 0 active and standby temperatures to 0C; Custom settings are not defined
; Miscellaneous
M911 S10 R11 P"M913 X0 Y0 G91 M83 G1 Z3 E-5 F1000" ; set voltage thresholds and actions to run on power losshomedelta.g:
; homedelta.g
; called to home all towers on a delta printer
;
; generated by RepRapFirmware Configuration Tool v3.3.0 on Sun Aug 08 2021 03:13:57 GMT+0200 (Central European Summer Time)
G91 ; relative positioning
;*** Slow homing has been configured. Change F180 to F1800 below when your configuration is working
G1 H1 X705 Y705 Z705 F180 ; move all towers to the high end stopping at the endstops (first pass)
G1 H2 X-5 Y-5 Z-5 F1800 ; go down a few mm
;*** Slow homing has been configured. Change F180 to F360 below when your configuration is working
G1 H1 X10 Y10 Z10 F180 ; move all towers up once more (second pass)
G1 Z-5 F6000 ; move down a few mm so that the nozzle can be centred
G90 ; absolute positioning
G1 X0 Y0 F6000 ; move X+Y to the centrebed.g;
; bed.g
; called to perform automatic delta calibration via G32
;
; generated by RepRapFirmware Configuration Tool v3.3.0 on Sun Aug 08 2021 03:13:57 GMT+0200 (Central European Summer Time)
M561 ; clear any bed transform
; Probe the bed at 3 peripheral and 3 halfway points, and perform 6-factor auto compensation
; Before running this, you should have set up your Z-probe trigger height to suit your build, in the G31 command in config.g.
G30 P0 X0 Y84.9 H0 Z-99999
G30 P1 X73.53 Y-42.45 H0 Z-99999
G30 P2 X-73.53 Y-42.45 H0 Z-99999
G30 P3 X0 Y42.4 H0 Z-99999
G30 P4 X36.72 Y-21.2 H0 Z-99999
G30 P5 X-36.72 Y-21.2 H0 Z-99999
G30 P6 X0 Y0 H0 Z-99999 S6
; Use S-1 for measurements only, without calculations. Use S4 for endstop heights and Z-height only. Use S6 for full 6 factors
; If your Z probe has significantly different trigger heights depending on XY position, adjust the H parameters in the G30 commands accordingly. The value of each H parameter should be (trigger height at that XY position) - (trigger height at centre of bed)M122
=== Diagnostics ===
RepRapFirmware for Duet 2 WiFi/Ethernet version 3.3 (2021-06-15 21:44:54) running on Duet WiFi 1.02 or later
Board ID: 0JD0M-9P6B2-NJ4S8-6J1FJ-3S06S-T86UL
Used output buffers: 3 of 24 (11 max)
=== RTOS ===
Static ram: 23876
Dynamic ram: 74496 of which 0 recycled
Never used RAM 16044, free system stack 184 words
Tasks: NETWORK(notifyWait,13.6%,246) HEAT(delaying,0.0%,314) Move(notifyWait,0.1%,364) MAIN(running,85.6%,441) IDLE(ready,0.7%,29), total 100.0%
Owned mutexes: WiFi(NETWORK) HTTP(MAIN)
=== Platform ===
Last reset 00:02:28 ago, cause: power up
Last software reset at 2021-08-07 21:01, reason: User, GCodes spinning, available RAM 16044, slot 0
Software reset code 0x0003 HFSR 0x00000000 CFSR 0x00000000 ICSR 0x0041f000 BFAR 0xe000ed38 SP 0x00000000 Task MAIN Freestk 0 n/a
Error status: 0x00
Step timer max interval 0
MCU temperature: min 17.1, current 23.9, max 24.3
Supply voltage: min 23.8, current 24.0, max 24.4, under voltage events: 0, over voltage events: 0, power good: yes
Heap OK, handles allocated/used 0/0, heap memory allocated/used/recyclable 0/0/0, gc cycles 0
Driver 0: position 70856, standstill, SG min/max not available
Driver 1: position 70856, standstill, SG min/max not available
Driver 2: position 70856, standstill, SG min/max not available
Driver 3: position 0, standstill, SG min/max not available
Driver 4: position 0, standstill, SG min/max not available
Driver 5: position 0
Driver 6: position 0
Driver 7: position 0
Driver 8: position 0
Driver 9: position 0
Driver 10: position 0
Driver 11: position 0
Date/time: 2021-08-08 11:58:59
Cache data hit count 4294967295
Slowest loop: 5.35ms; fastest: 0.17ms
I2C nak errors 0, send timeouts 0, receive timeouts 0, finishTimeouts 0, resets 0
=== Storage ===
Free file entries: 10
SD card 0 detected, interface speed: 20.0MBytes/sec
SD card longest read time 4.0ms, write time 0.0ms, max retries 0
=== Move ===
DMs created 83, maxWait 0ms, bed compensation in use: none, comp offset 0.000
=== MainDDARing ===
Scheduled moves 0, completed moves 0, hiccups 0, stepErrors 0, LaErrors 0, Underruns [0, 0, 0], CDDA state -1
=== AuxDDARing ===
Scheduled moves 0, completed moves 0, hiccups 0, stepErrors 0, LaErrors 0, Underruns [0, 0, 0], CDDA state -1
=== Heat ===
Bed heaters = 0 -1 -1 -1, chamberHeaters = -1 -1 -1 -1
=== GCodes ===
Segments left: 0
Movement lock held by null
HTTP is ready with "M122 " in state(s) 0
Telnet is idle in state(s) 0
File is idle in state(s) 0
USB is idle in state(s) 0
Aux is idle in state(s) 0
Trigger is idle in state(s) 0
Queue is idle in state(s) 0
LCD is idle in state(s) 0
Daemon is idle in state(s) 0
Autopause is idle in state(s) 0
Code queue is empty.
=== Network ===
Slowest loop: 80.32ms; fastest: 0.00ms
Responder states: HTTP(0) HTTP(0) HTTP(0) HTTP(0) FTP(0) Telnet(0), 0 sessions
HTTP sessions: 1 of 8- WiFi -
Network state is active
WiFi module is connected to access point
Failed messages: pending 0, notready 0, noresp 0
WiFi firmware version 1.26
WiFi MAC address 24:a1:60:2d:ff:ff
WiFi Vcc 3.43, reset reason Turned on by main processor
WiFi flash size 4194304, free heap 23216
WiFi IP address 192.168.1.33
WiFi signal strength -65dBm, mode 802.11n, reconnections 0, sleep mode modem
Clock register 00002002
Socket states: 0 0 0 0 0 0 0 0
M98 P"config.g"
HTTP is enabled on port 80
FTP is enabled on port 21
TELNET is enabled on port 23This is with belts not mounted (as I tried if the stepper motor even turn, which they do in one direction only).
Thanks for the help.
linus
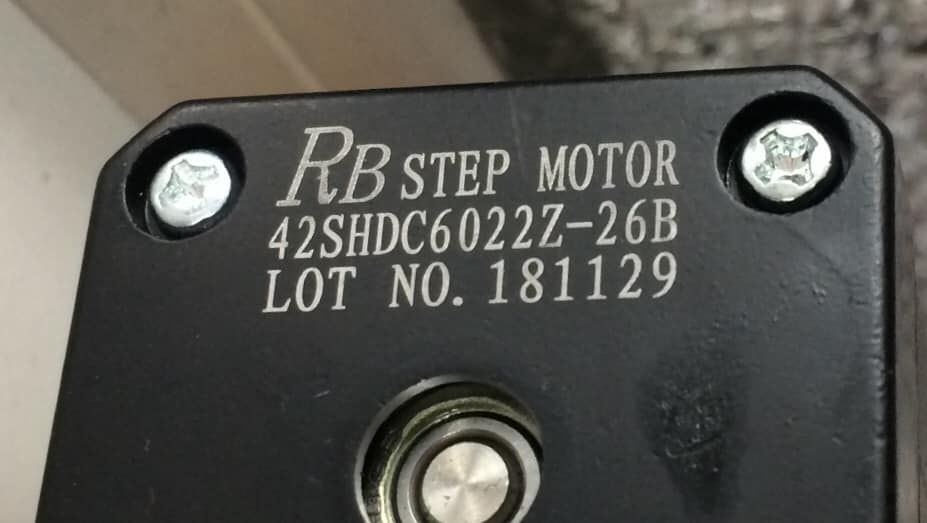
P.S. : Might it be a problem of the Stepper Motors ? Only info I have is whats written on them : RB STEP MOTOR 42SHDC6022-Z26B - LOT NO. 190402
- WiFi -
-
@linus4200 said in Tevo Little Monster stepper motor move only in one direction:
; Endstops
M574 X1 S1 P"xstop" ; configure active-high endstop for low end on X via pin xstop
M574 Y1 S1 P"ystop" ; configure active-high endstop for low end on Y via pin ystop
M574 Z1 S1 P"zstop" ; configure active-high endstop for low end on Z via pin zstopYour endstop positions are incorrect for a delta. X1 Y1 Z1 means low end of travel. They should be X2 Y2 Z2 for the high end of the towers.
Once that is fixed your homing should produce the right results.
-
Thank you very much. One issue less. I changed it as per your instruction and pressed the home all button. Result the x+ y
motor slowly lowering their position while z did not move nothing and consequently by lowering the x and y axis without the z axis results in crashing against the z aluminum profile of the printer and trying to move even further.Moreover I manually moved the "print head" into the home position and pushed again home all and a small movement
and then stopped. Thereafter I used DWC to try if there is any
movement on x, y and z axis. Indeed it moved but only in one direction using x+ or x- .... . Any idea why?With reference to the motors themselves do I have the change the current? to get a "fluid" movement?
Thanks for your help, without that I would not know what to do.
linus
P.S.: Might it be that even being a new printer the stepper motors are broken ? How to check this? Attached a video
to better understand my problem. -
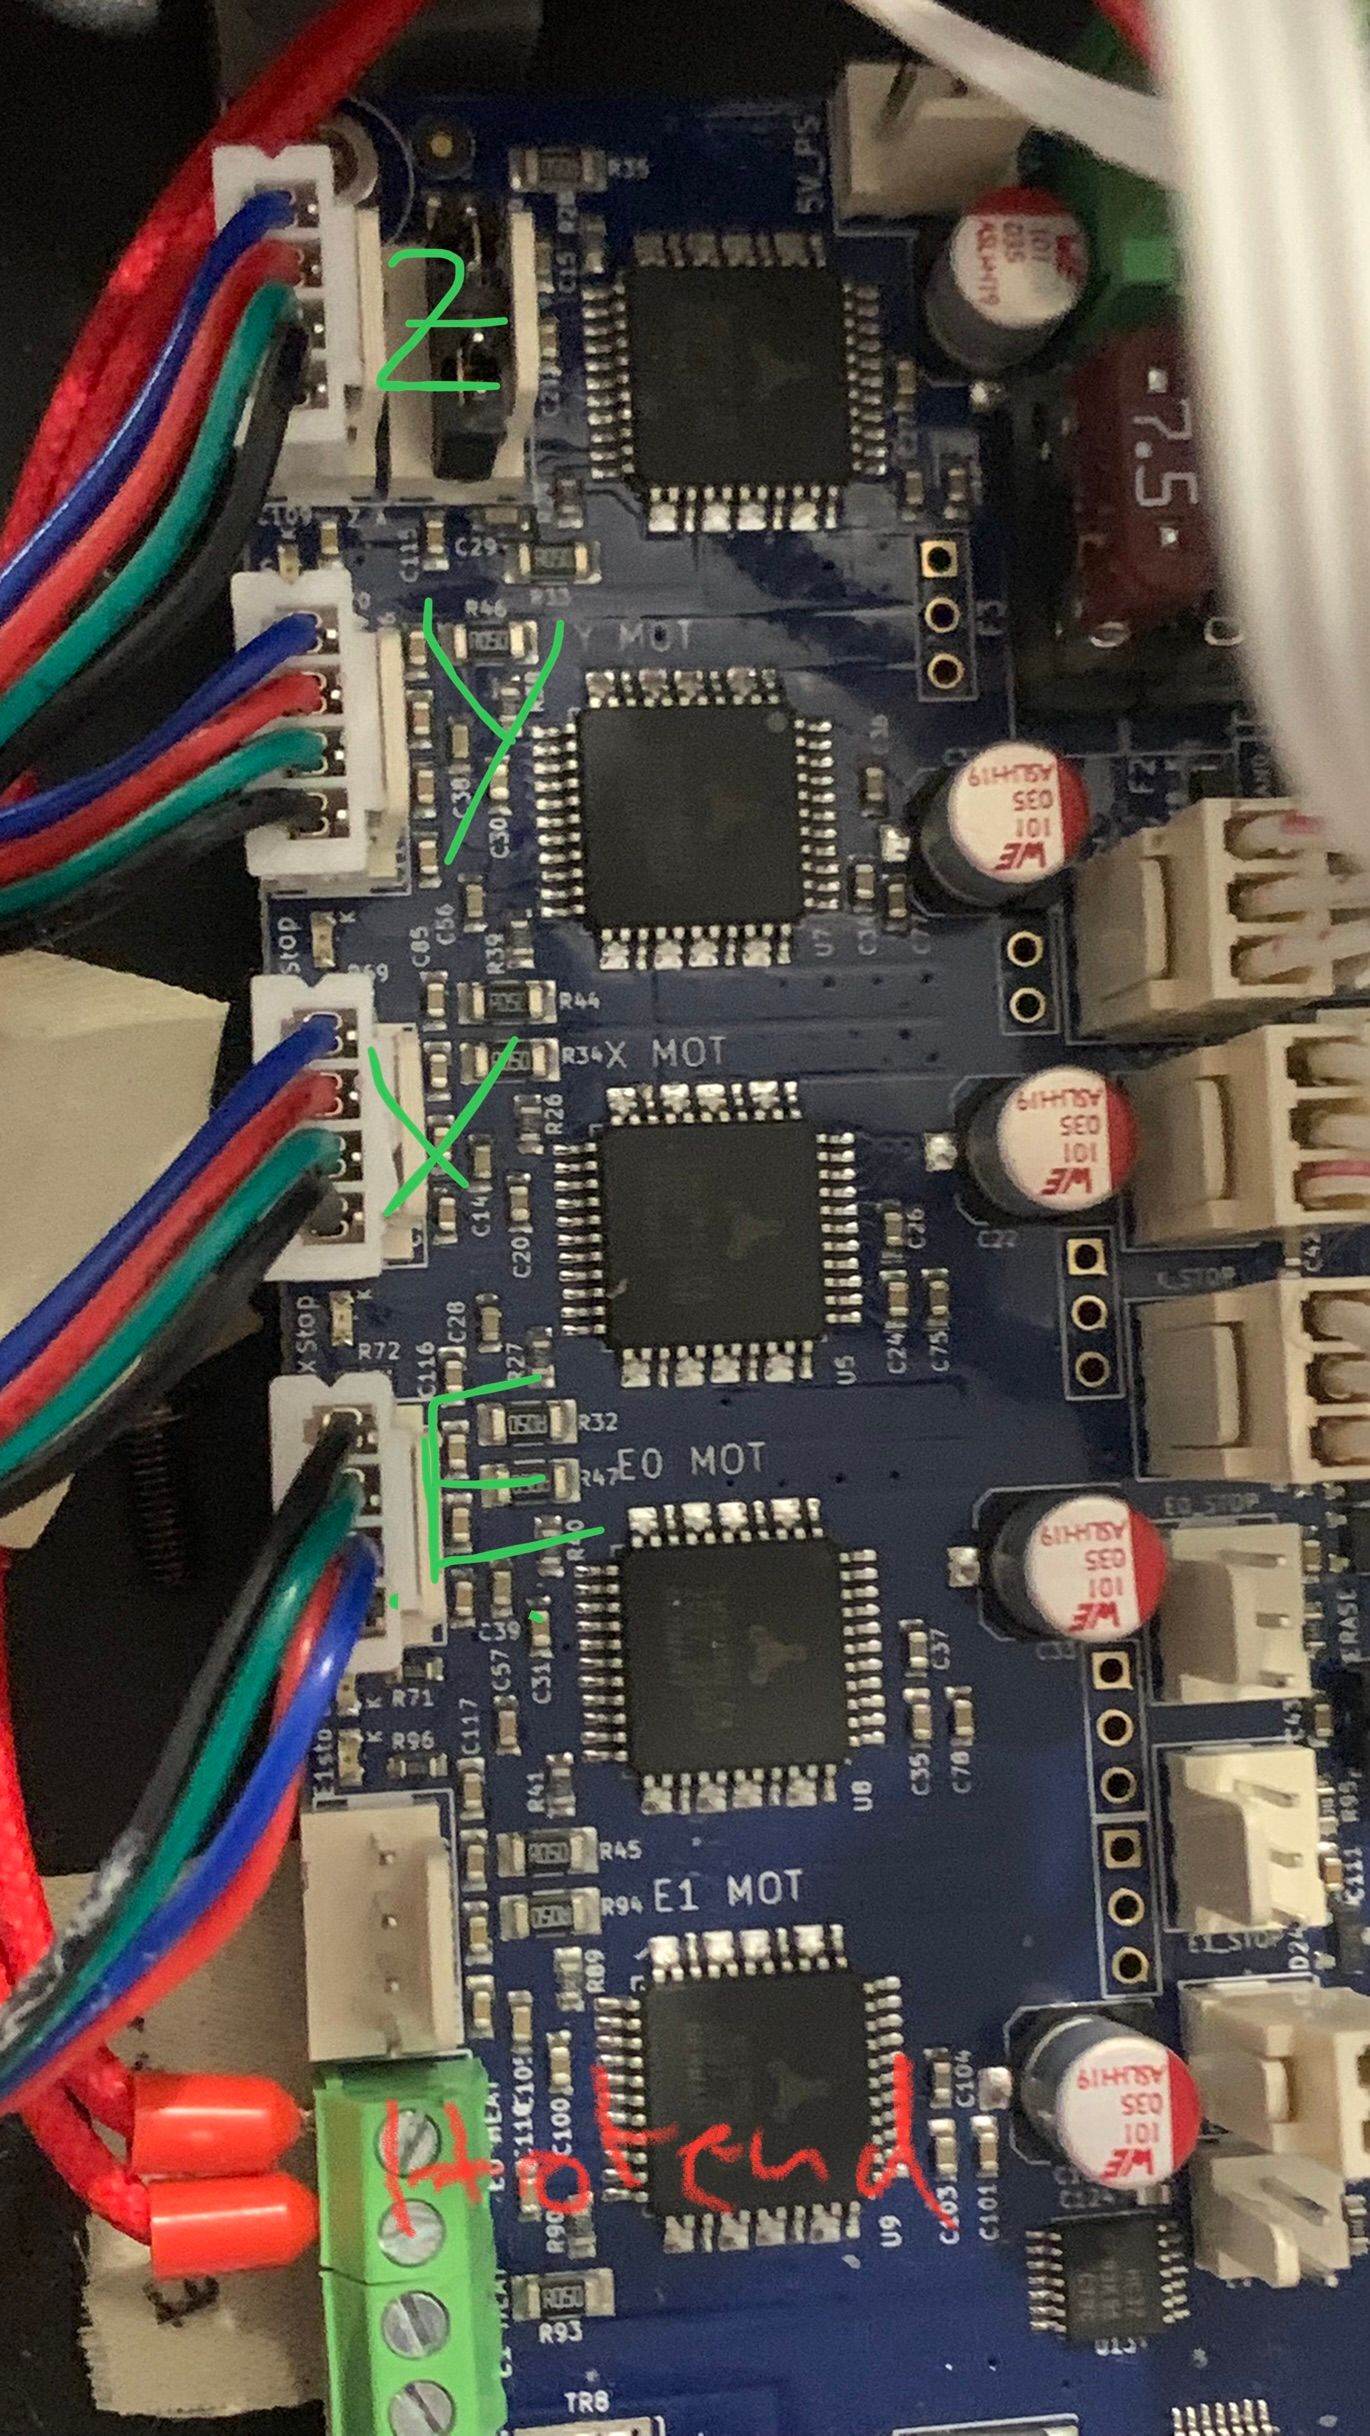
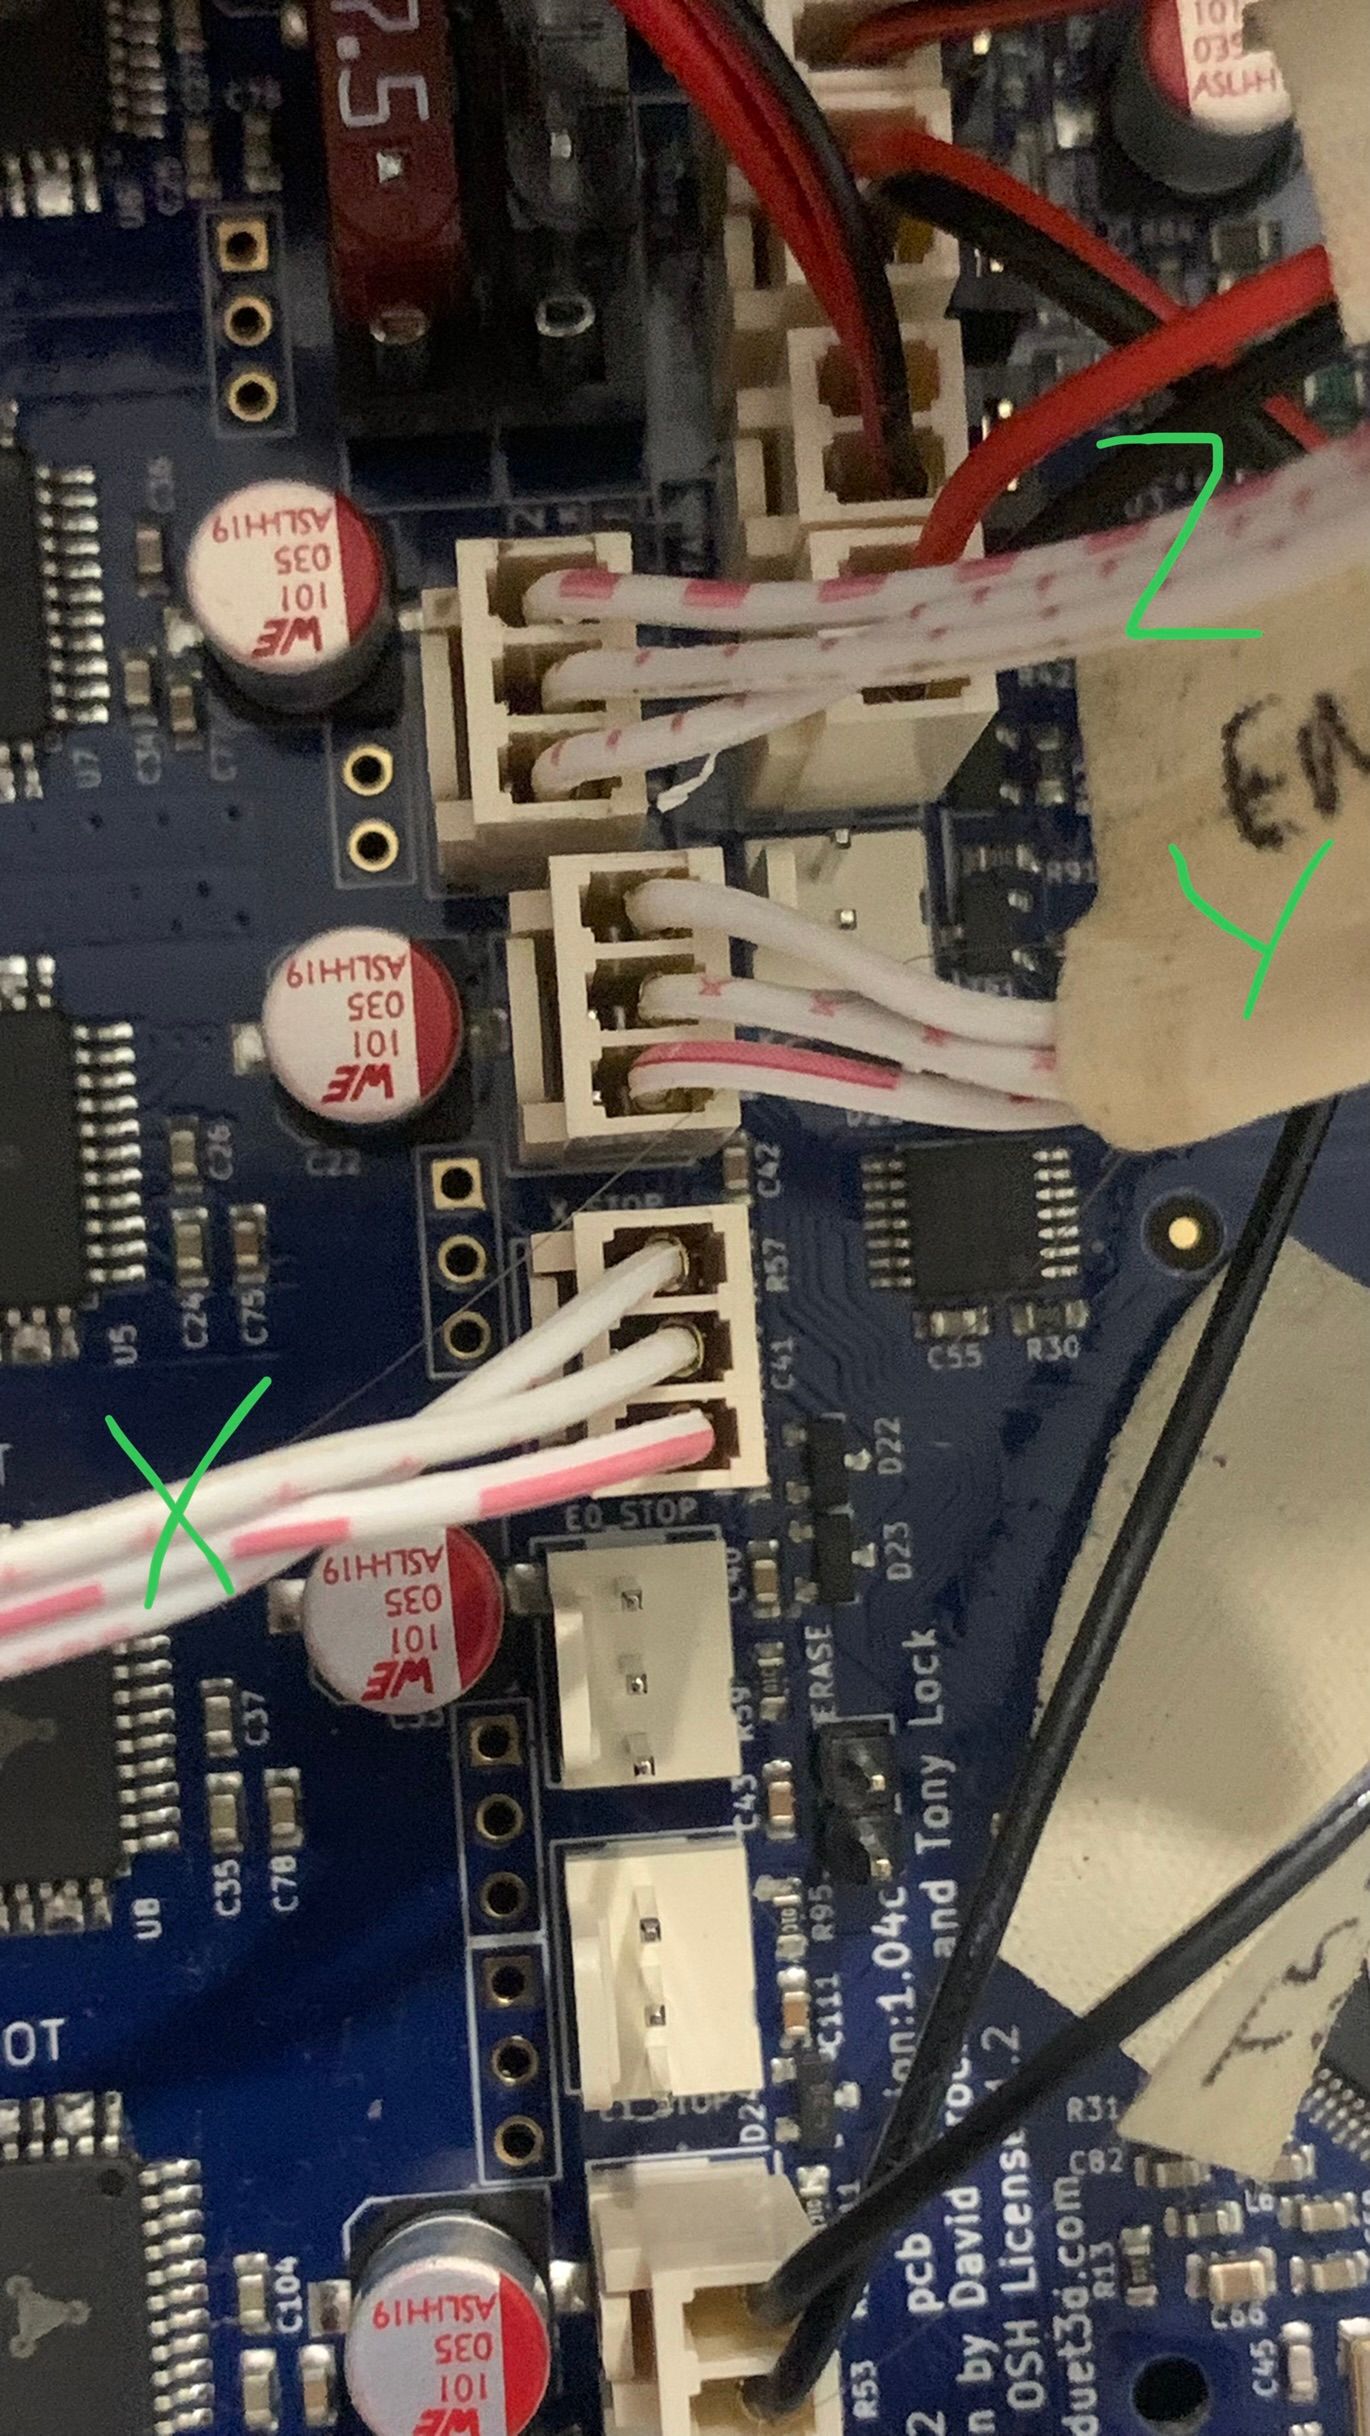
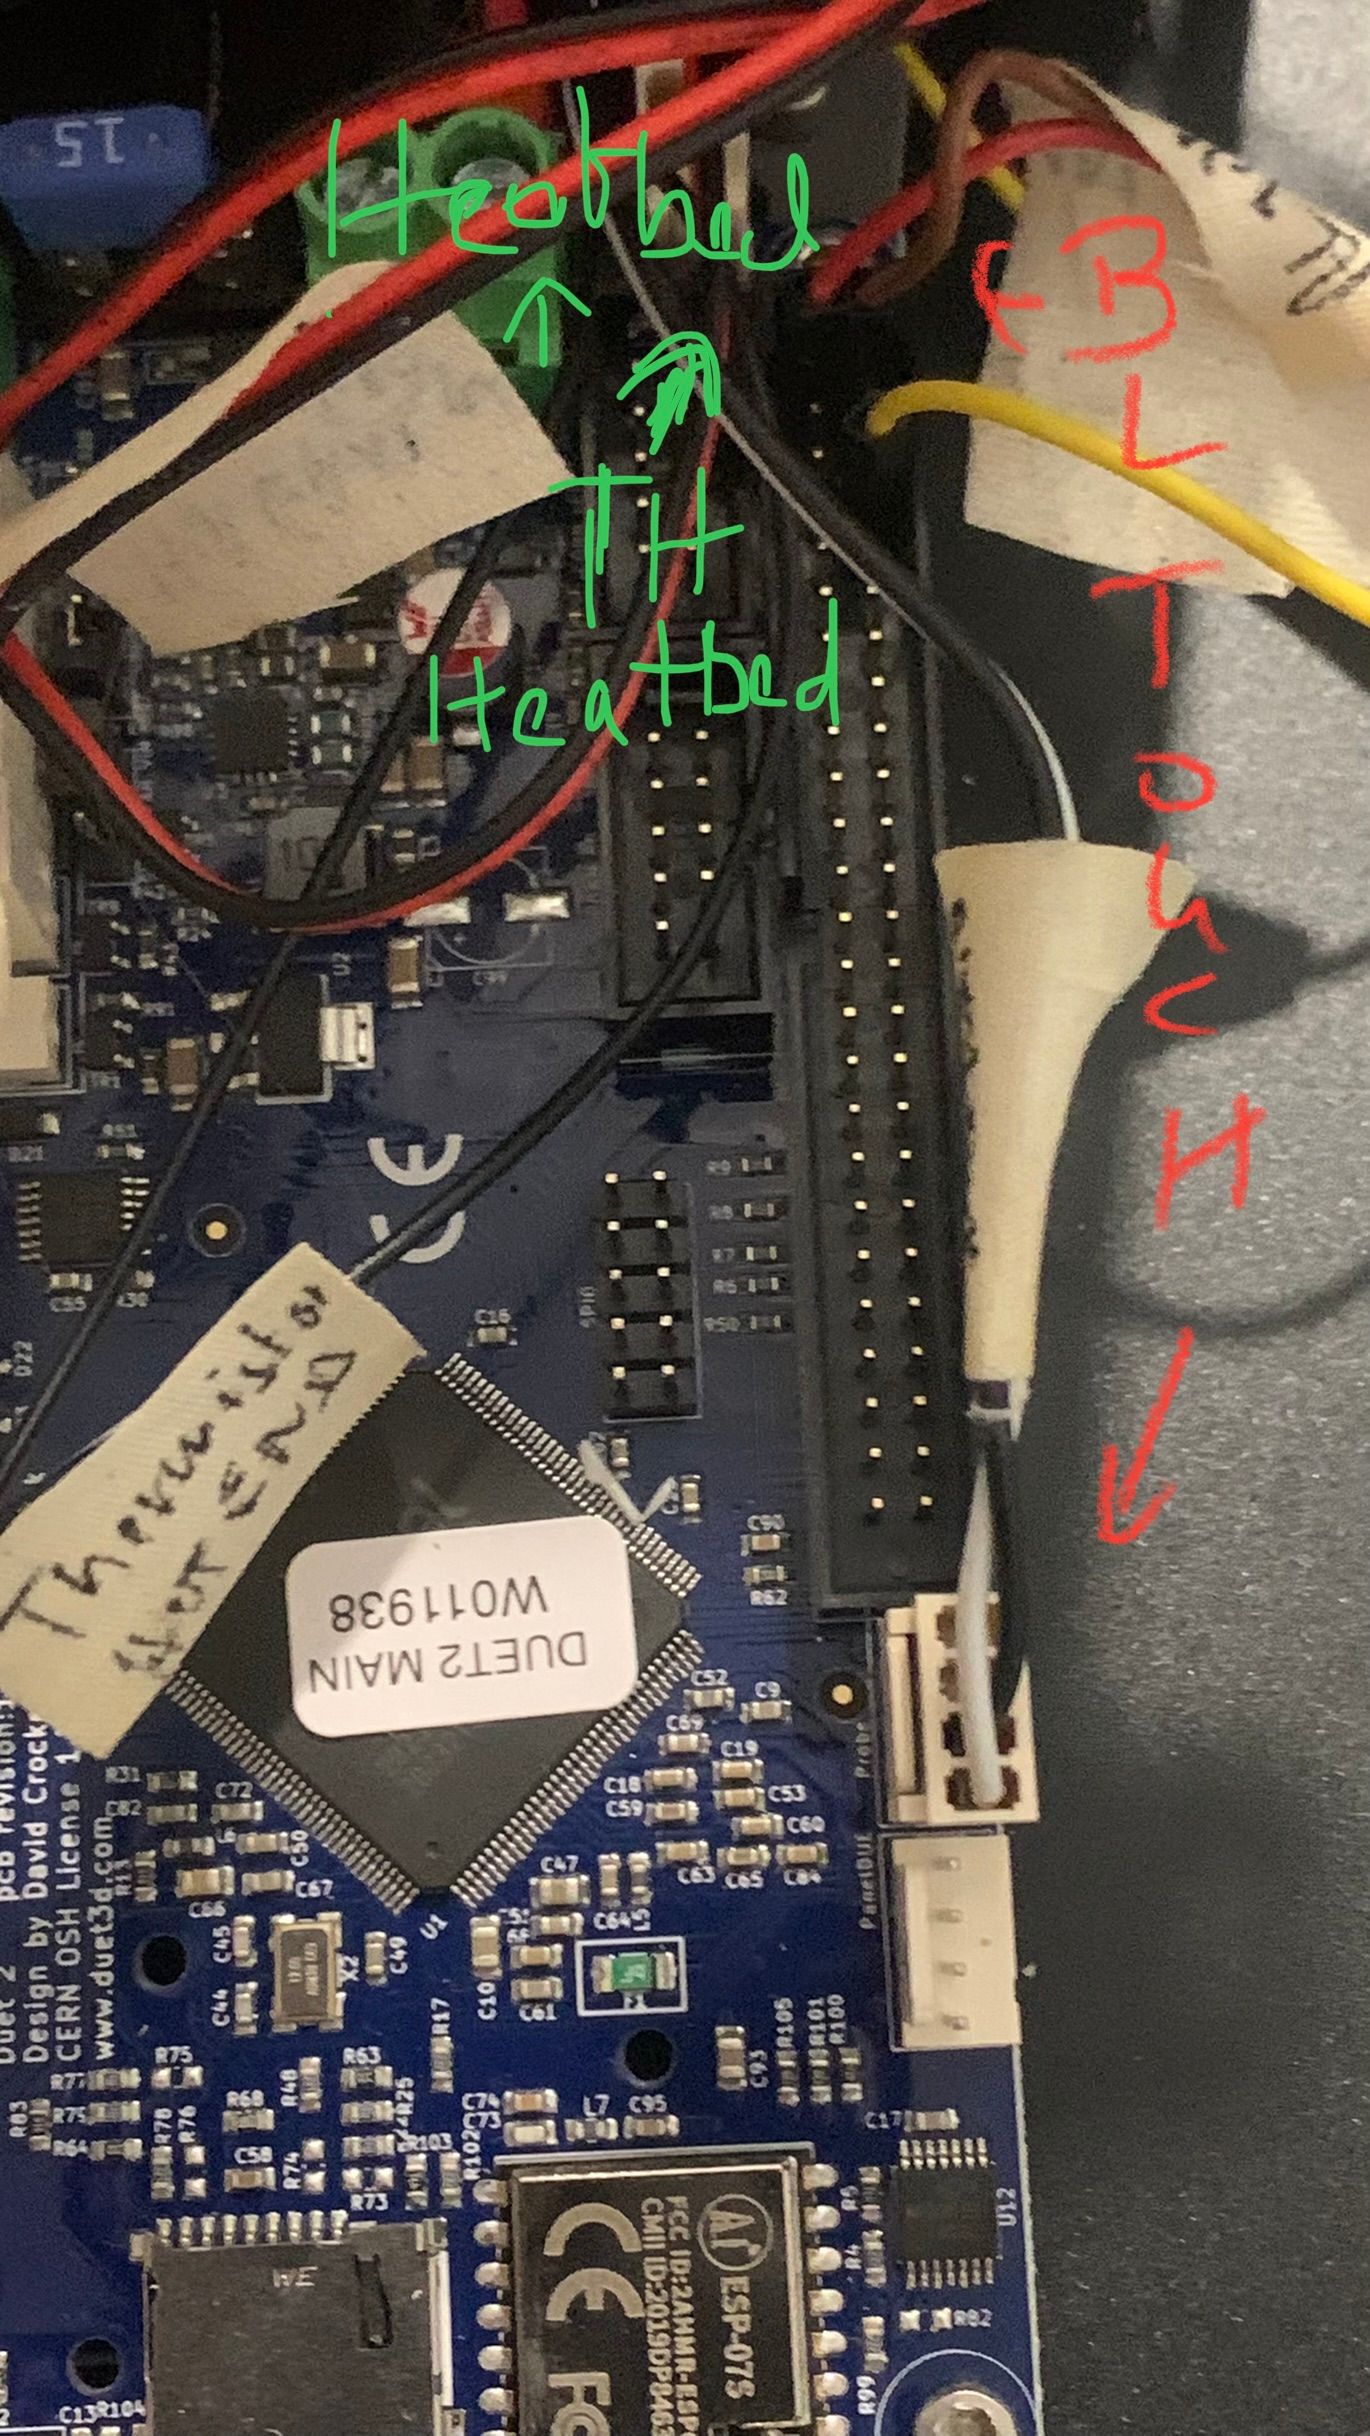
Dear @PHAEDRUX,
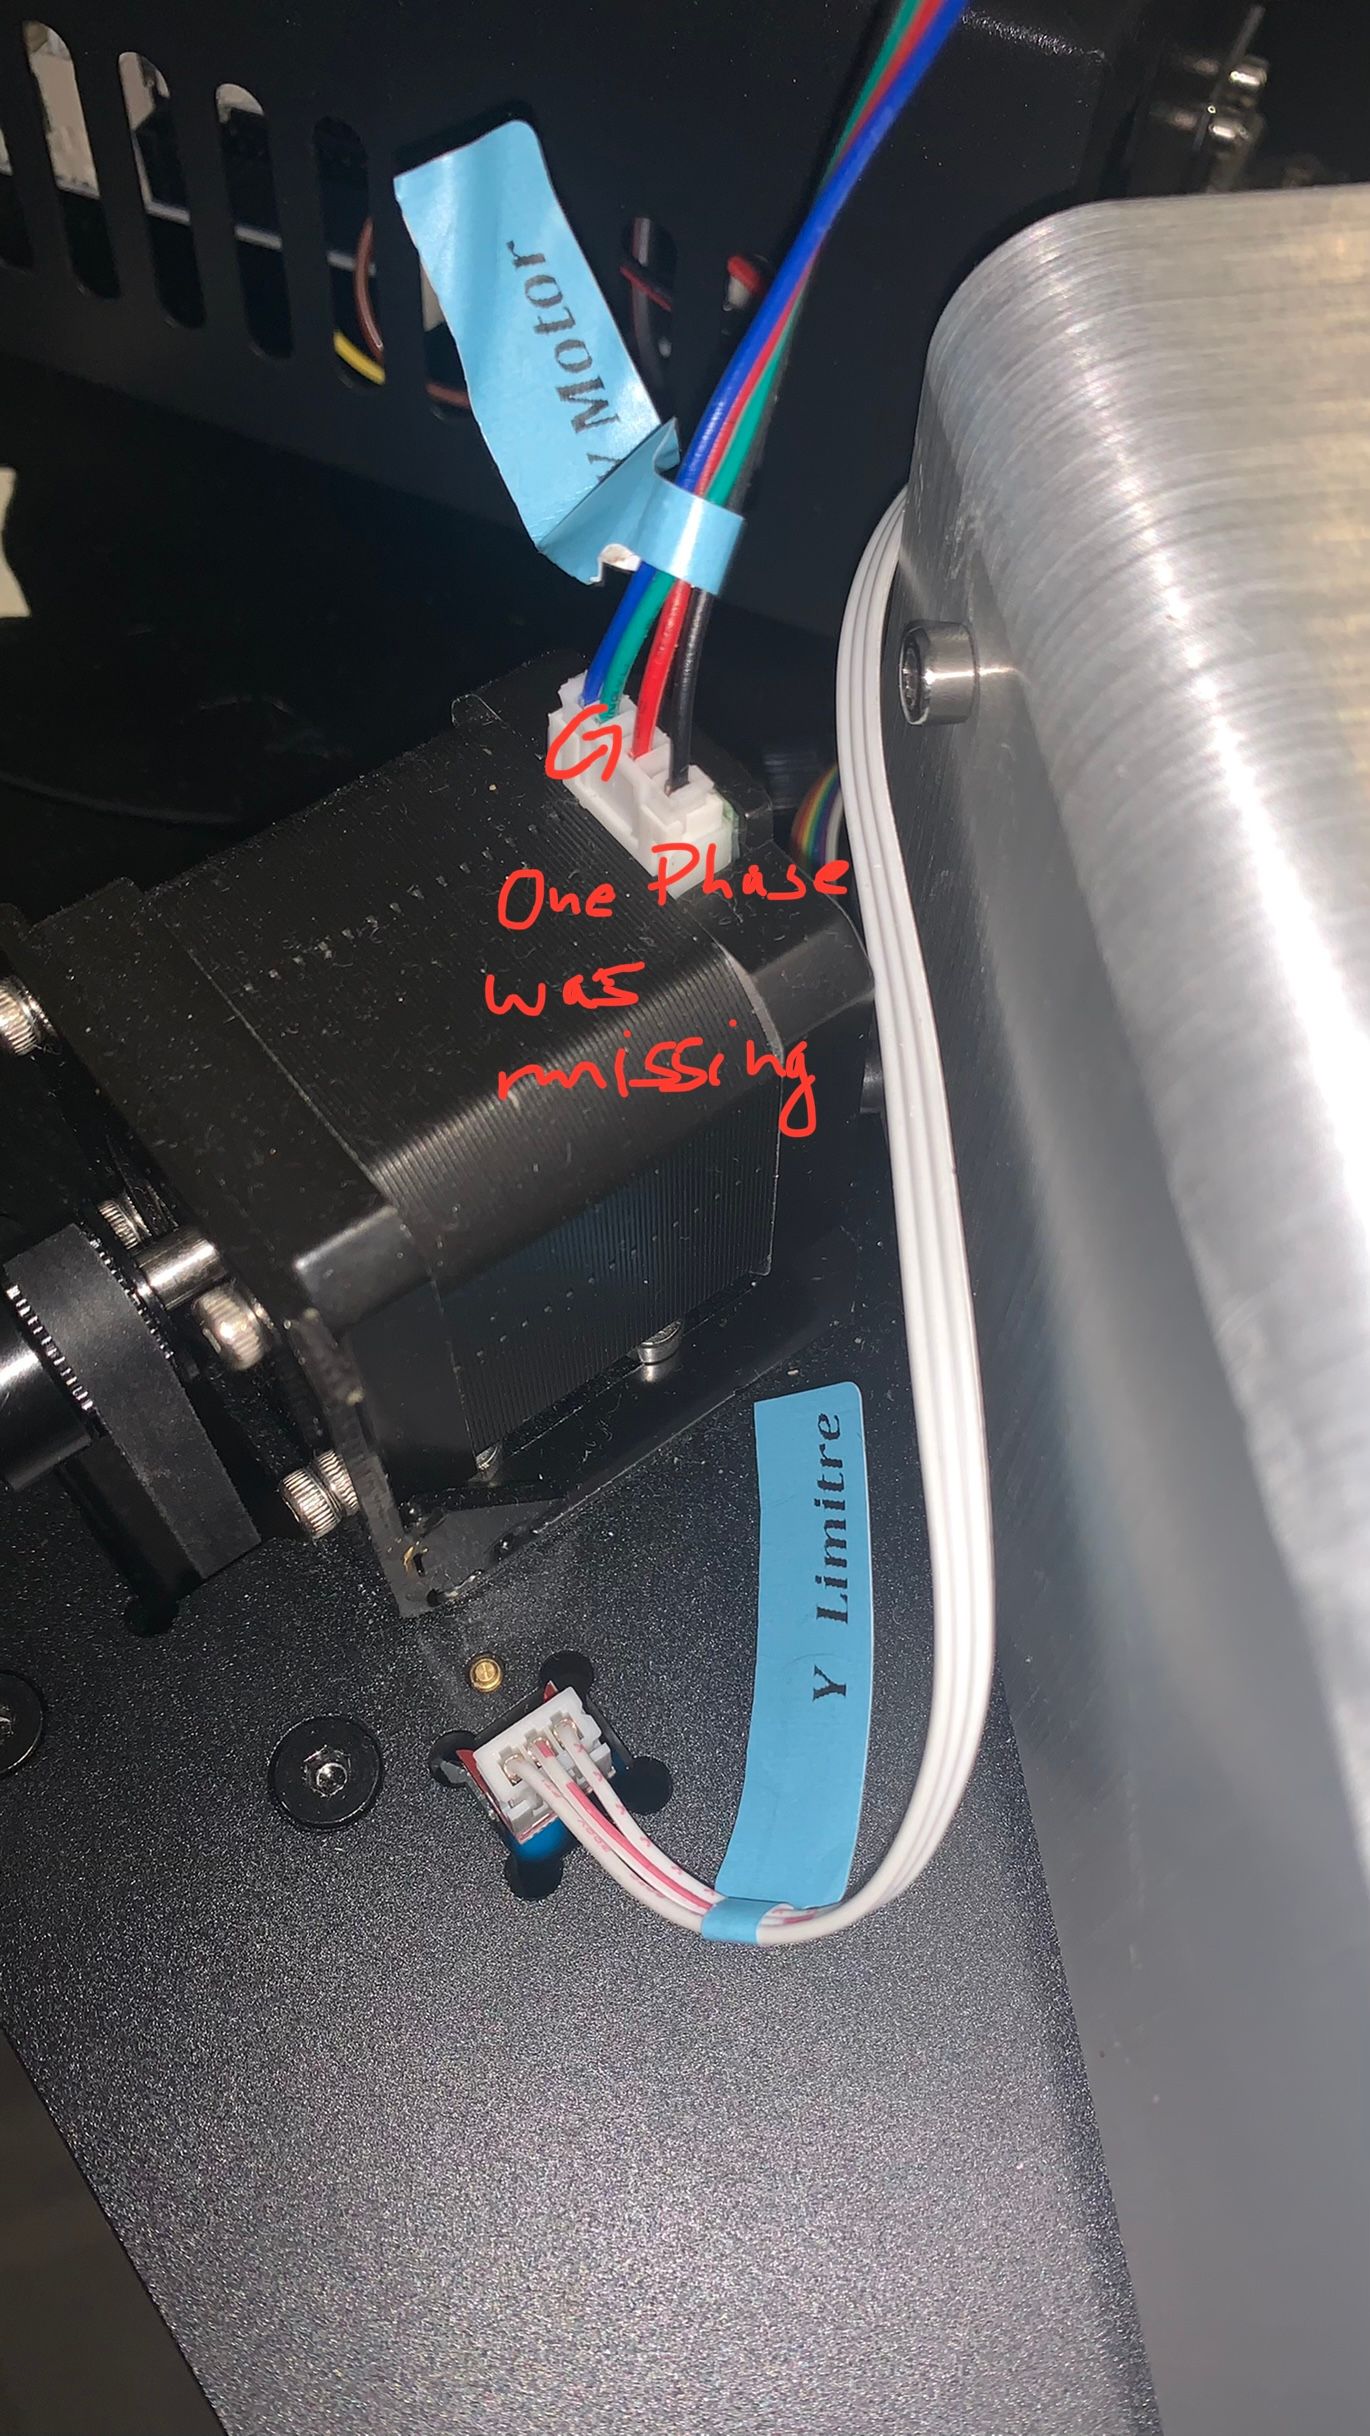
I thought with reference to eventual wiring mistakes it might come handy to make some photos. Therefore please find the photos attached. I hope it helps. Thank you very much.
Linus


-
I forgot
-
@phaedrux said in Tevo Little Monster stepper motor move only in one direction:
Check your motor phases are wired correctly: https://duet3d.dozuki.com/Wiki/Choosing_and_connecting_stepper_motors#Section_Identifying_the_stepper_motor_phases
Did you check the motor phase pairs?
Now with the endstop corrected if you remove the belts from the motor shafts and try to move the motors, does it spin correctly?
To see if you can get them to move without homing first, send G92 X100 Y100 Z100 and then try to issue movement commands for each motor individually by sending
G91
G1 H2 X10
G1 H2 X-10
G1 H2 Y10
G1 H2 Y-10
G1 H2 Z10
G1 H2 Z-10 -
Thanks for the reply. Following your advise I and lowering the current from 1000mA to 800mA and up to 1500mA by executing G92 X100 Y100 Z100 and then G91 H2 X10 I got a movement on down (attached files) and by using G91 H2 X-10 the exact same result and the same direction.
As far as I understand I should have had a movement in two directions up&down. How can it be that in my case all three motors move down x10 and x-10, y10 and y-10 and z10 and z-10 for both commands? Any hint ?Thanks
linus
P.S. : Attached Motor Info
[0_1628509204934_DUET TLM.zip](Uploading 100%) -
-
@linus4200 did you check your motor phases like @Phaedrux asked?
https://duet3d.dozuki.com/Wiki/Choosing_and_connecting_stepper_motors#Section_Identifying_the_stepper_motor_phasesMost likely you've got one of them switched. You need to use a multimeter to check them (as shown in the guide).
-
Thank you very much to both of you, as without your help, I would never ever have expected, that, purchasing a new printer, they deliver it, without wiring correctly the stepper motor and as consequence only one phase is working.
With reference to the Home All Button. Does the procedure HOME ALL has to be successfully be executed for the Home X,Y & Z Button to appear on the Dashboard? Once again, thank you for your assistance. I did not expected to get proven the proverb " someone is to poor to buy cheap" so soon. Thanks.
linus
-
@linus4200 I've seen the phases paired wrongly before but not that! Glad you fixed it though
")
For a delta, you only ever do homeall to home all towers at once. If you home one tower on its own while the others were at the bottom you'd rip your effector in two! Separate homex, homey, homez are for cartesian/corexy printers
-
By using the home all button x and y move towards the end-stop while z does not move, which could break the rods, if I do not switch off before. Is this still related to my former problem or
do I miss something?linus
-
@linus4200 well that means you have another issue...
First, follow @Phaedrux's previous advice and check if all three of your motors spin at all:
@phaedrux said in Tevo Little Monster stepper motor move only in one direction:
Now with the endstop corrected if you remove the belts from the motor shafts and try to move the motors, does it spin correctly?
To see if you can get them to move without homing first, send G92 X100 Y100 Z100 and then try to issue movement commands for each motor individually by sending
G91
G1 H2 X10
G1 H2 X-10
G1 H2 Y10
G1 H2 Y-10
G1 H2 Z10
G1 H2 Z-10From this you should see if they all move, and double-check they are spinning in the correct direction.
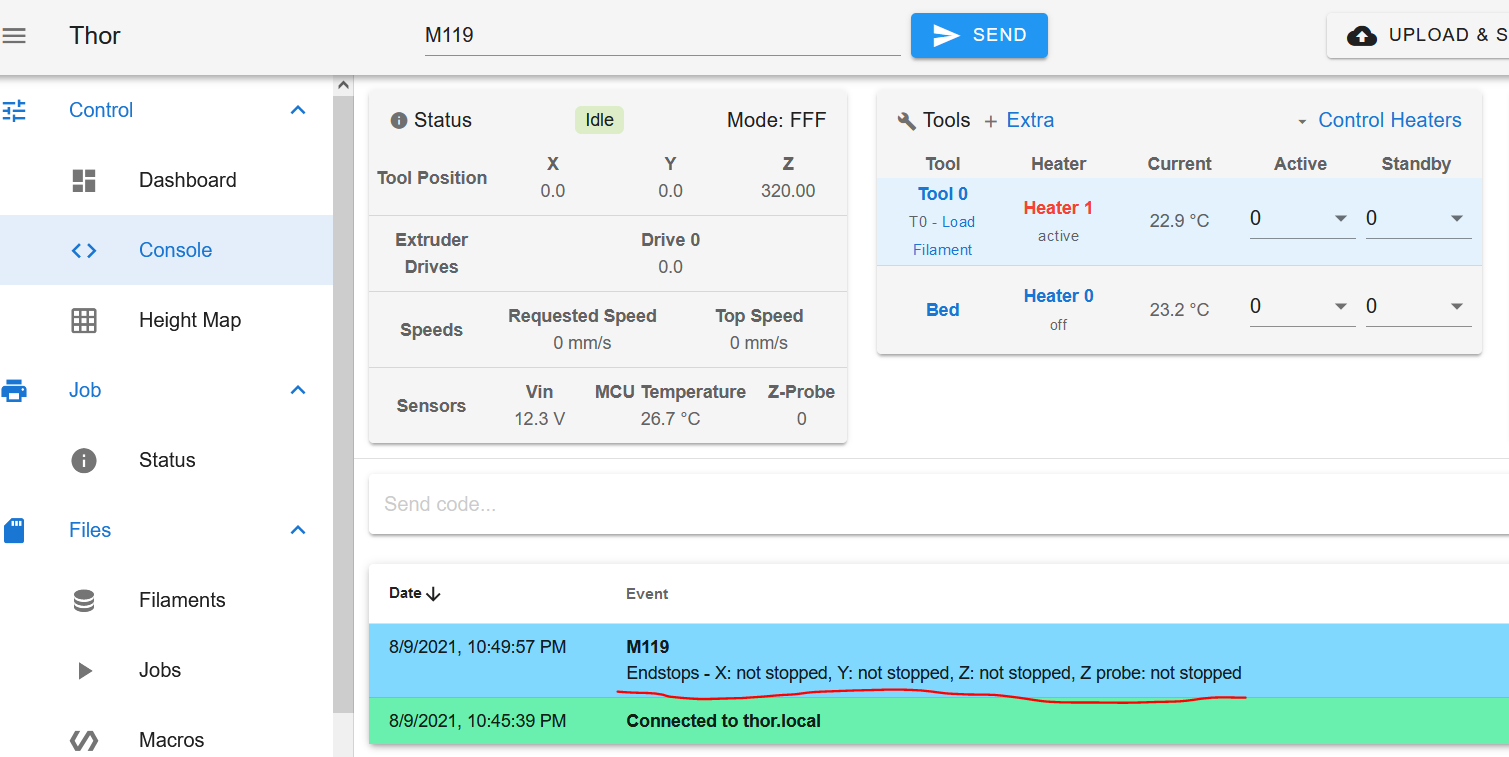
After you have done that, you can check if your endstops are working correctly. With the carriages away from the endstops (i.e. so the endstops aren't pressed), send M119 via the console in DWC. You should get a response like this, showing that the endstops are not pressed:
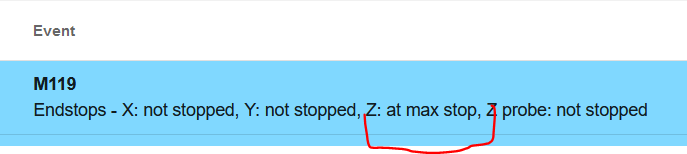
Now press & hold each of the endstop switches in turn and see if they react by sending M119 again. You should get something like this for each saying it's at the 'max stop' (in this one I'm pressing the Z endstop switch)
Do both of those sets of tests and let us know the results andwe can help you from there
-
@engikeneer said in Tevo Little Monster stepper motor move only in one direction:
G91
G1 H2 X10
G1 H2 X-10
G1 H2 Y10
G1 H2 Y-10
G1 H2 Z10
G1 H2 Z-10Dear @engikeneer please find attached the result of what I should try.
Moreover you find what happens clicking home all. I think the video
explains it better than I could do in writing. Thankslinus
-
I see your photos and video, but I don't have any context for them. What's happening exactly?
The video looks like you've got movement working in both directions now?
In your photos, it looks like you've tested the endstops.. And they respond appropriately to being triggered? Do they also match the towers as expected? See here: https://duet3d.dozuki.com/Wiki/ConfiguringRepRapFirmwareDeltaPrinter#Section_Testing_the_motors_and_endstops_individually
The big red error message in your photos. When does that pop up?
-
@linus4200 in both pictures, it says Z at max stop. If you weren't pressing the Z endstop in the first picture, that means you have a problem with the z endstop.
Check the wiring and repeat that test until you see the z endstop working properly. There's some more details in the guide page that @Phaedrux has posted
-
Dear @Phaedrux
The Fotos and Video correspond to the previous post of @engikeneer to check result
Of m119 and to execute G1H2 X10, G1 H2 C-10 then the same for Y&Z to check motor movement and the “home all” video shows what happened clicking the home all button, as you can see there, x and y carriage move up to the endstop while the z carriage does not move. I hope I checked correctly. Thank you very muchLinus
-
@linus4200 said in Tevo Little Monster stepper motor move only in one direction:
x and y carriage move up to the endstop while the z carriage does not move.
This would be explained by the endstop status always reading as triggered as @engikeneer mentioned. So check your endstops wiring for Z.
-
@linus4200
Hi, I have your same crap of printer , is just remained the top and bottom frame and the glass (even the glass support is not the same).
I attach my config.g. Have a look. I use the 0.9 motor , yours are the 1.8. So take care at that. I also use the bondtechBGM (so not the original extruder). Endstop are the same. I have also the smarteffector so the z-probe section is not good for you.
I have also the heater for hot chamber and related fan... you can avoid it. New version of firmware doesn't need the deploy for the BLTouch but you have to investigate this point for a proper configuration. The original motors have the same color order as the duet want. At first I used the original jack inserted on the duets pins.Config.g ; Configuration file for Duet WiFi (firmware version 1.20 or newer) ; executed by the firmware on start-up ; ; generated by RepRapFirmware Configuration Tool on Sat Jul 07 2018 15:37:48 GMT-0700 (Pacific Daylight Time) ; Mapping extruder to drive E3 M584 E3 ; General preferences G21 ; Work in millimetres G90 ; Send absolute coordinates... M83 ; ...but relative extruder moves ;M555 P2 ; Set firmware compatibility to look like Marlin ;*** The homed height is deliberately set too high in the following - you will adjust it during calibration. M575 P1 S1 B57600; enable panel due to connect properly M665 L400.310:400.320:400.310 R164.474 H510.20 B165.0 X0 Y0 Z0.000; Set diagonal rod length, delta radius, printable radius and homed - L400.310:400.320:400.310 - Diagonals 400.310:400.320:400.310, delta radius 164.474, homed height 510.200, bed radius 165.0, X -0.071°, Y 0.090°, Z 0.000° con cinghie nere e carrelli liberi M666 X0.00 Y0.0 Z0.0 A0.00 B0.00; Put your endstop adjustments here, or let auto calibration find them ; old setting M666 X0.45 Y0.40 Z-0.25 A0.00 B0.00; ; Network M550 PTEVO Little Monster ; Set machine name M552 S1 G4 P1000 M587 S"*********" P"*********" M586 P0 S1 ; Enable HTTP M586 P1 S0 ; Disable FTP M586 P2 S0 ; Disable Telnet ; Motors 0.9 degree M569 P0 S1 ; Drive 0 goes forwards M569 P1 S1 ; Drive 1 goes forwards M569 P2 S1 ; Drive 2 goes forwards M569 P3 S0 ; Drive 3 goes forwards M350 X16 Y16 Z16 E16 I1 ; Configure microstepping with interpolation M92 X160 Y160 Z160 E830 ; Set steps per mm M566 X800 Y800 Z800 E1200 ; Set maximum instantaneous speed changes (mm/min) Jerk M203 X18000 Y18000 Z18000 E5000 ; Set maximum speeds (mm/min) M201 X800 Y800 Z800 E1500 ; Set accelerations (mm/s^2) M906 X1650 Y1650Z1650 E1350 I60 ; Set motor currents (mA) and motor idle factor in per cent.I100 is idle 100% power motor. By def 1700 for axis and 1500 for Extruder for standard motors. For 0.9 motors use 1700 for 3 axis and 1700 for extruder (the motors are the same). ;M84 S30 ; Set idle timeout ; Axis Limits M208 Z-0.3 S1 ; Set minimum Z for use negative baby steps ; Endstops M574 X2 S1 P"xstop" ; Set active high endstops M574 Y2 S1 P"ystop" M574 Z2 S1 P"zstop" ; Z-Probe M307 H3 A-1 C-1 D-1 ; Disable heater on PWM channel for BLTouch M558 P8 C"^zprobe.in+zprobe.mod" H4 F1000 T5000 A5 R0.4 ; P9 for BLTouch, dive height 5mm=H5 , probe at 100mm/min, travel 6000mm/min, up to 5 probes, pause 0.1s ; M558 P8 R0.4 F1200 for smart effector G31 P100 X0 Y0 Z-0.1 ; offset and trigger height. The higher the Z value, the closer the bed will get to the nozzle. G31 X0 Y20 Z1.150 P25 for BLT. - G31 P100 X0 Y0 Z-0.1 for SMART. M557 R140 S50 ; Define mesh grid ; HEATERS : M308 S0 P"bedtemp" Y"thermistor" A"Bed" T100000 B3950 ; define bed temperature sensor M950 H0 C"bedheat" T0 ; heater 0 uses the bed_heat pin, sensor 0 M308 S1 P"e0temp" Y"thermistor" A"Nozzle" T100000 B4725 C7.060000e-8 R4700; define E0 temperature sensor for nozzle M950 H1 C"e0heat" T1 ; heater 1 uses the e0_heat pin and sensor 1 ;M308 S2 P"e1temp" Y"thermistor" A"H_C_Resistor" T100000 B4725 C7.060000e-8 R4700 ; configure sensor 2 as thermistor on pin e1_temp for hot chamber ;M950 H2 C"e1heat" T2 ; heater 2 uses the e1_heat pin and sensor 2resistence ;M307 H2 B0 S1.00 ; disable bang-bang mode for the chamber heater and set PWM limit M308 S3 P"e2temp" Y"thermistor" A"Enclosure" T10000 ; configure sensor 3 as thermistor on pin exp.35 for enclosure (air volume) M950 P3 P"exp.heater3" T3; sensor 3 uses the exp.35 pin and sensor 3 M140 H0 ; the bed heater is heater 0 ;M141 H2 ; heater 2 is the chamber heater M143 H1 S280 ; set max temp nozzle ;M143 H2 S140 ; set temperature limit for heater 2 to 140C M570 H1 P1200 S1200 ; Tools M563 P0 D0 H1 S"Nozzle"; F1 - Define tool 0 L'F1 inverte la ventola del tool e le ventole di raffreddamento. cosi' quando sposto il cursore del tool varia correttamente l'intensita' della ventola del nozzle. (prima invece cambiavano le ventole di raffreddamento) Con la nuova mappatura dei pin questo non e' piu' necessario. G10 P0 X0 Y0 Z0 ; Set tool 0 axis offsets G10 P0 R0 S0 ; Set initial tool 0 active and standby temperatures to 0C ;M572 D0 S0.2; pressure advance - D0 - extruder name and SX.X the amount of the pressure advance ; Fans M950 F0 C"fan1" ; part fan M106 P0 S0 C"Printend Part" H-1 ; M106 P1 S0 I0 F500 H-1 ; Set fan 1 value, PWM signal inversion and frequency. Thermostatic control is turned off M950 F1 C"fan0" ; tool fan M106 P1 S1 X1 C"Nozzle Head" H1 T40 ; Set fan 0 value, PWM signal inversion and frequency. Thermostatic control is turned on at 45degree - 0.3 is 30% M950 F2 C"fan2" M106 P2 S1 X1 C"Chamber" H2 T40; Set fan 0 value, PWM signal inversion and frequency. Thermostatic control is turned off - 0.3 is 30% ; Automatic power saving M911 S10 R11 P"M913 X0 Y0 G91 M83 G1 Z3 E-5 F1000" ; Set voltage thresholds and actions to run on power loss ; Custom settings ;M591 D0 C3 P2 E6.0 ;old extruder settings ; Filament Sensor - Add the following to config file anywhere before the M501 command M591 D0 P1 C"e0_stop" R20 S1; configure extruder drive 0 to use E1 endstop (C4) with 20% tolerance , new extruder settings for filament sensor ;M591 D0 ; display filament sensor parameters for extruder drive 0 ; Miscellaneous M501 ; Load saved parameters from non-volatile memory ; deployprobe.g ; called to deploy a physical Z probe ; ; generated by RepRapFirmware Configuration Tool on Sat Jul 07 2018 15:37:48 GMT-0700 (Pacific Daylight Time) ;M280 P3 S160 I1 M280 P3 S10 I1 ; retractprobe.g ; called to retract a physical Z probe ; ; generated by RepRapFirmware Configuration Tool on Sat Jul 07 2018 15:37:48 GMT-0700 (Pacific Daylight Time) M280 P3 S90 I1 -
@Phaedrux , @engikeneer ,@giostark
Thank you very much to all of you. As x and y endstop are working, I tried the cable on z endstop and run M119 and the same result. So I ordered new endstop and have to be patient for it to arrive. Based on your help, I think this is the way to go, as the z motor works but if „it“ thinks it reached the limit, then obviously it won’t move. Well again thank you.
Linus
P.D. Once I tried, I will report the result.