E3d Toolchanger to a Leapfrog frame
-
Hello!
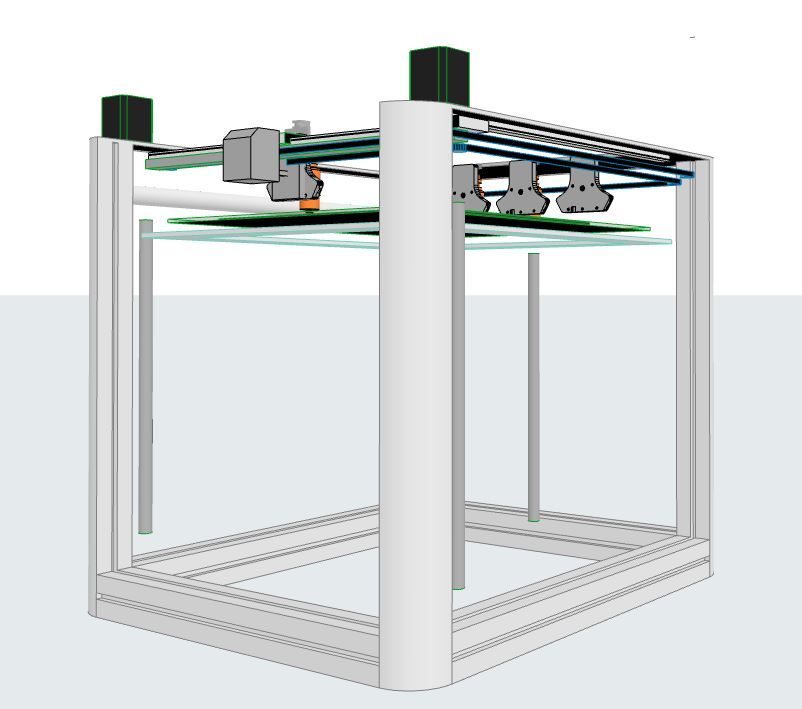
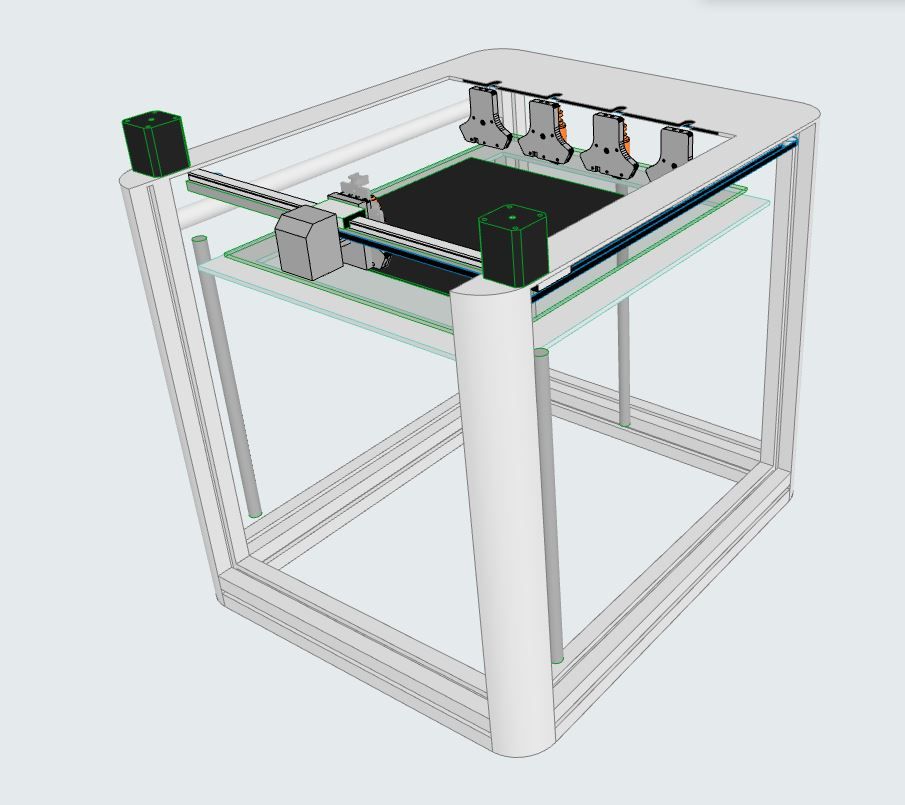
My old Leaprog Creatr is going to have a facelift now. The good thing of the frame is that it is strong and rigid. I ordered some E3d parts and now I´m starting the modification with two tools. If I succeed then I add 2 tools more.
The final purpose is to print landscape models.
-
@pertti

Updated situation:
-XY motors positioned to the back corners.- X-carriage made of PLA (could not buy it, did I miss something?)
Direct drive light weight stepper motor
configure.g updated for core XY
The original glass plate has bent 1mm, I must replace it with an aluminium one. Looks like the rigid frame, power unit and z-axis parts remain, everything else is replaced.
Now I want to try with single tool, more tools later, but....
- How do I configure the toolchanger ?
Now I have a duet Wifi, I think it has enough features for one tool.
With the expansion breakout board the second tool might be possible.
If I have luck with the one tool configuration then I´ll buy more tools and boards.
Thanks for help!
- X-carriage made of PLA (could not buy it, did I miss something?)
-
You can see some example tool changer config here: https://github.com/Duet3D/RRF-machine-config-files/tree/master/E3D_Tool_Changer/dc42-wifi-centreZero-quadTitan
-
@phaedrux
Thanks.
Many things make me curious in this toolchanger. For example what function has the microswitch below the x-carriage? And stepper stall, do I have to have some extra sensors to cope with that?
My first print gave too much material flow. I wondered if the extruder was configured wrong. But no. When I reduced the feed rate to 60% things got better.
But the problem was the steps/mm settings. Of course the CoreXY moves 83.4% less than the regular one.
-
@pertti said in E3d Toolchanger to a Leapfrog frame:
what function has the microswitch below the x-carriage?
It homes the Z axis. When a tool is selected. The offset for that tool is loaded.
@pertti said in E3d Toolchanger to a Leapfrog frame:
stepper stall, do I have to have some extra sensors to cope with that?
Stall detection homing is a feature built into the stepper driver. It detects the back EMF of the stepper when it stalls. It must be tuned and configured for best results.
-
@phaedrux
Ok, the Z-homing happens without any tool connected? And every tool has its own z offset.
Finally I found out that the pulley gears were changed to smaller ones... that´s why the movements were shorter. -
@pertti said in E3d Toolchanger to a Leapfrog frame:
Ok, the Z-homing happens without any tool connected? And every tool has its own z offset.
On the E3D tool changer, yes, that's how it works. The offset must be measured for each tool.
-
Now I received Duet Wifi and Duex5.
 Some things I have to ask
 :
:- Should the C7 axis (toolchanger connecor shaft) have some kind of physical endstop? Mine is runnig free...
I found a screw in the middle of the shaft, is it doing the thing? I have not the original x-carriage but my own. - Can´t find the configuration file and the command where you can adjust the positioning of the tool docks. My bed is 300 x 300. Dimensions are certainly different than in the original TC.
- so far so good, looking forward to see all working !
Pertti
“A winner is just a loser who tried one more time.”
George M. Moore, Jr. - Should the C7 axis (toolchanger connecor shaft) have some kind of physical endstop? Mine is runnig free...
-
@pertti said in E3d Toolchanger to a Leapfrog frame:
Now I received Duet Wifi and Duex5.
Some things I have to ask :- Should the C7 axis (toolchanger connecor shaft) have some kind of physical endstop? Mine is runnig free...
I found a screw in the middle of the shaft, is it doing the thing? I have not the original x-carriage but my own.
There is no endstop for the C axis. It uses stall detection for homing.
(Note that there is a mod on thingiverse that lets you use physical endstops for X and Y on the E3D toolchanger. But C always uses stall detection.)
Have you read through this yet? https://e3d-online.zendesk.com/hc/en-us/article_attachments/4402646531729/08_-_ToolChanger_Toolhead_Installation.pdf to better understand which part goes where?
- Can´t find the configuration file and the command where you can adjust the positioning of the tool docks. My bed is 300 x 300. Dimensions are certainly different than in the original TC.
If you follow the github link above, compare tpre0.g/tfree0.g to tpre1.g/tfree1.g. The numbers that differ between those files are the coordinates for docking tool 0/tool 1.
Be aware that in the linked config files, the bed center is at x=0/y=0. In E3D's default config, the center of the bed is at x=150/y=100 (just in case you run into someone else's config files).
- so far so good, looking forward to see all working !
- Should the C7 axis (toolchanger connecor shaft) have some kind of physical endstop? Mine is runnig free...
-
@pertti said in E3d Toolchanger to a Leapfrog frame:
Should the C7 axis (toolchanger connecor shaft) have some kind of physical endstop? Mine is runnig free...
I found a screw in the middle of the shaft, is it doing the thing? I have not the original x-carriage but my own.Mine is also home made.
The screw in the middle of the clamp shaft is the endstop; it stalls against the protrusion inside the casting to reference it.
Looking from the tool side, the shaft should rotate clockwise until it hits that end of the travel; the motor current is reduced during the home sequence so stalling does no harm.
this is my "homec.g" file:
; homec.g
; called to home the C axis (coupler)
;
;G91
M400
G92 C499
M400
M913 C60		; MOTOR TO 60% CURRENT
G1 H1 C0 F2000
;
M400
G92 C0
;G90
M913 C100			; MOTOR TO 100% CURRENT
G1 C0 F10000

;Open Coupler
M98 P"/macros/Coupler - Unlock"
As martink says, you create or edit the movement sequences in the tpre and tpost files, to pick up or return each tool.
After referencing, move to each tool position manually, making sure the head is dead centre with the tool, and note the X & Y positions when it's just touching.
Also note how far away from the other tools you need to be (on Y) to be able to move across safely on X without the possibility of collisions.
The sequence is something like
Move Z slightly in G91
Move Y to the safe position
Move X in line with the appropriate tool
Move in more slowly to the tool pickup/release position
Clamp or unclamp, depending if its a pickup or return
Move back to the Y safe positionExample - my tpre0.g
; tpre0.g ; called before tool 0 is selected ; Verify X & Y are referenced before any tool action if !move.axes[0].homed || !move.axes[1].homed M98 P"homey.g" M98 P"homex.g" M98 P"homec.g" G91 G1 Z5 F15000 G90 ;Unlock Coupler M98 P"/macros/Coupler - Unlock" ;Move to clearance position G1 Y200 F25000 ;Align G1 X300.0 Y220 F25000 ;Pick up position G1 X300.0 Y298.0 F2500 ;Close Coupler M98 P"/macros/Coupler - Lock" ;Move Out G1 X300.0 Y220 F4000 -
@rjenkinsgb Thanks. It takes a while to discover the geometry. Yes, now I managed to set up the docks. Next thing is to prepare the stall brake.
-
@Pertti
The belts around the stepper pulleys wrap only 90°. This isn't enough fo my liking.
How much does the X-axis sag with the unsupported linear rail? I have the same on my IDEX, but that beam is only 300mm. -
@o_lampe said in E3d Toolchanger to a Leapfrog frame:
How much does the X-axis sag with the unsupported linear rail? I have the same on my IDEX, but that beam is only 300mm
I tried to measure it, by pressing by 337 grams it was about 0.3 mm. I think it is not good but I can fix it later if necessary. Good that You asked, thanks.
-
First test runs are done
. The tool0 works ok.  Next leap is the slicer. I´m familiar with Cura. Any opinions or examples? Or do I have to use some other slicer?
My new 230v bed heat is a surprise, the temperature rises really fast. It looks like the machine first heats the bed and when it´s done then it starts with the tool. Is it possible to start both the bed and the tool heating at the same time? -
My first attempt with two tools failed.
 The toolchanger did not catch the tools. Should there be start and end codes for both printer and tools in the slicer (Cura)? T0 and T1 drop and pick do their job properly when tested manually.
Thanks for help in advance!
-
@pertti you should not need to set up any tool change scripts in Cura, assuming you have done everything necessary within the tool change files. Are you certain that your tool change files (tfree#.g, tpre#.g and tpost#.g) work regardless of where on the bed the pickup head is when you change tools?
Duet WiFi hardware designer and firmware engineer
Please do not ask me for Duet support via PM or email, use the forum
http://www.escher3d.com, https://miscsolutions.wordpress.com -
@dc42 Maybe the distance between T0 and T1 is too short, 70 mm? It looks like the x-carriage approaches the tool diagonally and possibly touches the neighbouring tool. I think that the final approach should be like the airplane landing circuit:
 the final is parallel with the runway. Can this be achieved by adjusting the tpre#.g ? Or should I spread the distance between tools? Then I loose one tool.
-
@pertti adjust tpre.
for example, move to the X coordinate first and then move in Y. Means you're taking a straight run up -
@jay_s_uk That´s a square advise! thnks.
-
@pertti BUT. Tool1 works ok, somehow T0 does not. The toolpick 0 macro works fine, When I start printing the Tool 0 is selected and moved backwards but then it loosens the screw and does not print. After that the screw is tightened and "printing" ends. Also Z-homing becomes "insufficient". This happens after the printer tries all by itself to home all.
I have completely no idea to fix this.