Heater fault not detected
-
Hey guys,
I just had a very scary problem.
Here is what happened :
It's an E3D toolchanger, it was during a print. Everything working well at first.
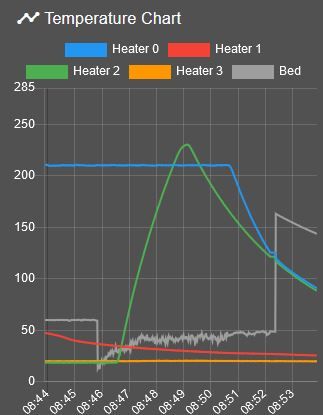
Then I wanted to prepare my next print while this one was ending so I fired up Heater 2 (in green), to change filament.
Once it's done, I look at my print and it's very bad. I look at the temp charts and see the bed.
Very stupid of me : i touch the bed, it's frickin hot.
Clearly there is a problem and I slap the Emergency stop to reset everything (the print is dead anyway).
Then the temps show that the bed was actually at 160°C
And now everything is working normally again.So my question :
1 - Any guess on what happened ? I checked thermistor cables of my bed and everything seems okay, and it's working now...
2 - At 8h46, there has been a huge drop in temperature of the heated bed. Shouldn't this have trigered a heater fault and stopped everything ? Should I change something in my config.g so that it actually does.Anyway, the printer will not be fired up again before I install a thermal fuse on it...
I have this installed :
RepRapFirmware for Duet 2 WiFi/Ethernet version 3.4.0 (2022-03-15 18:58:31) running on Duet Ethernet 1.02 or later + DueX5v0.11
-
@fbunel thats a lot of noise on the thermistor for the bed. I would suggest you start looking at the wiring for that.
-
@jay_s_uk
I will recheck my wiring.
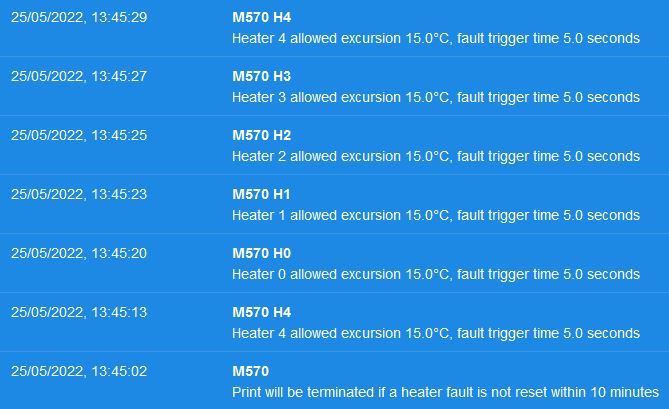
But in any case, the software SHOULD have detected the fall in temperature at 8:46 and trigered a heater fault, which it did not.I checked my heater fault settings with "M572 H0" and it is set to 15.0°C excursion and 5.0 seconds. The graph clearly show more than that.
-
This post is deleted! -
@fbunel
I checked my heater fault settings with "M572 H0"
A typo?
M572controls pressure advance.M570is for heater fault detection … quick check: isH0your bed heater?As @jay_s_uk points out, the noise on the bed’s thermistor readings indicates a wiring problem. Alas, a static test with a multimeter won’t help much with connections to moving parts, better you check suspicious crimps, connectors and wires - one at a time, until you have no more jitter in the graph.
-
@fbunel what board are you using? Might also be worth posting your config file so people can help understand what your fault detection setting are
-
@engikeneer "RepRapFirmware for Duet 2 WiFi/Ethernet version 3.4.0 (2022-03-15 18:58:31) running on Duet Ethernet 1.02 or later + DueX5v0.11"
@fbunel As above it would be good to see your config.g file.
I wonder what is really happening with the temperature reading? It could be that the noisy reading is providing temperatures that are around the set temperature for (very) brief periods that do not show in the graph. Perhaps something like that is enough to stop the protection code from triggering? I'll have to take a look at the code to see how it works.
-
@gloomyandy @infiniteloop @jay_s_uk
I believe you were right and the problem was indeed a wiring problem.
With the printer on, I just jiggled the connector on the duet and the readings went off the charts. I believe it's just bad crimps and I will re-do these and it should fix the problem. I checked the cable themselves and they look fine.However, this still does not explain why the heater fault was not triggered at 8:46 with the huge temperature drop.
@infiniteloop Yes I made a typo, I typed "M570 H4" (which is my bed heater).
Since I haven't changed this in my config.g, it's the default value for all the heaters.
And this is my config.g :
; Configuration file for Duet WiFi / Ethernet running RRF3 on E3D Tool Changer ; executed by the firmware on start-up ;######################## ; General preferences ;######################## M111 S0 ; Debugging off G21 ; Work in millimetres G90 ; Send absolute coordinates... M83 ; ...but relative extruder moves M555 P2 ; Set firmware compatibility to look like Marlin M667 S1 ; Select CoreXY mode ;######################## ; Network ;######################## M550 P"ToolChanger" ; Set machine name "part of config.g deleted for obvious reasons" ;######################## ; Drive ;######################## ;Drive directions M569 P0 S0 ; Drive 0 (X) M569 P1 S0 ; Drive 1 (Y) M569 P2 S1 ; Drive 2 (Z) M569 P3 S0 ; Drive 3 (C) M569 P4 S0 ; Drive 4 (E0) M569 P5 S0 ; Drive 5 (E3) M569 P6 S0 ; Drive 6 (E2) M569 P7 S0 ; Drive 7 (E1) M569 P8 S0 ; Drive 8 UNUSED M569 P9 S0 ; Drive 9 UNUSED ;Drive mapping and control M584 X0 Y1 Z2 C3 E4:7:6:5 ; Stepper motor connection points, see C:\Users\YN14386\Documents\Documentation\Toolchanger for wiring diagram M208 X-35:328.5 Y-49:243 Z0:300 C-45:360 ; Set axis maxima & minima M92 X100 Y100 Z800 C91.022 E392:392:392:392 ; Set steps per mm assuming x16 microstepping M350 X16 Y16 Z16 I1 ; Configure microstepping with interpolation for the extruders M350 E16:16:16:16 I1 ; Configure microstepping with interpolation for the XYZ movements M350 C16 I10 ; Configure microstepping without interpolation for the coupler ;Drive speeds and acceleration M203 X35000 Y35000 Z1200 C5000 E5000:5000:5000:5000 ; Set maximum speeds (mm/min) M201 X2000 Y2000 Z400 C500 E2500:2500:2500:2500 ; Set maximum accelerations (mm/s^2) was X6000 Y6000 M566 X400 Y400 Z8 C2 E400:400:400:400 ; Set the jerk : maximum instantaneous speed changes (mm/min) ; Motor current M906 X1800 Y1800 Z1330 I30 ; Idle motion motors to 30% M906 E1000:1000:1000:1000 C500 I10 ; Idle extruder and cooupler motors to 10% ;######################## ; Endstops ;######################## ;X and Y axis M574 X1 Y1 S3 ; Set X / Y endstop stall detection M915 X Y S3 F0 H400 R1 ; Stall Detection for the X and Y Axes ; ; Coupler Axis M574 C0 Z0 ; No C Z endstop, it just crashes ;Z axis M558 P8 C"zstop" H3 F360 I0 T20000 ; Set Z probe type to switch, the axes for which it is used and the dive height + speeds G31 P200 X0 Y0 Z0 ; Set Z probe trigger value, offset and trigger height M557 X10:290 Y20:180 S40 ; Define mesh grid ;M376 H15 ; bed compensation taper ;######################## ; Heaters ;######################## ;see C:\Users\YN14386\Documents\Documentation\Toolchanger\*** for connection points names ;Tool 0 M308 S0 P"e1temp" Y"thermistor" A"Heater 0" T100000 B4725 C7.06e-8 ; Set thermistor number (S), connection point (P), name (A) and parameters (YTBC) M950 H0 C"e1heat" T0 ; Set heater number (H) and connection point (C) M143 H0 S285 ; Set temperature limit for heater to 285C ;Tool 1 M308 S1 P"duex.e2temp" Y"thermistor" A"Heater 1" T100000 B4725 C7.06e-8 ; Set thermistor number (S), connection point (P), name (A) and parameters (YTBC) M950 H1 C"duex.e2heat" T1 ; Set heater number (H) and connection point (C) M143 H1 S285 ; Set temperature limit for heater to 285C ;Tool 2 M308 S2 P"duex.e3temp" Y"thermistor" A"Heater 2" T100000 B4725 C7.06e-8 ; Set thermistor number (S), connection point (P), name (A) and parameters (YTBC) M950 H2 C"duex.e3heat" T2 ; Set heater number (H) and connection point (C) M143 H2 S285 ; Set temperature limit for heater to 285C ;Tool 3 M308 S3 P"duex.e4temp" Y"thermistor" A"Heater 3" T100000 B4725 C7.06e-8 ; Set thermistor number (S), connection point (P), name (A) and parameters (YTBC) M950 H3 C"duex.e4heat" T3 ; Set heater number (H) and connection point (C) M143 H3 S285 ; Set temperature limit for heater to 285C ;Heated bed M308 S4 P"bedtemp" Y"thermistor" A"Bed" T100000 B4138 C0 ; Set thermistor number (S), connection point (P), name (A) and parameters (YTBC) M950 H4 C"bedheat" T4 ; Set heater number (H) and connection point (C) M143 H4 S110 ; Set temperature limit for bed heater to 110C M140 H4 ; Bed heater is heater 4 ;######################## ; Fans ;######################## ;Tool 0 M950 F4 C"fan1" ; Set hotend fan number (F) and connection point (C) M106 P4 S255 H0 T60 ; Link fan to Heater (H) and turn it for temperature above 60C (T) M950 F0 C"fan2" ; Part cooling fan connection point M106 P0 S0 ; Turn off the part cooling fan. ;Tool 1 M950 F5 C"duex.fan3" ; Set hotend fan number (F) and connection point (C) M106 P5 S255 H1 T60 ; Link fan to Heater (H) and turn it for temperature above 60C (T) M950 F1 C"duex.fan4" ; Part cooling fan connection point M106 P1 S0 ; Turn off the part cooling fan. ;Tool 2 M950 F6 C"duex.fan5" ; Set hotend fan number (F) and connection point (C) M106 P6 S255 H2 T60 ; Link fan to Heater (H) and turn it for temperature above 60C (T) M950 F2 C"duex.fan6" ; Part cooling fan connection point M106 P2 S0 ; Turn off the part cooling fan. ;Tool 3 M950 F7 C"duex.fan7" ; Set hotend fan number (F) and connection point (C) M106 P7 S255 H3 T60 ; Link fan to Heater (H) and turn it for temperature above 60C (T) M950 F3 C"duex.fan8" ; Part cooling fan connection point M106 P3 S0 ; Turn off the part cooling fan. ;######################## ; Tools ;######################## ;Tool 0 M563 P0 S"Tool 0" D0 H0 F0 ; Define the tool : its number (P), its name (S), its extruder drive (D), its heater (H) and its part cooling fan (F) G10 P0 X0 Y0 Z0 ; Reset tool axis offsets G10 P0 R0 S0 ; Reset initial tool active and standby temperatures to 0C ;Tool 1 M563 P1 S"Tool 1" D1 H1 F1 ; Define the tool : its number (P), its name (S), its extruder drive (D), its heater (H) and its part cooling fan (F) G10 P1 X0 Y0 Z0 ; Reset tool axis offsets G10 P1 R0 S0 ; Reset initial tool active and standby temperatures to 0C ;Tool 2 M563 P2 S"Tool 2" D2 H2 F2 ; Define the tool : its number (P), its name (S), its extruder drive (D), its heater (H) and its part cooling fan (F) G10 P2 X0 Y0 Z0 ; Reset tool axis offsets G10 P2 R0 S0 ; Reset initial tool active and standby temperatures to 0C ;Tool 3 M563 P3 S"Tool 3" D3 H3 F3 ; Define the tool : its number (P), its name (S), its extruder drive (D), its heater (H) and its part cooling fan (F) G10 P3 X0 Y0 Z0 ; Reset tool axis offsets G10 P3 R0 S0 ; Reset initial tool active and standby temperatures to 0C ;######################## ; PID tune ;######################## ; run M303 T0 S230 with the tool you want to autotune (T) and the target temperature (S) ; for the bed, run M303 H4 S80 with the target temperature (S) ;Tool 0 M307 H0 R2.020 K0.305:0.329 D5.69 E1.35 S1.00 B0 V24.2 ;PID parameter for a heater (H) ;Tool 1 M307 H1 R1.887 K0.290:0.268 D6.00 E1.35 S1.00 B0 V24.3 ;PID parameter for a heater (H) ;Tool 2 M307 H2 R1.854 K0.286:0.300 D6.01 E1.35 S1.00 B0 V24.3 ;PID parameter for a heater (H) ;Tool 3 M307 H3 R1.973 K0.430:0.139 D6.19 E1.35 S1.00 B0 V24.3 ;PID parameter for a heater (H) ;Bed M307 H4 R1.223 K0.255:0.000 D3.83 E1.35 S1.00 B0 ;PID parameter for the bed heater (H) ;######################## ; tool offsets ;######################## ; !ESTIMATED! offsets for: ; V6-tool: X-9 Y39 Z-5 ; Volcano-tool: X-9 Y39 Z-13.5 ; Hemera-tool: X20 Y43.5 Z-6 ; smaller negativ values means closer to bed G10 P0 X20.00 Y43.50 Z-5.26 ; T0 x20 y43.5 reference G10 P1 X19.70 Y43.70 Z-5.74 ; T1 x20 y43.5 G10 P2 X19.60 Y43.55 Z-5.25 ; T2 x20 y43.5 G10 P3 X19.65 Y43.50 Z-5.54 ; T3 x20 y43.5 ;######################## ; Pressure advance ;######################## ;Default pressure advance for PLA, different values should be set in the slicer M572 D0 S0.025 ; pressure advance T0 M572 D1 S0.025 ; pressure advance T1 M572 D2 S0.025 ; pressure advance T2 M572 D3 S0.025 ; pressure advance T3 ;######################## ; Others ;######################## M593 F42.2 ; cancel ringing at 42.2Hz (https://forum.e3d-online.com/threads/accelerometer-and-resonance-measurements-of-the-motion-system.3445/) ;M575 P1 S1 B57600 ; Enable LCD G29 S2 ; disable mesh T-1 ; deselect tools ;M501 ; load config-override.g, commented so it's not used : ;do not use M500 and config-override, modifications should be made in config.g directly. -
@fbunel
However, this still does not explain why the heater fault was not triggered at 8:46 with the huge temperature drop.
Right. Counter question: Did you PID-tune your bed?
The reason I ask: the duet has nothing more than the thermistor readings to monitor a heater. Well, and that one reported quite low values (on average), so the duet happily kept the heater heating. To detect faulty temperature readings, RRF has a model of the heater. That’s a curve of the expected temperatures for the amount of power provided over time.
In your case, the model’s expectations were met, despite the chaotic sensor readings, which tells me the model doesn’t quite match the physics of your bed - it allows too much deviation. In addition, the faulty thermistor readings had a lot of spikes - these were covered by the tolerance settings of
M570.Edit: BTW, your config was a joy to read.
-
Right. Counter question: Did you PID-tune your bed?
I did do a PID Tune of each tool and for the bed (as you can see in my config.g, each tool has different PID parameters).
I did it running the command :
M303 H4 S80the results are added to my config.g in line 176 :
M307 H4 R1.223 K0.255:0.000 D3.83 E1.35 S1.00 B0 ;PID parameter for the bed heater (H)I had slightly different values from the standard E3D configuration for the heated bed which I guess is expected.
In any case, I will rerun a PID tune once I have fixed the bad crimp.Edit: BTW, your config was a joy to read.
Thanks ! I spent a lot of times on it. We are multiple people working on the same printer and I made it this way so that less experienced people can relatively easily find what they are looking for.
-
@fbunel said in Heater fault not detected:
I did do a PID Tune of each tool and for the bed (as you can see in my config.g, each tool has different PID parameters).
Sorry, I wasn't sure whether these entries originated from E3D.
Finally, your example demonstrates how valuable additional protection is against heaters running wild. A lonely thermistor can fail, and if not, crimps, connectors or cables will do. On my printer, I have a chamber heater which I could only "tune" by hand - I had to estimate the values for
M307. As a safeguard, I installed a second thermistor to shut down the heater temporarily if it exceeds a certain level (withM143). As long as you have some spare ports on the Duet …