My custom D-Bot
-
@dr_ju_ju Here you go, https://www.thingiverse.com/thing:2849355
It's not my design but I've made a few variants of it to fit more stepper sizes.
-
Thank You
-
You're D-Bot looks way cleaner than my.

Is the 3 Leadscrew System woth it?
I got 2 with a BLTouch as a probe and i'am not shure if the 2 Leadscrews are not good enough or the Z Probe is crap.
-
great looking printer, I like the cable management!
-
@as-3d-druck said in My custom D-Bot:
You're D-Bot looks way cleaner than my.
Is the 3 Leadscrew System woth it?
I got 2 with a BLTouch as a probe and i'am not shure if the 2 Leadscrews are not good enough or the Z Probe is crap.the advantage with 3 is that then defines a plane so when setup correctly the bed must always be level when you have just 2 then that is a pivot point.
Doug
-
Phaedrux,
Are you planning on releasing any of those custom files for the z carriage?
Paul
-
@as-3d-druck I would say that using 3 lead screws is worth it. It's far easier to get them leveled and lined up. I just lower the bed as far as I can, loosen off the bolts for the mounts of on the frame and the bed and let everything relax and align, then retighten and raise the bed. I run the z motor at 80% of rated current (~1500) and I get no binding or skipped steps top to bottom.
I've seen people use 2 screws belted together to keep them in sync, but then you still have to find the balance spot. At the very least adding the front cross bar and wheels keep the bed from bouncing and should help make the sweet spot for balancing the bed a little more forgiving.
You could also go another step further and use 3 or 4 independent motors and do auto leveling. But the extra cost and complexity didn't make sense to me.
@t3p3tony Thanks, it wasn't always so tidy. A few of the pictures in the gallery show the work in progress wiring and there were times when it looks more like a pile of wires than a printer.
@hozza I updated the first post with a list of mods used with links.
-
This post is deleted! -
This post is deleted! -
@hozza I updated the first post with a list of mods used with links.
Brilliant thank you...
-
https://forum.duet3d.com/topic/5280/need-help-with-x-stop-and-bltouch
You were great help and you almost have me there.Thank you so much for your help
-
Looks great. I have a heavily modified C-Bot (D-Bot wasn't around when I made it) and I really dig your z-axis leadscrew setup. Nicely done!
-
@ak-eric Thanks a lot. I read through your build logs while I was planning out the build. Definitely learned a lot.
-
Love the build. This is my next build, But I wont be ordering the kit, I cant seem to find a D-bot thing on Thingiverse, I did see your Thing on there and will be using it. Is there a thing with all the files that need to be printed? My plan is something like a 22x22x24 build index, don't need it but why not haha.
-
@stealthy_tt here's the stock DBot thing https://www.thingiverse.com/thing:1001065
And here is the thing with all the mod files for the z-axis setup I used. https://www.thingiverse.com/thing:2651649
-
@phaedrux Thank you, I couldn’t find it to save my life.
-
Thanks for posting this. I am in the process of ordering parts for a new D-Bot build pretty much identical to yours. I have a quick noob question; On the 3-lead screw mod, what GT2 pulleys do I need to achieve the 1:1 ratio for screws and motor? I've ordered these 8/2 lead screws: https://www.amazon.com/gp/product/B017AR5QBS/ref=od_aui_detailpages01?ie=UTF8&psc=1 and these stepper motors: https://www.amazon.com/gp/product/B06ZY9SPWL/ref=od_aui_detailpages01?ie=UTF8&psc=1. Im just new at this and am unsure about the pulleys as there are so many choices.
-
@uncreative1 Are you planning on using a single motor to turn 3 screws, or one motor for each screw?
The screws you linked appear to have 8mm of travel per revolution which would be fairly steep in my arrangement and might require more torque to lift a heavy build platform than a single motor can reliably provide. This wouldn't be as much of an issue with one motor for each screw though.
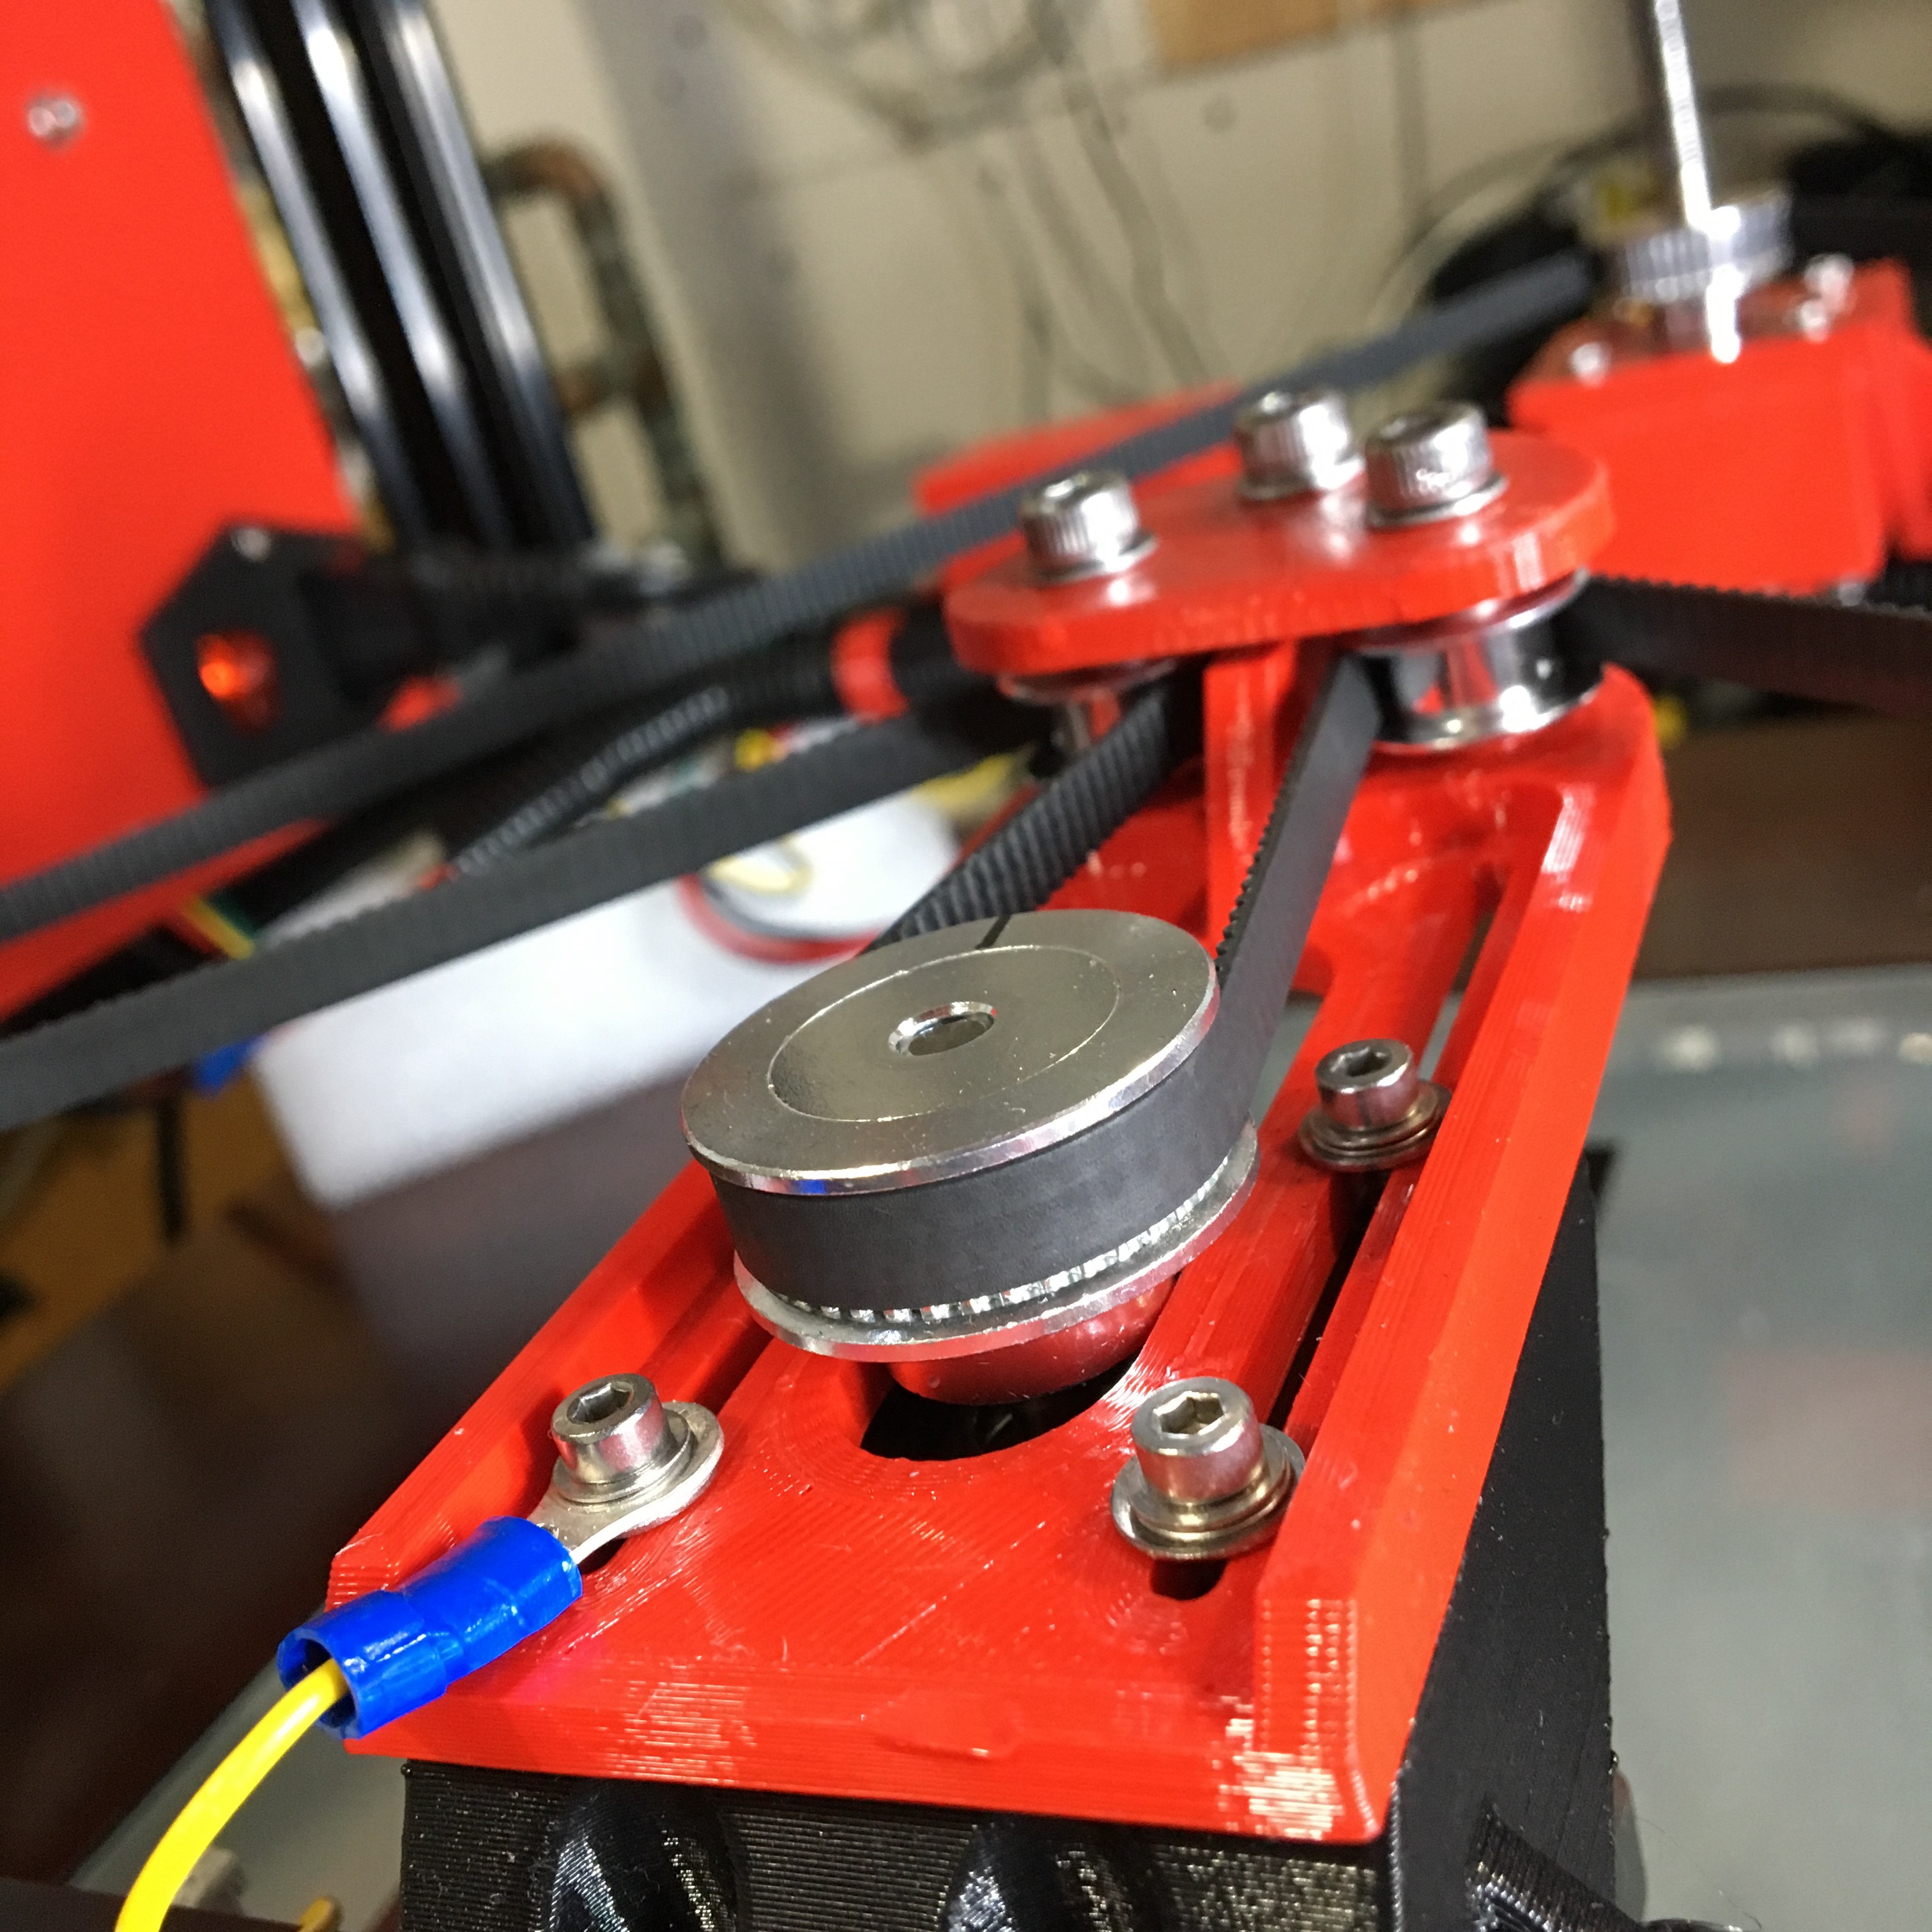
For the pulleys I just chose 40 tooth GT2 pulleys to give the belt ample surface to grip. They are the same tooth count between the motor and the lead screws, which gives 1:1 ratio. 5mm bore for the motor and 8mm bore for the screws. The triangle arrangement ensures that the belt gets good contact and reduces the chance of slippage.
Here's a link to the pulleys I used. https://www.aliexpress.com/item/10pcs-New-GT2-Timing-Pulley-30-36-40-60-Tooth-Wheel-Bore-5mm-8mm-Aluminum-Gear/32822906054.html
In your case, you may want to change up your gear ratio between the motor and the screws to gain more torque. For instance, a 60 tooth pulley at the motor and 40 at the screws.
-
This is a really pretty build, and it's made me pull the thread on building one. I just bought a kit and am looking at what other parts I'm going to need to buy. I definitely like some of the changes you've made and used, and plan to use some myself. Looking through your pictures and this thingiverse file you used (https://www.thingiverse.com/thing:2401504), and I'm not getting how the lead screws stay secure in the flange bearings. He said something about using 8mm clamping collars, but I'm not seeing how that would keep it any more secure than the toothed gear. Am I missing something? I looked through your pictures, but couldn't from the angles. Thanks for sharing your build!
-
@ntgorilla Thanks for the compliment. I think you'll enjoy the build, it's a challenge, but pretty satisfying when it all comes together. Spauda01 did well on the design.
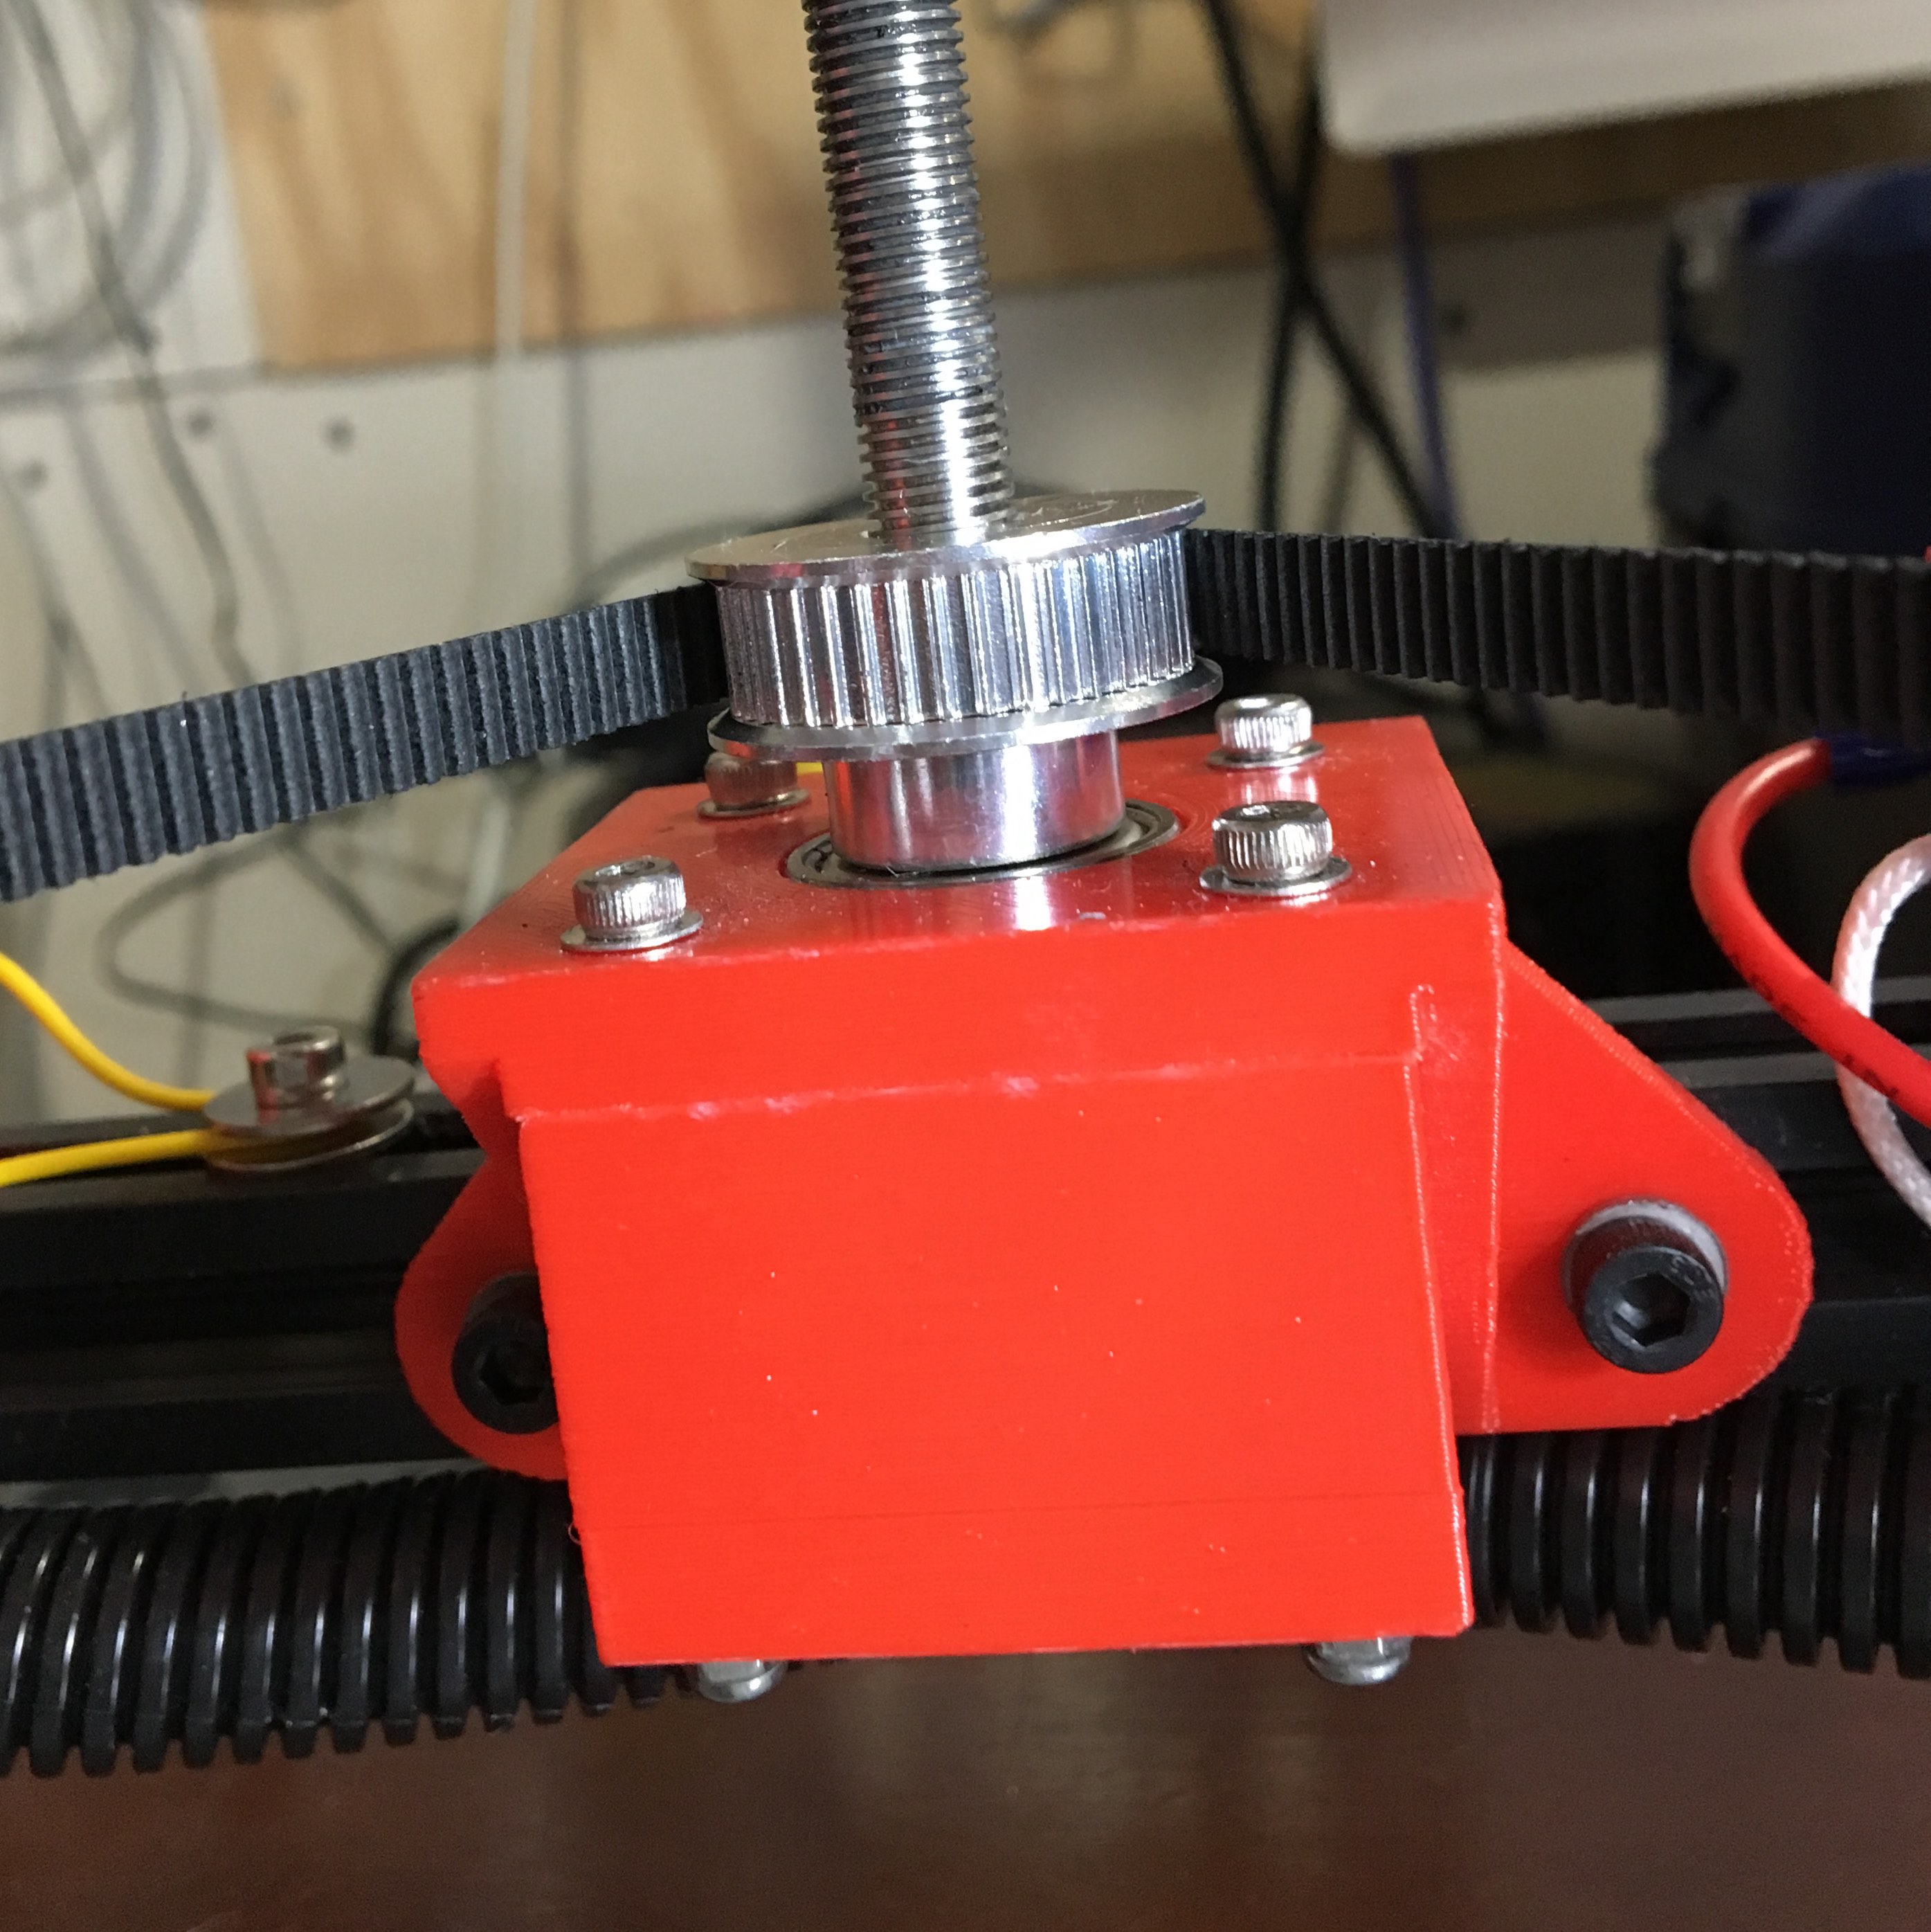
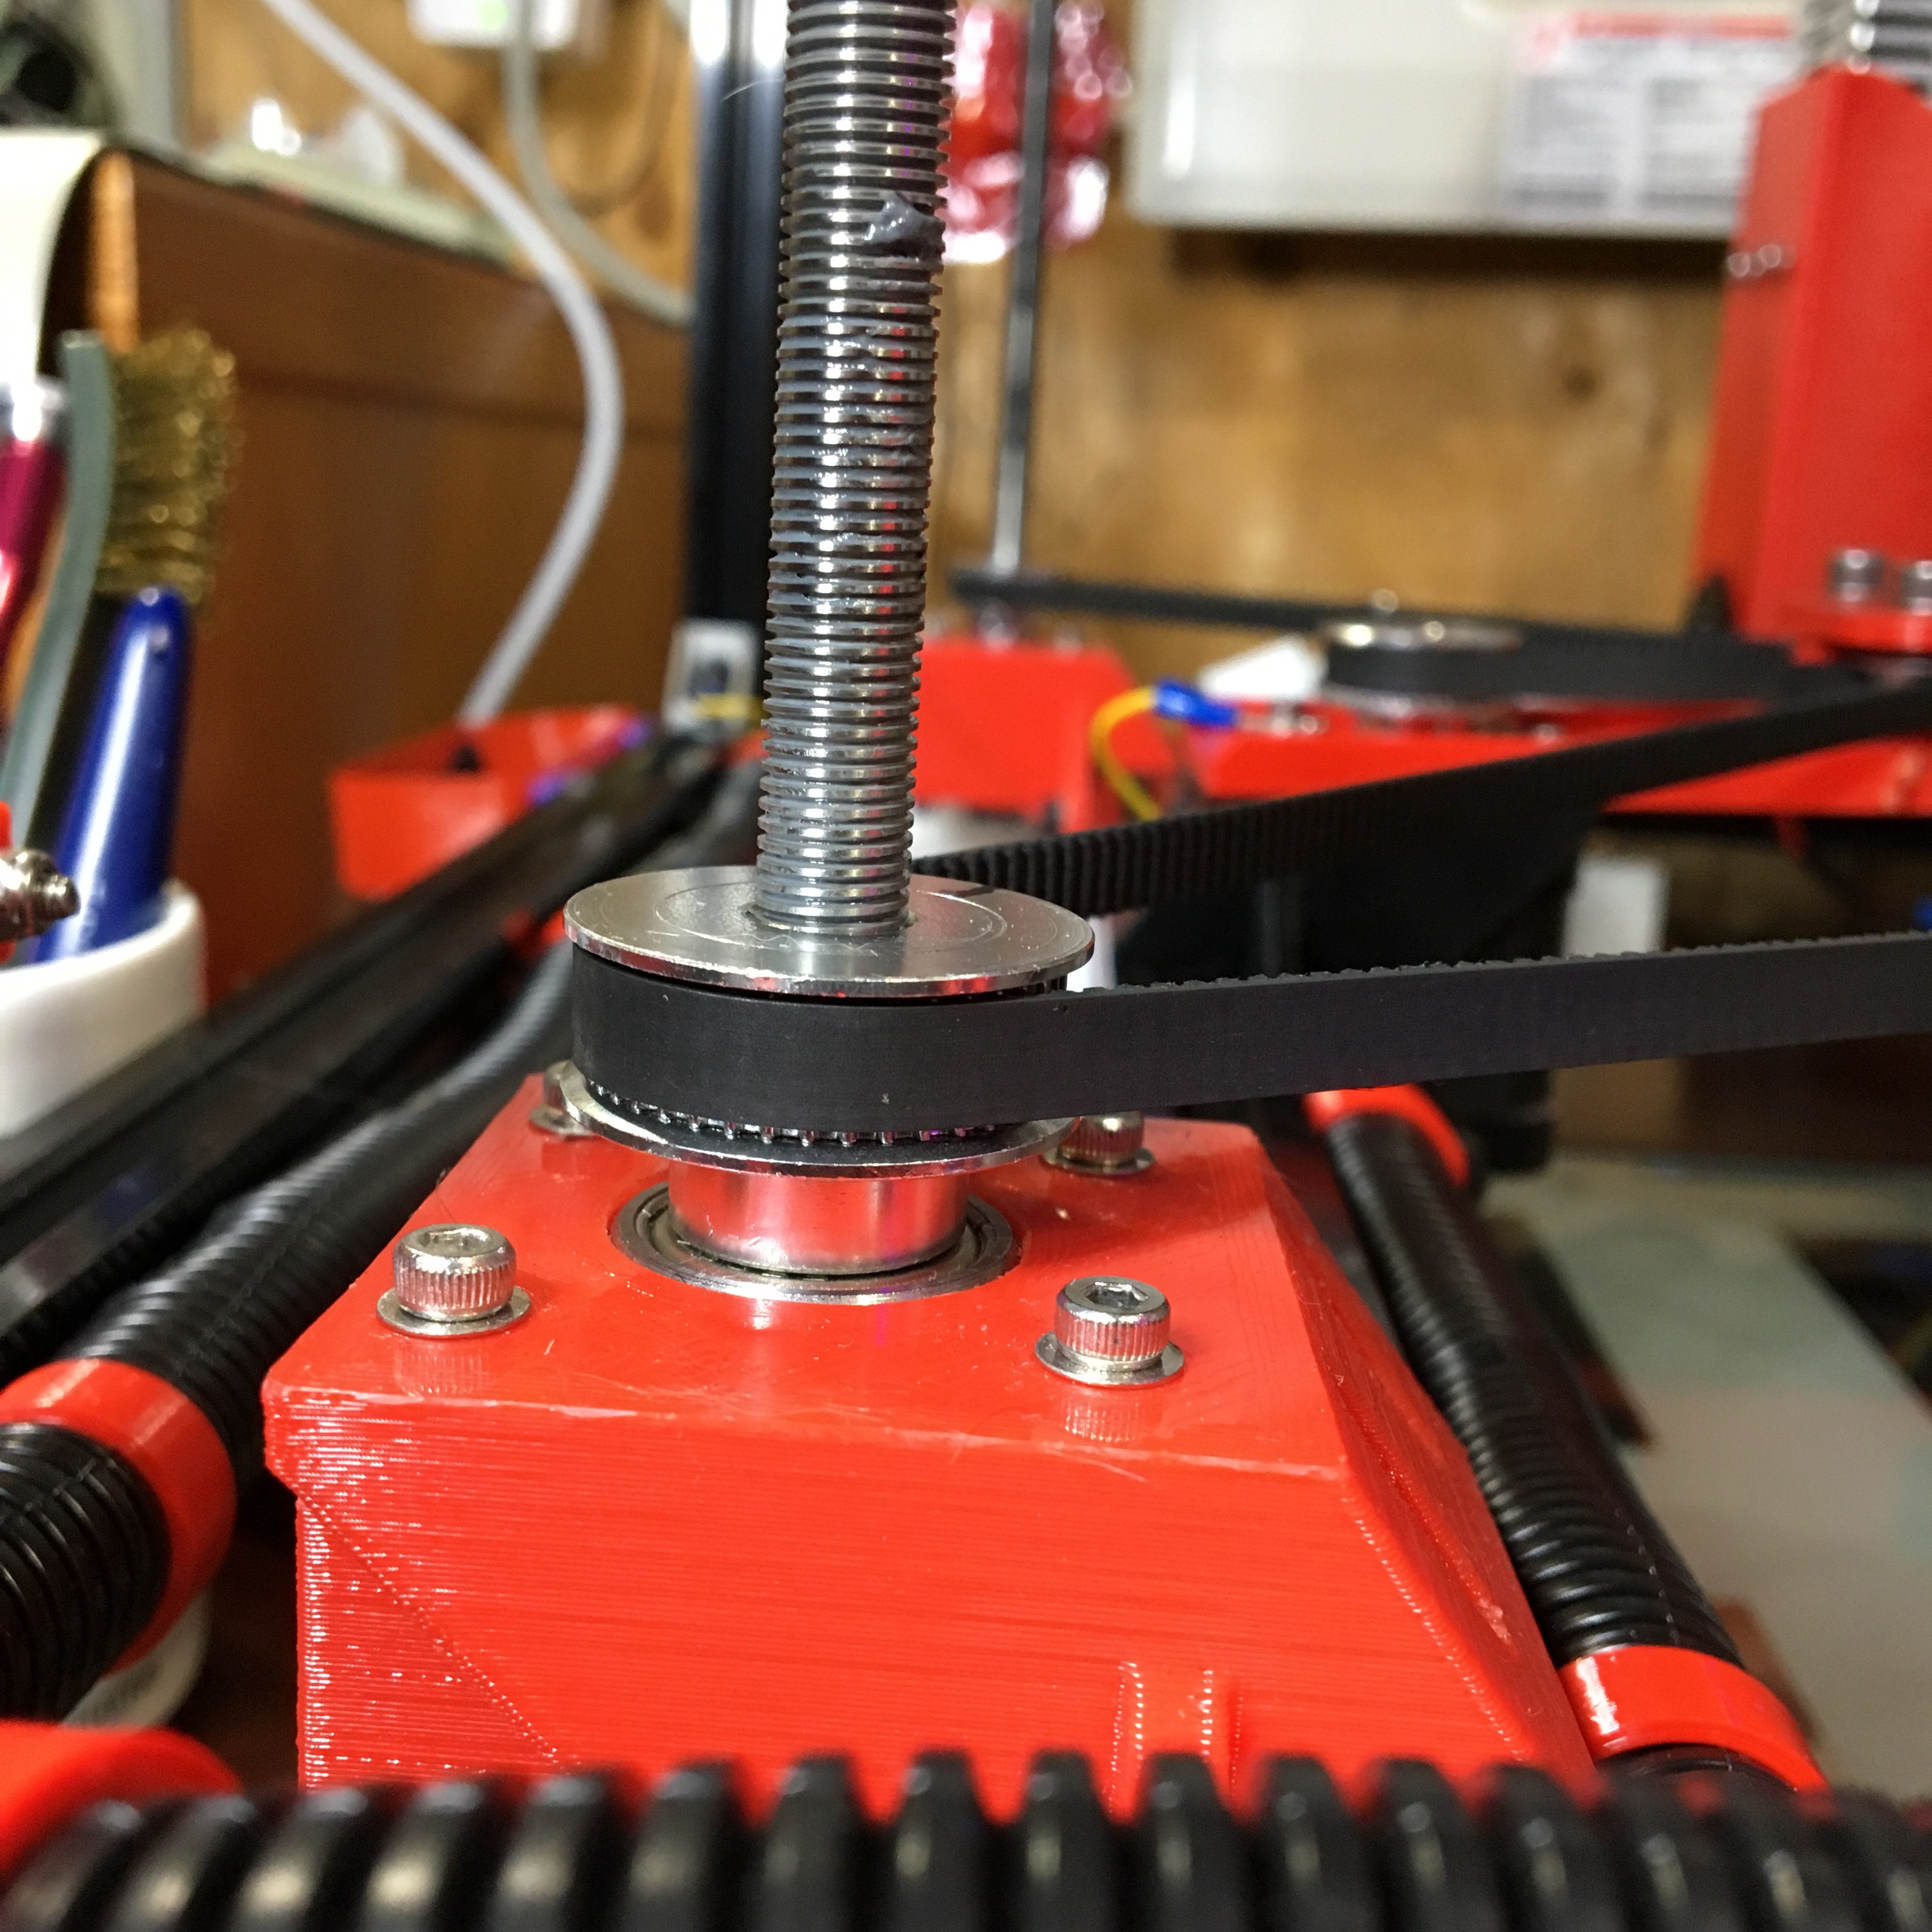
I took some more pictures of the lead screw mounts that show how I have used them. I didn't follow exactly the description from that original thingiverse mod. The pulleys I used have a body small enough to sit comfortably on the bearing, so the weight of the bed assembly holds it down onto the bearing. The lead screw protrudes from the bottom just enough for a lock collar to clamp on and keep the lead screw in place against any lifting forces. It doesn't do anything else other than let you clamp the lead screw into the bearing sandwich.
During installation I slide the lead screws into the bearing blocks and put the collar on so that the end of the lead screw is flush with the collar. Then I push down on the pulley and up on the collar and secure the set screws of the pulleys. That keeps the lead screws quite secure in the mounting block.
Before putting the belt on I rotate the lead screws so the tops are flush with the top of the nuts in the bed mount. Then carefully wrap the belt around the back pulley and then side pulleys without making them rotate to keep the in sync. Then into the tensioner. It really helps to have a second set of hands for this step. I try not to tension the belt too much or else it deflects the lead screws a bit which can cause binding when the bed is at the lowest extent.
Speaking of binding, it's also critical to get the lead screw bed mounts perfectly lined up with the screw mounts. The bed frame needs to be tightened in stages to allow for some wiggle room in the X or Y. The Z wheels need to be aligned on the V slots before being tightened. Everything needs to be done in stages otherwise you will run into binding.