Heated bed 220V vs 24V
-
I am switching to an 8mm thick aluminium bed .
Can you suggest me best way to heating it?
Sylicone? 220v AC or 24v DC ?I already own an extra good quality PSU dedicated to the heated bed , but I can move to 220 if it worth.
Thx
Andrea -
Have you read https://duet3d.dozuki.com/Wiki/Choosing_a_bed_heater ?
-
Thank you for answering me but I am trying to figuring out the reasons for people to choose 220 V bed heater. Sure it has double wattage 750 vs 360 W in my 300x300 case, but stating to your link 360w will be more than enough without the risks of playing with high current.
it seems to me that some more minutes of waiting time for heating the bed isn't a good reason for using 220v I could be wrong and I would like to know more opinions about thisthx
Andrea -
The main reason for choosing 110V or 220V bed heaters is that machines with large beds need a lot of heating power (I recommend 0.4W per sq cm), and if you use a low voltage bed heater then that implies large bed heater current and a large PSU to power it. For example, a 400x400mm bed heater needs around 640W of power, which is nearly 27A @ 24V. Using a mains voltage bed heater + SSR allows a much smaller PSU to be used and avoids the need for very thick bed heater wires.
Against that you need to balance the additional safety precautions needed when using mains powered bed heaters. On deltas and other printers with fixed beds that in normal use are not accessible from underneath, it's fairly easy to keep them safe. It's harder with a moving bed.
-
tank you for your clarification. very usefull.
I have a corexy with moving bed , so I would like to stay on the safer side.
My psu is brand new RSP-500-24 has a rated power of 504W https://www.mouser.it/datasheet/2/260/RSP-500-spec-1109676.pdf
I am planning to use a 400W keenovo pad. Do you thing the PSU will be sufficient?thank you
Andrea -
A 360W heater should be adequate for a 300x300mm bed. A 500W PSU should be adequate unless you plan to have more than 2 extruder heaters or use a Super Volcano. If you are worried that you are close to the power limit, you can turn the PSU voltage down a little. See https://duet3d.dozuki.com/Wiki/Choosing_the_power_supply#Section_Total_power_needed.
-
thank you .
the 500W psu is dedicated to the heated bed , all the other stuff has another 360W PSU so I should lay on the safe side.Thank you for your help
-
@claustro This site has a pretty accurate calculator that will tell you how long you'll be waiting for the bed to heat up based on its size, applied heater power, and target temperature. https://jscalc.io/calc/uS8JYjYISgIvzJ1x
I wouldn't consider a 24V cable carrying tens of amps to be very much safer than one carrying 220VAC. If you screw up or something fails, you're less likely to die by electrocution with the 24V cable, but there's still plenty of potential for starting a fire. For printer build purposes, I'd treat them the same way. Use electrical fuses, proper grounding, thermal cutoffs, and strain relief at both ends of the cable.
-
thank you , I already planned electrical fuse , thermal fuse and 16awg cables fixed at the end to the frame I also installed fire alarm in all the house
")
the calculator give me 360 seconds for 24V vs 170 220V...
-
Looks like you've found your answer (and that calculator that @mrehorstdmd linked sure is handy, haven't seen that before!) but I'll add for others that one thing to take into consideration when looking at the power calculations is not just the W/cm^2, but the W/cm^3 as well.
W/cm^2 will give you a good idea of your bed's maximum temperature, but it won't really give you a good idea of how long it's going to take to heat up. I inititally chose roughly 0.35 W/cm^2 for my heat bed, but I went with a 3/8" (~9.5mm) thick aluminum tool plate which meant my heat up times were quite long (10+ minutes for PETG temps). I had based my initial calculations off of a Prusa i3 clone that had a ~3.5mm thick aluminum bed and a heater that provided 0.3 W/cm^2. On that machine, the heat up times were great, so I figured that just matching (or even exceeding a little bit) the W/cm^2 for the Hypercube Evo build that I'd get similar performace. Obviously if I had sat and thought about it for a little bit I would have realized that my heat up times would be roughly 3 times longs, since my bed was roughly three times as thick!
That's why I switched to a 700 watt AC heater mat to give me 0.7 W/cm^2, or 0.073 W/cm^3 (instead of the 0.036 W/cm^3 of the initial DC heater mat). Now I can hit PETG temps in just a couple of minutes!
As others have mentioned though, certainly make sure you do your due diligence if you go the route of an AC heat bed. I used a proper, high quality SSR from a reputable manufacturer, electrical fuses in-line with the machine, and a thermal fused bolted to the aluminum bed itself just in case the SSR fails. The machine is well grounded and the cables are strain relieved. Mains voltage is certainly nothing to play around with, especially when it's a machine that you're not going to be watching all of the time!
-
The calculator should take in account the bed thickness , for reaching 110 celsius 6 minutes for the 24V and 3 for the 220 seems reasonable.
should only the bed grounded if this will be isolated from the frame by V-wheels? I am frightened to not be able to ground all the printer correctly.
Sure the components , cable and ssr are certainly more stressed with the 24v version for the high current in play.
-
@claustro That calculator does take into account the bed thickness - which is why it's quite handy! I was more so cautioning others about just using W/cm^2 without any regard to thickness of the bed.
-
@lumberjackengineering
thank you for answering me.
I am still thinking about the best path to follow, what kind of printer do you own ? have you had difficult grounding your bed? -
@claustro said in Heated bed 220V vs 24V:
@lumberjackengineering
thank you for answering me.
I am still thinking about the best path to follow, what kind of printer do you own ? have you had difficult grounding your bed?at worst you can ground the bed by using a separate wire bed plate to ground. But you should also protect yourself by using a good Quality RCD (or GCFI it think it is in the states) on the AC Feed anyway
-
The machine that has a AC heat bed on it is a Hypercube Evolution. The aluminum toolplate bed itself is grounded, and it's connected to the bed frame via plastic mounts (I.E there is no electrical continuity between the bed and the bed frame). IIRC, I grounded at least one piece of the bed frame, but relying on grounding aluminum extrusion always seem sketchy to me. The layer of anodization (at least the black Misumi extrusion) isn't conductive when tested with at multimeter continuity check voltage levels (3V ish?), so I'm not sure that grounding just one piece is really good enough. I think that they make special screws/washers for grounding extrusion that have teeth on them to dig through the anodization layer.
On the other hand, at higher voltage (I.E if you did have a mains fault) then maybe it's conductive enough that it'd arc to the ground connection through the anodized layer.
Hopefully others can chime in with their experience too!
-
My 2 cents: I've got 2 printers with beds heated by 220V AC silicone mats. Both have been ordered from Keenovo - they offer an option to install a bimetallic thermal switch of the temperature rating of your choosing into the heater itself. Which makes the whole thing a lot safer. I've got a 140 degree switch in one and a 150 in the other, which is plenty for the normal operation and should protect you if the SSR fails closed.
Add some sturdy ground wiring and you're good to go, fairly safe and heats up really fast.
-
I use a 400x400mm ~1300W 220V silicone heater on a 500x500x8 Aluminium bed. So far so good. Barely any wait for it to get to temperature. The seller said it can withstand up to 200 C so I tested something like 150-180 to see what will melt. I made sure it does not attach to plastic directly and grounded the thing.
-
@claustro said in Heated bed 220V vs 24V:
My psu is brand new RSP-500-24 has a rated power of 504W
Are you ok with the fan noise of the RSP-500-24? Switching to mains power will eliminate it.
-
@mike said in Heated bed 220V vs 24V:
from Keenovo - they offer an option to install a bimetallic thermal switch of the temperature rating of your choosing
The Voron people recommend to add your own rather than using the built in. Here is their heated bed related video, many good general tips. https://www.youtube.com/watch?v=8C4jtj0OuE4
-
@zapta You can get bimetallic, self-resetting TCOs built into the heater, but it's probably not a good idea. If there's a fault that causes an overheating condition, you don't want the TCO to keep cycling the power to the heater. You want the thing to shut down.
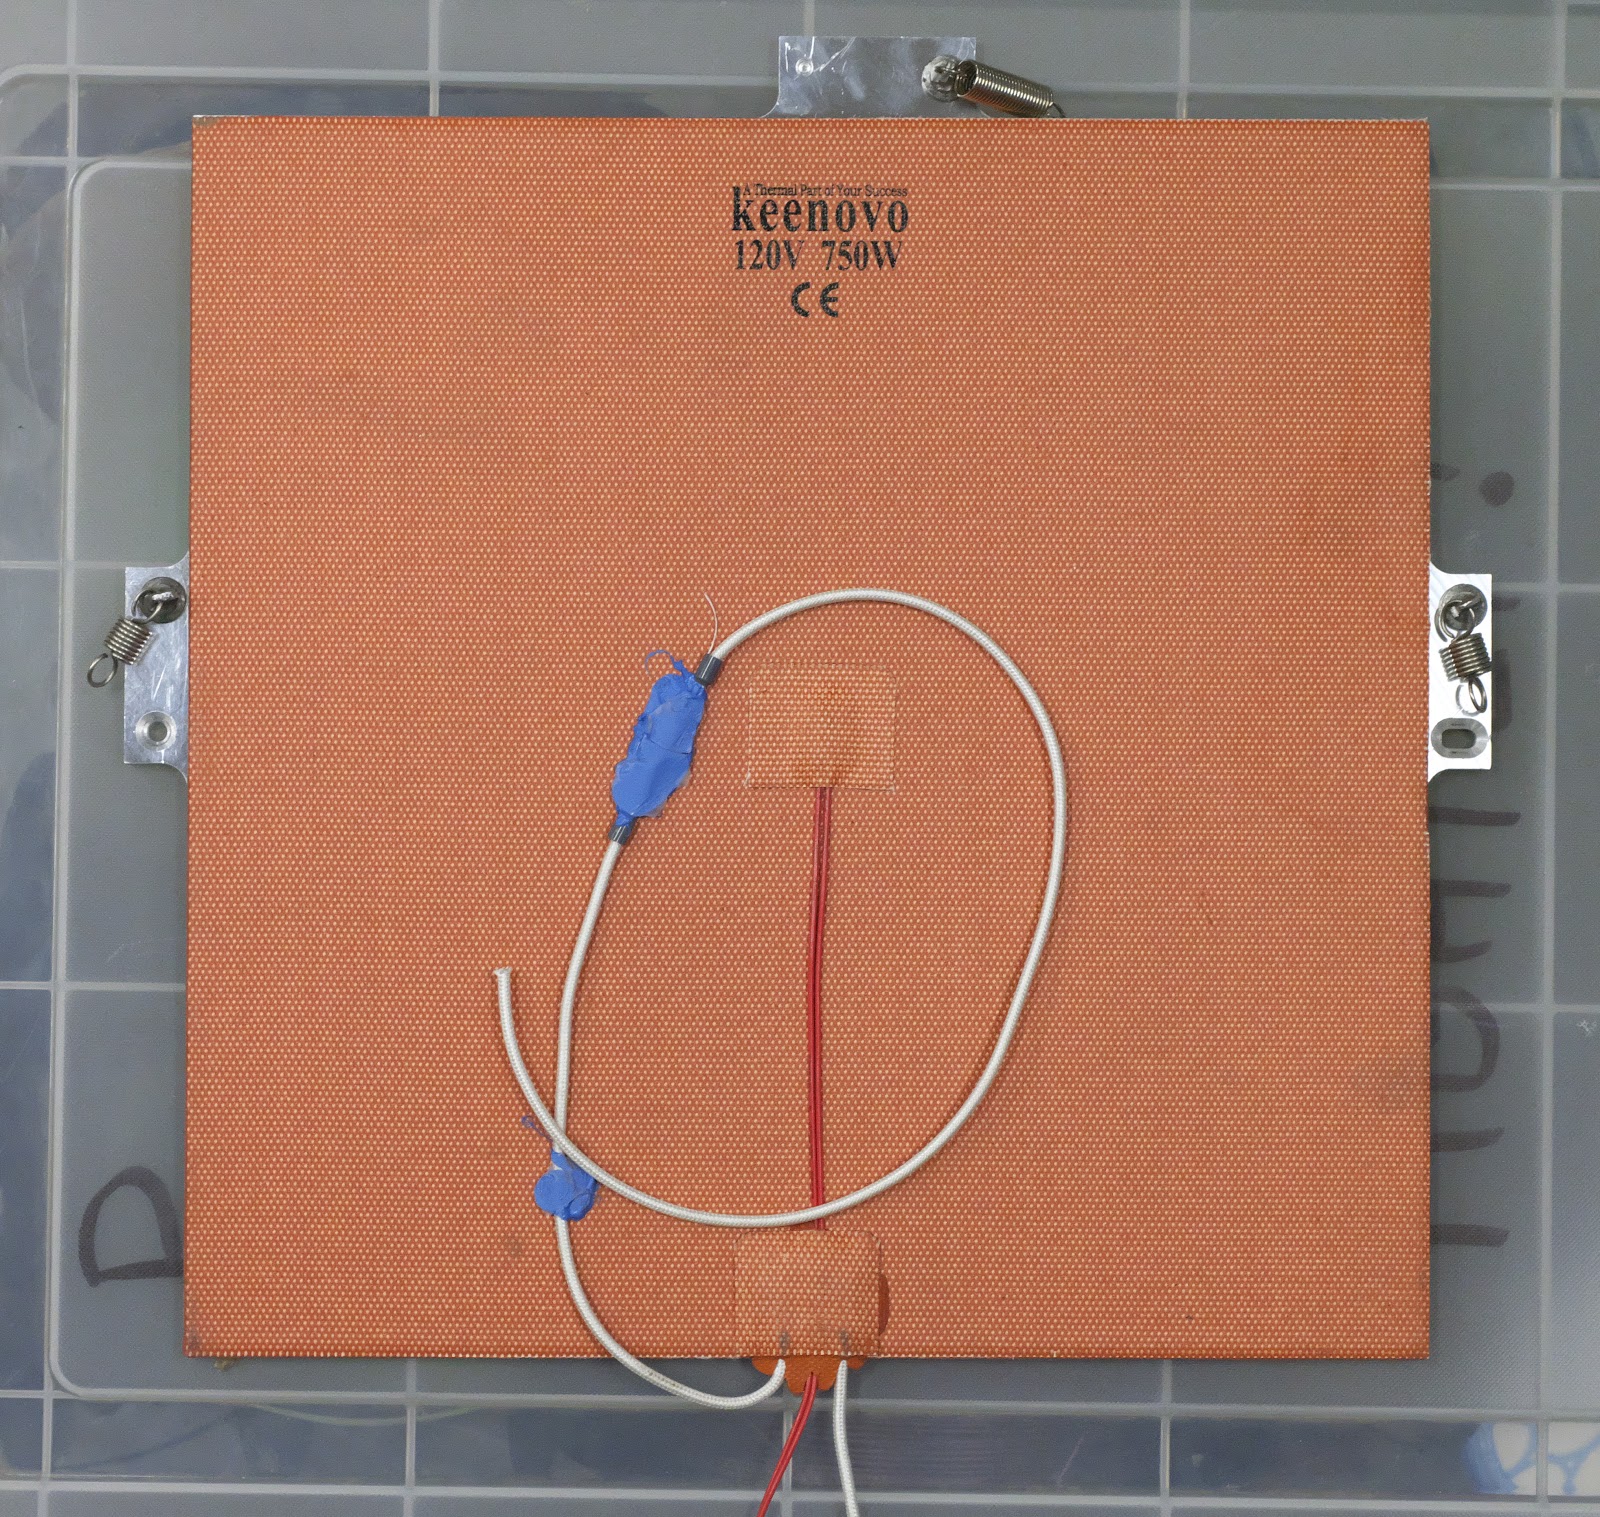
I would not trust thermal fuses purchased via Ali-express. This is not the place to be penny wise and pound foolish. TCOs with full safety certifications only cost about $1. Read the data sheet to find out how to select the TCO that will trip at the right temperature- they self heat and operate at a higher temperature than the bed. In my printer's case (about 6A current), the TCO operating temperature should be about 24C above the maximum expected operating temperature.
When I built my corexy printer about 2 years ago I mounted a TCO on the bed plate. A few months ago I noticed that the adhesive (468MP) holding the heater on the bed plate was starting to let go. That made me realize that it's much better to mount the TCO on the heater so that if it comes off the bed plate it will still do its intended job. I've seen 468MP let go of the PEI sheet on top of the bed after about 2 years of temperature cycling, too, so I think that that's about all you can expect from that adhesive.
I recently converted a printer at the makerspace to a kinematic mount and mounted the TCO on the heater using high temperature silicone (the blue blob in the photo). I'll be doing the same on the corexy printer soon, and mounting the heater to the plate using the same high temperature silicone.