First Test Print following Duet3d Upgrade
-
Did you PID tune the heaters?
Did you calibrate the E steps?
-
@b0m0a0k said in First Test Print following Duet3d Upgrade:
100k 3950 Thermistor
the problem with those thermistors is that the B3950 is only valid for the range of 25-50C.
the resistance for different B3950 can vary by a lot at higher temperatures.If i take this table https://www.makeralot.com/download/Reprap-Hotend-Thermistor-NTC-3950-100K.pdf
it will give me a B4171 if i put in 25-220. So your temperature can be easily off by 40C. -
Thanks for this.
I had not performed a PID tune yet.
When I can the RepRap configurator I defaulted to Bang-Bang for the control method. I now read that this not perhaps the best method and that PID is recommended.
I first attempted to run an autotune using M303 H1 S190 C8
My first response from the board was "No heater has been tuned yet". I found an article by weput that helped me resolve that one. I reran M303 H1 S190 C8 and autotune started and then finished. The results were as follows;
SENDING:M303 H1 S190 C8
Auto tuning heater 1 using target temperature 190.0°C and PWM 1.00 - do not leave printer unattended
Auto tune phase 1, heater on
Auto tune phase 2, heater off
Auto tune phase 3, peak temperature was 200.9
Warning: Heater 1 appears to be over-powered. If left on at full power, its temperature is predicted to reach 483C.
Auto tune heater 1 completed in 286 sec
Use M307 H1 to see the result, or M500 to save the result in config-override.gM307 H1
SENDING:M307 H1
Heater 1 model: gain 458.6, time constant 183.4, dead time 8.7, max PWM 1.00, calibration voltage 12.4, mode PID, inverted no, frequency default
Computed PID parameters for setpoint change: P8.3, I0.207, D50.0
Computed PID parameters for load change: P8.3,"Warning: Heater 1 appears to be over-powered. If left on at full power, its temperature is predicted to reach 483C."
I notice while researching this that @Phaedrux had experience with one of those, but under slightly different circumstances.
So from what I can gather that warning tells you what will happen if you experience a temperature runaway.
My current config.g looks like this with regards to heaters and the tool;
Heaters
M305 P0 T100000 B3988 R4700 ; Set thermistor + ADC parameters for heater 0
M143 H0 S100 ; Set temperature limit for heater 0 to 100C
M305 P1 T100000 B3988 R4700 ; Set thermistor + ADC parameters for heater 1
M143 H1 S210 ; Set temperature limit for heater 1 to 210C; Tools
M563 P0 D0 H1 ; Define tool 0 uses extruder drive 0 and heater 1
G10 P0 X0 Y0 Z0 ; set tool 0 temperatures and offsets
G10 P0 R0 S0 ; Set initial tool 0 active and standby temperatures to 0CSo it looks like I need to change from Bang-Bang to PID but I can't get a clear idea of what I should be changing these values to.
Also, the autotune didn't appear to provide the values I was expecting on completion (i'm running this in Pronterface). I was expecting something like (the numbers displayed are for example only);
Kp: 21.61
Ki: 1.59
Kd: 73.46I have to admit that I'm confused as hell right now.
-
did you read the guide?
https://duet3d.dozuki.com/Wiki/Tuning_the_heater_temperature_control -
I have now completed PID tuning of both Bed and Extruder as well as e-steps calibration on the extruder and re-run my first test prints.
The results are pretty much the same as presented at the start of this post. I am seeing a very loose extrusion with little inter-filament adhesion, I am also still seeing a weird "pulse" in the filament as it is laid down.
Both Bed and Extruder temperatures are now very stable and the e-steps calibration of the extruder was accurate and didn't need any modification.
Do you think these issues are being caused by something I may have overlooked in the set-up of the printer/board or is this now a matter of re-tuning the slicing software (Cura 4.1.0)?
Settings Files;
5_1559663925636_homez.g 4_1559663925636_homey.g 3_1559663925636_homex.g 2_1559663925636_homeall.g 1_1559663925636_config.g 0_1559663925636_bed.g
Cura Settings:
Resolution: 0.3mm
Print Temp: 190
Print Temp Initial Layer: 190
Initial print temp: 180
Build Plate Temp: 60
Flow: 100%
Retraction enabled
Retraction Distance: 6.5mm
Retraction Speed: 25
Print Speed: 60
Travel Speed: 120
Initial Layer Speed: 30.0
Cooling Enabled
FAN Speed: 100
FAN Regular Speed: 100
FAN Max Speed: 100
Support: No
Build Plate Adhesion: Brim
Brim Width: 8.0
Print Sequence: All At Once
;FLAVOR:RepRap
;TIME:1640
;Filament used: 0.858545m
;Layer height: 0.3
;MINX:39.7
;MINY:39.7
;MINZ:0.3
;MAXX:160.3
;MAXY:160.3
;MAXZ:1.8
;Generated with Cura_SteamEngine 4.1.0
T0
M190 S60
M104 S190
M109 S190
M82 ;absolute extrusion mode
G21 ;metric values
G90 ;absolute positioning
M82 ;set extruder to absolute mode
M107 ;start with the fan off
G28 X0 Y0 ;move X/Y to min endstops
G28 Z0 ;move Z to min endstops
G1 Z15.0 F120 ;move the platform down 15mm
G92 E0 ;zero the extruded length
G1 F200 E6 ;extrude 6 mm of feed stock
G92 E0 ;zero the extruded length again
G1 F120
M117 Printing...
M83 ;relative extrusion mode
G1 F1500 E-6.5
;LAYER_COUNT:6
;LAYER:0
M107
G0 F3600 X42.123 Y41.849 Z0.3
;TYPE:SKIRT
G1 F1500 E6.5
G1 F1800 X42.722 Y41.334 E0.01486BODY CODE REMOVED
;TIME_ELAPSED:1640.655353
G1 F1500 E-6.5
M140 S0
M82 ;absolute extrusion mode
M107
M104 S0 ;extruder heater off
G91 ;relative positioning
G1 E-1 F300 ;retract the filament a bit before lifting the nozzle, to release some of the pressure
G1 Z+0.5 E-5 X-20 Y-20 F120 ;move Z up a bit and retract filament even more
G28 X0 Y0 ;move X/Y to min endstops, so the head is out of the way
M84 ;steppers off
G90 ;absolute positioning
M83 ;relative extrusion mode
M104 S0
;End of Gcode
-
The maximum speed and jerk of your extruder is quite low. At the very least this can impact your retraction speed and could impact pressure advance if and when you decide to try it.
M566 X900.00 Y900.00 Z12.00 E120.00 ; Set maximum instantaneous speed changes (mm/min)
M203 X6000.00 Y6000.00 Z600.00 E600.00 ; Set maximum speeds (mm/min)Try M566 E1200 and M203 E6000
It's hard to see from the picture because it's very small, but if it looks similar to the first picture you posted it still looks over extruded. Since your E steps have been calibrated, perhaps we need to look at other sources of over extrusion. Perhaps the Z axis steps per mm is incorrect at 400? If it's not raising the nozzle the expected amount for eachlayer, it would appear as over extrusion.
If you raise the nozzle 100mm above the bed does it measure out as 100mm in actuality?
I have been working on Part 4 of the Ender 3 guide for initial calibration. It's still in draft form, but you can take a look to see if anything jumps out at you. https://duet3d.dozuki.com/Guide/Ender+3+Pro+and+Duet+Maestro+Guide+Part+4:+Calibration/40
-
@phaedrux Thanks very much. I will review all that you have said here and see what changes I can make (it's currently printing a very raggedy Benchy).
I would very much like to take a look at your calibration guide. I was sorry to see it missing when I ran through "commissioning".
-
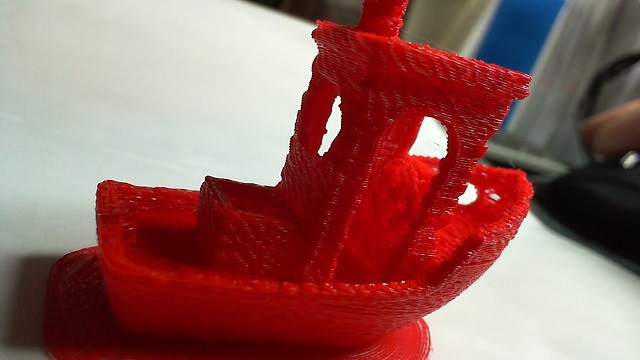
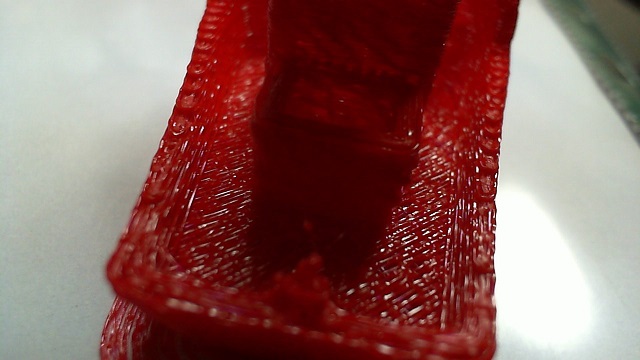
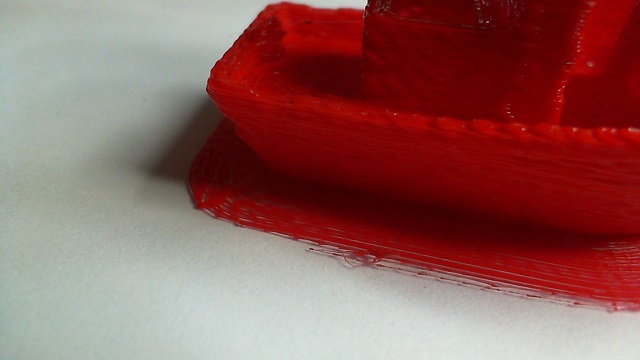
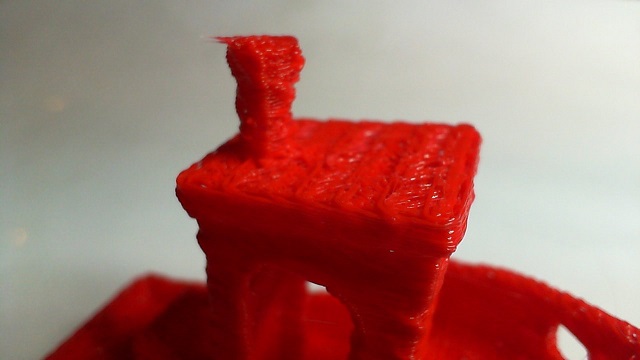
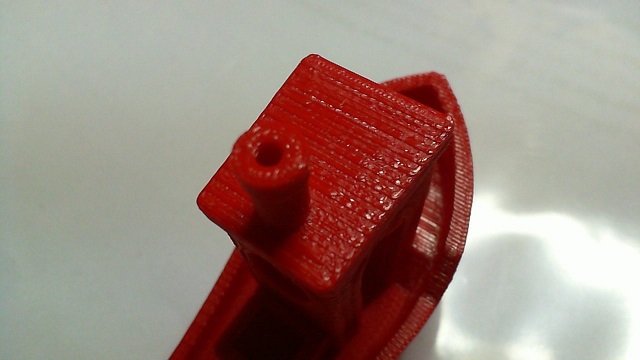
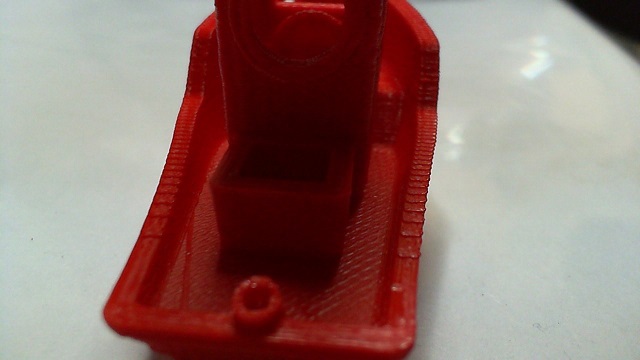
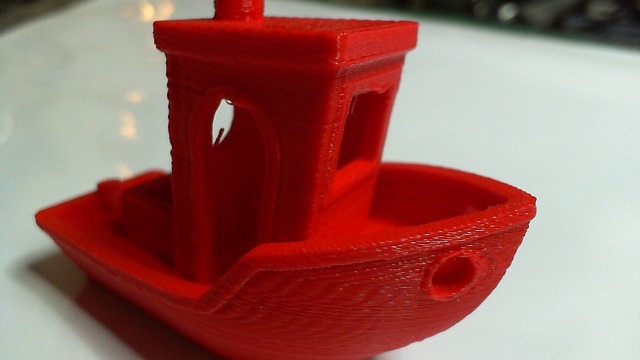
I really wouldn't want to put to sea in this, but hopefully the photos are closer in and you can get a better idea of what i am seeing.
-
.. for comparison. This is what my Benchy looked like with the old Melzi board.
-
@phaedrux said in First Test Print following Duet3d Upgrade:
Perhaps the Z axis steps per mm is incorrect at 400?Actually I took this measurement from the EEPROM of the old Melzi board.Thought it was probably a good place to start.
-
can you print a temperature tower?
https://www.thingiverse.com/thing:2625999 -
@veti Haven't tried that yet, great suggestion. I'm desperately trying to get this to an acceptable level where I can print the BLTouch mount and get that installed to help with the hell that is bed levelling

-
Are you using the stock extruder? I just configured a model like this for someone and the extruder steps/mm were in the 90s (like 94).
Were you serious with the be leveling comment? Why is bed leveling so difficult for you?
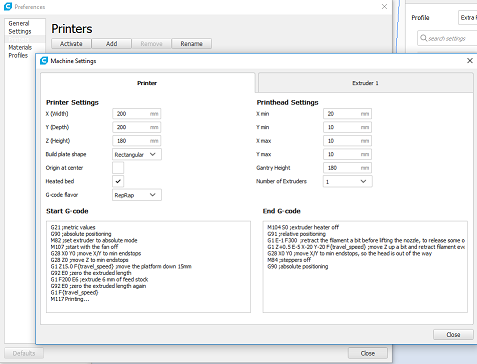
Can you post the full config.g file.
-
It certainly seems like under extrusion in some of the pictures.
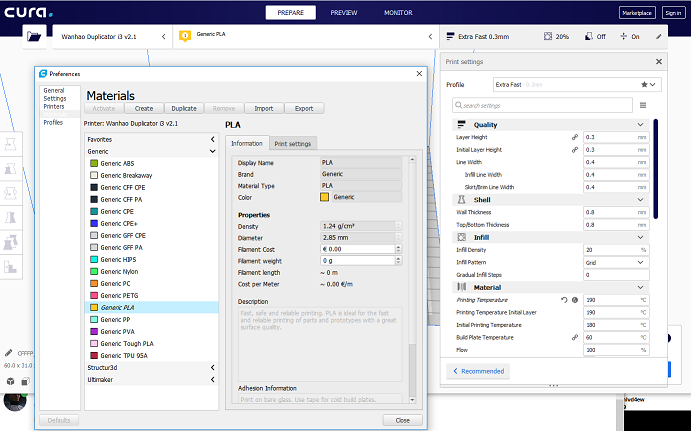
Can you check your printer setup in Cura to ensure that it's set to use 1.75mm filament and not 2.85mm.
Also the temperature tower would be a good idea. We need to verify that your temperatures are accurate, or at least find a temperature where extrusion can happen smoothly.
-
@veti said in First Test Print following Duet3d Upgrade:
can you print a temperature tower?
https://www.thingiverse.com/thing:2625999I agree, it looks to me that your test print with the Duet is printed at too high a temperature.
-
@bricor Yes, I am using the stock Wanhao Duplicator i3 v2.1 extruder wich is described as;
MK10 Single-Extruder (with Steel X-Carriage)
Re: Bed leveling. Yeah, kinda am. Its just such and ambiguous process. You can give 4 people the same printer and tell them what to do and they will all assume a different criteria for success. How on earth are you supposed to condense that into anything approaching a fool-proof method.
-
Apologies for going off subject with the bed leveling, but it may be the i3 design that's the issue. Bed leveling is a straight forward procedure on a printer like this and does not require a probe. Delta printers require a bit more to get right and probing makes life easier but also not necessary.
To get back on track, print the temp tower and post the results. Interested to see where this goes.
-
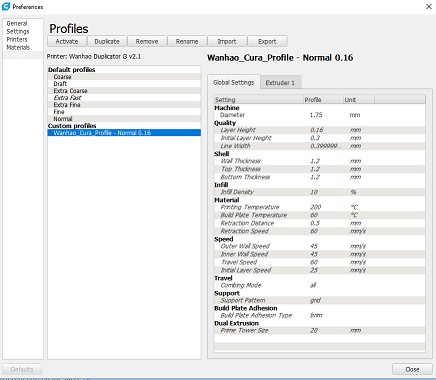
I have the print running at what Cura (4.1.0) calls "Extra Fast" the settings for which are as follows;
Resolution: 0.3mm
Print Temp: 190
Print Temp Initial Layer: 190
Initial print temp: 180
Build Plate Temp: 60
Flow: 100%
Retraction enabled
Retraction Distance: 6.5mm
Retraction Speed: 25
Print Speed: 60
Travel Speed: 120
Initial Layer Speed: 30.0
Cooling Enabled
FAN Speed: 100
FAN Regular Speed: 100
FAN Max Speed: 100
Support: No
Build Plate Adhesion: Brim
Brim Width: 8.0
Print Sequence: All At OnceHowever. The Wanhao Duplicator i3 profile is active in the Cura interface so I'm not sure how much of that it keeps if you choose a Cura based resolution rather than the Wanhao profile (included below).
It's worth mentioning that I used the "Extra Fast" setting to produce the better quality Benchy while the Wanhao i3 was still using the factory Melzi board.

-
Let me know if these are too small, I was getting told off by the system earlier for trying to post images that were too large, so have been reducing the images by 50%
-
As I suspected, the screen shot of your machine settings extruder tab show it's using 2.85mm for your filament diameter. Change that to 1.75 or whatever the measured diameter of your filament is.