Duet3D Logo

    Duet3D

    • Register
    • Login
    • Search
    • Categories
    • Tags
    • Documentation
    • Order

    Bimodal layer shift

    General Discussion
    7
    33
    565
    Loading More Posts
    • Oldest to Newest
    • Newest to Oldest
    • Most Votes
    Reply
    • Reply as topic
    Log in to reply
    This topic has been deleted. Only users with topic management privileges can see it.
    • spudaddict
      spudaddict last edited by spudaddict

      I am stumped with a "bi-modal" layer shift issue on my BLV Cube at 45 degrees - front right to back left. Hours of research have turned up nothing similar so I am looking for community help.

      PHOTO1: As part of the troubleshooting I printed 4 tubes (solid base, then 0.8mm tubes) at the same time. The front right tube was good - not great. The back left was a little worse, the front left was a little worse and the back right was terrible.
      Tube.png

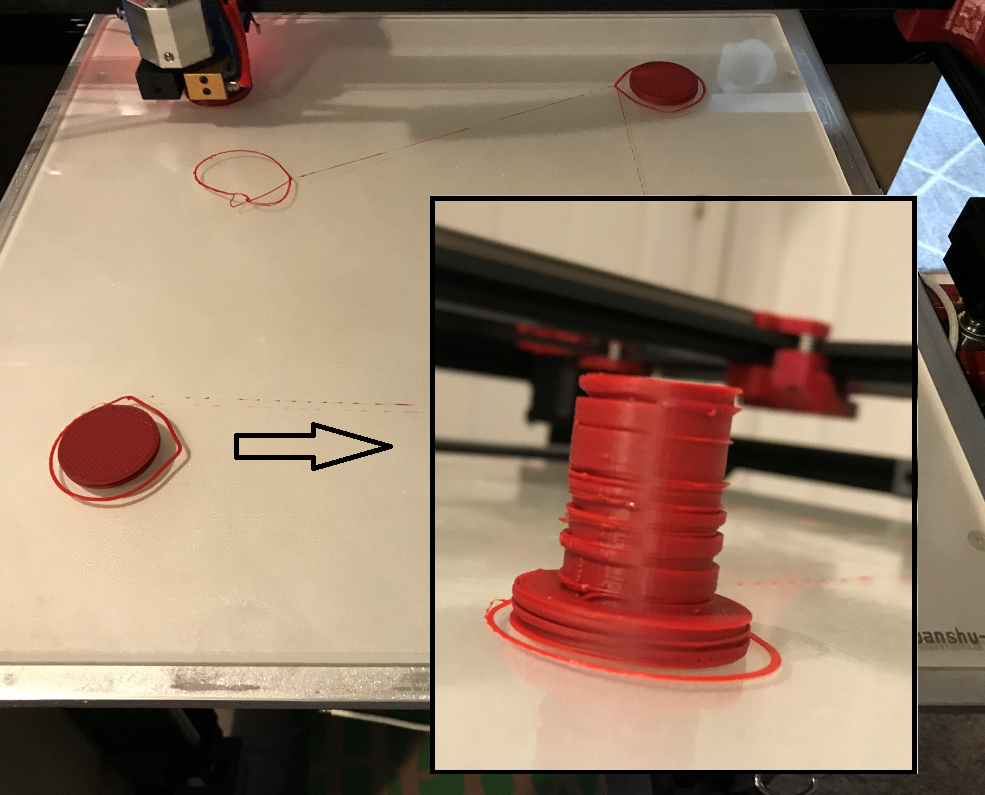
      I then printed a Moai(Easter Island head) and a shotgun rapid loader widget that both turned out perfect.

      PHOTO2: Feeling confident I printed a 4x7 array of drag chain parts. The front left ones were passible, the back left ones are unusable.
      Array.png

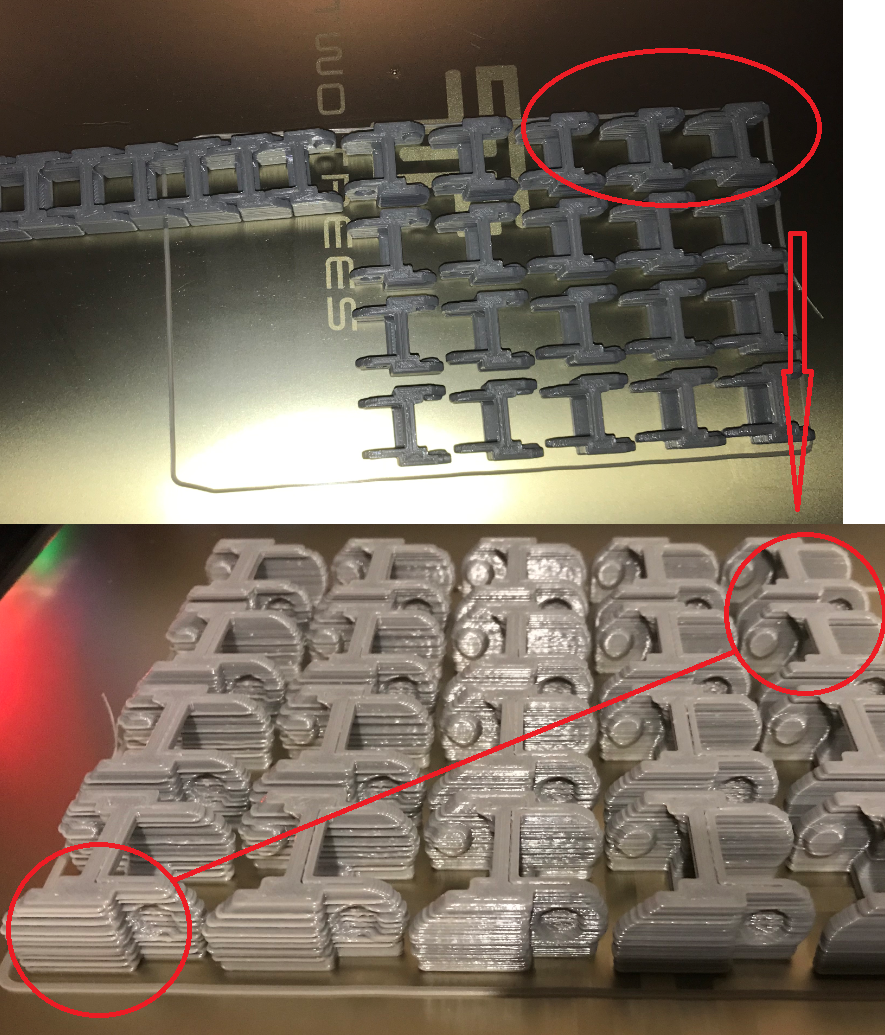
      So how-in-the-world am i getting good and bad parts in the very same print? How is the layer shift finding its way between 2 stable endpoints?

      My setup: BLV Cube; Duet2WIFI, 0.9 Steppers for X-Y, 330x330 bed. Other than water cooling - built to standard BLV design on Thingiverse. 1800 current to steppers. No damage on belts or pulleys. (this printer is essentially new)

      Checked so far: board is cool; steppers are cool; took belt off and verified MGN rails are smooth and no binding. The boden/wire umbilical is not catching on anything, the printhead mount feels solid, replaced the Y motor, then the X motor. Did find 58V being induced by an AC bed heater which I regrounded and is now 0V.!

      Comments WELCOME please.

      spudaddict 2 Replies Last reply Reply Quote 0
      • Phaedrux
        Phaedrux Moderator last edited by

        Perhaps some binding in the rails at that position?

        Z-Bot CoreXY Build | Thingiverse Profile

        spudaddict 1 Reply Last reply Reply Quote 0
        • NitroFreak
          NitroFreak last edited by NitroFreak

          Looks 100% like a loose pulley on one of the motors , explains why it is at 45° since it is a coreXY and it goes back and forth.

          Make sure the pulleys set screws are set correctly on the detent of the motor shaft and not on the side or so

          spudaddict 1 Reply Last reply Reply Quote 0
          • spudaddict
            spudaddict @Phaedrux last edited by

            @Phaedrux With the belts off I could not detect any binding - but that could change under belt tension. During one print I did grab the Y bridge and apply considerable rotational pressure to try to force a layer shift. It continued to print fine. Is there anything you have seen or tried to help prove out a binding issue?

            1 Reply Last reply Reply Quote 0
            • spudaddict
              spudaddict @NitroFreak last edited by spudaddict

              @NitroFreak I pulled both stepper motors in my initial troubleshooting and verified they are solid. I extended the "D cut" on one of them to make sure the set screw was hitting the flat. At this point I am not discounting anything, but I did pull and verify tight fit on both motors. I will try pulling them again this weekend.

              1 Reply Last reply Reply Quote 0
              • NitroFreak
                NitroFreak last edited by

                @spudaddict said in Bimodal layer shift:

                Try marking the side of the pulley to the stepper shaft with a marker and observe during the print if the line shifts.
                Especially observe the stepper that is responsible of the 45 degree motion that is in the direction of the shift.

                I´m 100% sure that this is not a normal skipped step from the stepper because it is too uniform and back and forth to the exact same space, does not happen.

                spudaddict 1 Reply Last reply Reply Quote 0
                • Danal
                  Danal last edited by

                  Carefully check the entire length of the belts. I've found stretched spots that are REALLY hard to see, and if they were in "one end" vs. "the other" it could explain the good/bad pattern across the bed.

                  Delta / Kossel printer fanatic

                  spudaddict 1 Reply Last reply Reply Quote 0
                  • DigiD
                    DigiD last edited by

                    Check that the ribs on the belts are not worn more in one section vs another , look for rubber dust as a sign of wear .
                    I had that happen on my delta and it caused all kinds of mysterious issues with travel being ok then not ok .
                    I actually saw the belt ribs ( the 3/4 worn ones ) riding on top of the drive pulley teeth rather than in between !

                    spudaddict 1 Reply Last reply Reply Quote 0
                    • mrehorstdmd
                      mrehorstdmd last edited by

                      Is this a corexy printer? Do the belt tensions vary with the extruder position in the XY plane?

                      https://drmrehorst.blogspot.com/

                      JamesM spudaddict 2 Replies Last reply Reply Quote 0
                      • JamesM
                        JamesM @mrehorstdmd last edited by JamesM

                        @mrehorstdmd

                        The BLV cube is a corexy printer....I have built one myself and don't have these issues.

                        @spudaddict

                        If you have a duet board in your printer(which I assume since you posted here) I would run an M122 command during a print that is having these issues and look to see if any "hiccups" are reported which could translate into missed steps.

                        I would post up your config.g file so people here could review it and see if anything sticks out.

                        I do agree with the others who have posted that it seems more like a mechanical issue since it is worse in different locations on the print bed.

                        mrehorstdmd spudaddict 2 Replies Last reply Reply Quote 0
                        • mrehorstdmd
                          mrehorstdmd @JamesM last edited by mrehorstdmd

                          @JamesM Thanks, but I'd still like to hear what @spudaddict has to say. Self built printers are seldom identical, even if they start from the same set of plans/BOM. People make part substitutions and design changes all the time. Print quality varying with bed position is exactly the sort of problem you would expect from belts being improperly laid out, evidence of which is varying belt tension as the extruder carriage moves around.

                          https://drmrehorst.blogspot.com/

                          NitroFreak spudaddict 2 Replies Last reply Reply Quote 0
                          • NitroFreak
                            NitroFreak @mrehorstdmd last edited by

                            @mrehorstdmd said in Bimodal layer shift:

                            @JamesM Thanks, but I'd still like to hear what @spudaddict has to say. Self built printers are seldom identical, even if they start from the same set of plans/BOM. People make part substitutions and design changes all the time. Print quality varying with bed position is exactly the sort of problem you would expect from belts being improperly laid out, evidence of which is varying belt tension as the extruder carriage moves around.

                            Thats a good point, thats true.
                            However belt tension would have a very sloppy effect on print quality, but just check the first red tower, the sections that are shifted within themselves are very properly aligned

                            spudaddict 1 Reply Last reply Reply Quote 0
                            • spudaddict
                              spudaddict @mrehorstdmd last edited by spudaddict

                              @mrehorstdmd As James M said, it is a CoreXY. I am not sure how I would measure tension variation on a moving belt - open to suggestions. IF the x and y rails are orthogonal there should be no tension variation. The strange thing is that in between the red tube print and the drag chain print, the printer made a perfect moai (Thingiverse: 144668). Its at work so I cant pull up a photo. Also, the "good" zones seem to move around the bed.

                              1 Reply Last reply Reply Quote 0
                              • spudaddict
                                spudaddict @Danal last edited by spudaddict

                                @Danal The belt is new, but I will do as you suggest. There are 2 belts on a CoreXY so I can easily check between them when I tear it down this weekend. I also have a new set of belts I may try as well.

                                1 Reply Last reply Reply Quote 0
                                • spudaddict
                                  spudaddict @DigiD last edited by

                                  @DigiD The belts are new, but I will definitely look them over. I also have a new set of belts I may try this weekend as well.

                                  1 Reply Last reply Reply Quote 0
                                  • spudaddict
                                    spudaddict @NitroFreak last edited by

                                    @NitroFreak I absolutely agree, which is why I ruled out most layer shifting "fixes." The pattern varies by location on the bed, is at random heights, but has two endpoints and then reverses back to the first layer origin. Very strange but specific.

                                    1 Reply Last reply Reply Quote 0
                                    • spudaddict
                                      spudaddict @JamesM last edited by

                                      @JamesM I will run a print tonight and try the M122 command. I too think it is mechanical, but I cant wrap my head around what it could be.

                                      1 Reply Last reply Reply Quote 0
                                      • spudaddict
                                        spudaddict @mrehorstdmd last edited by

                                        @mrehorstdmd See my reply to you above. A fellow 3D enthusiast from work built the same printer in tandem as I built mine. His BLV cube does not have this issue either. I'm not sure how to measure belt tension - maybe put a spring on the end and measure an elongation?

                                        1 Reply Last reply Reply Quote 0
                                        • spudaddict
                                          spudaddict @NitroFreak last edited by

                                          @NitroFreak Thats what is killing me! How is it so perfectly sloppy? 🙂

                                          1 Reply Last reply Reply Quote 0
                                          • spudaddict
                                            spudaddict @spudaddict last edited by

                                            @spudaddict Here is a photo of the best and the worst pieces from the drag chain print. They were in diagonally opposite corners... which seems to indicate a mechanical issue due to the CoreXY configuration.IMG_0924[1].JPG

                                            These were printed at the same time just 150mms or so apart.

                                            1 Reply Last reply Reply Quote 0
                                            • spudaddict
                                              spudaddict @spudaddict last edited by

                                              @spudaddict Config.g

                                              ; Configuration file for Duet WiFi (firmware version 2.03)
                                              ; executed by the firmware on start-up
                                              ;
                                              ; generated by RepRapFirmware Configuration Tool v2.0.4 on Wed Oct 02 2019 19:29:38 GMT-0600 (Mountain Daylight Time)

                                              ; General preferences
                                              G90 ; send absolute coordinates...
                                              M83 ; ...but relative extruder moves
                                              M550 P"Wyrm Forge" ; set printer name

                                              M667 S1 ; select CoreXY mode

                                              ; Network
                                              M552 S1 ; enable network
                                              M586 P0 S1 ; enable HTTP
                                              M586 P1 S0 ; disable FTP
                                              M586 P2 S0 ; disable Telnet

                                              ; Drives
                                              M569 P0 S0 ; physical drive 0 goes 0=backwards, 1=forwards
                                              M569 P1 S0 ; physical drive 1 goes
                                              M569 P2 S1 ; physical drive 2 goes
                                              M569 P3 S1 ; physical drive 3 goes
                                              M584 X0 Y1 Z2 E3 ; set drive mapping
                                              M350 X16 Y16 Z16 E16 I1 ; configure microstepping with interpolation
                                              M92 X79 Y158.88 Z809.21 E108.90 ; set steps per mm X is 158.88 with 0.9 stepper replaced
                                              M566 X900.00 Y900.00 Z12.00 E120.00 ; set maximum instantaneous speed changes (mm/min)
                                              M203 X18000.00 Y18000.00 Z180.00 E1200.00 ; set maximum speeds (mm/min)
                                              M201 X3000.00 Y3000.00 Z100.00 E9000.00 ; set accelerations (mm/s^2)
                                              M906 X1700 Y1700 Z800 E1400 I30 ; set motor currents (mA) and motor idle factor in per cent
                                              M84 S30 ; Set idle timeout

                                              ; Axis Limits
                                              M208 X-28.0 Y-6.0 Z0 S1 ; set axis minima
                                              M208 X320 Y320 Z460 S0 ; set axis maxima

                                              ; Endstops
                                              M574 X1 Y1 S1 ; set active high and disabled endstops

                                              ; Z-Probe
                                              M574 Z1 S2 ; set endstops controlled by probe
                                              M307 H3 A-1 C-1 D-1 ; disable heater on PWM channel for BLTouch
                                              M558 P9 H4 F120 T9000 ; set Z probe type to bltouch and the dive height + speeds
                                              G31 P500 X8.1 Y-61.1 Z1.36 ; set Z probe trigger value, offset and trigger height
                                              M557 X30:250 Y30:250 P7
                                              ;M557 X10:320 Y10:360 P7 ; define mesh grid

                                              ; Heaters
                                              M305 P0 T100000 B4138 R4700 ; set thermistor + ADC parameters for heater 0
                                              M143 H0 S140 ; set temperature limit for heater 0 to 140C
                                              M305 P1 T100000 B4138 R4700 ; set thermistor + ADC parameters for heater 1
                                              M143 H1 S280 ; set temperature limit for heater 1 to 280C
                                              M307 H1 A987.5 C204.5 D8.4 S0.85 V24.1 B0 ; set A=gain, C=heat time, D=dead time, S=power %, V=voltage, B0=bang bang

                                              ; Fans
                                              M106 P0 S0 I0 F500 H-1 ; set fan 0 value, PWM signal inversion and frequency. Thermostatic control is turned off
                                              M106 P1 S1 I0 F500 H1 T45 ; set fan 1 value, PWM signal inversion and frequency. Thermostatic control is turned on

                                              ; Tools
                                              M563 P0 S"Right" D0 H1 F0 ; define tool 0
                                              G10 P0 X0 Y0 Z0 ; set tool 0 axis offsets
                                              G10 P0 R0 S0 ; set initial tool 0 active and standby temperatures to 0C

                                              ; Custom settings are not defined

                                              ; Miscellaneous
                                              M911 S10 R11 P"M913 X0 Y0 G91 M83 G1 Z3 E-5 F1000" ; set voltage thresholds and actions to run on power loss

                                              1 Reply Last reply Reply Quote 0
                                              • mrehorstdmd
                                                mrehorstdmd last edited by

                                                Belt tension doesn't have to be checked while it's moving. Simply move the extruder carriage around manually- you'll feel any variations in tension.

                                                How about some photos or your BLV cube?

                                                Are you, by any chance, using steel core belts?

                                                https://drmrehorst.blogspot.com/

                                                spudaddict 1 Reply Last reply Reply Quote 0
                                                • spudaddict
                                                  spudaddict @mrehorstdmd last edited by

                                                  @mrehorstdmd I tried steel belts on a modified Anet A8, they were terrible. Currently have fiberglass backed belts on it and have a coupe nylon corded rubber ones to try out.

                                                  I reprinted my tubes design. The offsets are much smaller. I was able to force the front right tube to offset by pressing and pulling the print head. Still troubleshooting...

                                                  My BLV is a bit hacked up since I have been swapping out motors, moving wires, inspecting belts and cannibalizing my A8 bed parts... but here ya go.
                                                  IMG_0940[1].JPG
                                                  IMG_0942[1].JPG
                                                  IMG_0943[1].JPG
                                                  IMG_0941[1].JPG
                                                  IMG_0935[1].JPG

                                                  mrehorstdmd 1 Reply Last reply Reply Quote 0
                                                  • mrehorstdmd
                                                    mrehorstdmd @spudaddict last edited by

                                                    @spudaddict That first photo at the top of this thread looks like something is shifting by a mm or two. There has to be something loose. Can you detect any play at all in the bearing blocks on the linear guides? Are the pulley axles solidly mounted? Grab the heater block on the hot-end and try to wiggle it.

                                                    Try pushing on the bed and see if you can make it wiggle.

                                                    The frame has an open front in that design for some reason. Does it flex when you push the two top corners toward each other?

                                                    https://drmrehorst.blogspot.com/

                                                    spudaddict Danal 2 Replies Last reply Reply Quote 0
                                                    • JamesM
                                                      JamesM last edited by

                                                      Did my eyes deceive me or do you have a 1.8deg stepper on X and a 0.9deg stepper on Y looking at your config.g and the steps/mm??? I'm guessing by the heatsinks on the stepper drivers that it is a clone duet board since the standard duets don't come with them. If that's the case I would put some active cooling on that board since the clones generally have only 1/2 the amount of copper in the pcb compared to the real duet boards.

                                                      spudaddict 1 Reply Last reply Reply Quote 0
                                                      • First post
                                                        Last post
                                                      Unless otherwise noted, all forum content is licensed under CC-BY-SA