How to setup the Bigtreetech smart filament sensor?
-
I recently got the smart filament sensor from Bigtreetech and have some trouble getting it to work with my Duet 2 maestro.
Since the 2 previous posts I found did not get it to work either and left me confused about the sensor type and pinout I decided to take mine apart to have a look inside.
After poking around with a multimeter I came to the following pinout:
| Out
-- GND
• VinI calculated the distance between the holes to figure out the pulse/mm and (if I did my math correctly) got 7.26mm which is close enough to the advertised 7mm detection length.
I added the sensor to the config.g using the following line and left R & E a bit high hoping to calibrate it later:
M591 D0 P7 C3 R0:200 L7.26 E25.0 S1;Using the camera on my phone I could see the IR led so I assumed everything was wired correctly and started a print to have it collect data and calibrate but I got the following result during the print.
M591 D0
Pulse-type filament monitor on endstop input 3, enabled, sensitivity 7.26mm/pulse, allowed movement 0% to 200%, check every 25.0mm, no calibration data
At this point im stuck trying to figure out why this is happening.
I measured the voltage coming out of the sensor and it seems to be fluctuating between 2.44V & 2.58V. So it's not producing a pulse as I (and maybe the Duet) was expecting to see.
What would be the correct sensor type for this to work? I tried the Duet3D rotating magnet sensor with no success.
Alternatively would converting this sine wave to a square wave give the Duet the input it's expecting? -
The only thing I'm unsure about is the foto sensor as I never seen PNP foto-transistor, nor I seen them in this dual packages before. Normally they are NPN and single package but the way it is connected I have to assume this is PNP.
Now, Vcc - GND, I tested 5V and 3.3V and both work perfect.
The out_X is already push-pull so you do not need any pull-up/push-down on the IO pin on duet. And no need for resistor dividers, only power the sensor from 3.3V and you should be golden.Have not yet connected to my duet but scope shows impulses going ok.
I have to say I don't get the construction?!?!
- the spring (at least in the one that @omni brought here today for me to test) is so damn strong the sensor deforms the filament and makes it very hard to pull. Not a big deal if you are running BMG but cmon, there's no need for this, the original spring must go away and to be replaced with a softer one
- there is a fixed idler bearing with V grove ?!?!
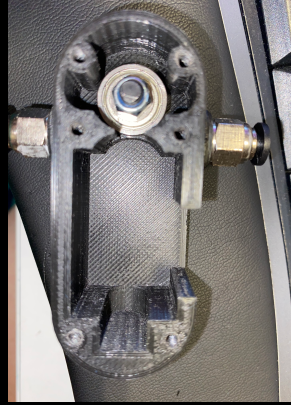
normally you make this idler moveable so it presses on the drive gear, but they decided to make this bearing static and to move the whole block with electronics, connector... to press the filament ?!!? WEEEEEEIRD
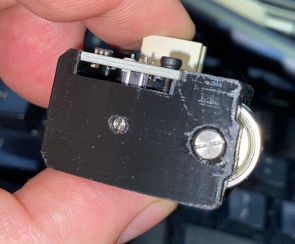
- then, instead of encoder wheel (with rubber outside ring, soft and sticky to grab the filament easily) having contact with the filament, they add another bearing between encoder wheel and the filament, another V groved metal bearing that have zero grip on the filament (probbly why the spring is so strong so filament don't slip on the smoth side of the bearing)
So, to "fix"
- replace the spring with something softer
- need to add grip on the bearing in the slide-block, I assume a small wide rubber band will do the trick (those used for money wide ones are great)
To connect:
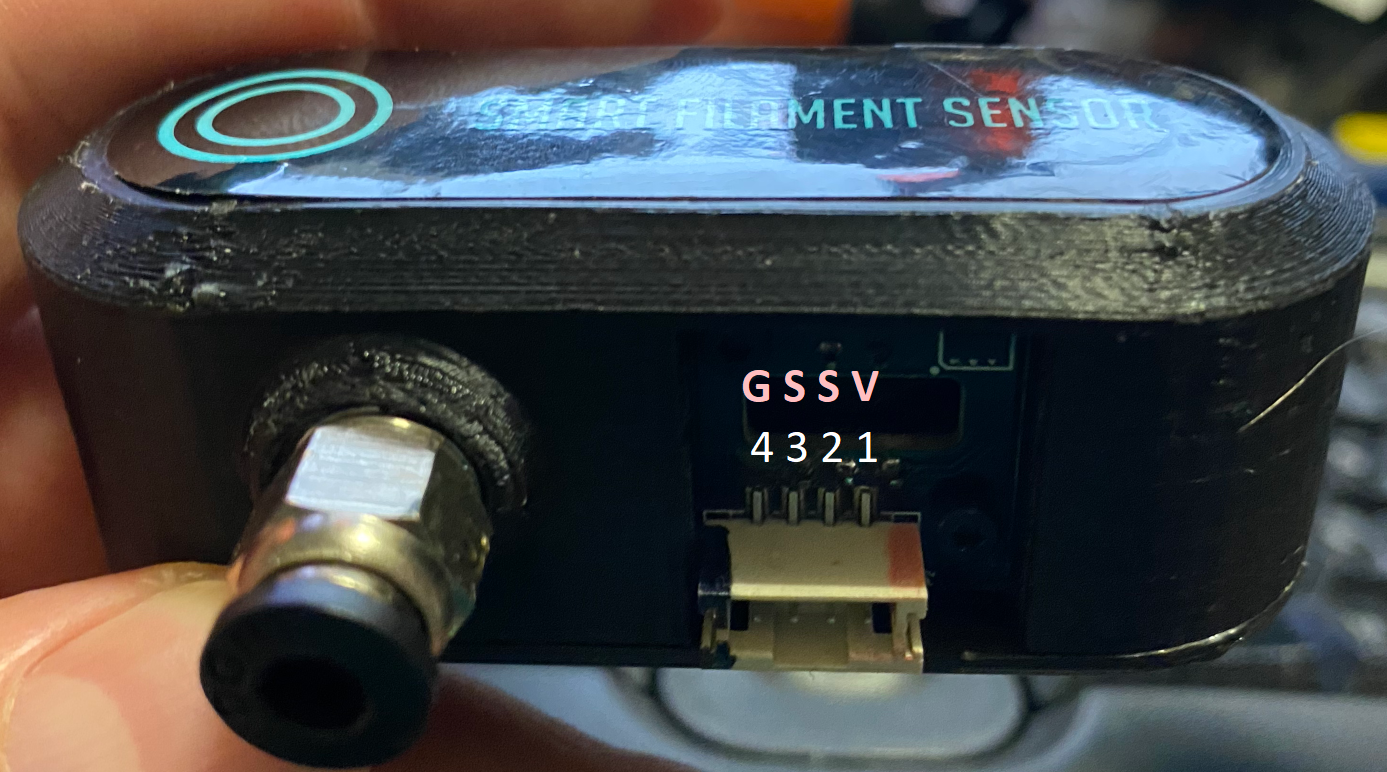
Pin closes to the bowden coupling is Ground, than there are 2 output pins and the pin farthest from the bowden connector is Vcc. Connect Vcc to 3v3, Ground to Ground, one of the output pins to the E_stop and that's it
-
@Infinitysnek said in How to setup the Bigtreetech smart filament sensor?:
seems to be fluctuating between 2.44V & 2.58V
This is measured between Out and GND when you’ve applied 5V to the sensor? Is that with the sensor plugged in or unplugged? I’m no expert but I wonder if there should be a pull down resistor between Out and GND on the main board side, so that you see 0V in between pulses and 5V during pulses.
-
@whopping-pochard Yes this is between Out and GND with the sensor plugged in and printing so I assume these are the high and low values. The board gives 3.3V to the sensor.
I could maybe add a pull down resistor at the connector and test again. -
It's more likely you need a pull-up 10k resistor between 3v3 and output.
You can test this without DUET, just power the sensor with 3V3, add a 10K between out and 3v3 and measure voltage on the out and turn the wheel manually ...
-
@arhi I just tried this and now I'm getting a reading between 0.752V and 0.882V and 0.702V - 0.840V with the resistor between Out and GND. This is not what was supposed to happen right?
-
@Infinitysnek nope. I ordered one months ago but it never arrived so I can't test myself but if you have any type of scope that would be helpful. Put 10k between output and 3V not ground. Or 4k7 or even 2k2.
Can you take a high def images of the electronics?
Normally, the OUT pin should be open drain pulling the output low so you should use a pullup to keep it high and it will pull it to ground when it needs to.
So test should be
- Disconnect it completely from DUET
- Add resistor between 2k and 10k between output and Vcc
- Connect 3V3 or 5V to Vcc
- Connect ground to Gnd (Vss)
- Measure voltage on the OUT pin and rotate wheel slowly doing so
-
@arhi Sadly I do not have a scope. I will try again with other resistors tomorrow.
Here are some pictures of the pcb, the ic at U1 says C145. I'm not yet sure what it does but it could maybe be a Single Schmitt-Trigger Inverter based on what I found online.
The traces are a bit dificult to follow so I could make a schematic of it if that's helpful.

-
Most probably it is dual smidth 74xx2g14. If you could reverse engineer schematic that would be great.
But looking at images, output from the LDR goes to input2 ... see if you can see where the pins 4 and 6 from the U1 go. Pins 2 and 5 are Vss and Vcc, 4 and 6 are outputs, it is possible one is going directly to the signal pin on the connector.
Also check if Vcc and Vss from the connector go directly to pins 5 and 2.
This should be powered from 3v3 and should have 3v3 pulses on the signal output..
For test, no resistor needed as this does not have open drain output.
- supply 3.3V to Vcc, ground to Vss
- measure voltage between pins 2 and 5 (middle pins) on U1
- measure voltage across LED
- use camera phone, see if you can see if LED is emitting light (you should be able to see IR light with most phone cameras, check also some remote controller if you can see the light with camera when you press a button)
- Measure voltage on U1 pins 1 and 3 (input)
- measure voltage on U1 pins 4 and 6 (output) - check if they are inverted 1-3
- measure resistance U1 pins 4 and 6 to the signal pin on the connector
-
@Infinitysnek said in How to setup the Bigtreetech smart filament sensor?:
with the resistor between Out and GND
I think arhi suggested a resistor between Out and Vin.
-
@arhi This is what I could find and its only confusing me more and more. If 4 &6 are supposed to be outputs one goes to what I thought was Vcc and the other to a pin that is not even connected to anything.
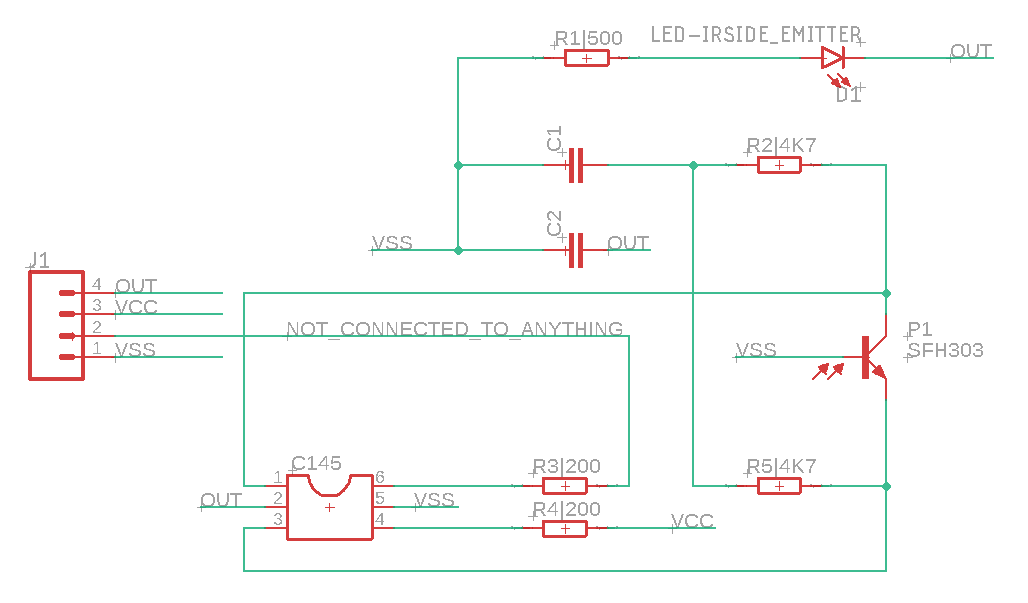
Based on the schematic I switched Vcc and Out around to test but then the IR led is turning on.
measure voltage between pins 2 and 5 (middle pins) on U1
2.55V
measure voltage across LED
1.113V
Measure voltage on U1 pins 1 and 3 (input)
measure voltage on U1 pins 4 and 6 (output) - check if they are inverted 1-3I am not really getting a consistent reading on both of them sometimes its around 1.1V, around 0.8V or nothing and 4&6 are usually inverted but not always
measure resistance U1 pins 4 and 6 to the signal pin on the connector
Pin6 - Signal = 1.3M ohm
Pin4 - Signal = 24.4 ohm -
@zapta said in How to setup the Bigtreetech smart filament sensor?:
@Infinitysnek said in How to setup the Bigtreetech smart filament sensor?:
with the resistor between Out and GND
I think arhi suggested a resistor between Out and Vin.
I tried it both ways, the first one was between Out and Vin the second between Out and GND
-
@Infinitysnek said in How to setup the Bigtreetech smart filament sensor?:
@arhi This is what I could find and its only confusing me more and more.
Looking at this schematic, I'd say the names on the J1 are all wrong

Fors start, the main thing to do is to get the IR led to power on.
In order to power the IR LED on you need Ground (Vss) to be on J1-4 and 5V (Vcc) on J1-1. Bringing 5V between pins 1 and 4 should get the LET to turn on as that will directly power the LED trough R1.
If that works, this will automatically properly power the C145 as U1-2 is Vss and U1-5 is Vcc and that correspond with 5V on J1-1 to J1-4.
In this case output of the U1 are pins J1-2 and J1-3 and are alternating from what I see so you should be able to use either as the signal to the duet's sensor input.
All this hoping that all the parts on the board are working ok, as by connecting them with wrong pinout you might kill the U1
Note that to test the outputs properly the whole thing needs to be closed or in the dark so that P1 only see the light from the IR diode and not ambient light.
-
@arhi I changed the pins around, this made the led turn on and got 3.3V over pin 2 - 5 so that's all good now. Measured the voltage over 1 & 3 while turning the wheel and that does seem to give a 1V pulse consistently but nothing happens overt 4 & 6. The IC is not getting hot so either something is going wrong or the IC is already dead i guess?
I updated the schematic to reflect the changes and I do have to say this makes more sense now

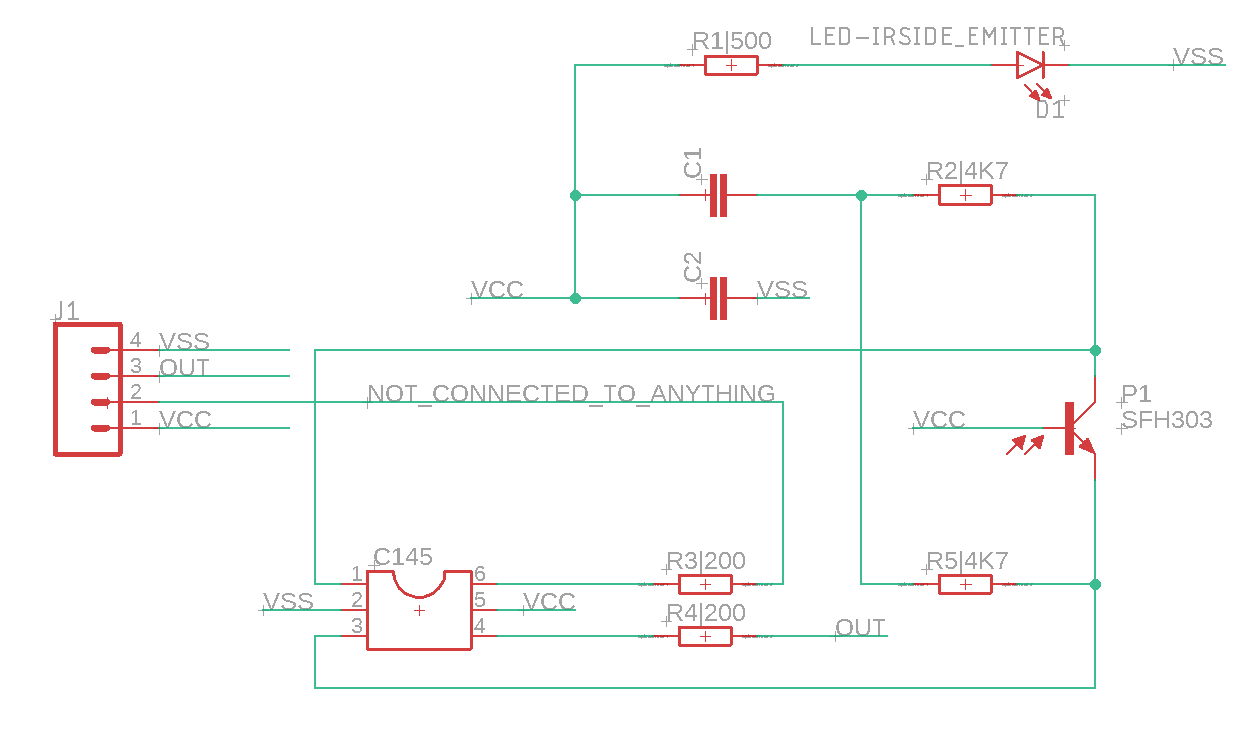
-
@Infinitysnek said in How to setup the Bigtreetech smart filament sensor?:
Measured the voltage over 1 & 3 while turning the wheel and that does seem to give a 1V pulse consistently but nothing happens overt 4 & 6.
The Vt+ when operating from 3V source per datasheet is 1.3-2.2V so 1V is not enough to trigger that schmitt. Check if will trigger better if you power the contraption from 5V.
Not sure if input on the duet is 5V tolerant (@dc42 should know) so if it works when powered from 5V you will probbly need a voltage divider on the output before feeding it to duet. But for now, just test it without any connection to duet.
To test the U1 on it's own you can bring Vcc to pin1 and expect 0V on the pin6 and also Vss to pin1 and expect 5V on pin6, just to be sure the U1 is not dead. Shorting U1-1 to Vcc or Vss should not damage anything.
BTW are you sure about schematic? The C1 seems weird, maybe they did it like this to just have a single pulse even if the hole is there for a while
-
@Infinitysnek said in How to setup the Bigtreetech smart filament sensor?:
have to say this makes more sense now
I have to say the schematic as a whole does not make too much sense to me.
Vcc directly on the base of the foto transistor will keep it always open ?!?! for e.g. maybe Vcc is in the collector? SFH303 is BCE footprint:
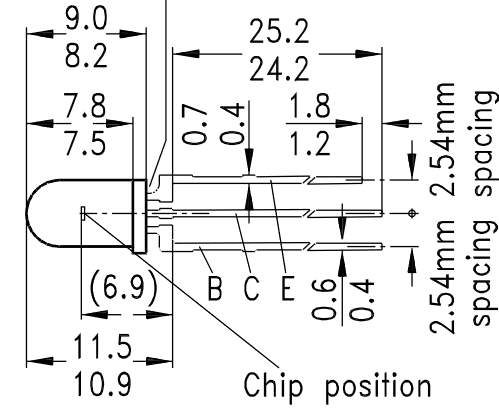
but from the pictures I see it's a square piece, not the round one so.. who knows what PRC made pos is that

Anyhow, assuming the schematic works 2 and 3 pins should have the pulses out if nothing is dead on that board.
-
@arhi Oh yes i could not find writing on the sensor so i just took something from the eagle library that roughly looked the same
-
yes probably the vcc is in the collector.. if that's npn at all ..
did you manage to test the U1 and output on J1-2 and J1-3 ?
-
@arhi said in How to setup the Bigtreetech smart filament sensor?:
To test the U1 on it's own you can bring Vcc to pin1 and expect 0V on the pin6 and also Vss to pin1 and expect 5V on pin6, just to be sure the U1 is not dead. Shorting U1-1 to Vcc or Vss should not damage anything.
I'm not exactly sure what you mean by this. Should i bridge Vcc or vss to U1-1 then measure over U1-6 and Vss?
With 5V I get a 1,7V pulse so that should be high enough however i'm getting a constant 1,3V on the output now
-
@Infinitysnek said in How to setup the Bigtreetech smart filament sensor?:
I'm not exactly sure what you mean by this. Should i bridge Vcc or vss to U1-1 then measure over U1-6 and Vss?
yes.
With 5V I get a 1,7V pulse so that should be high enough however i'm getting a constant 1,3V on the output now
I fear that U1 is dead. The schmitt output can only be 0 or Vcc (with a very little offset), the output of 1.3 on the 4 or 6 pin should only happen if you power it from 1.3V
-
@arhi Well thats too bad. The chips is fairly cheap at €2 for 20 so ill get some and replace the chip when it arrives in a month or so.
It is impossible for me to bridge the 2 pins and probe 2 others at the same time so Im going to assume its dead.Thank you for your help so far I really appreciate it
