differences between manual and automatic leveling
-
Hello everyone, i'm new to this forum because i have read a lots of hours about mesh compensation and auto Z leveling. but i can't get it to work the right way.
First i would like to introduce my machine:
It's a Hypercube evolution (CoreXY) and i have spent a lot of time to build it up very precise.
As printplate i am usung a FR4 plate which works very well on my other printer. Electronics is a duet 2 wifi. Firmware is about 2.xxx (for now not able to update it to firmware 3.xxx)Ok, but now lets go over to my Problem:
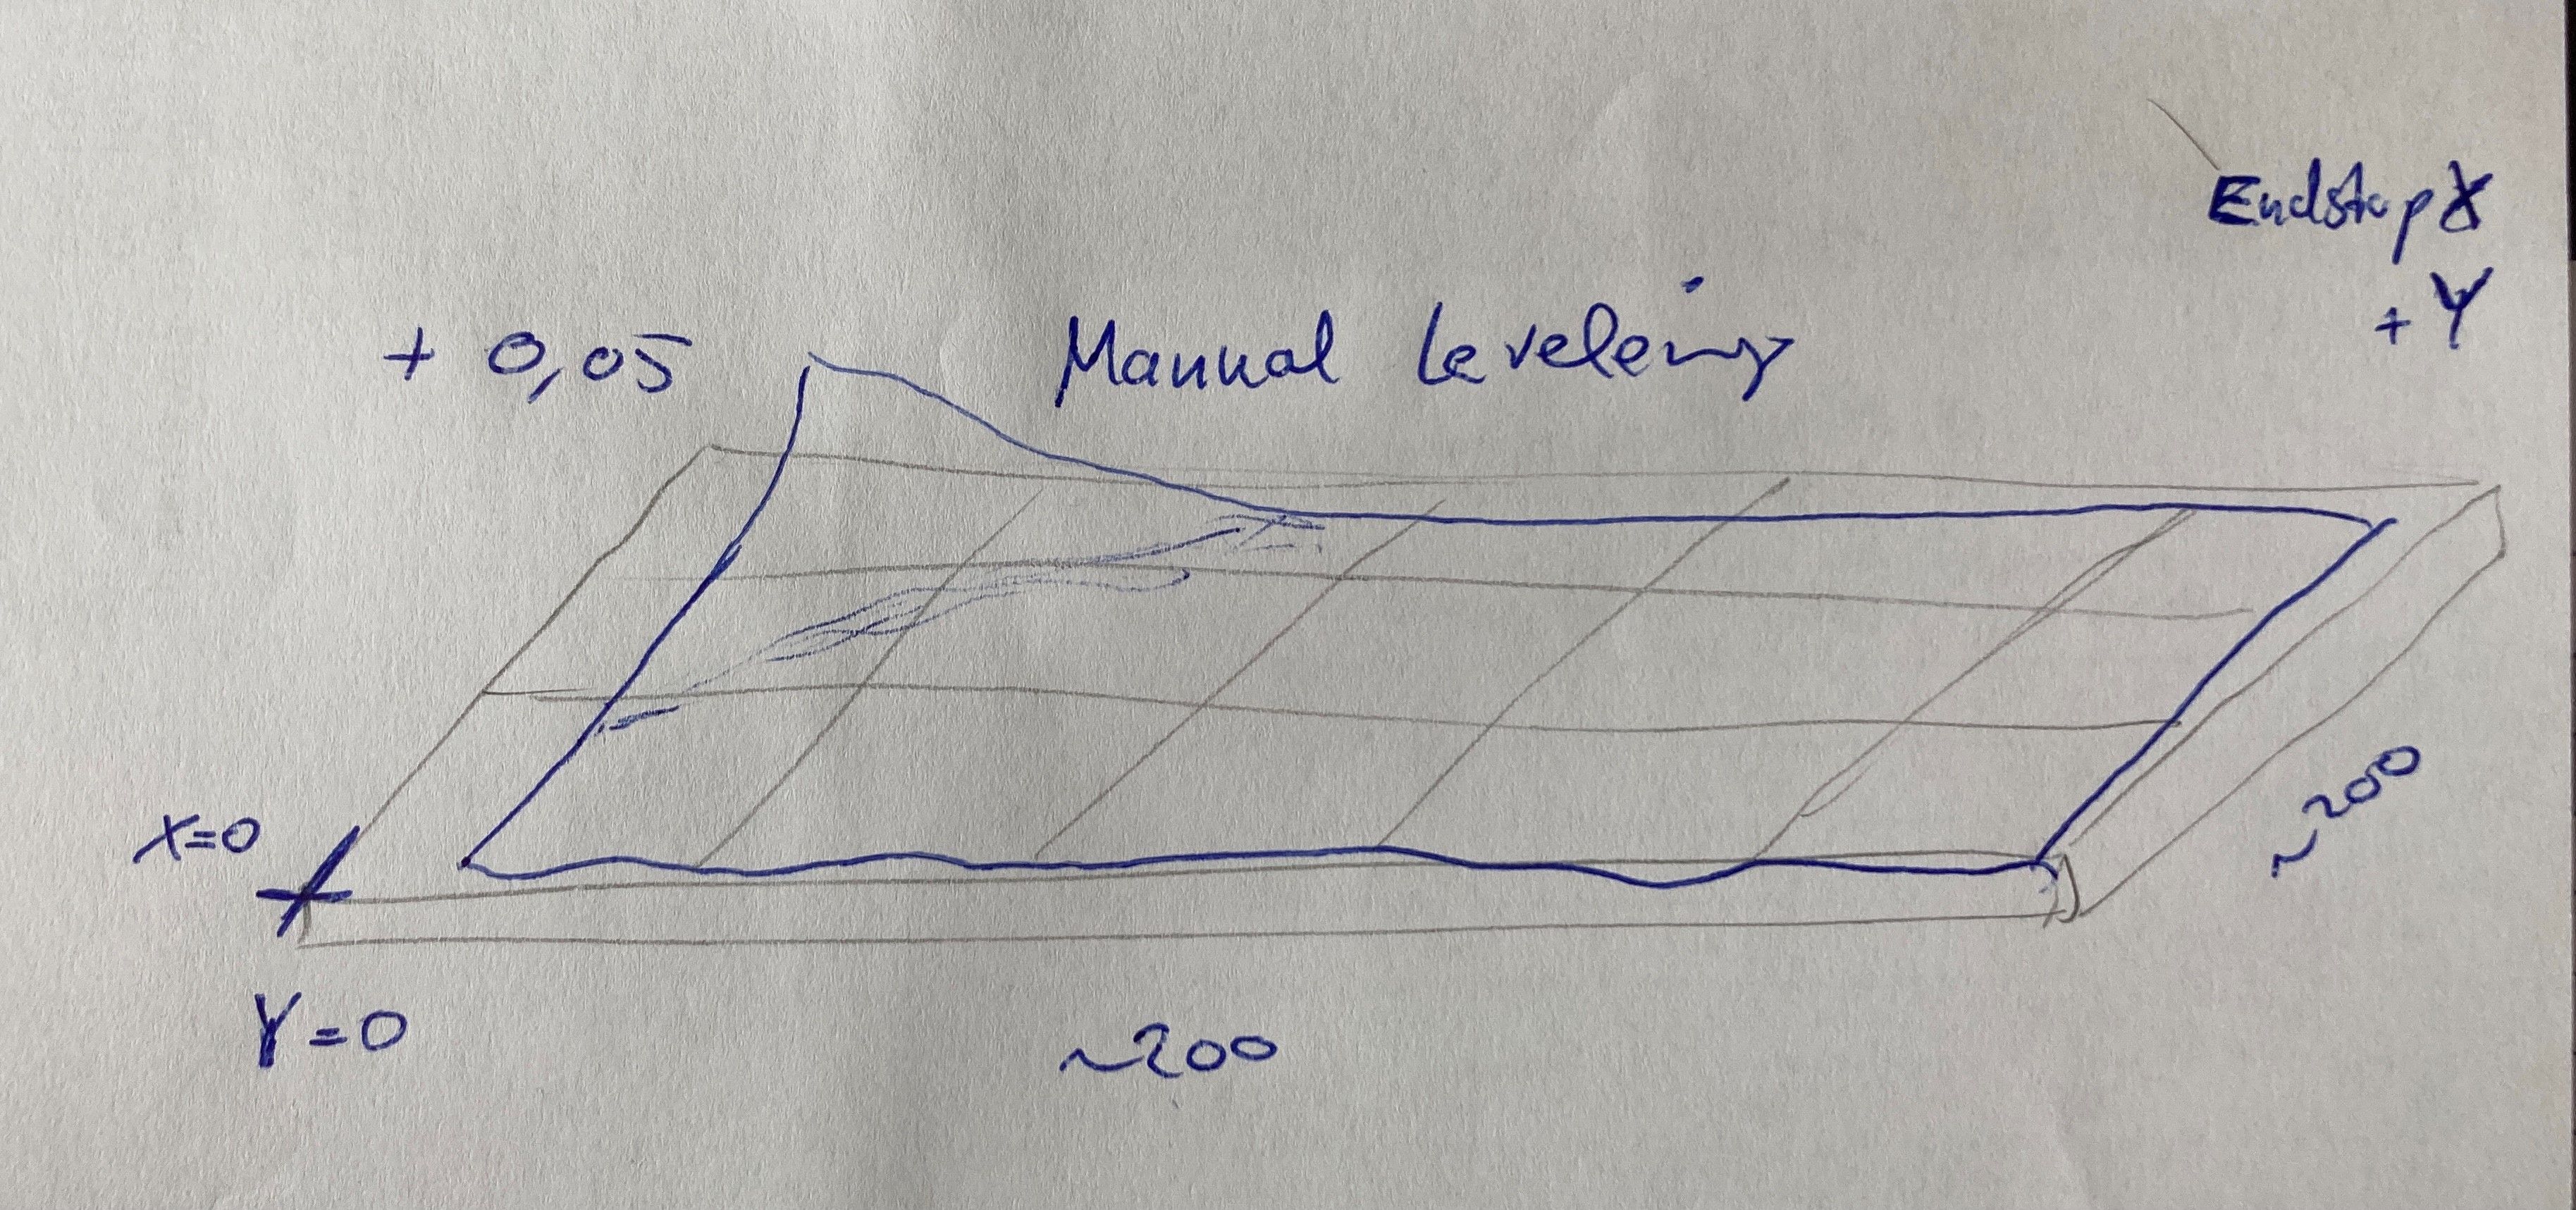
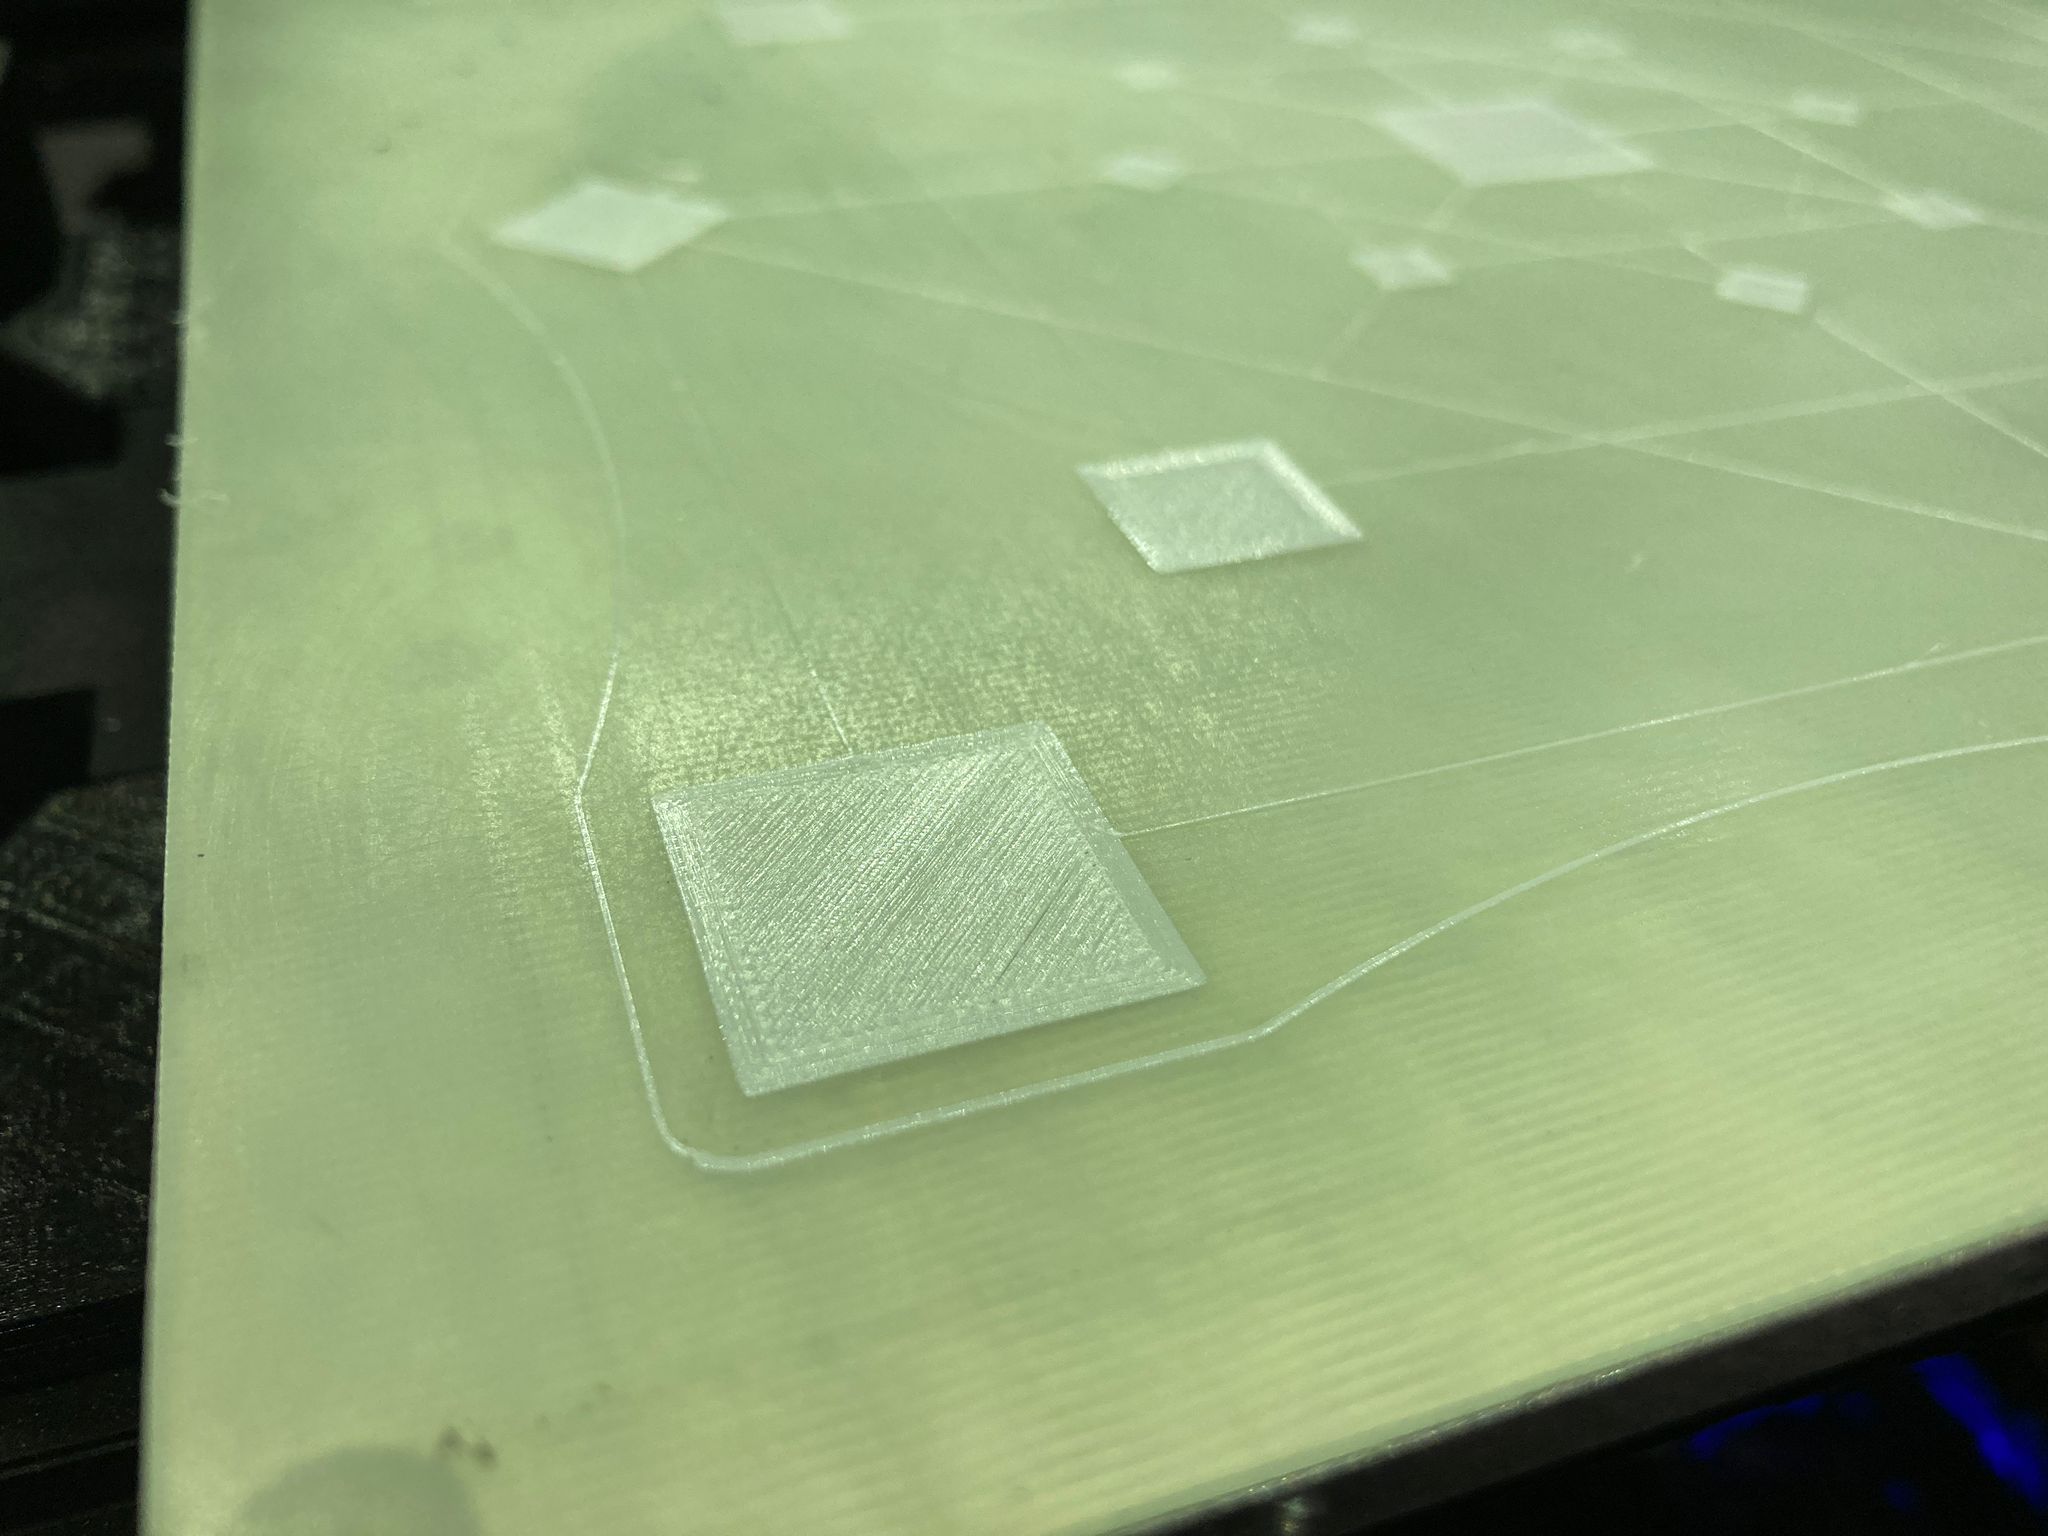
In the past i have leveled the bed with a piece of paper ( Hot nozzle and hot Bed) and i've got the following result:

So then i decided to buy a IR Probe height and use auto probing with mesh compensation. I had read all de topics and manuals multiple but still not got it to work as suspected. The IR Probe is not the original one, but i think it works very well.
What i have done:
I had checked several times with G30 what my IR is doing, it is consent and will only change the trigger height about 2 Microns.Then i had sent the following commands:
G30 ( in the middle of the bed)
G28
G30
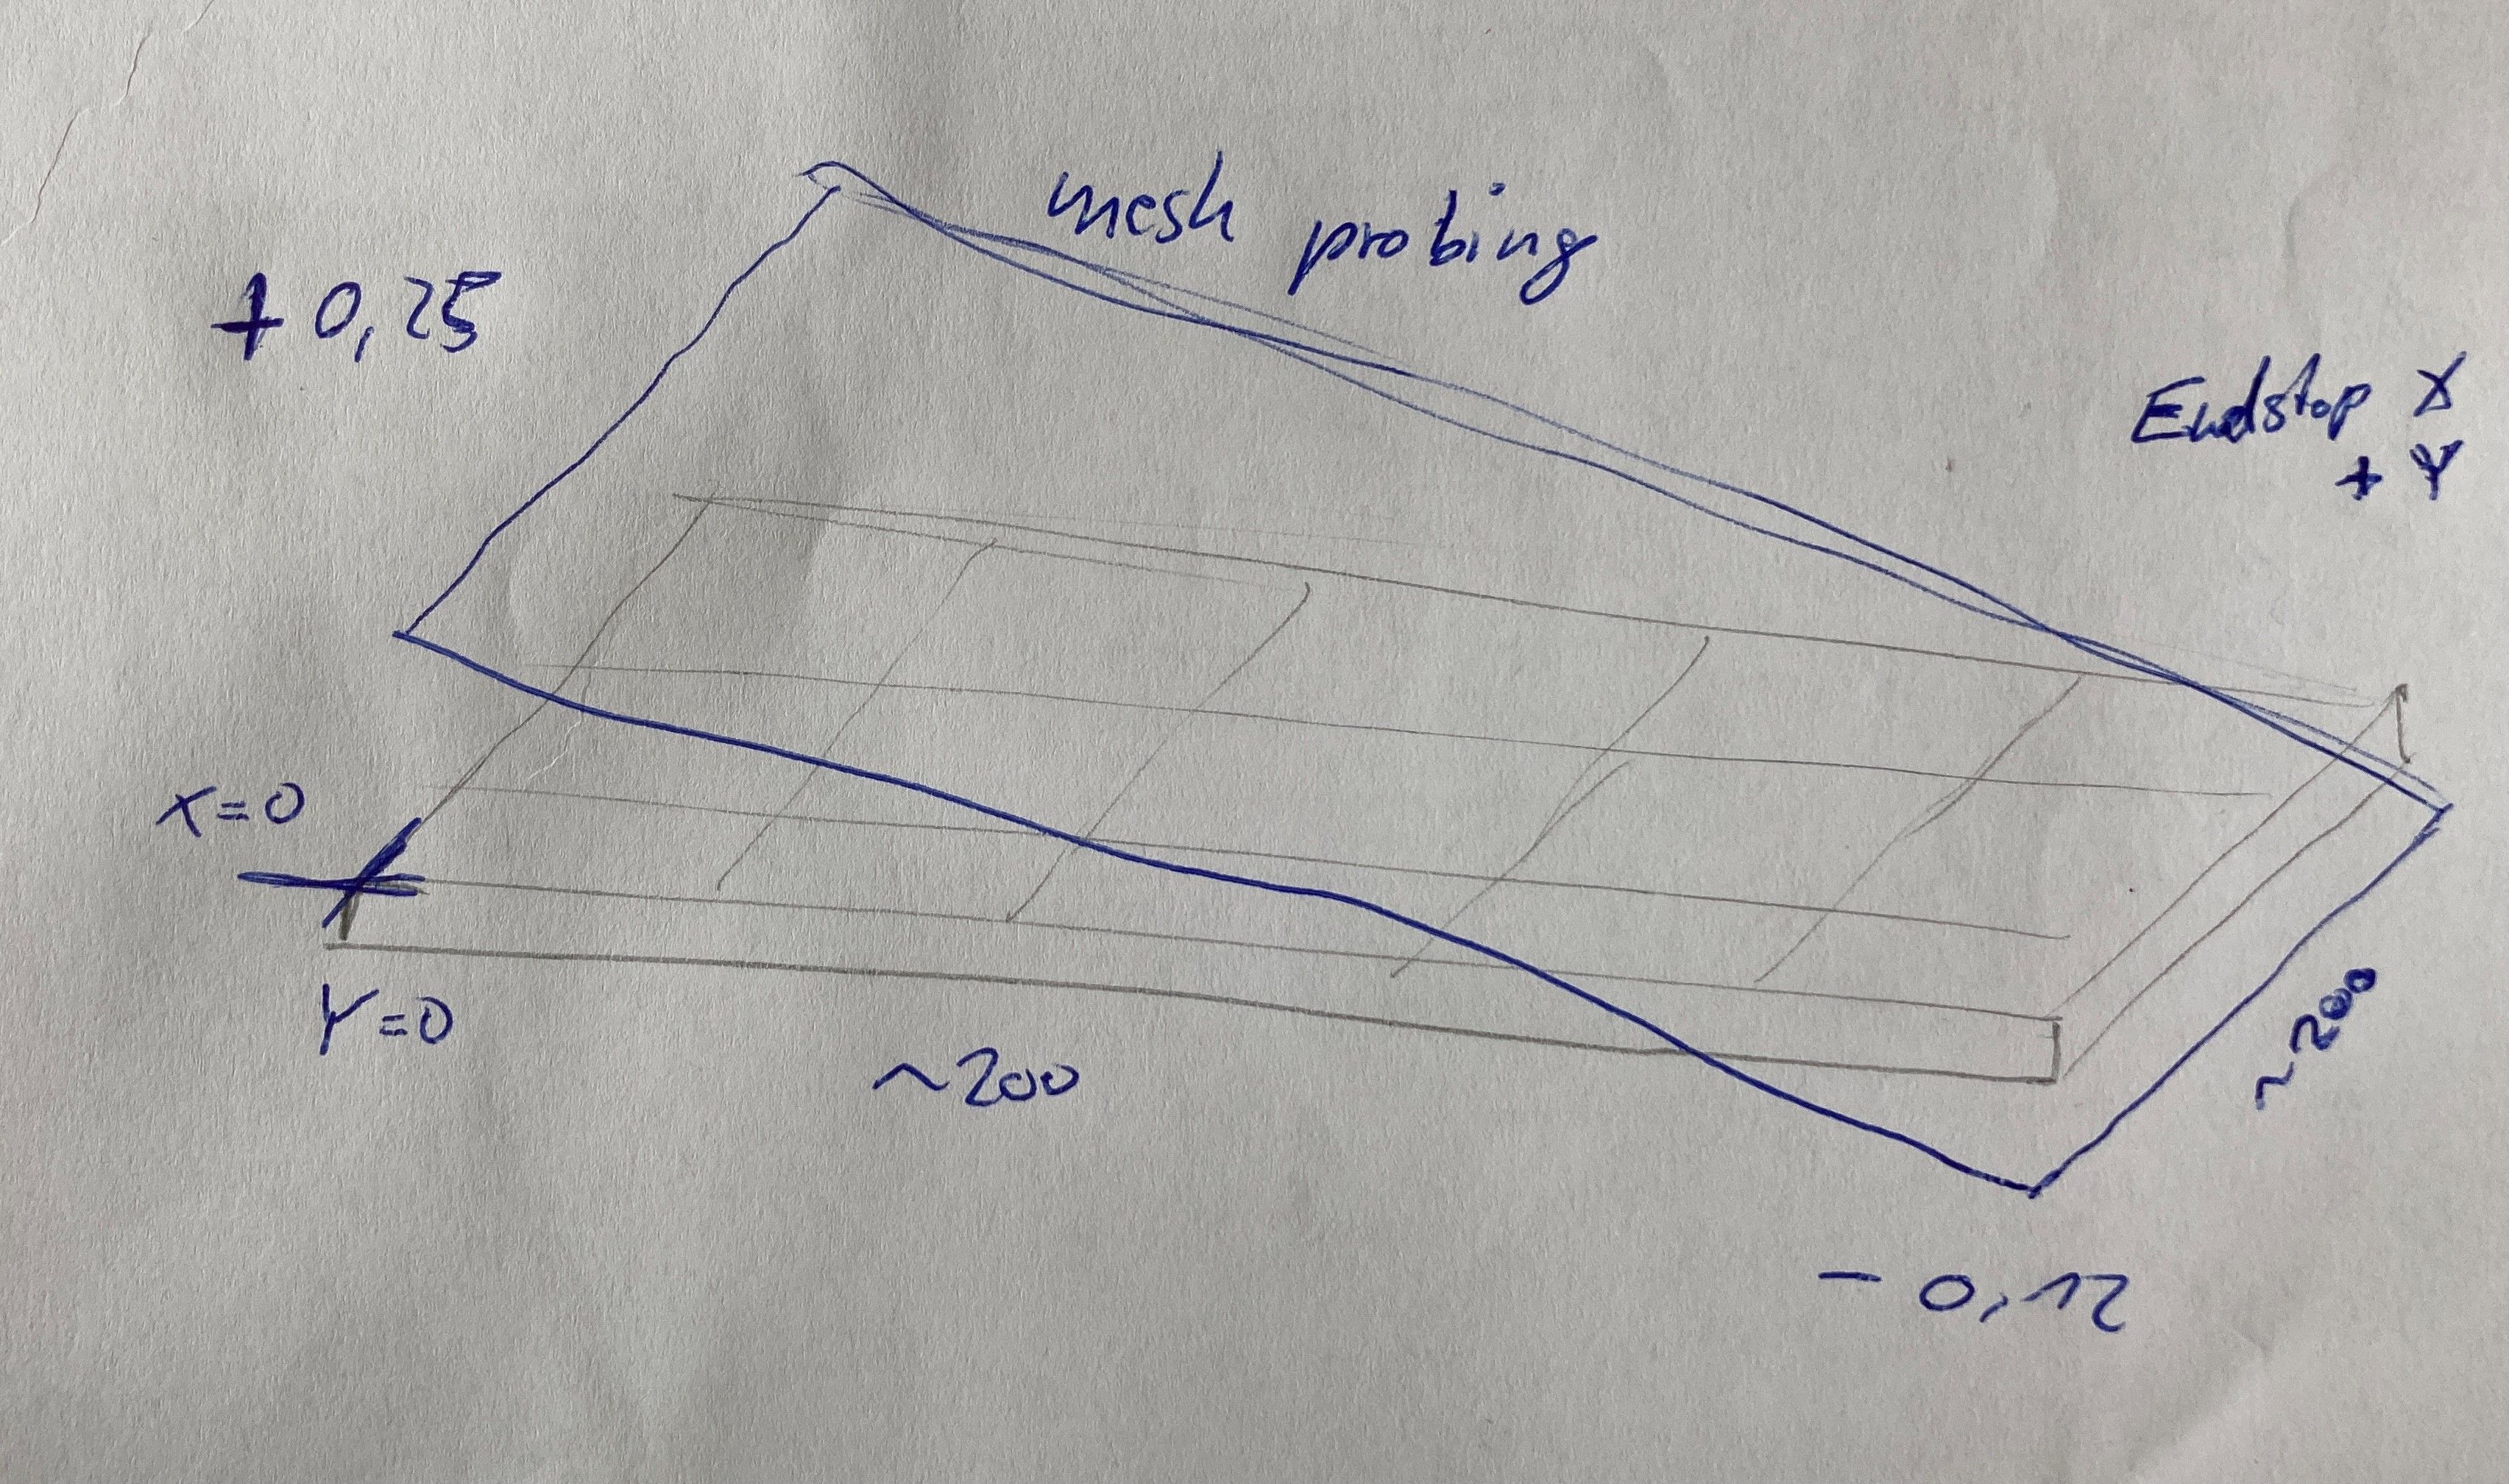
G29After finishing G29 i got the following result:

I don't why know but lets go to next step:
mesh grid is loading, for the print, Z Axis does compensating but not enought, or wrong. And first layer shows what i see if i do printing with manual leveling. (Left corner in back area is to high and material is not coming out)
Please see also my Config / Bed / HomeZ and HomeAll.
would be great someone could assist me....
Config:
; Configuration file for Duet WiFi (firmware version 2.03) ; executed by the firmware on start-up ; ; generated by RepRapFirmware Configuration Tool v3.3.0 on Wed Aug 11 2021 00:52:15 GMT+0200 (Mitteleuropäische Sommerzeit) ; General preferences G90 ; send absolute coordinates... M83 ; ...but relative extruder moves M550 P"Hypercube" ; set printer name M669 K1 ; select CoreXY mode ; Network M552 S1 ; enable network M586 P0 S1 ; enable HTTP M586 P1 S0 ; disable FTP M586 P2 S0 ; disable Telnet ; Drives M569 P0 S1 ; physical drive 0 goes forwards M569 P1 S1 ; physical drive 1 goes forwards M569 P2 S1 ; physical drive 2 goes forwards M569 P3 S1 ; physical drive 3 goes forwards M584 X0 Y1 Z2 E3 ; set drive mapping M350 X16 Y16 Z16 E16 I1 ; configure microstepping with interpolation M92 X80.00 Y80.00 Z400.00 E396.82 ; set steps per mm M566 X900.00 Y900.00 Z900.00 E900.00 ; set maximum instantaneous speed changes (mm/min) JERK M203 X30000.00 Y30000.00 Z2000.00 E5000.00 ; set maximum speeds (mm/min) M201 X4000.00 Y4000.00 Z3000.00 E4000.00 ; set accelerations (mm/s^2) M906 X1000 Y1000 Z1000 E800 I50 ; set motor currents (mA) and motor idle factor in per cent M84 S20 ; Set idle timeout ;M593 F42,5 ;dynamic acceleration ; Axis Limits M208 X0 Y0 Z-1 S1 ; set axis minima M208 X205 Y202 Z150 S0 ; set axis maxima ; Endstops M574 X2 Y2 Z2 S1 ; set active high endstops ;New Z-Probe MM M558 P1 C"zprobe.in" H5 F400 T6000 ; set Z probe type to unmodulated and the dive height + speeds G31 P500 X0 Y-40 Z2.01 ; set Z probe trigger value, offset and trigger height M557 X5:195 Y5:195 S25 ; define mesh grid ; Z-Probe ;M558 P500 H5 F120 T6000 ; disable Z probe but set dive height, probe speed and travel speed ;M557 X15:25 Y15:25 S20 ; define mesh grid ; Z probe ;M558 P1 X0 Y0 Z1 H0 F200 T5000 R0 ; smart IR Z probe, used for homing Z axis only, dive height 3mm, probe speed 200mm/min, travel speed 4000mm/min, no recovery time ;;G31 P500 X0 Y34 Z0.77 ; set threshold and offsets ; Heaters M307 H0 B0 S1.00 ; disable bang-bang mode for the bed heater and set PWM limit M305 P0 T100000 B4400 R4700 ; set thermistor + ADC parameters for heater 0 ;3950 M143 H0 S120 ; set temperature limit for heater 0 to 120C M305 P1 T100000 B4400 R4700 ; set thermistor + ADC parameters for heater 1 M143 H1 S280 ; set temperature limit for heater 1 to 280C ; Fans M106 P0 C"Hotend" S255 I0 F500 H1 T45 ; set fan 0 name, value, PWM signal inversion and frequency. Thermostatic control is turned on M106 P1 C"Bauteilkühlung" S0 I0 F500 H-1 ; set fan 1 value, PWM signal inversion and frequency. Thermostatic control is turned off ; Tools M563 P0 D0 H1 F0 ; define tool 0 G10 P0 R0 S0 ; set initial tool 0 active and standby temperatures to 0C G10 P0 X0 Y0 Z0 ; set tool 0 axis offsets ; Custom settings are not defined M501 bed:
; bed.g ; called to perform automatic bed compensation via G32 ; ; generated by RepRapFirmware Configuration Tool v3.3.0 on Wed Aug 11 2021 00:52:15 GMT+0200 (Mitteleuropäische Sommerzeit) ;M561 ; clear any bed transform ;G29 ; probe the bed and enable compensation ; bed.g ; called to perform automatic bed compensation via G32 ; ; generated by RepRapFirmware Configuration Tool v3.3.2 on Sat Sep 11 2021 02:09:19 GMT+0200 (Mitteleuropäische Sommerzeit) ;M561 ; clear any bed transform :G29 ; probe the bed and enable compensation homez:
; homez.g ; called to home the Z axis ; ; generated by RepRapFirmware Configuration Tool v3.3.0 on Wed Aug 11 2021 00:52:15 GMT+0200 (Mitteleuropäische Sommerzeit) ;G91 ; relative positioning ;G1 H2 Z5 F6000 ; lift Z relative to current position ;G1 H1 Z-155 F150 ; move Z down until the endstop is triggered ;G92 Z0 ; set Z position to axis minimum (you may want to adjust this) ; Uncomment the following lines to lift Z after probing :G91 ; relative positioning :G1 Z5 F100 ; lift Z relative to current position :G90 ; absolute positioning ; homez.g ; called to home the Z axis ; ; generated by RepRapFirmware Configuration Tool v3.3.2 on Sat Sep 11 2021 02:04:22 GMT+0200 (Mitteleuropäische Sommerzeit) G91 ; relative positioning G29 S2 G1 H2 Z5 F6000 ; lift Z relative to current position G90 ; absolute positioning G1 X102 Y100 F6000 ; go to first probe point G30 ; home Z by probing the bed ; Uncomment the following lines to lift Z after probing ;G91 ; relative positioning ;G1 Z5 F100 ; lift Z relative to current position ;G90 ; absolute positioning homeAll:
; homeall.g ; called to home all axes ; ; generated by RepRapFirmware Configuration Tool v3.3.0 on Wed Aug 11 2021 00:52:15 GMT+0200 (Mitteleuropäische Sommerzeit) ;G91 ; relative positioning ;G1 H2 Z5 F400 ; lift Z relative to current position ;G1 H1 X195 Y195 F6500 ; move quickly to X or Y endstop and stop there (first pass) ;G1 H1 X195 ; home X axis ;G1 H1 Y195 ; home Y axis ;G1 X-5 Y-5 F6000 ; go back a few mm ;G1 H1 X195 F360 ; move slowly to X axis endstop once more (second pass) 195 ;G1 H1 Y195 ; then move slowly to Y axis endstop ;G1 H1 Z-155 F200 ; move Z down stopping at the endstop ;G90 ; absolute positioning ;G92 Z0 ; set Z position to axis minimum (you may want to adjust this) ;G91 ; relative positioning ;G1 H2 Z5 F6000 ; lift Z relative to current position ;G1 H1 X210 Y207 F1800 ; move quickly to X or Y endstop and stop there (first pass) ;G1 H1 X210 ; home X axis ;G1 H1 Y207 ; home Y axis ;G1 X-5 Y-5 F6000 ; go back a few mm ;G1 H1 X210 F360 ; move slowly to X axis endstop once more (second pass) ;G1 H1 Y207 ; then move slowly to Y axis endstop ;G1 H1 Z-155 F360 ; move Z down stopping at the endstop ;G90 ; absolute positioning ;G92 Z0 ; set Z position to axis minimum (you may want to adjust this) ; homeall.g ; called to home all axes ; ; generated by RepRapFirmware Configuration Tool v3.3.2 on Sat Sep 11 2021 02:06:07 GMT+0200 (Mitteleuropäische Sommerzeit) G91 ; relative positioning G29 S2 G1 H2 Z5 F6000 ; lift Z relative to current position G1 H1 X210 Y207 F1800 ; move quickly to X or Y endstop and stop there (first pass) G1 H1 X210 ; home X axis G1 H1 Y207 ; home Y axis G1 X-5 Y-5 F6000 ; go back a few mm G1 H1 X210 F360 ; move slowly to X axis endstop once more (second pass) G1 H1 Y207 ; then move slowly to Y axis endstop G90 ; absolute positioning G1 X95 Y125 F6000 ; go to first bed probe point and home Z G30 ; home Z by probing the bed ; Uncomment the following lines to lift Z after probing ;G91 ; relative positioning ;G1 Z5 F100 ; lift Z relative to current position ;G90 ; absolute positioning Thank you in advance
")
Gip_86 -
@gip_86 said in differences between manual and automatic leveling:
G31 P500 X0 Y-40 Z2.01
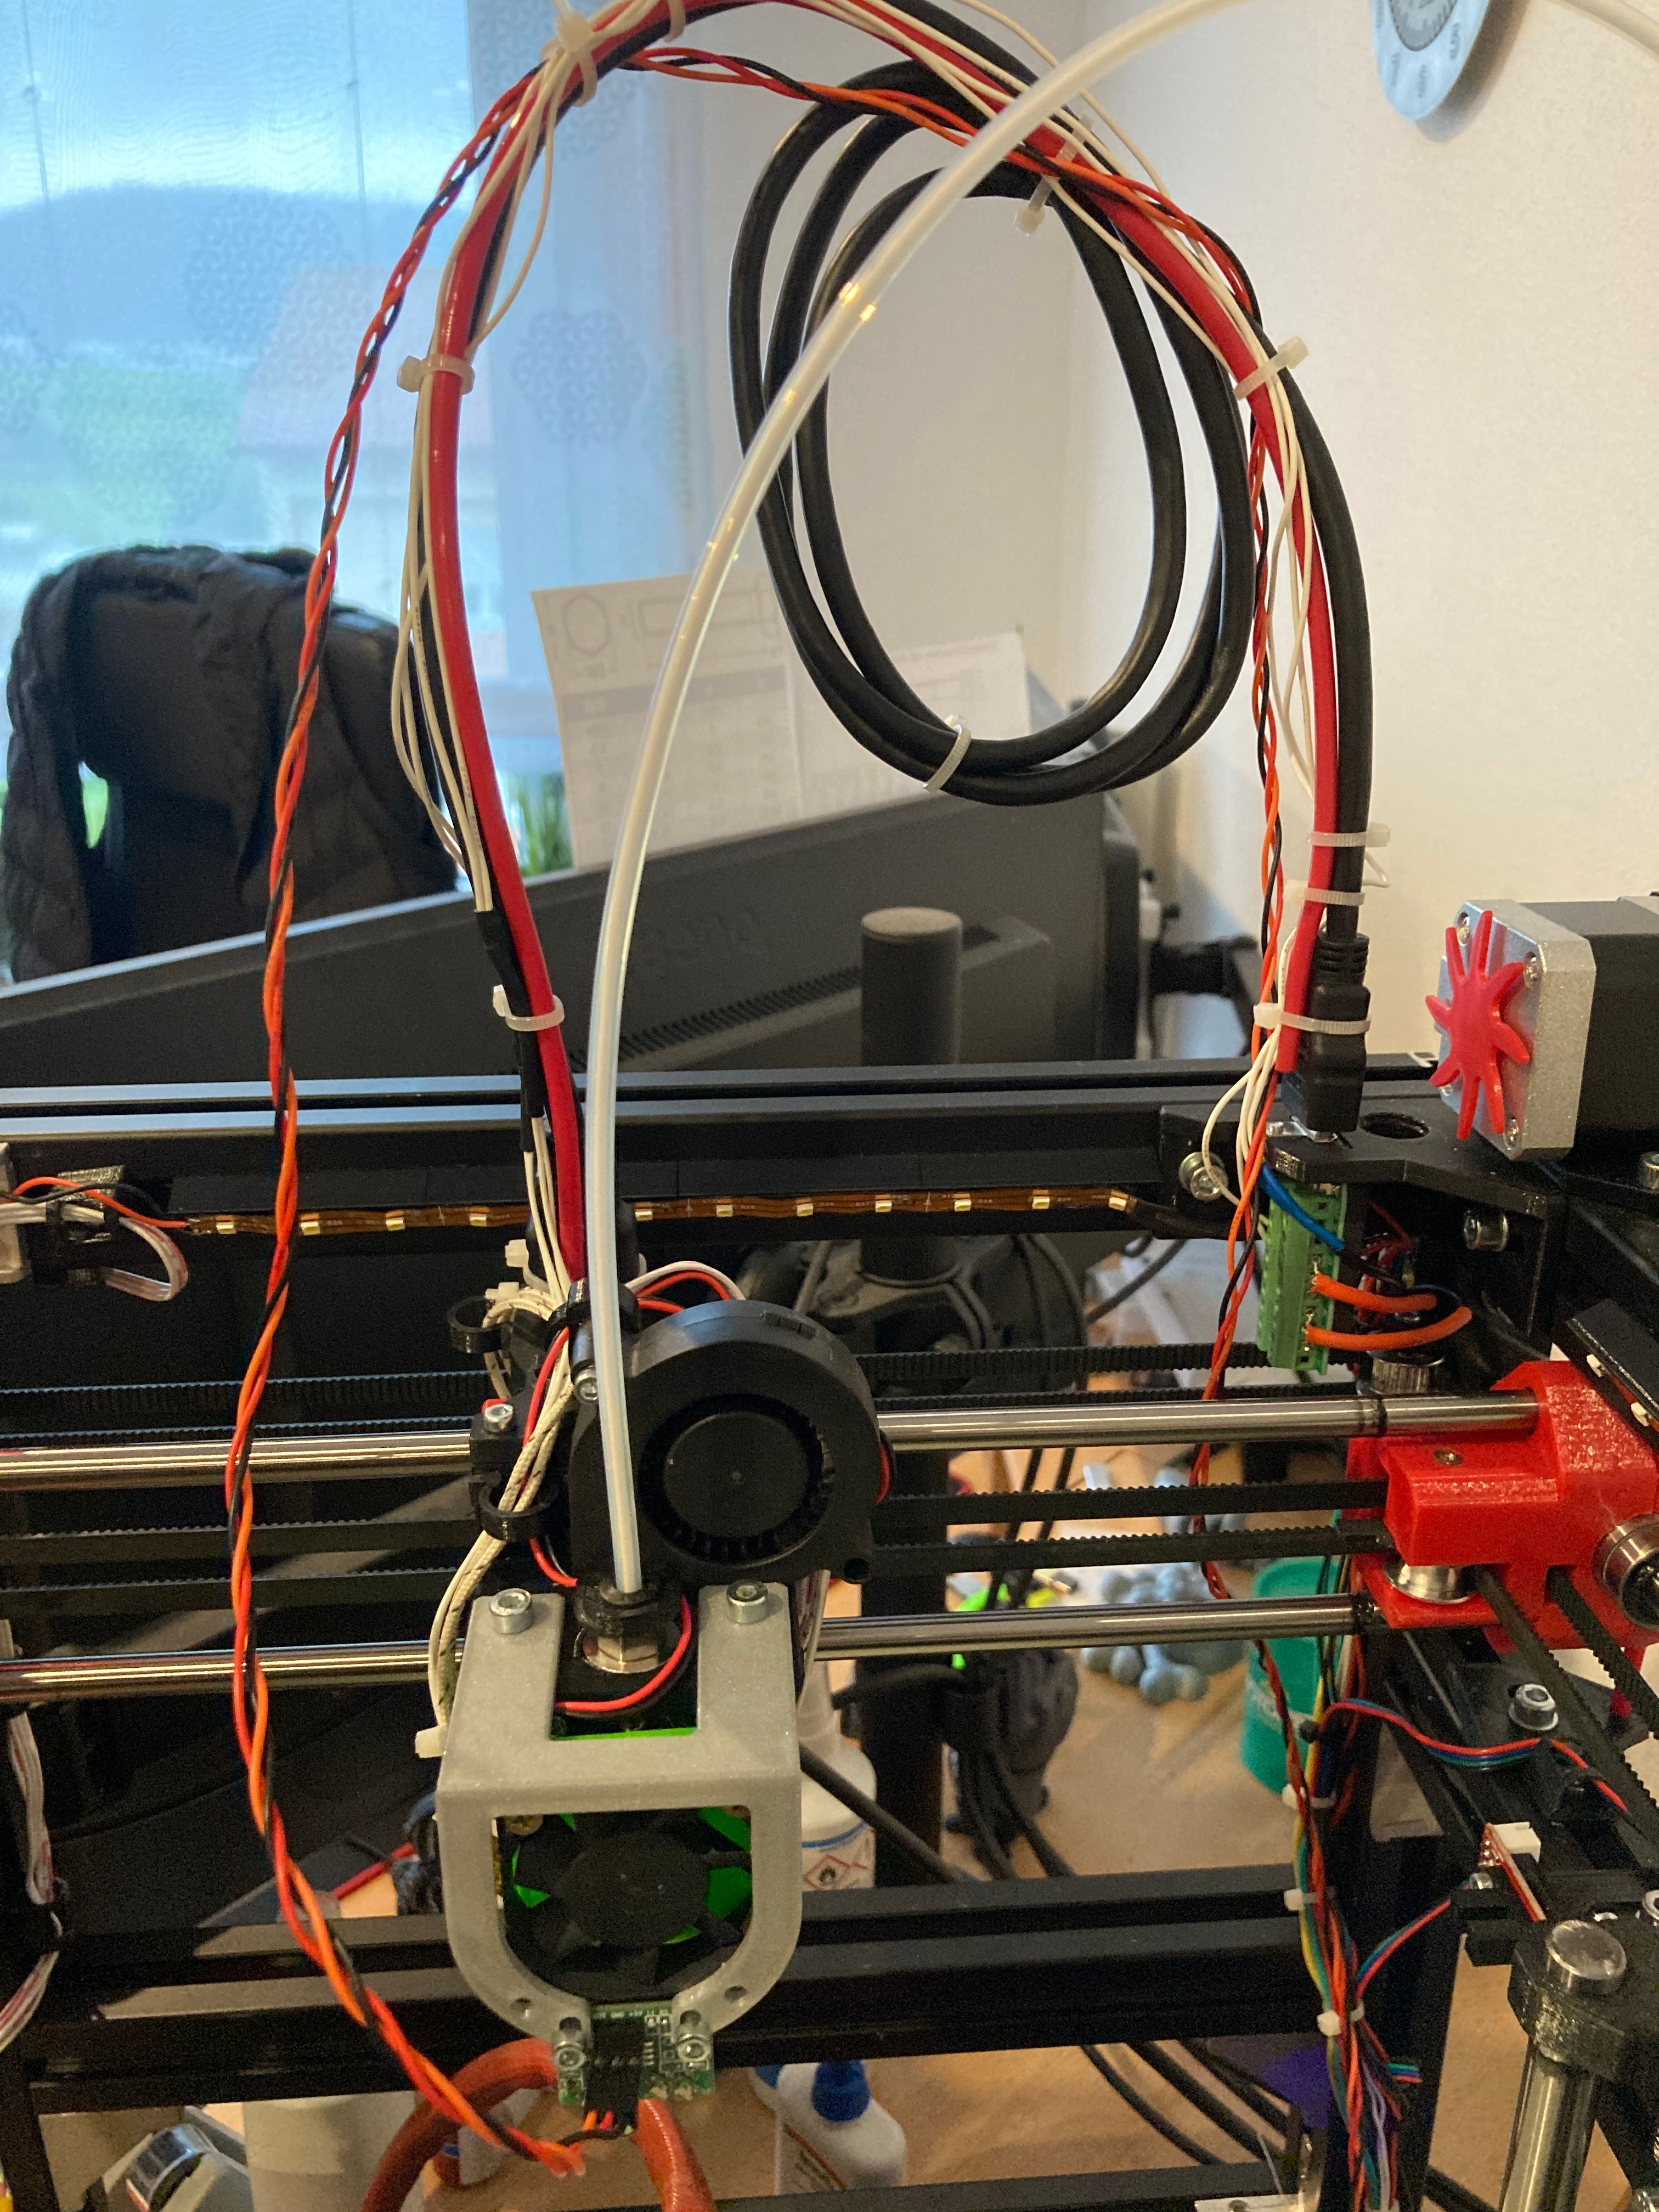
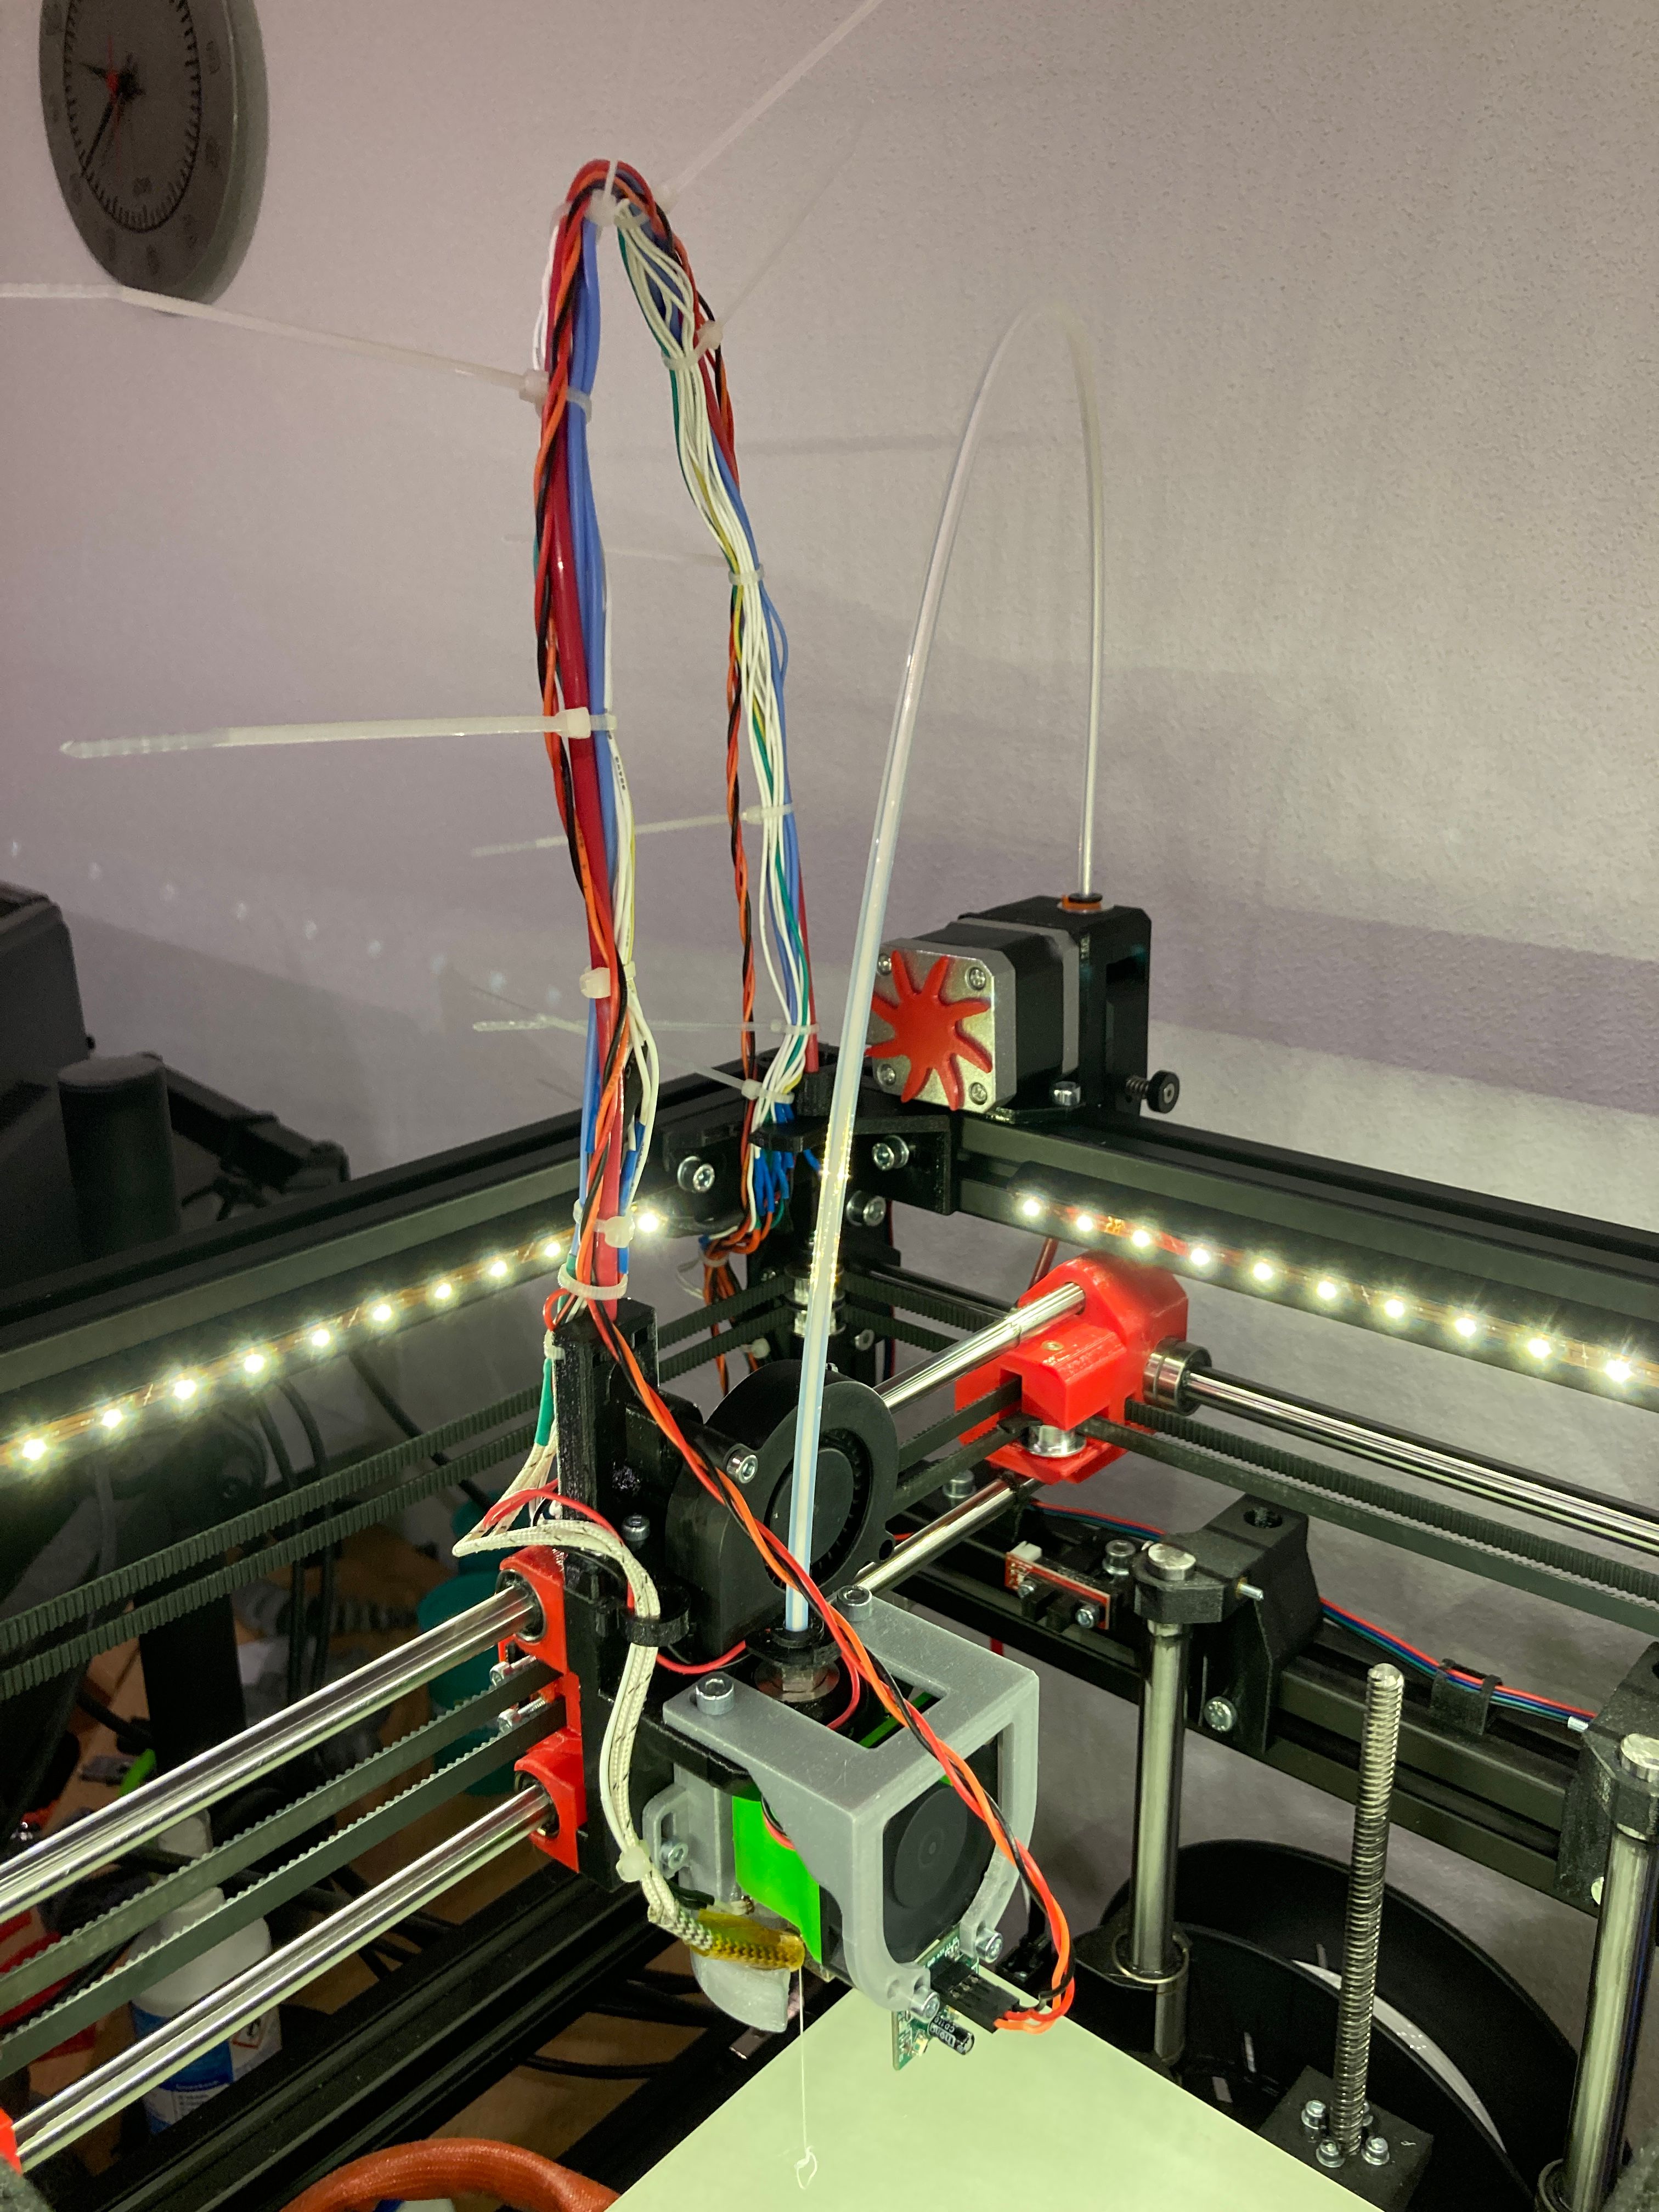
Can you show a picture of how the probe is mounted? With that much Y offset, I guess it's hanging off the front of your X carriage. It may be that you have a twist in your X axis, or something is pulling on the X carriage (eg Bowden tube), so the carriage twists slightly as it goes from X0 to X200, causing the probe to lift and be further away at X0, then drop as it goes to X200. The nozzle is closer to the centre of rotation, or below it, so is less affected by the rotation.
Ian
-
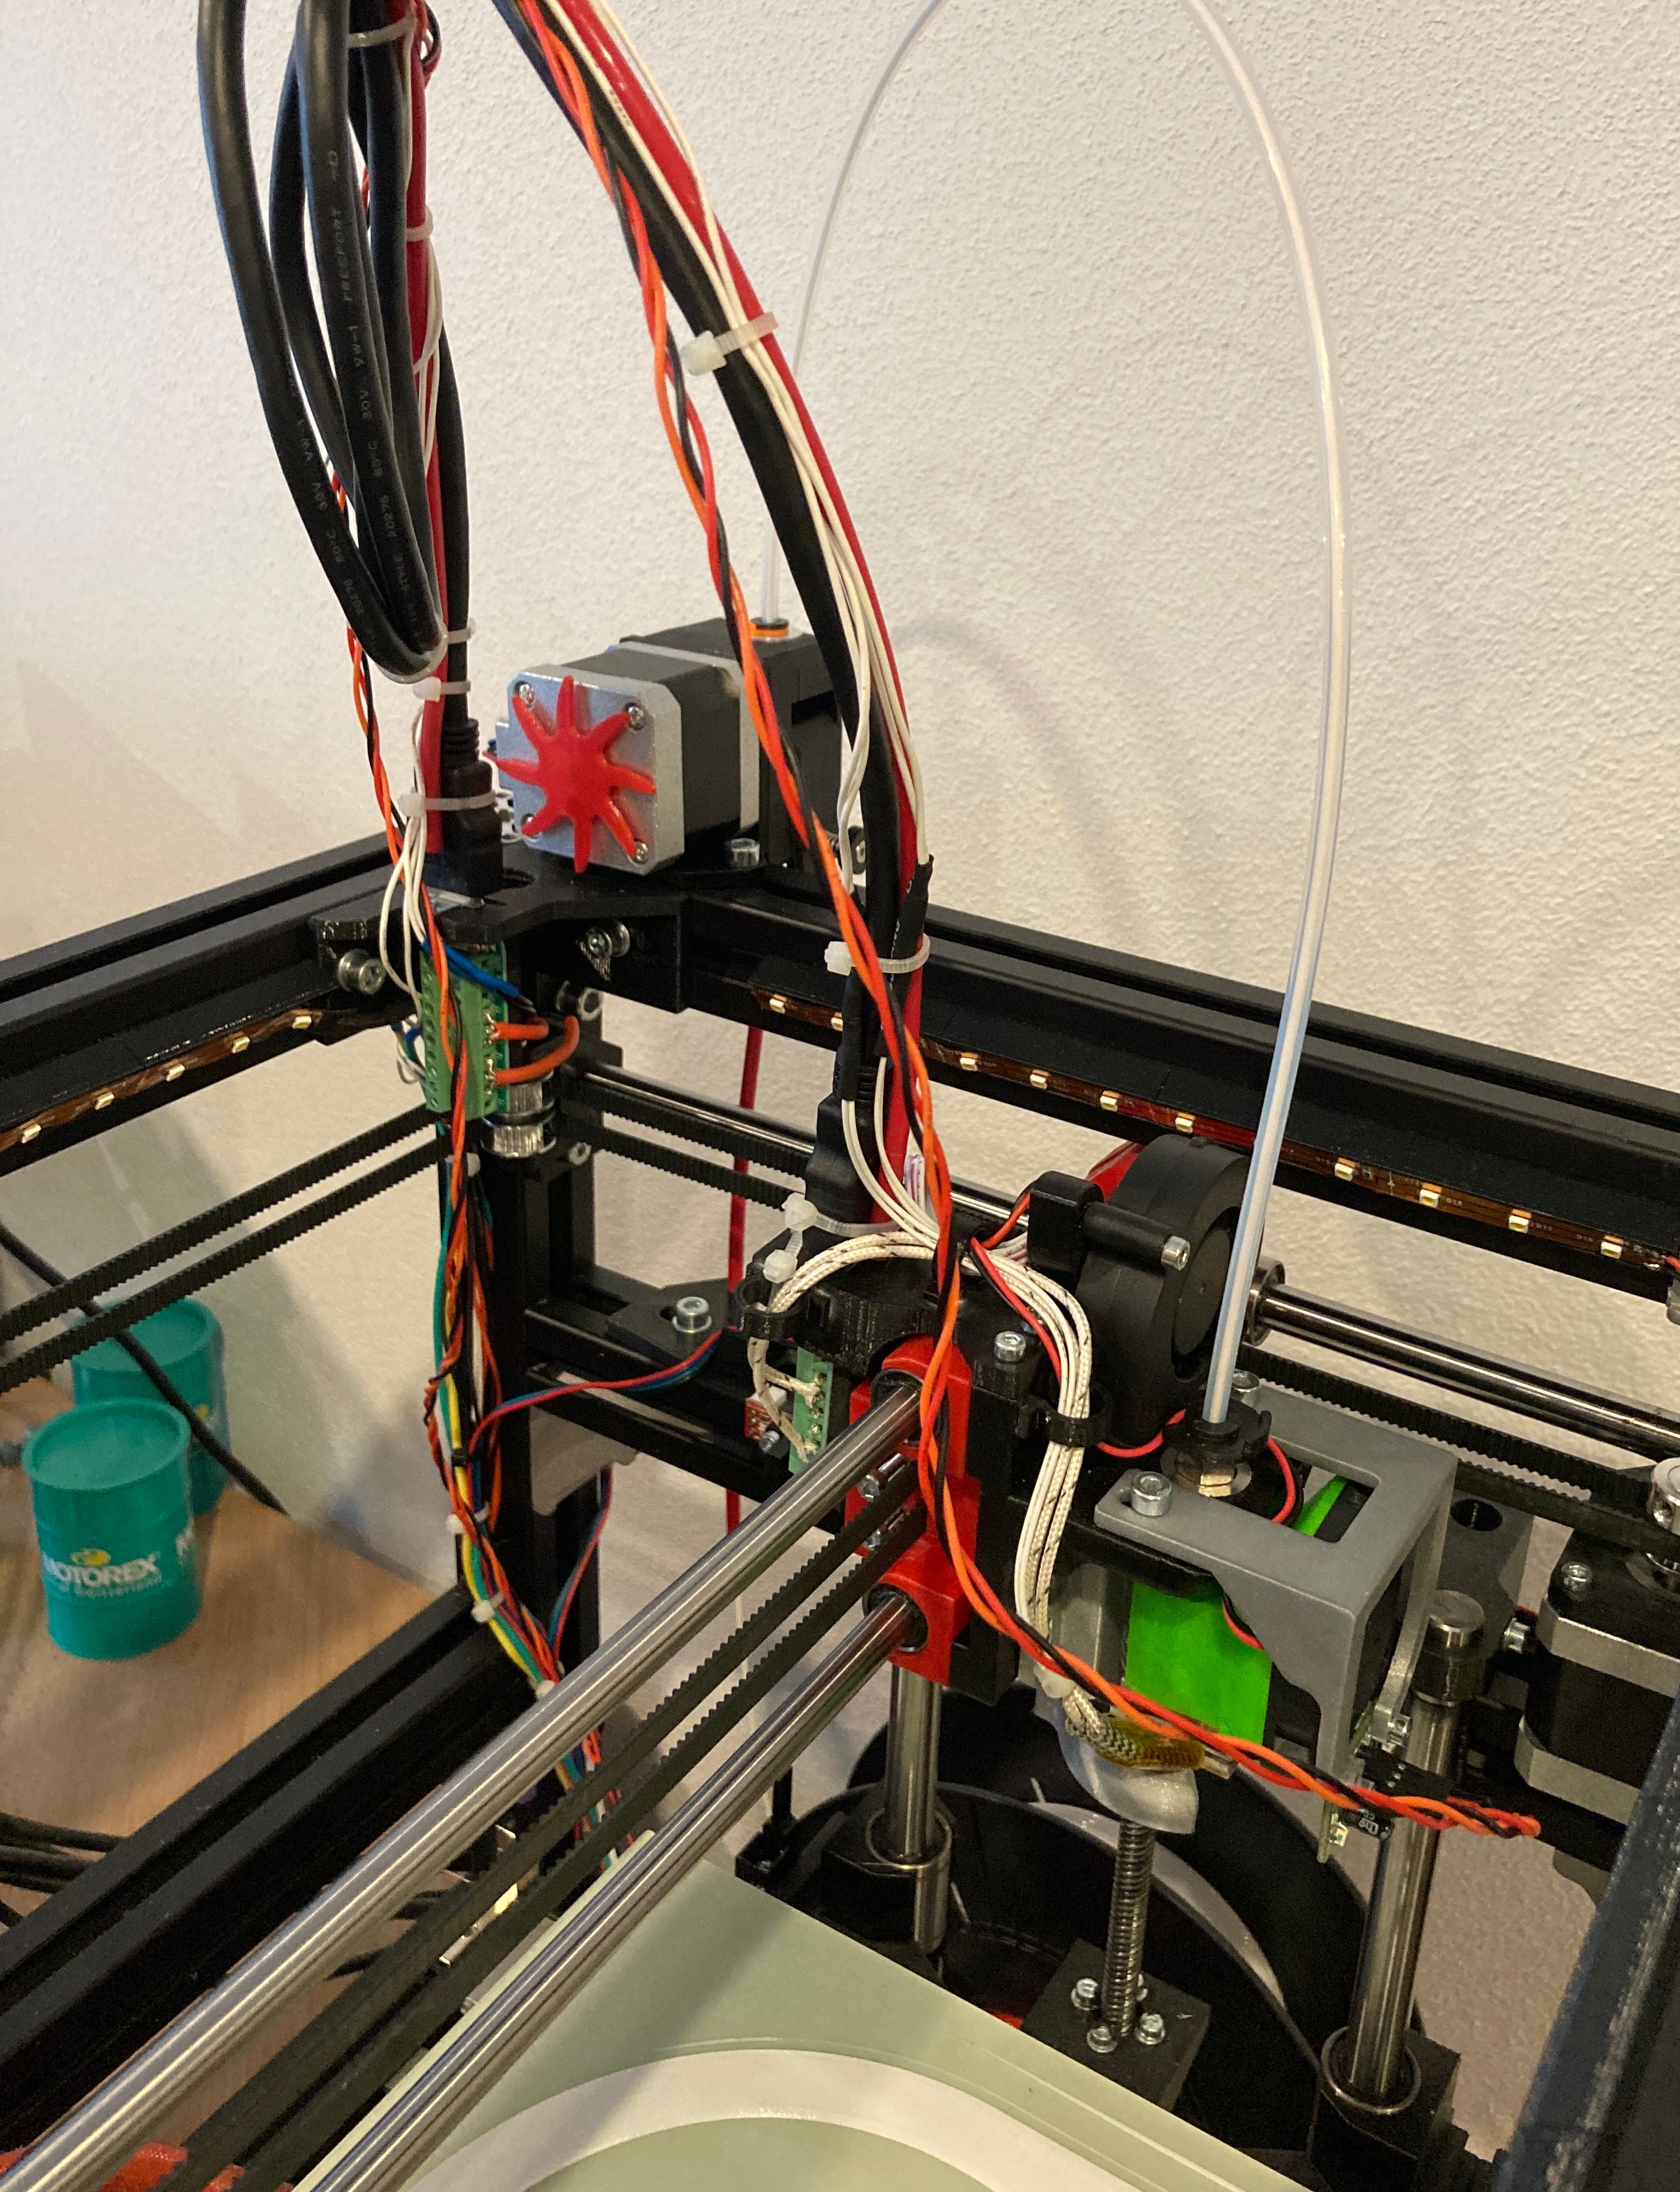
Hi Ian, yes you‘re right. It hangs in front of it, because first it was not planned to mount a probe. Please see the pictures below.
Edit: first have to check how to upload pictures by iPhone…
-
-
Okay guys I have rewired my printhead and put the hdmi cable out, maybe it is more flexible now. I think I will give it a try

-
Hi,
Since you only have one Z stepper you cannot do automatic bed leveling (G32)
Since you have a Z probe you can use that with the manual bed leveling assistant (also G32) to level the bed - assuming it has adjustment screws you can turn manually.
And while mesh bed compensation (G29) can compensate for an out-of-level bed that is not it's intended purpose.
I would suggest that before you do anything else you upgrade the firmware to 3.3.
Frederick
-
Hi Frederick,
maybe it have discribed it wrong in the title. I would like to get the Z height with my IR Probe and then compensate any hills and deeps getting the mesh...I have 4 adjusting screws, and have now leveled on the fly. Looks good now. Mesh is deactivated.
If after this print i will send a G29 then heightmap should be really flat.. Or what do you think?
-
Hello again,
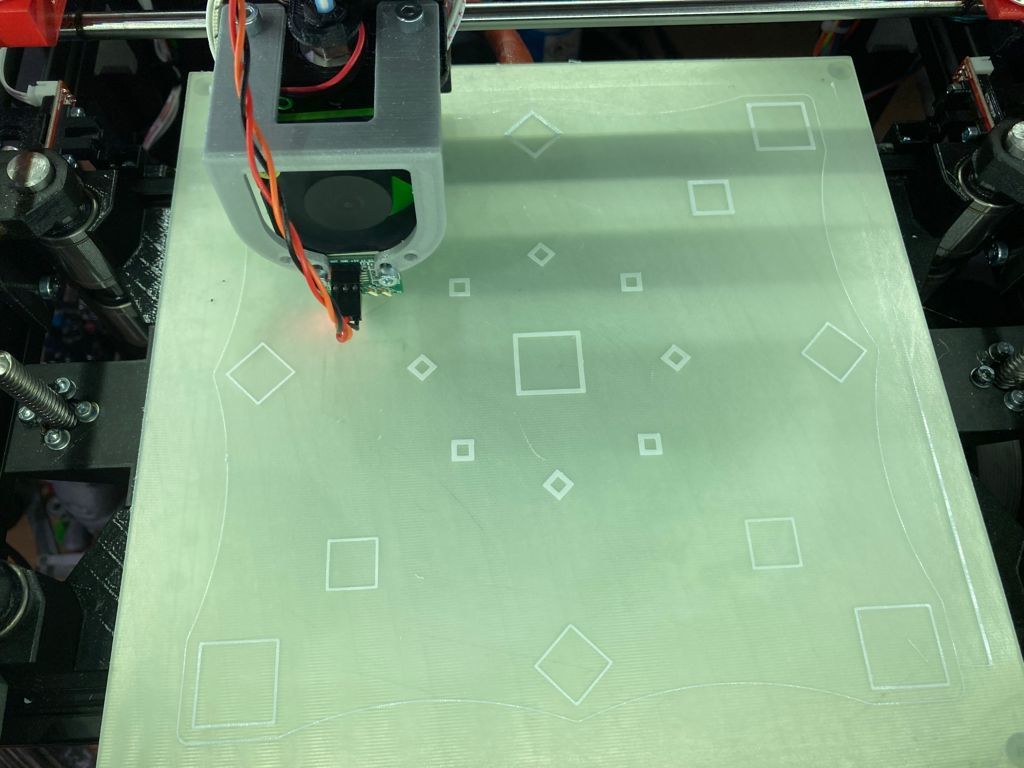
so print is done and looks good, bed sems to be flat!

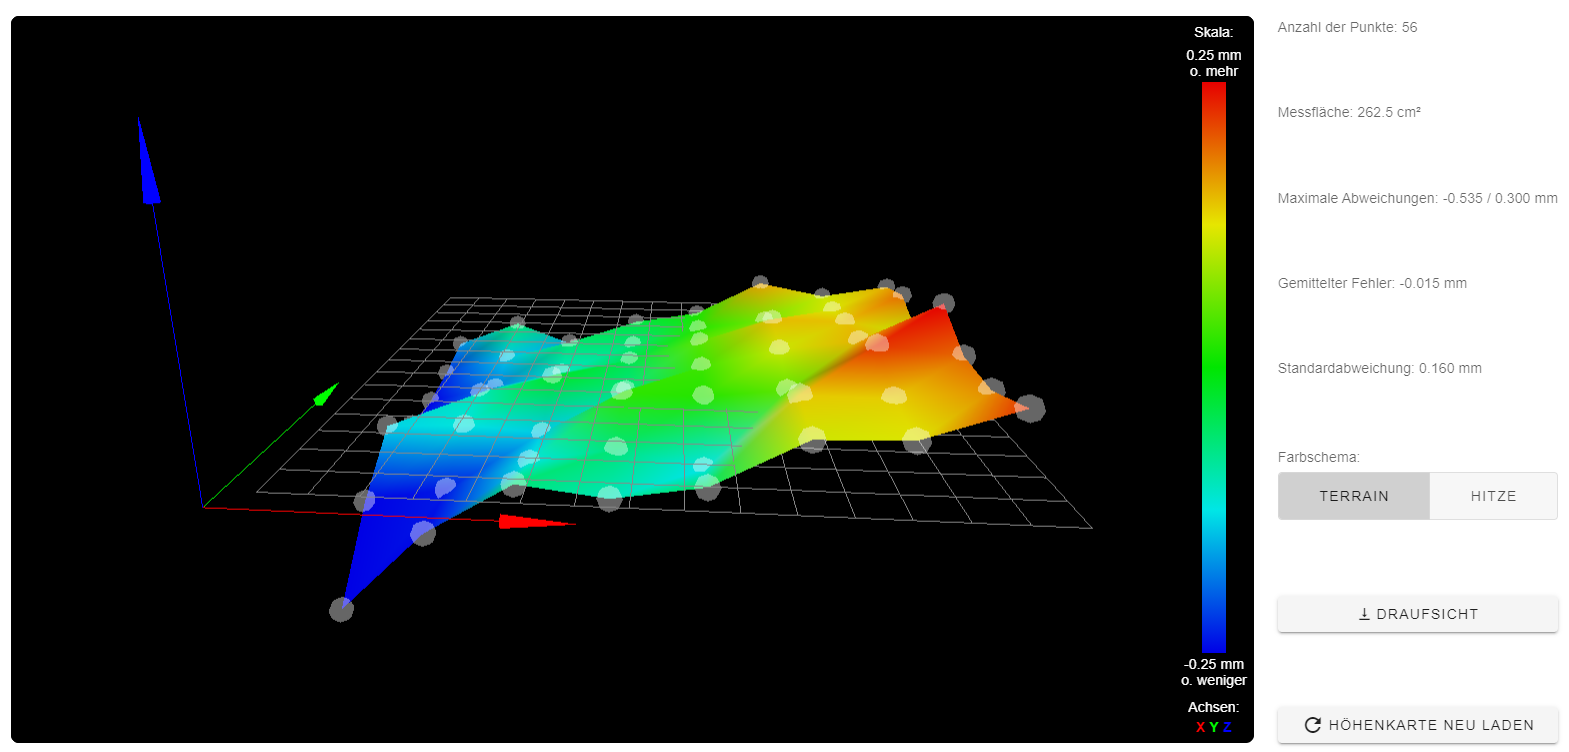
but why is this heightmap looking like this? It was made directly after the print. I'm very confused
-
@gip_86 That's the movement of your printhead!
Can you mount the sensor nearer to the shafts? That should increase accuracy. -
The heightmap you posted reveals some bed irregularities, which are common.
It also shows the bed is not as level as you would like it.
You can read about using the manual bed leveling assistant here:
When can you update to firmware 3.3 (or later)?
Frederick
-
Some of your config.g command syntax looks like RRF3 already.
M558 P1 C"zprobe.in" H5 F400 T6000
What firmware version are you actually using?
Can you share the results of sending M122 and M98 P"config.g"?Can you confirm your coordinate system is right handed?
-X should move left, +X should move right
-Y should move to the nozzle to the front of the bed, +Y to the back. -
okay thank you for this information.
I think i can update this weekend. but i'm not shure if it works, because i have tried it befor i have set up the machine abd i always got errors. If i update to 3.3, can i use the old config or should i do all new?
(because i'm not so good writing these files)here is M122, (M98 will follow this day)
m122 === Diagnostics === RepRapFirmware for Duet 2 WiFi/Ethernet version 2.03 running on Duet WiFi 1.02 or later Board ID: 0JD0M-9P6M2-NWNS4-7J1FG-3S06R-9A0ZM Used output buffers: 3 of 24 (16 max) === RTOS === Static ram: 25680 Dynamic ram: 93680 of which 380 recycled Exception stack ram used: 604 Never used ram: 10728 Tasks: NETWORK(ready,524) HEAT(blocked,1236) MAIN(running,3780) IDLE(ready,160) Owned mutexes: === Platform === Last reset 09:34:28 ago, cause: software Last software reset at 2021-09-15 21:44, reason: User, spinning module GCodes, available RAM 10792 bytes (slot 1) Software reset code 0x0003 HFSR 0x00000000 CFSR 0x00000000 ICSR 0x0041f000 BFAR 0xe000ed38 SP 0xffffffff Task 0x4e49414d Error status: 24 Free file entries: 9 SD card 0 detected, interface speed: 20.0MBytes/sec SD card longest block write time: 511.5ms, max retries 0 MCU temperature: min 37.7, current 38.8, max 40.4 Supply voltage: min 23.8, current 24.2, max 24.5, under voltage events: 0, over voltage events: 0, power good: yes Driver 0: ok, SG min/max 0/1023 Driver 1: ok, SG min/max 0/1023 Driver 2: standstill, SG min/max 0/1023 Driver 3: ok, SG min/max 0/1023 Driver 4: standstill, SG min/max not available Date/time: 2021-09-16 07:19:21 Cache data hit count 4294967295 Slowest loop: 227.29ms; fastest: 0.07ms I2C nak errors 0, send timeouts 0, receive timeouts 0, finishTimeouts 0, resets 0 === Move === Hiccups: 0, FreeDm: 148, MinFreeDm: 124, MaxWait: 20085157ms Bed compensation in use: none, comp offset 0.000 === DDARing === Scheduled moves: 21661, completed moves: 21621, StepErrors: 0, LaErrors: 0, Underruns: 0, 0 === Heat === Bed heaters = 0 -1 -1 -1, chamberHeaters = -1 -1 Heater 0 is on, I-accum = 0.9 Heater 1 is on, I-accum = 0.4 - WiFi – Network state is running WiFi module is connected to access point Failed messages: pending 0, notready 0, noresp 0 WiFi firmware version 1.26 WiFi MAC address f4:cf:a2:ea:55:43 WiFi Vcc 3.36, reset reason Turned on by main processor WiFi flash size 4194304, free heap 27016 WiFi IP address 192.168.0.84 WiFi signal strength -65dBm, reconnections 0, sleep mode unknown Socket states: 0 0 0 0 0 0 0 0 Yes i can confirm that my coordinate system is right handed. as you described.
-
Hi,
There are changes that need to be made to use v3 firmware but they are not extensive.
You could use the configuration utility to create a new set of configuration files.
Or you can edit your existing files.
I put off doing it for quite a while but I'm glad I finally did. Version 3 firmware has many good things.
You cannot for from v2.x to v3.3. You have to go from 2.x to 3.0 and then from 3.0 to 3.3.
-
When dealing with bed mesh, it useful to remember that what we measure is not just the characteristics of the bed but also all the errors between the bed and the sensor, including x,y,z mechanical system, head errors (e.g. does it sags and tilts) and error nozzle and the sensor (e.g. if the head tilts) and sensor errors (how accurate it is, is the bed surface compatible with it, etc).
That's why we sometimes see measurement results that wouldn't make sense if we would measure the bed alone.
Having some experience with HEVO, and it's motion mechanism tends to be soft (compared to more modern extrusion+rail based designs), especially the X rods, which are thinner (8mm?) and sag or cause head tilting. I would suggest to place the sensor to have zero y offest rather than zero x offset since this will cancel better the effect of head tilting.
BTW, do you use two independent drivers for the Z motors? If you do, the Duet can do auto 'real' leveling between the two motor which is nice and reduces the compensation that the mesh need to do.
-
Updating to 3.3 isn't that hard really, but it can be confusing if you're really used to the RRF2 way. I do recommend updating though, 2.03 is ~2 years old.
If you still have access to DWC. Upload these 3 zip files, one at a time in the system tab. Don't extract them first. Reboot after each. Use M115 in the gcode console to verify the firmware has been applied.
https://github.com/Duet3D/RepRapFirmware/releases/download/2.05.1/Duet2Firmware-2.05.1.zip
https://github.com/Duet3D/RepRapFirmware/releases/download/3.0/Duet2and3Firmware-3.0.zip
https://github.com/Duet3D/RepRapFirmware/releases/download/3.3/Duet2and3Firmware-3.3.zip
That will get your firmware and DWC up to date.You can see the change logs here:
https://github.com/Duet3D/RepRapFirmware/wiki/Changelog-RRF-3.xFor your config, might be a good idea to run through the configurator tool and generate a fresh set for RRF3.
https://configtool.reprapfirmware.org/StartBackup your existing config files in the sys folder in case you want to switch back to RRF2. It’s easy to switch back and forth, just upload the zip file for the version you want and then upload your config files.
These documents will come in handy during the conversion.
https://duet3d.dozuki.com/Wiki/RepRapFirmware_3_overview
https://duet3d.dozuki.com/Wiki/Gcode -
ufff spent the 4 last hours to upgrade to 3.3. holy sh... nothing was working anymore. had to switchover to bossa.
Now it works ok. but i get a heater fault. i will try to compare to my old config
-
@gip_86 said in differences between manual and automatic leveling:
ufff spent the 4 last hours to upgrade to 3.3. holy sh... nothing was working anymore. had to switchover to bossa.
Now it works ok. but i get a heater fault. i will try to compare to my old config
If you copy-and-paste your new config.g file here (using the </> tag) we can all pitch in and take a look.
It's very likely just a syntax error.
Frederick
-
so this is the new config. I hava adjusted all i see to fit with the old config
; Configuration file for Duet WiFi (firmware version 3.3) ; executed by the firmware on start-up ; ; generated by RepRapFirmware Configuration Tool v3.3.2 on Sat Sep 18 2021 02:15:19 GMT+0200 (Mitteleuropäische Sommerzeit) ; General preferences G90 ; send absolute coordinates... M83 ; ...but relative extruder moves M550 P"HeVo" ; set printer name M669 K1 ; select CoreXY mode ; Network M552 S1 ; enable network M586 P0 S1 ; enable HTTP M586 P1 S0 ; disable FTP M586 P2 S0 ; disable Telnet M575 P1 B57600 S1 ; Drives M569 P0 S1 ; physical drive 0 goes forwards M569 P1 S1 ; physical drive 1 goes forwards M569 P2 S1 ; physical drive 2 goes forwards M569 P3 S1 ; physical drive 3 goes forwards M584 X0 Y1 Z2 E3 ; set drive mapping M350 X16 Y16 Z16 E16 I1 ; configure microstepping with interpolation M92 X80.00 Y80.00 Z400.00 E396.00 ; set steps per mm M566 X21000.00 Y21000.00 Z180.00 E54000.00 ; set maximum instantaneous speed changes (mm/min) M203 X21000.00 Y21000.00 Z180.00 E300000.00 ; set maximum speeds (mm/min) M201 X4000.00 Y4000.00 Z3000.00 E4000.00 ; set accelerations (mm/s^2) M906 X1000 Y1000 Z1000 E800 I30 ; set motor currents (mA) and motor idle factor in per cent M84 S30 ; Set idle timeout ; Axis Limits M208 X0 Y0 Z-1 S1 ; set axis minima M208 X205 Y202 Z150 S0 ; set axis maxima ; Endstops M574 X2 S1 P"xstop" ; configure active-high endstop for high end on X via pin xstop M574 Y2 S1 P"ystop" ; configure active-high endstop for high end on Y via pin ystop M574 Z1 S2 ; configure Z-probe endstop for low end on Z ; Z-Probe M558 P1 C"zprobe.in" H5 F120 T6000 ; set Z probe type to unmodulated and the dive height + speeds G31 P500 X40 Y-35 Z2.04 ; set Z probe trigger value, offset and trigger height M557 X15:205 Y15:195 S20 ; define mesh grid ; Heaters M308 S0 P"bedtemp" Y"thermistor" T100000 B4400 ; configure sensor 0 as thermistor on pin bedtemp M950 H0 C"bedheat" T0 ; create bed heater output on bedheat and map it to sensor 0 M307 H0 B0 S1.00 ; disable bang-bang mode for the bed heater and set PWM limit M140 H0 ; map heated bed to heater 0 M143 H0 S120 ; set temperature limit for heater 0 to 120C M308 S1 P"e0temp" Y"thermistor" T100000 B4400 ; configure sensor 1 as thermistor on pin e0temp M950 H1 C"e0heat" T1 ; create nozzle heater output on e0heat and map it to sensor 1 M307 H1 B0 S1.00 ; disable bang-bang mode for heater and set PWM limit M143 H1 S280 ; set temperature limit for heater 1 to 280C ; Fans M950 F1 C"fan0" Q500 ; create fan 0 on pin fan0 and set its frequency M106 P0 S0 H-1 ; set fan 0 value. Thermostatic control is turned off M950 F0 C"fan1" Q500 ; create fan 1 on pin fan1 and set its frequency M106 P1 S1 H1 T45 ; set fan 1 value. Thermostatic control is turned on ; Tools M563 P0 D0 H1 F0 ; define tool 0 G10 P0 X0 Y0 Z0 ; set tool 0 axis offsets G10 P0 R0 S0 ; set initial tool 0 active and standby temperatures to 0C ; Custom settings are not defined -
Hmm...
Everything seems correct.
When are you getting this fault?
What is the exact message your are seeing?
Thanks.
Frederick
-
hi Frederick
this is the message i got:
Error: Heater 0 fault: temperature rising much more slowly than the expected 1.3°C/sec
Resume state saved
Warning: Tool 0 was not driven because its heater temperatures were not high enough or it has a heater fault