Duet3D Logo Duet3D
    • Tags
    • Documentation
    • Order
    • Register
    • Login

    Closed-Loop tuning on CL57T stepper driver

    Scheduled Pinned Locked Moved
    Duet Hardware and wiring
    3
    18
    1.5k
    Loading More Posts
    • Oldest to Newest
    • Newest to Oldest
    • Most Votes
    Reply
    • Reply as topic
    Log in to reply
    This topic has been deleted. Only users with topic management privileges can see it.
    • V.A.M.P printing snprojundefined
      V.A.M.P printing snproj
      last edited by

      This post is deleted!
      1 Reply Last reply Reply Quote 0
      • V.A.M.P printing snprojundefined
        V.A.M.P printing snproj
        last edited by

        It will not let me post my config file but at the start of a print it crashes into the side of the frame of the printer.

        alankilianundefined Phaedruxundefined 2 Replies Last reply Reply Quote 1
        • alankilianundefined
          alankilian @V.A.M.P printing snproj
          last edited by alankilian

          @v-a-m-p-printing-snproj

          OK, you won't start closed-loop tuning by starting a print right away.

          You'll need to go one-axis-at-a-time and get them moving properly first.

          • Put everything in open-loop and make sure you can move each axis back-and-forth small moves using G1 commands before going the next step.

          You can start up and home everything in open-loop mode.
          Then switch to closed-loop mode and try a short move.

          If you encoder is hooked up backwards, the axis will run full-speed and smash into a hard stop. Be prepared for that
          
          • Start with the X axis and make sure you can home in open-loop mode, that you can move 10mm forward, 10mm backwards and that the head moves about 10mm each time and THEN switch to closed-loop and try the 10mm moves again.
          PLEASE be super careful not to get hurt. closed-loop tuning on a newly-wired-up system can be SUPER dangerous.
          

          Send us the commands you entered and the results you got.

          SeemeCNC Rostock Max V3 converted to V3.2 with a Duet2 Ethernet Firmware 3.2 and SE300

          V.A.M.P printing snprojundefined 1 Reply Last reply Reply Quote 0
          • V.A.M.P printing snprojundefined
            V.A.M.P printing snproj @alankilian
            last edited by

            @alankilian Everything was homing fine in open loop so I switched to closed loop on the X and Y. Using the web controllers movement controls i began moving the x in small increments of 1mm each way and it moved fine so I tried 10mm and it continued moving fine. I then tried homing X and it also homed without any issue. I did the same for the Y and everything worked fine. I then homed all and it did without any issues.

            alankilianundefined 1 Reply Last reply Reply Quote 0
            • alankilianundefined
              alankilian @V.A.M.P printing snproj
              last edited by

              @v-a-m-p-printing-snproj

              OK, so you have the encoders hooked up properly and everything is setup to start tuning.

              I would start by printing a box that is one wall thick and about 30mm square at a VERY SLOW speed.

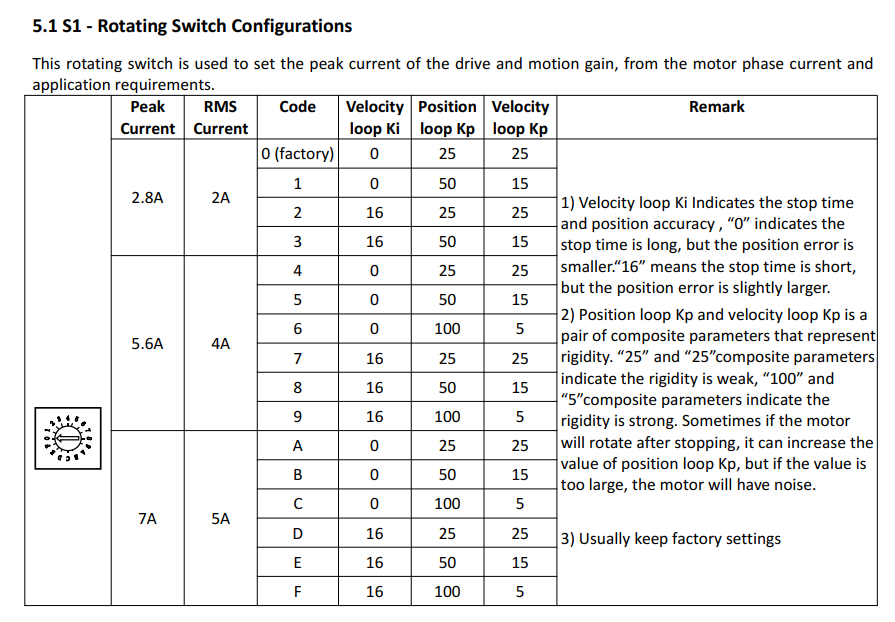
              This will show how well your motors are following the commanded position at setting #0 on the rotary switch S1 on the CL57T V4.0.

              After that, you should increase the speed to where you want it to be and if everything is OK, you're done!

              Capture.PNG

              SeemeCNC Rostock Max V3 converted to V3.2 with a Duet2 Ethernet Firmware 3.2 and SE300

              V.A.M.P printing snprojundefined 1 Reply Last reply Reply Quote 0
              • Phaedruxundefined
                Phaedrux Moderator @V.A.M.P printing snproj
                last edited by

                @v-a-m-p-printing-snproj said in Closed-Loop tuning on CL57T stepper driver:

                It will not let me post my config file

                Try again?

                Z-Bot CoreXY Build | Thingiverse Profile

                V.A.M.P printing snprojundefined 1 Reply Last reply Reply Quote 0
                • V.A.M.P printing snprojundefined
                  V.A.M.P printing snproj @Phaedrux
                  last edited by

                  @phaedrux ; Configuration file for Duet WiFi (firmware version 2.03)
                  ; executed by the firmware on start-up
                  ;
                  ; generated by RepRapFirmware Configuration Tool v3.2.3 on Mon Mar 15 2021 15:55:39 GMT-0400 (Eastern Daylight Time)

                  ; General preferences
                  G90 ; send absolute coordinates...
                  M83 ; ...but relative extruder moves
                  M550 P"VAMP" ; set printer name
                  M669 K1 ; select CoreXY mode

                  ; Network
                  M552 P0.0.0.0 S1 ; enable network and acquire dynamic address via DHCP
                  M586 P0 S1 ; enable HTTP
                  M586 P1 S0 ; disable FTP
                  M586 P2 S0 ; disable Telnet

                  ; Drives

                  M569 P3 S0 ; physical drive 3 goes forwards
                  M569 P5 S1 T2.5:2.5:5:5 ; physical drive 5 goes forwards
                  M569 P6 S1 T2.5:2.5:5:5 ; physical drive 6 goes forwards
                  M569 P7 S0 T2.5:2.5:5:5 ; physical drive 7 goes backwards
                  M569 P8 S0 T2.5:2.5:5:5 ; physical drive 8 goes backwards
                  M569 P9 S0 T2.5:2.5:5:5 ; physical drive 9 goes backwards
                  M584 X5 Y6 Z7:8:9 E3 ; set drive mapping
                  M350 X16 Y16 Z16 E16 I1 ; configure microstepping with interpolation
                  M92 X80.5234 Y79.6020 Z800.00 E95.00 ; set steps per mm
                  M566 X900.00 Y900.00 Z60.00 ; set maximum instantaneous speed changes (mm/min)
                  M203 X6000.00 Y6000.00 Z180.00 ; set maximum speeds (mm/min)
                  M201 X500.00 Y500.00 Z20.00 ; set accelerations (mm/s^2)
                  M906 E1600 I30 ; set motor currents (mA) and motor idle factor in per cent
                  M84 S30 ; Set idle timeout

                  ; Axis Limits
                  M208 X0 Y0 Z0 S1 ; set axis minima
                  M208 X415 Y415 Z440 S0 ; set axis maxima

                  ; Endstops
                  M574 X1 Y2 S1 ; set active high endstops
                  M574 Z1 S2 ; set endstops controlled by probe

                  ; Z-Probe
                  M307 H6 A-1 C-1 D-1 ; disable heater on PWM channel for BLTouch
                  M558 P9 H5 F120 T6000 ; set Z probe type to bltouch and the dive height + speeds
                  G31 P500 X0 Y0 Z2.5 ; set Z probe trigger value, offset and trigger height
                  M557 X15:215 Y15:195 S20 ; define mesh grid

                  ; Heaters
                  M305 P0 T100000 B3950 R4700
                  M305 P1 T4700000 B5140 R4700 ; set thermistor + ADC parameters for heater 1
                  M143 H0 S180 ; set temperature limit for heater 0 to 100C
                  M143 H1 S490 ; set temperature limit for heater 1 to 490C

                  ; Fans

                  ; Tools
                  M563 P0 D0 H1 F0 ; define tool 0
                  G10 P0 X0 Y0 Z0 ; set tool 0 axis offsets
                  G10 P0 R0 S0 ; set initial tool 0 active and standby temperatures to 0C

                  ; Custom settings are not defined
                  M501

                  1 Reply Last reply Reply Quote 0
                  • V.A.M.P printing snprojundefined
                    V.A.M.P printing snproj @alankilian
                    last edited by

                    @alankilian
                    Okay ill do that and let you know how it goes. Since I had to change my home all coordinates for the Y position when the Z axis is homing, will this effect coordinates for a print?

                    alankilianundefined 1 Reply Last reply Reply Quote 0
                    • alankilianundefined
                      alankilian @V.A.M.P printing snproj
                      last edited by

                      @v-a-m-p-printing-snproj

                      I don't know,

                      Home the printer and then use G1 to move to someplace.

                      Then measure the distance from the printer's origin to that location and see if it matches.

                      SeemeCNC Rostock Max V3 converted to V3.2 with a Duet2 Ethernet Firmware 3.2 and SE300

                      1 Reply Last reply Reply Quote 0
                      • Phaedruxundefined
                        Phaedrux Moderator
                        last edited by

                        I think it should only matter if you've changed M208.

                        Z-Bot CoreXY Build | Thingiverse Profile

                        1 Reply Last reply Reply Quote 0
                        • V.A.M.P printing snprojundefined
                          V.A.M.P printing snproj
                          last edited by

                          @phaedrux Okay my only concern before starting a print is before i changed my drivers, in front of the rear lead screw it was reading that Y was at 85 and now it is reading at 315 at that lead screw. Also when i look at the code for a print it has Y coordinates less than 315 which isnt on my build plate.

                          1 Reply Last reply Reply Quote 0
                          • Phaedruxundefined
                            Phaedrux Moderator
                            last edited by

                            You should do some careful positioning testing before starting a print.

                            https://docs.duet3d.com/en/User_manual/Tuning/Bed_origin

                            Z-Bot CoreXY Build | Thingiverse Profile

                            V.A.M.P printing snprojundefined 1 Reply Last reply Reply Quote 1
                            • V.A.M.P printing snprojundefined
                              V.A.M.P printing snproj @Phaedrux
                              last edited by

                              @phaedrux Okay sounds good thanks!

                              V.A.M.P printing snprojundefined 1 Reply Last reply Reply Quote 0
                              • V.A.M.P printing snprojundefined
                                V.A.M.P printing snproj @V.A.M.P printing snproj
                                last edited by

                                @v-a-m-p-printing-snproj
                                Okay so I've been messing around with movement on my printer and notice the distance the printer head is moving is not correct. Before my maximum for the x and y was 415, but when i would try to go to X0 Y0 it could go to Y0. So I set the maximum to 115 for both the X and Y and now it can go to X0 Y0. Why is the distance my print head is traveling reading differently now?

                                alankilianundefined 1 Reply Last reply Reply Quote 0
                                • alankilianundefined
                                  alankilian @V.A.M.P printing snproj
                                  last edited by

                                  @v-a-m-p-printing-snproj

                                  I don't quite understand, I'm sorry.

                                  If you can type in the exact GCODE commands you are typing and tell us what you expect to happen and what actually happens it will help understand what's going wrong.

                                  SeemeCNC Rostock Max V3 converted to V3.2 with a Duet2 Ethernet Firmware 3.2 and SE300

                                  V.A.M.P printing snprojundefined 1 Reply Last reply Reply Quote 0
                                  • V.A.M.P printing snprojundefined
                                    V.A.M.P printing snproj @alankilian
                                    last edited by

                                    @alankilian
                                    My bed length and width is 415mm but after getting everything going in the right direction when I command the printer to move to X115 Y115 it will travel to what should be 415mm.

                                    alankilianundefined 1 Reply Last reply Reply Quote 0
                                    • alankilianundefined
                                      alankilian @V.A.M.P printing snproj
                                      last edited by alankilian

                                      @v-a-m-p-printing-snproj

                                      I still don't understand because you didn't follow my instructions telling me what GCODE commands you enter.

                                      But I'll guess (Which wastes all our time)

                                      OK, you ask the printer to move 115mm in X and 115mm in Y and is actually moves 415, in X and 415mm in Y?

                                      That would mean you are commanding too many steps.

                                      Maybe change

                                      M350 X16 Y16 Z16 E16 I1 ; configure microstepping with interpolation
                                      

                                      to:

                                      M350 X4 Y4 Z16 E16 I1 ; configure microstepping with interpolation
                                      

                                      And see if it gets closer to the right move length.

                                      SeemeCNC Rostock Max V3 converted to V3.2 with a Duet2 Ethernet Firmware 3.2 and SE300

                                      1 Reply Last reply Reply Quote 0
                                      • First post
                                        Last post
                                      Unless otherwise noted, all forum content is licensed under CC-BY-SA