Duet 2 Wifi Dual Z issue after increasing esteps
-
@jay_s_uk 24v. It even says it on the dashboard, that was one of the first things I checked.
-
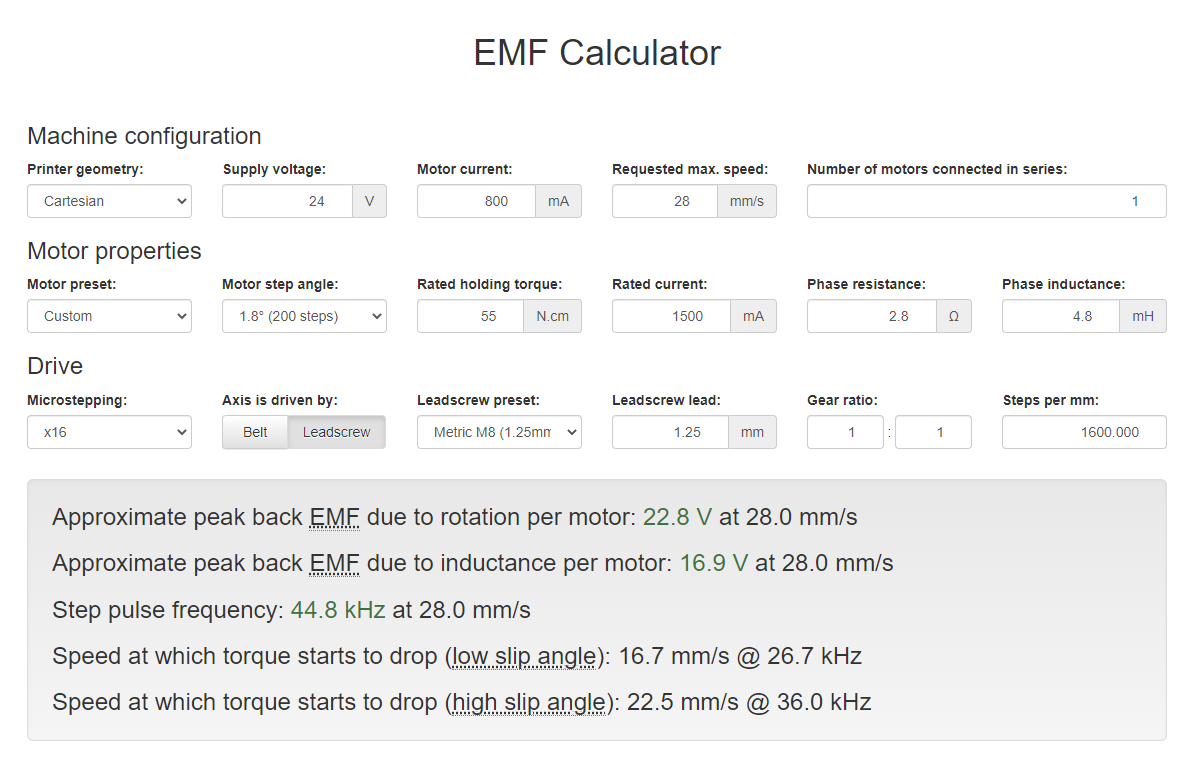
@slabstations how fast are you trying to move the motors?
max speed you can really run them at before generating too much EMF is 28mm/s (F1680)
Owns various duet boards and is the main wiki maintainer for the Teamgloomy LPC/STM32 port of RRF. Assume I'm running whatever the latest beta/stable build is
-
@jay_s_uk Honestly I am not sure, whatever the default is when you control it through the web interface. I started with the creality ender 3 base config in the configurator. I have gotten an ender 3 pro up and running, so I just copied the config and change printer size to fit the lulzbot. Only thing I did different was add a bl touch to the lulzbot, which seems to be working properly, have only gotten as far as retracting and dropping it.
-
According to the previous information... Motor model / Za + Zb / voltages and speeds from the config.g) this result should be more accurate.
I didn't know the values for "Phase resistance" and "Phase inductance" and I didn't change the displayed value either.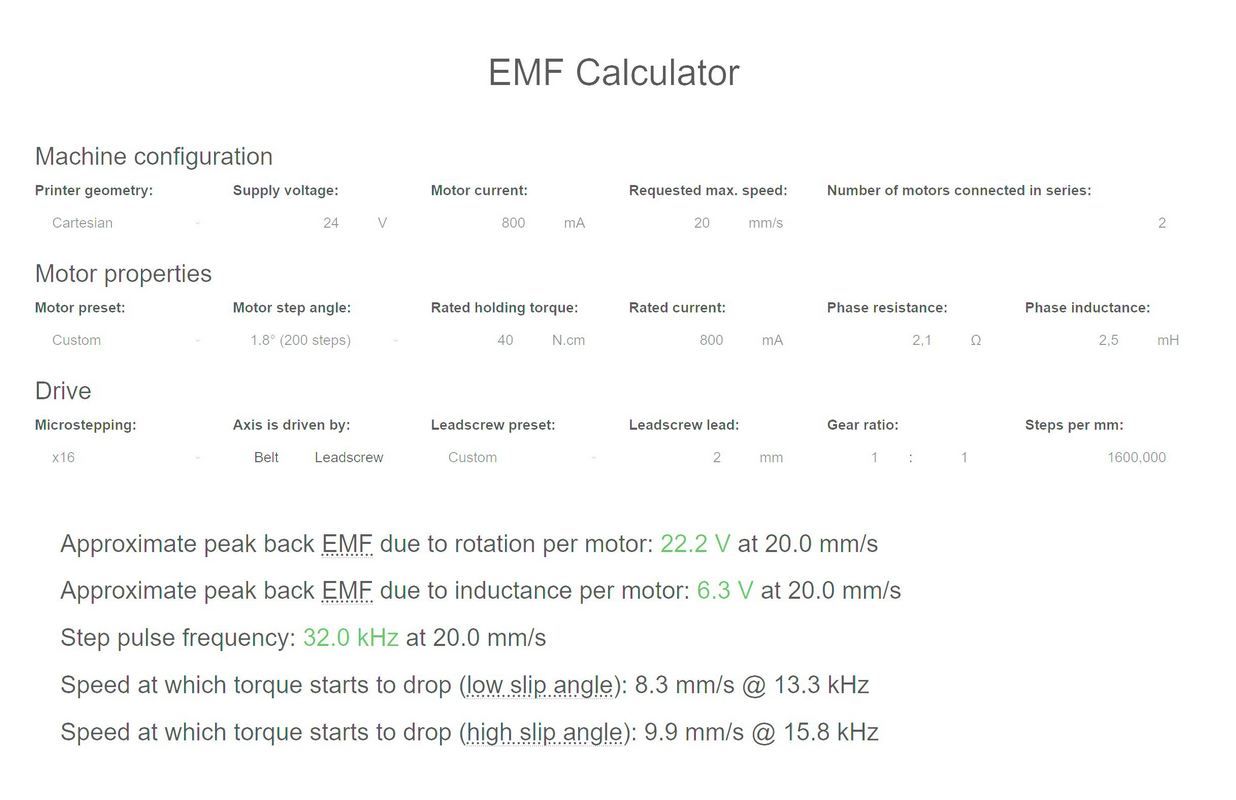
@slabstations :
I asked you earlier whether you have two end stops and possibly want to use E1 and Za for the two Z motors !?")
Google Translate
-- Original Text --Nach den bisherigen Infos... Motoren Modell / Za + Zb / Spannungen und Geschwindigkeiten aus der config.g) sollte dieses Ergebnis zutreffender sein.
Werte für "Phase resistance" und "Phase inductance" wusste ich nicht und habe den angezeigten Wert auch nicht geändert.@slabstations :
Ich hatte Dich vorhin gefragt ob Du zwei Endstops hast und eventuell E1 und Za für die beiden Z-Motoren nutzen willst !?DDA5X... 0.9° Stepper... Linearrails... Duet 2 Wifi... PT100 Board... Duet IR-Probe... Dyze Pro Kit up to 500°C.. etc
Thingiverse -
@jay_s_uk I would like the dual z bed leveling. Do you think I should try setting that up and hope this problem goes away, or do you think it could be something I have setup wrong?
-
@norder I only have one endstop switch mounted on highend of the left z axis. And setting up two z motors sounds good, I like the bed leveling feature!
-
@slabstations it definitely won't hurt as it makes sure everything is level. it may or may not help your issue though.
I would bump your current for Z up to 1200, separate them out as you say (don't forget the jumpers). and map E1 to Z using M584 e.g. M584 Z2:4
Then repost your config, homez and homeall -
-
config.g: ; Configuration file for Duet WiFi (firmware version 3)
; executed by the firmware on start-up
;
; generated by RepRapFirmware Configuration Tool v3.3.13 on Sat Sep 24 2022 04:07:34 GMT-0400 (Eastern Daylight Time)

; General preferences
;M575 P1 S1 B57600                              ; enable support for PanelDue
G90                                            ; send absolute coordinates...
M83                                            ; ...but relative extruder moves
M550 P"LulzBot Mini"                           ; set printer name
;M918 P1 E4 F2000000                            ; configure direct-connect display

; Network
M551 P"1084"                                   ; set password
M552 S1                                        ; enable network
M586 P0 S1                                     ; enable HTTP
M586 P1 S0                                     ; disable FTP
M586 P2 S0                                     ; disable Telnet

; Drives
M569 P0 S1                                     ; physical drive 0 goes forwards
M569 P1 S0                                     ; physical drive 1 goes backwards
M569 P2 S1                                     ; physical drive 2 goes forwards
M569 P3 S0                                     ; physical drive 3 goes backwards
M584 X0 Y1 Z2:4 E3                             ; set drive mapping
M671 x20:200 y0:0 s0.5                         ; leadscrews at left (connected to Z) and right (connected to E1) of X axis
M208 X05:205 Y0:200                            ; X carriage moves from -5 to 205, Y bed goes from 0 to 200
M350 X16 Y16 Z16 E16 I1                        ; configure microstepping with interpolation
M92 X101.26 Y100.00 Z1600 E436.54              ; set steps per mm
M566 X1200.00 Y1200.00 Z24.00 E300.00          ; set maximum instantaneous speed changes (mm/min)
M203 X9000.00 Y9000.00 Z1200.00 E6000.00       ; set maximum speeds (mm/min)
M201 X500.00 Y500.00 Z100.00 E5000.00          ; set accelerations (mm/s^2)
M906 X800 Y800 Z1200 E1000 I50                  ; set motor currents (mA) and motor idle factor in per cent
M84 S30                                        ; Set idle timeout

; Axis Limits
M208 X0 Y0 Z0 S1                               ; set axis minima
M208 X170 Y180 Z148 S0                         ; set axis maxima

; Endstops
M574 X1 S1 P"xstop"                            ; configure switch-type (e.g. microswitch) endstop for low end on X via pin xstop
M574 Y1 S1 P"ystop"                            ; configure switch-type (e.g. microswitch) endstop for low end on Y via pin ystop
M574 Z2 S1 P"zstop"                            ; configure switch-type (e.g. microswitch) endstop for high end on Z via pin zstop

; Z-Probe
M950 S0 C"exp.heater3"                         ; create servo pin 0 for BLTouch
M558 P9 C"^zprobe.in" H5 F120 T6000            ; set Z probe type to bltouch and the dive height + speeds
G31 P500 X0 Y0 Z2.5                            ; set Z probe trigger value, offset and trigger height
M557 X15:170 Y15:180 S20                       ; define mesh grid

; Heaters
M308 S0 P"bedtemp" Y"thermistor" T100000 B4092 ; configure sensor 0 as thermistor on pin bedtemp
M950 H0 C"bedheat" T0                          ; create bed heater output on bedheat and map it to sensor 0
M307 H0 B0 S1.00                               ; disable bang-bang mode for the bed heater and set PWM limit
M140 H0                                        ; map heated bed to heater 0
M143 H0 S110                                   ; set temperature limit for heater 0 to 110C
M308 S1 P"e0temp" Y"thermistor" T100000 B4092  ; configure sensor 1 as thermistor on pin e0temp
M950 H1 C"e0heat" T1                           ; create nozzle heater output on e0heat and map it to sensor 1
M307 H1 B0 S1.00                               ; disable bang-bang mode for heater  and set PWM limit
M143 H1 S275                                   ; set temperature limit for heater 1 to 275C

; Fans
M950 F0 C"fan0" Q500                           ; create fan 0 on pin fan0 and set its frequency
M106 P0 C"Extruder Fan" S1 H1 T160             ; set fan 0 name and value. Thermostatic control is turned on
M950 F1 C"fan1" Q500                           ; create fan 1 on pin fan1 and set its frequency
M106 P1 C"Case Fan" S1 H0 T50                  ; set fan 1 name and value. Thermostatic control is turned on
M950 F2 C"fan2" Q500                           ; create fan 2 on pin fan2 and set its frequency
M106 P2 C"Part Cooling" S1 H-1                 ; set fan 2 name and value. Thermostatic control is turned off

; Tools
M563 P0 S"Extruder" D0 H1 F0                   ; define tool 0
G10 P0 X0 Y0 Z0                                ; set tool 0 axis offsets
G10 P0 R0 S0                                   ; set initial tool 0 active and standby temperatures to 0C

; Custom settings are not defined
; bed.g ; called to perform automatic bed compensation via G32 ; ; generated by RepRapFirmware Configuration Tool v3.3.13 on Sat Sep 24 2022 04:07:34 GMT-0400 (Eastern Daylight Time) M561 ; clear any bed transform G29 ; probe the bed and enable compensation G28 ; home G30 P0 X20 Y100 Z-99999 ; probe near a leadscrew, half way along Y axis G30 P1 X180 Y100 Z-99999 S2 ; probe near a leadscrew and calibrate 2 motors; homeall.g ; called to home all axes ; ; generated by RepRapFirmware Configuration Tool v3.3.13 on Sat Sep 24 2022 04:07:34 GMT-0400 (Eastern Daylight Time) G91 ; relative positioning G1 H2 Z5 F6000 ; lift Z relative to current position G1 H1 X-175 Y-185 F3000 ; move quickly to X and Y axis endstops and stop there (first pass) G1 H2 X5 Y5 F6000 ; go back a few mm G1 H1 X-175 Y-185 F240 ; move slowly to X and Y axis endstops once more (second pass) G1 H1 Z153 F240 ; move Z up stopping at the endstop G90 ; absolute positioning G92 Z148 ; set Z position to axis maximum (you may want to adjust this) ; Uncomment the following lines to lift Z after probing ;G91 ; relative positioning ;G1 Z5 F100 ; lift Z relative to current position ;G90 ; absolute positioning; homez.g ; called to home the Z axis ; ; generated by RepRapFirmware Configuration Tool v3.3.13 on Sat Sep 24 2022 04:07:34 GMT-0400 (Eastern Daylight Time) G91 ; relative positioning G1 H2 Z5 F6000 ; lift Z relative to current position G1 H1 Z153 F3000 ; move Z up until the endstop is triggered G92 Z148 ; set Z position to axis maximum (you may want to adjust this) ; Uncomment the following lines to lift Z after probing ;G91 ; relative positioning ;G1 Z5 F100 ; lift Z relative to current position ;G90 ; absolute positioning -
; bed.g
; called to perform automatic bed compensation via G32
;
; generated by RepRapFirmware Configuration Tool v3.3.13 on Sat Sep 24 2022 04:07:34 GMT-0400 (Eastern Daylight Time)
M561 ; clear any bed transform
G29  ; probe the bed and enable compensation
You'll want to remove the G29 from bed.g. At least move it to the end of the file after the leveling if you want it to create a mesh at the same time. Otherwise handle the mesh creation separately.
jay_s_ukjay_s_uk 4 Oct 2022, 03:57
@slabstations what voltage are you running at?

Owns various duet boards and is the main wiki maintainer for the Teamgloomy LPC/STM32 port of RRF. Assume I'm running whatever the latest beta/stable build is

   0
slabstationsslabstations 4 Oct 2022, 04:07
@jay_s_uk 24v. It even says it on the dashboard, that was one of the first things I checked.

   0
jay_s_ukjay_s_uk 4 Oct 2022, 04:10
@slabstations how fast are you trying to move the motors?

max speed you can really run them at before generating too much EMF is 28mm/s (F1680)
6eed7354-d5dd-460e-97e3-f1ea977b870b-image.png

Owns various duet boards and is the main wiki maintainer for the Teamgloomy LPC/STM32 port of RRF. Assume I'm running whatever the latest beta/stable build is

   0
slabstationsslabstations 4 Oct 2022, 04:47
@jay_s_uk Honestly I am not sure, whatever the default is when you control it through the web interface. I started with the creality ender 3 base config in the configurator. I have gotten an ender 3 pro up and running, so I just copied the config and change printer size to fit the lulzbot. Only thing I did different was add a bl touch to the lulzbot, which seems to be working properly, have only gotten as far as retracting and dropping it.

   0
NorderNorder 4 Oct 2022, 04:48
According to the previous information... Motor model / Za + Zb / voltages and speeds from the config.g) this result should be more accurate.
I didn't know the values for "Phase resistance" and "Phase inductance" and I didn't change the displayed value either.

Unbenannt.JPG

@slabstations :
I asked you earlier whether you have two end stops and possibly want to use E1 and Za for the two Z motors !? 🙂

Google Translate
-- Original Text --

Nach den bisherigen Infos... Motoren Modell / Za + Zb / Spannungen und Geschwindigkeiten aus der config.g) sollte dieses Ergebnis zutreffender sein.
Werte für "Phase resistance" und "Phase inductance" wusste ich nicht und habe den angezeigten Wert auch nicht geändert.

@slabstations :
Ich hatte Dich vorhin gefragt ob Du zwei Endstops hast und eventuell E1 und Za für die beiden Z-Motoren nutzen willst !? 🙂

DDA5X... 0.9° Stepper... Linearrails... Duet 2 Wifi... PT100 Board... Duet IR-Probe... Dyze Pro Kit up to 500°C.. etc
Thingiverse

   0
slabstationsslabstations 4 Oct 2022, 04:49
@jay_s_uk I would like the dual z bed leveling. Do you think I should try setting that up and hope this problem goes away, or do you think it could be something I have setup wrong?

   0
slabstationsslabstations 4 Oct 2022, 04:52
@norder I only have one endstop switch mounted on highend of the left z axis. And setting up two z motors sounds good, I like the bed leveling feature!

   0
jay_s_ukjay_s_uk 4 Oct 2022, 04:52
@slabstations it definitely won't hurt as it makes sure everything is level. it may or may not help your issue though.
I would bump your current for Z up to 1200, separate them out as you say (don't forget the jumpers). and map E1 to Z using M584 e.g. M584 Z2:4
Then repost your config, homez and homeall

Owns various duet boards and is the main wiki maintainer for the Teamgloomy LPC/STM32 port of RRF. Assume I'm running whatever the latest beta/stable build is

   0
slabstationsslabstations 7 Oct 2022, 09:12
@jay_s_uk I followed the instructions from this https://duet3d.dozuki.com/Wiki/Bed_levelling_using_multiple_independent_Z_motors Hopefully everything is good, I don't want to test it until its been looked over just in case! I really appreciate your time and help!
homeall.g config.g bed.g homez.g

   0
slabstationsslabstations  7 Oct 2022, 09:15
@jay_s_uk

config.g: ; Configuration file for Duet WiFi (firmware version 3)
; executed by the firmware on start-up
;
; generated by RepRapFirmware Configuration Tool v3.3.13 on Sat Sep 24 2022 04:07:34 GMT-0400 (Eastern Daylight Time)

; General preferences
;M575 P1 S1 B57600                              ; enable support for PanelDue
G90                                            ; send absolute coordinates...
M83                                            ; ...but relative extruder moves
M550 P"LulzBot Mini"                           ; set printer name
;M918 P1 E4 F2000000                            ; configure direct-connect display

; Network
M551 P"1084"                                   ; set password
M552 S1                                        ; enable network
M586 P0 S1                                     ; enable HTTP
M586 P1 S0                                     ; disable FTP
M586 P2 S0                                     ; disable Telnet

; Drives
M569 P0 S1                                     ; physical drive 0 goes forwards
M569 P1 S0                                     ; physical drive 1 goes backwards
M569 P2 S1                                     ; physical drive 2 goes forwards
M569 P3 S0                                     ; physical drive 3 goes backwards
M584 X0 Y1 Z2:4 E3                             ; set drive mapping
M671 x20:200 y0:0 s0.5                         ; leadscrews at left (connected to Z) and right (connected to E1) of X axis
M208 X05:205 Y0:200                            ; X carriage moves from -5 to 205, Y bed goes from 0 to 200
M350 X16 Y16 Z16 E16 I1                        ; configure microstepping with interpolation
M92 X101.26 Y100.00 Z1600 E436.54              ; set steps per mm
M566 X1200.00 Y1200.00 Z24.00 E300.00          ; set maximum instantaneous speed changes (mm/min)
M203 X9000.00 Y9000.00 Z1200.00 E6000.00       ; set maximum speeds (mm/min)
M201 X500.00 Y500.00 Z100.00 E5000.00          ; set accelerations (mm/s^2)
M906 X800 Y800 Z1200 E1000 I50                  ; set motor currents (mA) and motor idle factor in per cent
M84 S30                                        ; Set idle timeout

; Axis Limits
M208 X0 Y0 Z0 S1                               ; set axis minima
M208 X170 Y180 Z148 S0                         ; set axis maxima

; Endstops
M574 X1 S1 P"xstop"                            ; configure switch-type (e.g. microswitch) endstop for low end on X via pin xstop
M574 Y1 S1 P"ystop"                            ; configure switch-type (e.g. microswitch) endstop for low end on Y via pin ystop
M574 Z2 S1 P"zstop"                            ; configure switch-type (e.g. microswitch) endstop for high end on Z via pin zstop

; Z-Probe
M950 S0 C"exp.heater3"                         ; create servo pin 0 for BLTouch
M558 P9 C"^zprobe.in" H5 F120 T6000            ; set Z probe type to bltouch and the dive height + speeds
G31 P500 X0 Y0 Z2.5                            ; set Z probe trigger value, offset and trigger height
M557 X15:170 Y15:180 S20                       ; define mesh grid

; Heaters
M308 S0 P"bedtemp" Y"thermistor" T100000 B4092 ; configure sensor 0 as thermistor on pin bedtemp
M950 H0 C"bedheat" T0                          ; create bed heater output on bedheat and map it to sensor 0
M307 H0 B0 S1.00                               ; disable bang-bang mode for the bed heater and set PWM limit
M140 H0                                        ; map heated bed to heater 0
M143 H0 S110                                   ; set temperature limit for heater 0 to 110C
M308 S1 P"e0temp" Y"thermistor" T100000 B4092  ; configure sensor 1 as thermistor on pin e0temp
M950 H1 C"e0heat" T1                           ; create nozzle heater output on e0heat and map it to sensor 1
M307 H1 B0 S1.00                               ; disable bang-bang mode for heater  and set PWM limit
M143 H1 S275                                   ; set temperature limit for heater 1 to 275C

; Fans
M950 F0 C"fan0" Q500                           ; create fan 0 on pin fan0 and set its frequency
M106 P0 C"Extruder Fan" S1 H1 T160             ; set fan 0 name and value. Thermostatic control is turned on
M950 F1 C"fan1" Q500                           ; create fan 1 on pin fan1 and set its frequency
M106 P1 C"Case Fan" S1 H0 T50                  ; set fan 1 name and value. Thermostatic control is turned on
M950 F2 C"fan2" Q500                           ; create fan 2 on pin fan2 and set its frequency
M106 P2 C"Part Cooling" S1 H-1                 ; set fan 2 name and value. Thermostatic control is turned off

; Tools
M563 P0 S"Extruder" D0 H1 F0                   ; define tool 0
G10 P0 X0 Y0 Z0                                ; set tool 0 axis offsets
G10 P0 R0 S0                                   ; set initial tool 0 active and standby temperatures to 0C

; Custom settings are not defined
; bed.g
; called to perform automatic bed compensation via G32
;
; generated by RepRapFirmware Configuration Tool v3.3.13 on Sat Sep 24 2022 04:07:34 GMT-0400 (Eastern Daylight Time)
M561 ; clear any bed transform
G29  ; probe the bed and enable compensation

G28 ; home
G30 P0 X20 Y100 Z-99999 ; probe near a leadscrew, half way along Y axis
G30 P1 X180 Y100 Z-99999 S2 ; probe near a leadscrew and calibrate 2 motors
; homeall.g
; called to home all axes
;
; generated by RepRapFirmware Configuration Tool v3.3.13 on Sat Sep 24 2022 04:07:34 GMT-0400 (Eastern Daylight Time)
...
G1 H1 Z153 F240         ; move Z up stopping at the endstop
G90                     ; absolute positioning
G92 Z148                ; set Z position to axis maximum (you may want to adjust this)
At the end of homeall and homez you are using an endstop to home the Z axis. You'll want to use the probe instead. To do this, remove those 3 lines and replace them with something like
G90
G1 X150 Y150 F6000 ; move to bed center
G30 ; probe the Z axis
You can also add those lines to the end of bed.g so that any change in Z position from the tilt correction is captured.
-
@slabstations This is not relevant to your problem, but you have two sets of axis limit commands (M208) - one under your "drives" section, the other in "axis limits". The latter will override the former so you might want to remove the former and/or make sure that the latter matches the machine (the two set of values are different and only one can be true).
-
@Phaedrux I was able to get both z motors running properly and able to run the g32 command successfully. Everything seems good to go, but when I heat the bed after PID the board makes loud chrips/hums and such. Here is a link to what it sounds like https://youtube.com/shorts/MbS4bipRc7Y?feature=share I tried adding Q10 to M950 H0 and same sounds just different pitch. It was printing, but has since stopped in the middle of the print.
; Configuration file for Duet WiFi (firmware version 3)
; executed by the firmware on start-up
;
; generated by RepRapFirmware Configuration Tool v3.3.13 on Sat Sep 24 2022 04:07:34 GMT-0400 (Eastern Daylight Time); General preferences
;M575 P1 S1 B57600 ; enable support for PanelDue
G90 ; send absolute coordinates...
M83 ; ...but relative extruder moves
M550 P"LulzBot Mini" ; set printer name
;M918 P1 E4 F2000000 ; configure direct-connect display; Network
M551 P"1084" ; set password
M552 S1 ; enable network
M586 P0 S1 ; enable HTTP
M586 P1 S0 ; disable FTP
M586 P2 S0 ; disable Telnet; Drives
M569 P0 S1 ; physical drive 0 goes forwards
M569 P1 S0 ; physical drive 1 goes backwards
M569 P2 S1 ; physical drive 2 goes forwards
M569 P3 S1 ; physical drive 3 goes backwards
M584 X0 Y1 Z2:4 E3 ; set drive mapping
M671 x0:170 y40:40 s0.5 ; leadscrews at left (connected to Z) and right (connected to E1) of X axis
M208 X05:205 Y0:200 ; X carriage moves from -5 to 205, Y bed goes from 0 to 200
M350 X16 Y16 Z16 E16 I1 ; configure microstepping with interpolation
M92 X101.26 Y100.00 Z1600 E436.54 ; set steps per mm
M566 X1200.00 Y1200.00 Z24.00 E300.00 ; set maximum instantaneous speed changes (mm/min)
M203 X9000.00 Y9000.00 Z1200.00 E6000.00 ; set maximum speeds (mm/min)
M201 X500.00 Y500.00 Z100.00 E5000.00 ; set accelerations (mm/s^2)
M906 X800 Y800 Z800 E2000 I50 ; set motor currents (mA) and motor idle factor in per cent
M84 S30 ; Set idle timeout; Axis Limits
M208 X0 Y0 Z0 S1 ; set axis minima
M208 X170 Y180 Z148 S0 ; set axis maxima; Endstops
M574 X1 S1 P"xstop" ; configure switch-type (e.g. microswitch) endstop for low end on X via pin xstop
M574 Y1 S1 P"ystop" ; configure switch-type (e.g. microswitch) endstop for low end on Y via pin ystop
M574 Z2 S1 P"zstop" ; configure switch-type (e.g. microswitch) endstop for high end on Z via pin zstop; Z-Probe
M950 S0 C"exp.heater3" ; create servo pin 0 for BLTouch
M558 P9 C"^zprobe.in" H5 F120 T6000 ; set Z probe type to bltouch and the dive height + speeds
G31 P500 X-22 Y-13 Z2.056 ; set Z probe trigger value, offset and trigger height
M557 X0:170 Y0:110 S20 ; define mesh grid; Heaters
M308 S0 P"bedtemp" Y"thermistor" T100000 B4092 ; configure sensor 0 as thermistor on pin bedtemp
M950 H0 C"bedheat" T0 Q15 ; create bed heater output on bedheat and map it to sensor 0
M307 H0 R0.582 K0.516:0.000 D3.58 E1.35 S1.00 B0 ; disable bang-bang mode for the bed heater and set PWM limit
M140 H0 ; map heated bed to heater 0
M143 H0 S110 ; set temperature limit for heater 0 to 110C
M308 S1 P"e0temp" Y"thermistor" T100000 B4092 ; configure sensor 1 as thermistor on pin e0temp
M950 H1 C"e0heat" T1 ; create nozzle heater output on e0heat and map it to sensor 1
M307 H1 B0 S1.00 ; disable bang-bang mode for heater and set PWM limit
M143 H1 S275 ; set temperature limit for heater 1 to 275C; Fans
M950 F0 C"fan0" Q500 ; create fan 0 on pin fan0 and set its frequency
M106 P0 C"Extruder Fan" S1 H1 T160 ; set fan 0 name and value. Thermostatic control is turned on
M950 F1 C"fan1" Q500 ; create fan 1 on pin fan1 and set its frequency
M106 P1 C"Case Fan" S1 H0 T50 ; set fan 1 name and value. Thermostatic control is turned on
M950 F2 C"fan2" Q500 ; create fan 2 on pin fan2 and set its frequency
M106 P2 C"Part Cooling" S1 H-1 ; set fan 2 name and value. Thermostatic control is turned off; Tools
M563 P0 S"Extruder" D0 H1 F0 ; define tool 0
G10 P0 X0 Y0 Z0 ; set tool 0 axis offsets
G10 P0 R0 S0 ; set initial tool 0 active and standby temperatures to 0C; Custom settings are not defined
-
@slabstations said in Duet 2 Wifi Dual Z issue after increasing esteps:
M950 H0 C"bedheat" T0 Q15
Is the parameter Q with the value 15 wanted? Default is Q250 for heaters.
This could cause the hissing noise when Q15 is not requested for the heater.If Q250 is correct for the heater I would repeat the PID tuning.
DDA5X... 0.9° Stepper... Linearrails... Duet 2 Wifi... PT100 Board... Duet IR-Probe... Dyze Pro Kit up to 500°C.. etc
Thingiverse -
@norder I did not have the Q15 in there before and it did the same thing, I had read on a few post on the forum that it may fix it. I even set it to 250 and same noise
-
@slabstations
You always had the hissing, or when did it start?DDA5X... 0.9° Stepper... Linearrails... Duet 2 Wifi... PT100 Board... Duet IR-Probe... Dyze Pro Kit up to 500°C.. etc
Thingiverse -
Do you mean the noise that can be heard when you show the print head?
-
You could try Q1 or Q2 even. I don't think you'll be able to totally eliminate the sound though.
@slabstations said in Duet 2 Wifi Dual Z issue after increasing esteps:
It was printing, but has since stopped in the middle of the print.
Did you stop it or are you saying it stopped? Was there an error message? What exactly happened?
-
@norder It starts to play a high pitch sound when the bed is being heated, besides that it seems normal. And the sound in the video that syncs up with the red light flashing on the board, not the steppers moving.
-
@phaedrux I tried that too and it was still annoyingly loud, do you think it could be the power supply? I could try hooking a meanwell one up to it.
-
@Phaedrux The stock one on the LulzBot Mini is a 24v 150watt, meanwell is 24v 350watts.