Sovol SV08 Multiple Motion System Upgrade.
-
@dwuk3d said in Sovol SV08 Multiple Motion System Upgrade.:
@droftarts Will be interesting to see if the video gets much pick up as it is certainly a very elegant design and could completely remove the need for me to add single nozzle multiplexing on top of tool changing - plus also remove the need for lots of electronics and motors etc. for the extra tools and multiplexer
Might do a better version of the video with a few animations of the different options next.
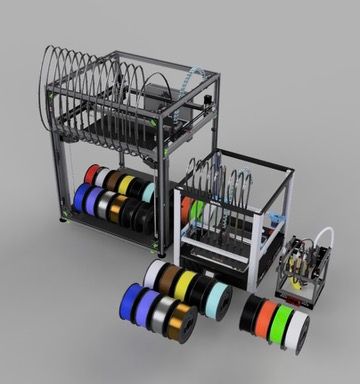
Finally got round to starting on some INDX/SV08 animations - which will eventually include my currently planned 2 Gantry, 3 Toolhead, rotating bed version - with some full multi colour ship print simulations.
Blender is very powerful - but I find it very hard to use compared to Fusion - I find I have to google at least half of the commands, including ones I have used only a few minutes ago - due to the odd keystrokes with combinations of modifier keys.
Doesn't help too that I am using a Mac - whereas most of the documentation and explanation videos use the windows versions of the keystroke modifier keys.

The INDX on SV08 renders I did last week got retweeted by both SOVOL and BONDTECH which was good.
-
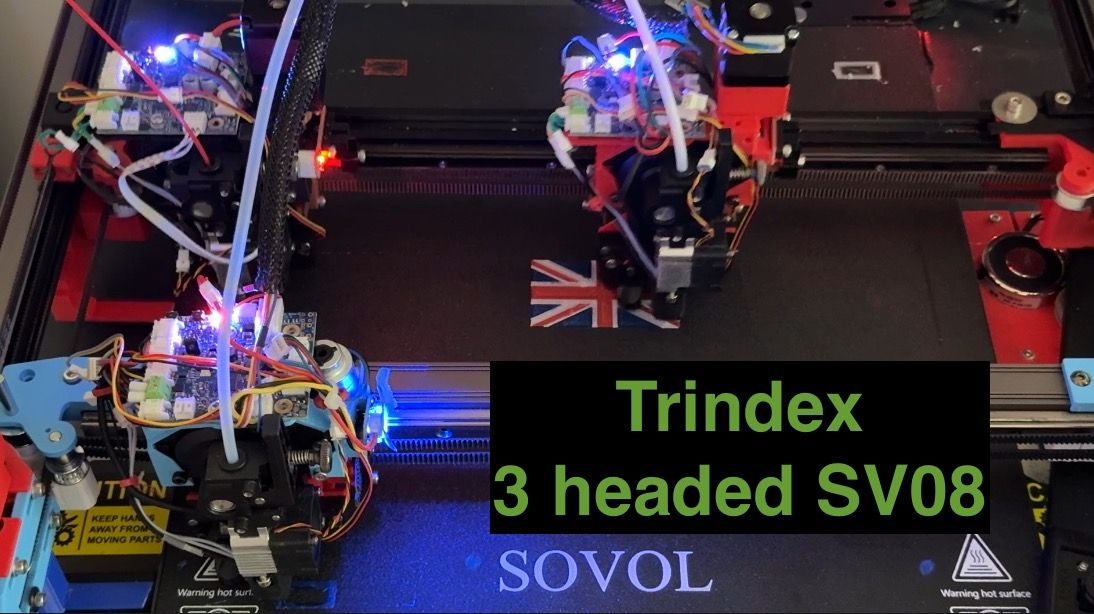
Started making some progress on the Trindex SV08 printer again.
Did some simple size test prints - and started getting issues with Z offsets.
I think I will have to improve my Z alignment - either by using 'voron tap' on all of the tools, or possibly using the ball probe Z offsets.
Plus a more serious issue.
When serial 3 headed printing - but with parallel print priming and colour switching between T1 (UV) and T0 (XY) - T0 consistently layer shifts about 10mm in the X and 5mm in the Y - and the layer shift if quite fast.
I had this issue a while ago and thought it was related to the Z hopper - but I have turned the Z hopping off on XY and are still getting the issue.
If I do similar prints with T2 (WV) and T0 (XY) - both of them print fairly well.
I have seen some oddities in normal alignment testing with X and Y sometimes jumping when I switch between tools - so not sure if it is an issue with my config, macros, slicer GCODE or a 3.5.4 problem.
Will continue investigating to try and get the problem to occur in a more simple gcode file without parallel printing.
Or might just try setting up another tool - T3 - and assign that to the UV - to see if I get the same issues.
-
@dwuk3d said in Sovol SV08 Multiple Motion System Upgrade.:
Plus a more serious issue.
I might have to do with endstop offset adjustment.
-
@o_lampe thanks - do you mean G92's.
I don't think I have any of those in my macros that would be invoked mid print - the problem occurs mid layer 2 = when the printing switches back between T1 to T0. But I will check.
I think though that something is changing the endstop offsets for the Y and Y axis and then jumping them quickly to the new position.
I have noticed some unexpected behaviour when moving around between tools and mapped axis - but haven't really found a way to recreate the issue.
If I don't manage to resolve the problem I suppose I could try removing the X and Y mapping completely from the T1 and T2 tools definitions , and instead post process the G0-G3's to specify U,V & W instead when using T1 or T2.
Ps - the sequence is
Homing.z offsets
Motion system 1 - layer 1 - print T0 section ok
Motion system 0 - layer 1 - wait for pre-heat, delay, preheat, T1 print prime, wait for print T0 to finish, T1 print layer 1, move Z up to layer 2, T1 print layer 2.
Motion system 1 - layer 2 - wait for pre-heat, delay, preheat, T0 prime for layer 2, wait for T1 to finish, T0 head jumps to incorrect position, T0 print layer 2 - with layer shift -
@dwuk3d said in Sovol SV08 Multiple Motion System Upgrade.:
Finally got round to starting on some INDX/SV08 animations - which will eventually include my currently planned 2 Gantry, 3 Toolhead, rotating bed version - with some full multi colour ship print simulations.
Nice animations!
Blender is very powerful - but I find it very hard to use compared to Fusion - I find I have to google at least half of the commands, including ones I have used only a few minutes ago - due to the odd keystrokes with combinations of modifier keys.
I keep shying away from learning Blender, but then I don't need to animate or simulate anything; Fusion 360 does everything I need for now. I know some people use Blender for all their CAD work, but that seems a bit masochistic.
Doesn't help too that I am using a Mac - whereas most of the documentation and explanation videos use the windows versions of the keystroke modifier keys.
I use a Mac too. So far, Fusion 360 has worked well, I haven't had any issues. A couple of years ago I was running it on an 2013 MacBook Pro, where performance was lacking when working with large models and rendering, so updated my desktop PC (I7-10700K with RX 6600XT - runs Windows 10/11, Linux, and MacOS with OpenCore), but after spending a long time trying to get it to run well, I ultimately bought an M2 14" MacBook Pro, which has been brilliant. Haven't turned on my PC for a long time! If I need to test something in Windows, I use Windows 11 ARM on VMware Fusion.
The INDX on SV08 renders I did last week got retweeted by both SOVOL and BONDTECH which was good.
Nice, fame at last! Maybe they could send some dev kit your way.
Ian
Bed-slinger - Mini5+ WiFi/1LC | RRP Fisher v1 - D2 WiFi | Polargraph - D2 WiFi | TronXY X5S - 6HC/Roto | CNC router - 6HC | Tractus3D T1250 - D2 Eth
-
@droftarts Yes I really like Fusion 360 too.
I did try doing a whole ship model in Blender - mainly due to the perspective corrector add-on - which is a really good way of tracing 3d objects when they are at an angle or have perspective distortion.
Ultimately though I gave up when print quality wasn't as good, plus having the spend ages wrestling will the models to correct model mesh errors.I'm still using a 2020 MacBook Air 8gb M1 - and it works pretty well - although it really started to struggle with this combined model - which I know would work easily in Blender. - I might upgrade to an M4 at some point with a larger screen for when I am away.
I got a PC too mainly for rendering of animations - which are about 60x faster on the 4070 Super/Ryzen7950X3D/32GB - vs the M1 GPU. Blender runs slightly quicker on Linux - but I usually do my rendering in windows 11.
Put up a couple more videos with a bit more detail, one of which got retweeted by Sovol - so fame building further. What would be really good though is if Sovol (or someone else) gets together with Bondtech to release a fully built, tested and supported INDX printer.
Free stuff might be nice - but I think it changes it from being a hobby - and starts putting pressure on to deliver. I haven't applied for the Bondtech Beta Programme as don't want to be sworn to secrecy.
PCBway have been in contact too about the triple headed printer videos - I guess having their logo on would add a certain amount of Kudos - but I don't think I need any custom PCBs - might need some CNC stuff though when I got to the rotary bed phase - but probably won't pursue it.Makerworld Boost points are pretty handy though for filament, plus Bambulab are selling quite a lot of parts too now. Plus might partially pay for an H2D if I decide to go for one. It's not until you try and create a printer do a major upgrade that you realise how much work must have gone into the X1C to make it so good.
-
Back to printer -
New Z Hopper motors arrived - bought full linear actuators - which I will take apart - as seems to be most cost effective way to source Nema 11 lead screw motors

Tap sensoring now working.
Logic is
1.Home All
2. G32 Z motor alignment
3. Then for each print head
4. Move other print heads 2mm up so that they are out of the way
5. Align Z hopper to just trigger optical sensor
6. Move head down about 0.02 mm to just past the trigger point.
7. Switch probes/endstops so that the Z axis now has the Z hopper end stop as its trigger. (inverted)
8. Move Z down until print head hits to bed and then pushes up slightly within the play of the print head to disable the triggered optical sensor.
9. Repeat for various points of the print bed,Short demo - showing tapping and play/flex - which might end up being a problem
https://youtu.be/5FGALqWV4t8Example Tap test macro.
;tap A.g M98.1 A"B On" ;reset probes to correct values M574 Z1 S2 K0; configure Z axis endstop M574 A1 P"122.io2.in" S1 ; configure A axis endstop G90 G1 Z3 F1000 G1 D{global.dOffset+2} F1000 G1 B{global.bOffset+2} F1000 var speed = 400 ;var w = {224, 224, 324, 324} ;var v = {310, 210, 210, 310} var w = {160, 200, 200, 160, 324} var v = {160, 160, 240, 240, 310} var point1 = -1 while iterations < 5 var iGrid = iterations G1 W{var.w[var.iGrid]} V{var.v[var.iGrid]} F10000 ;echo "W",var.w[iterations],"V",var.v[iterations] while iterations < 2 M574 Z1 S2 K0; configure Z axis endstop M574 A1 P"122.io2.in" S1 ; configure A axis endstop var aMax = 0 var aPos = 0 var aMin = 99 while iterations < 1 G1 A3 F{var.speed} M400 var aProbe = sensors.endstops[6].triggered if var.aProbe abort "A Probe already triggered" G1 H4 A-2 F{var.speed} set var.aPos = move.axes[6].machinePosition ;echo "D trigger pos",var.dPos if var.aPos > var.aMax set var.aMax = var.aPos if var.aPos < var.aMin set var.aMin = var.aPos var aProbe = false if var.aMax-var.aMin > 0.03 echo "variation",var.aMax-var.aMin,var.aMin,var.aMax while iterations < 4 ;echo "i",iterations G1 A{var.aPos-0.01*iterations} F{var.speed} M400 set var.aProbe = sensors.endstops[6].triggered if !var.aProbe abort "A Probe not triggered" else if iterations > 1 echo "lowered head ",0.01*iterations,"mm" break M574 A1 P"122.io3.in" S1 ; configure A axis to temporary Endstop M574 Z1 P"!122.io2.in" S1 ; configure Z Axis to A end stop inverted var zPos = 0 G1 Z{var.zPos+2} F500 M400 set var.aProbe = sensors.endstops[2].triggered if var.aProbe abort "AZ Probe already triggered" G1 H4 Z-7 F{var.speed} set var.zPos = move.axes[2].machinePosition if var.point1 == -1 set var.point1 = var.zPos echo "A zPos",var.zPos,"W",var.w[var.iGrid],"V",var.v[var.iGrid],"point",var.iGrid,"var",var.zPos-var.point1 G1 Z3 F1000 ;restore probes M574 Z1 S2 K0; configure Z axis endstop M574 A1 P"122.io2.in" S1 ; configure A axis endstop ; 122.io3.in - dummy endstop when A swapped out -
Printing getting better. I don't think the original problems with the flag in the video a few months ago were dimensional inaccuracies or alignment issues - rather the fact the it was cutting off some of the colours due to Axis limits.

-
Z offset Tapping now working quite reliably as long as the print heads are clean.
Lots more work to do on timings and speed, and print head design - but printer starting to come together.
-
@dwuk3d One of the first multicolour prints we did at RepRapPro with the Tri-colour Mendel, around 2013/14, was a Union Flag!

I don't have any pictures of the print, but the files are here: https://github.com/reprappro/Interesting-3D-Prints/tree/master/RRP Union flag2
Our other favourite was the multicolour frog: https://www.thingiverse.com/thing:329436
Ian
Bed-slinger - Mini5+ WiFi/1LC | RRP Fisher v1 - D2 WiFi | Polargraph - D2 WiFi | TronXY X5S - 6HC/Roto | CNC router - 6HC | Tractus3D T1250 - D2 Eth
-
@droftarts Cool - looks like that 3 colour printer predates the Prusa MMU1 by quite a lot.