Duet3D Logo Duet3D
    • Tags
    • Documentation
    • Order
    • Register
    • Login
    1. Home
    2. buzzby
    3. Posts
    • Profile
    • Following 0
    • Followers 0
    • Topics 10
    • Posts 47
    • Best 0
    • Controversial 0
    • Groups 0

    Posts made by buzzby

    • RE: Trying to remove blobs, what order to change things

      @engikeneer
      The testing continues. Thank you again for your suggestions.
      I did a test to see if temps made any difference. Printed a cylinder and went from 200c to 220 in 5c increments every 10mm. Zero no difference in how the seam was printed. Bit surprises it made no difference but a worthwhile test.

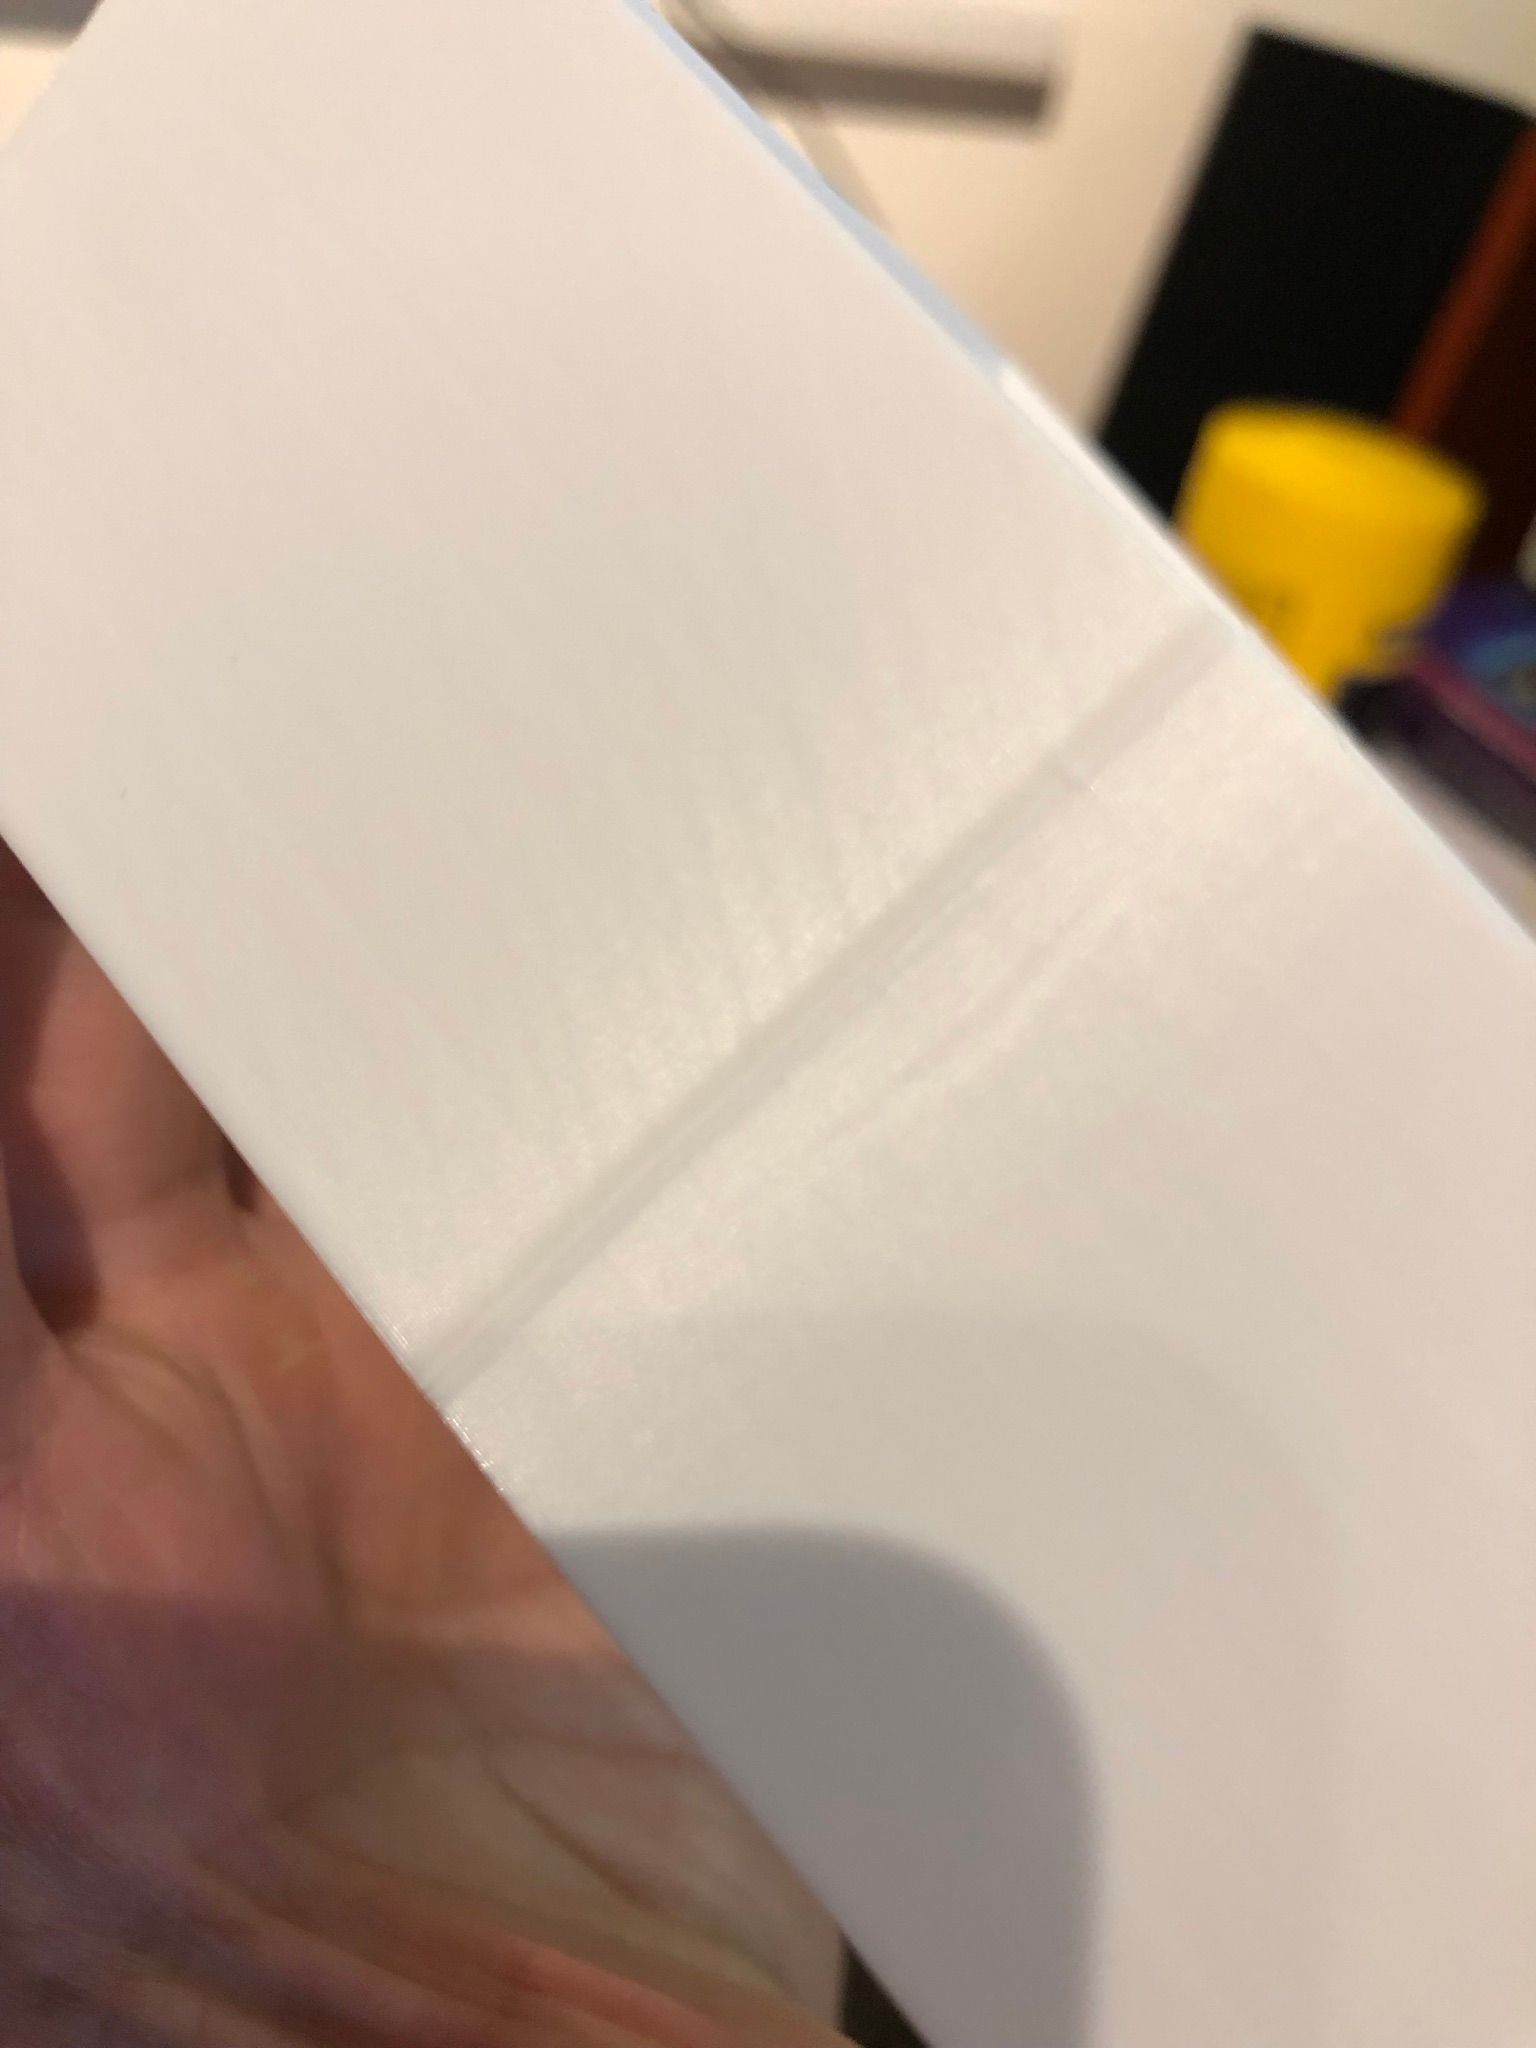
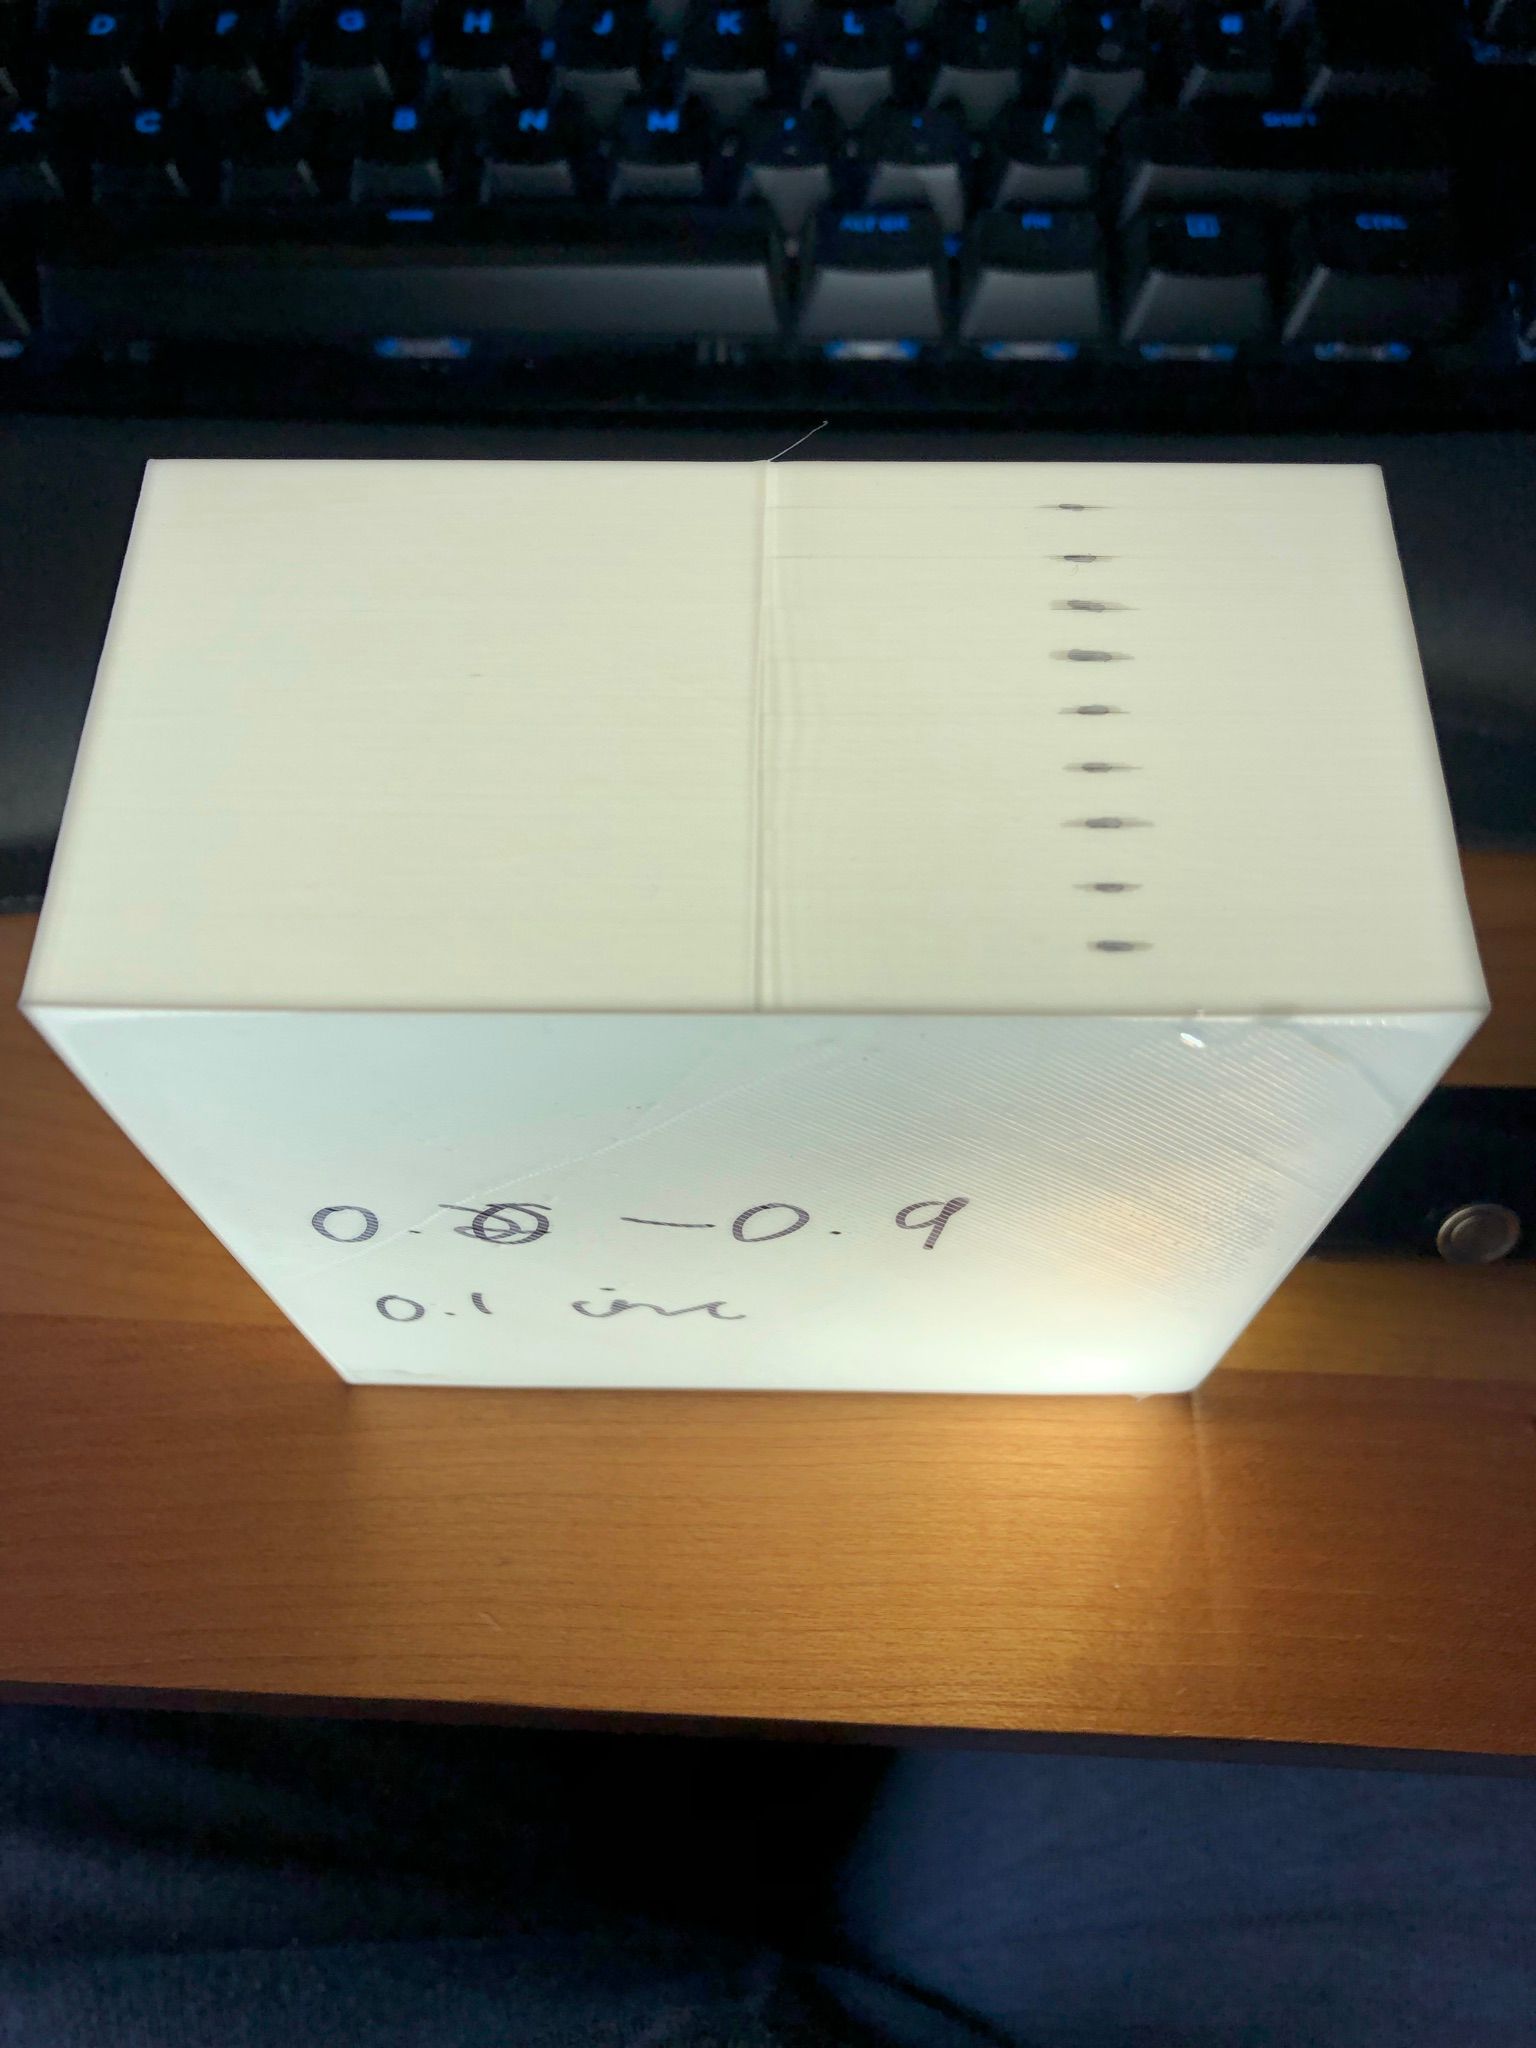
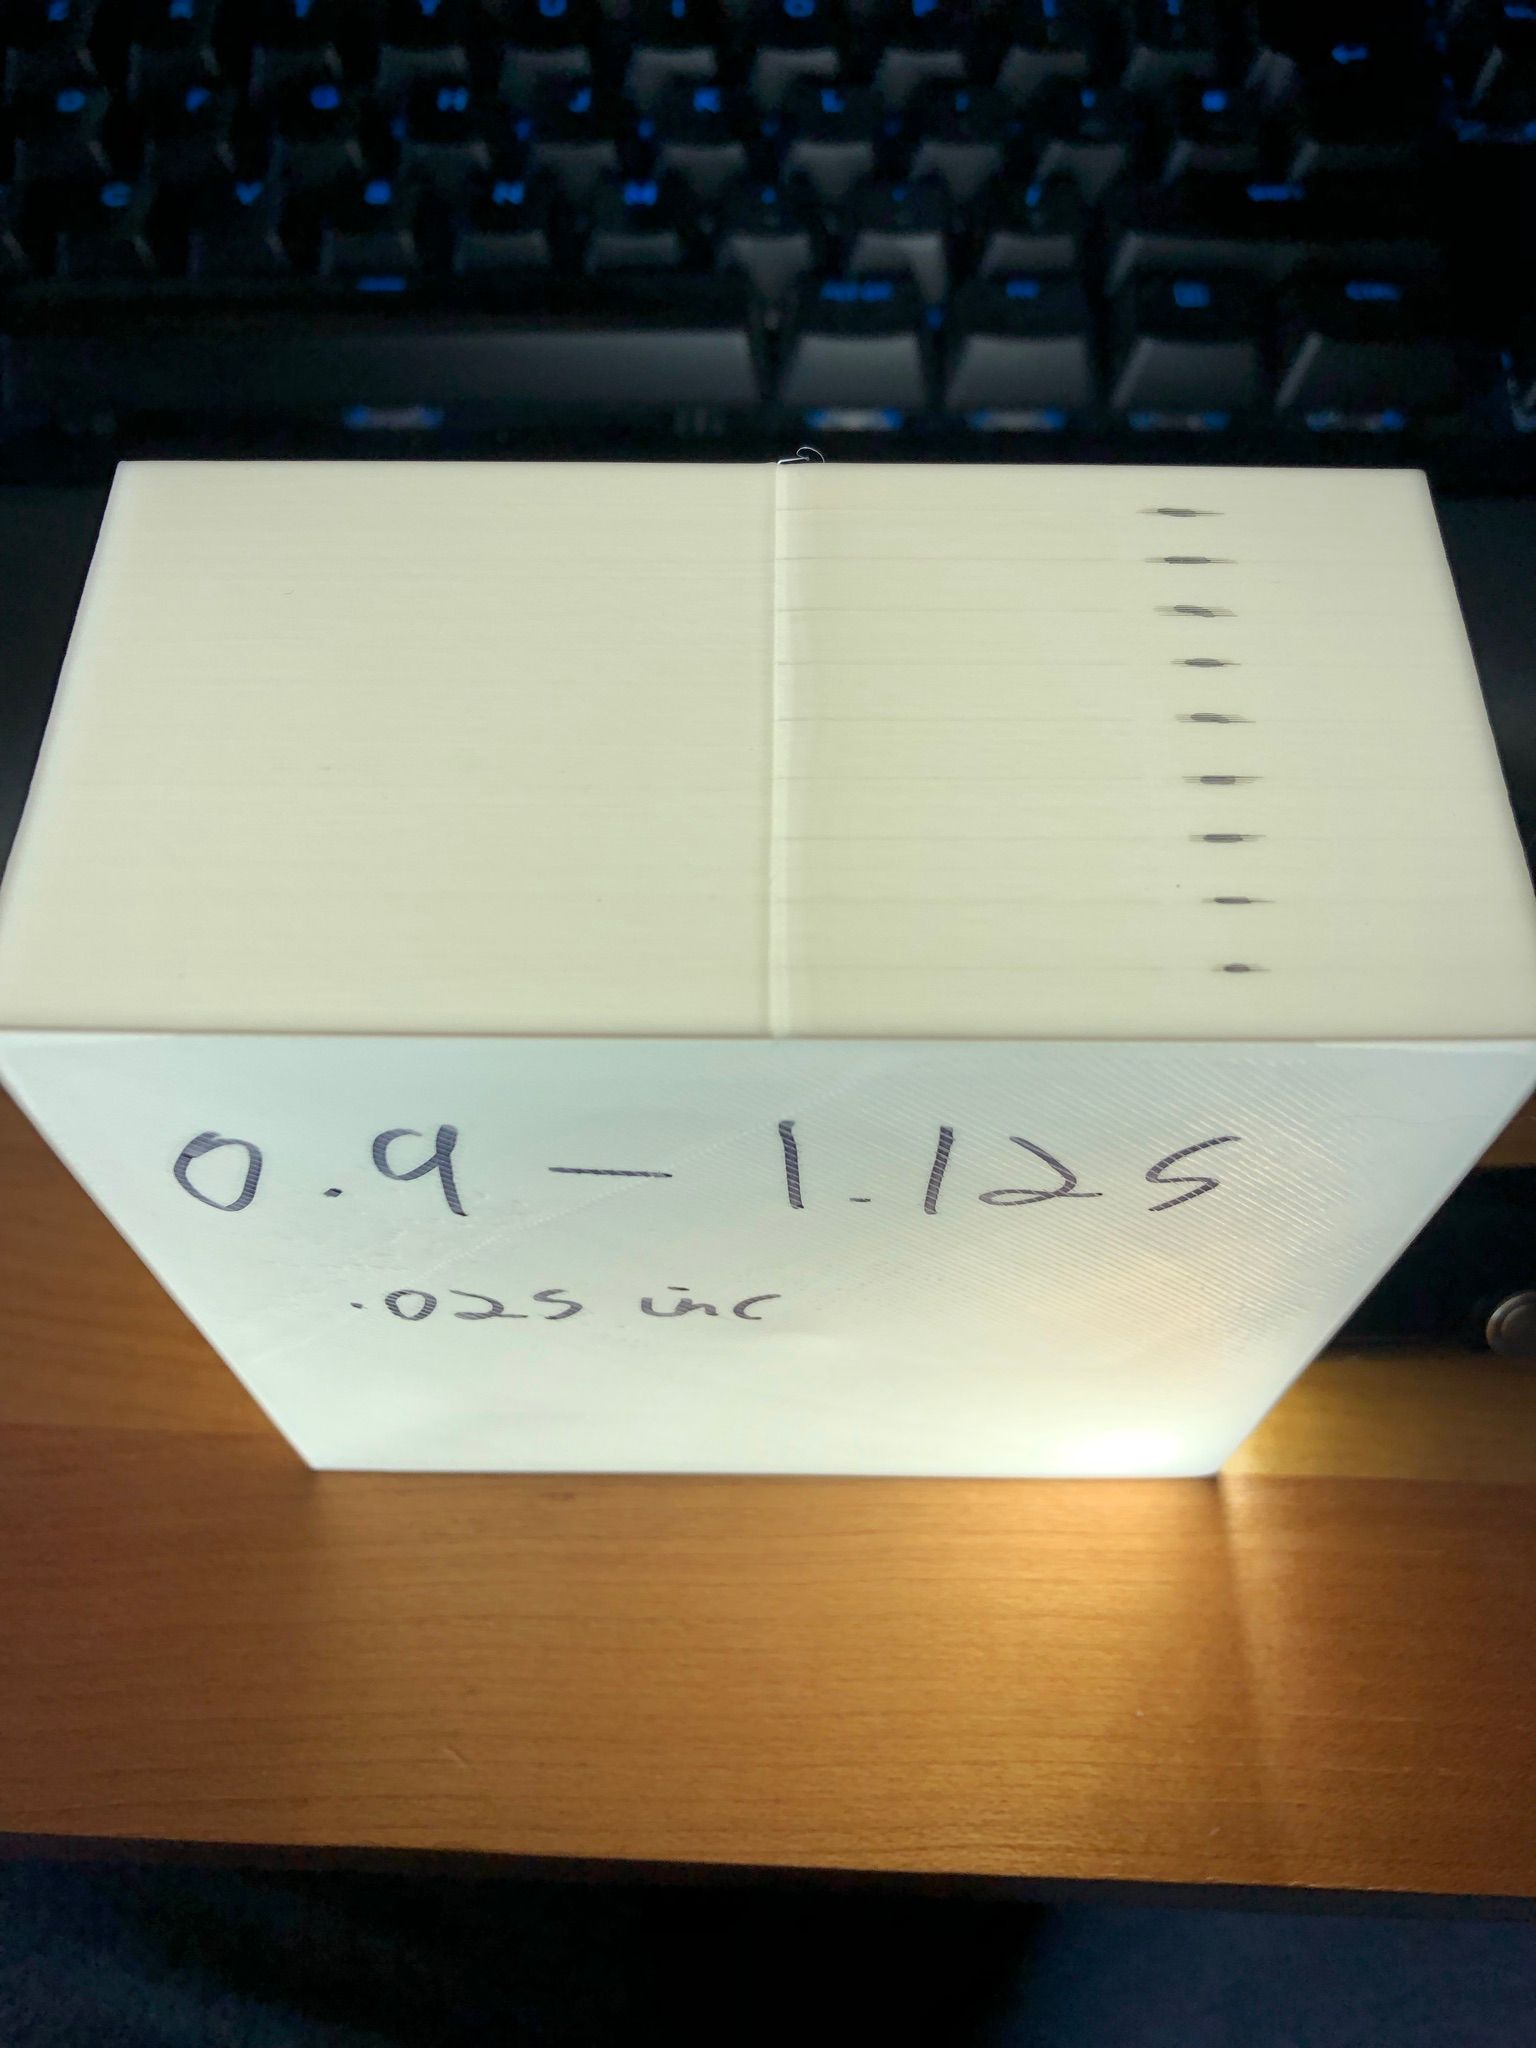
      I have continued with some box tests. I thought I was making progress but still cannot find a PA setting to get the sword test print I have to not weld itself together and I really don't want to have to use the slicer wipe function as that only works on a retraction. Anyway here are some pics of the box tests

      IMG_8045.JPEG IMG_8046.JPEG IMG_8047.JPEG IMG_8048.JPEG

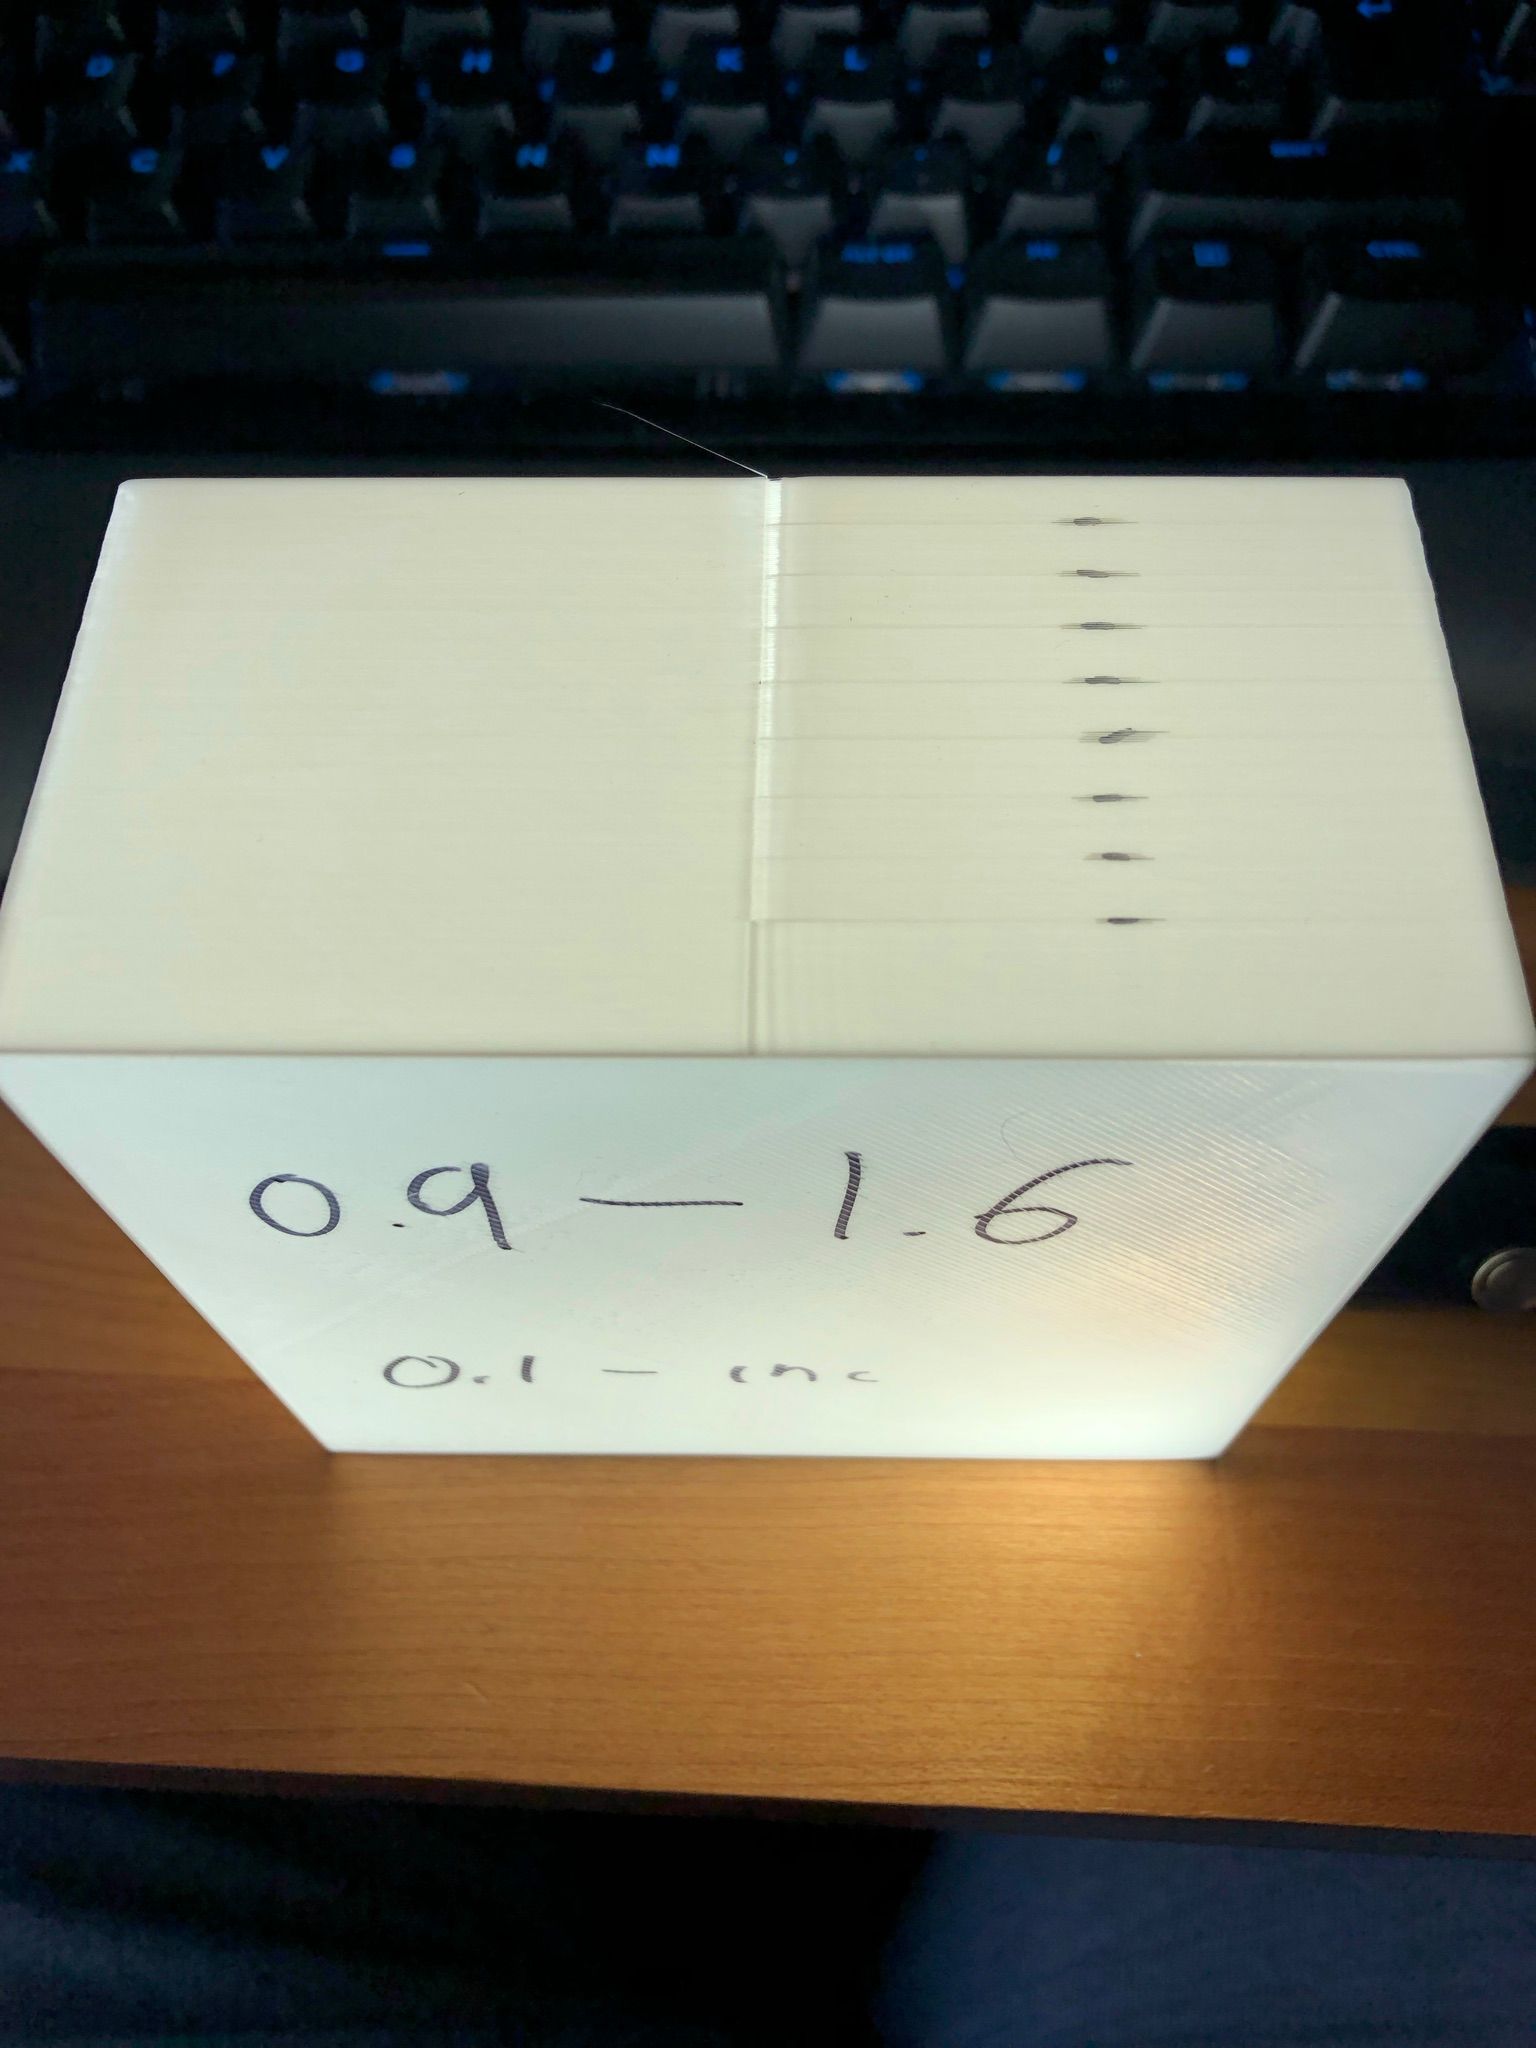
      Looked like there was a sweet spot between 0.9 and 1.1 but my print to try and find it didn't really have a huge range of differences.

      I found a forum thread here that talks about LOWERING the jerk on the travel axis.

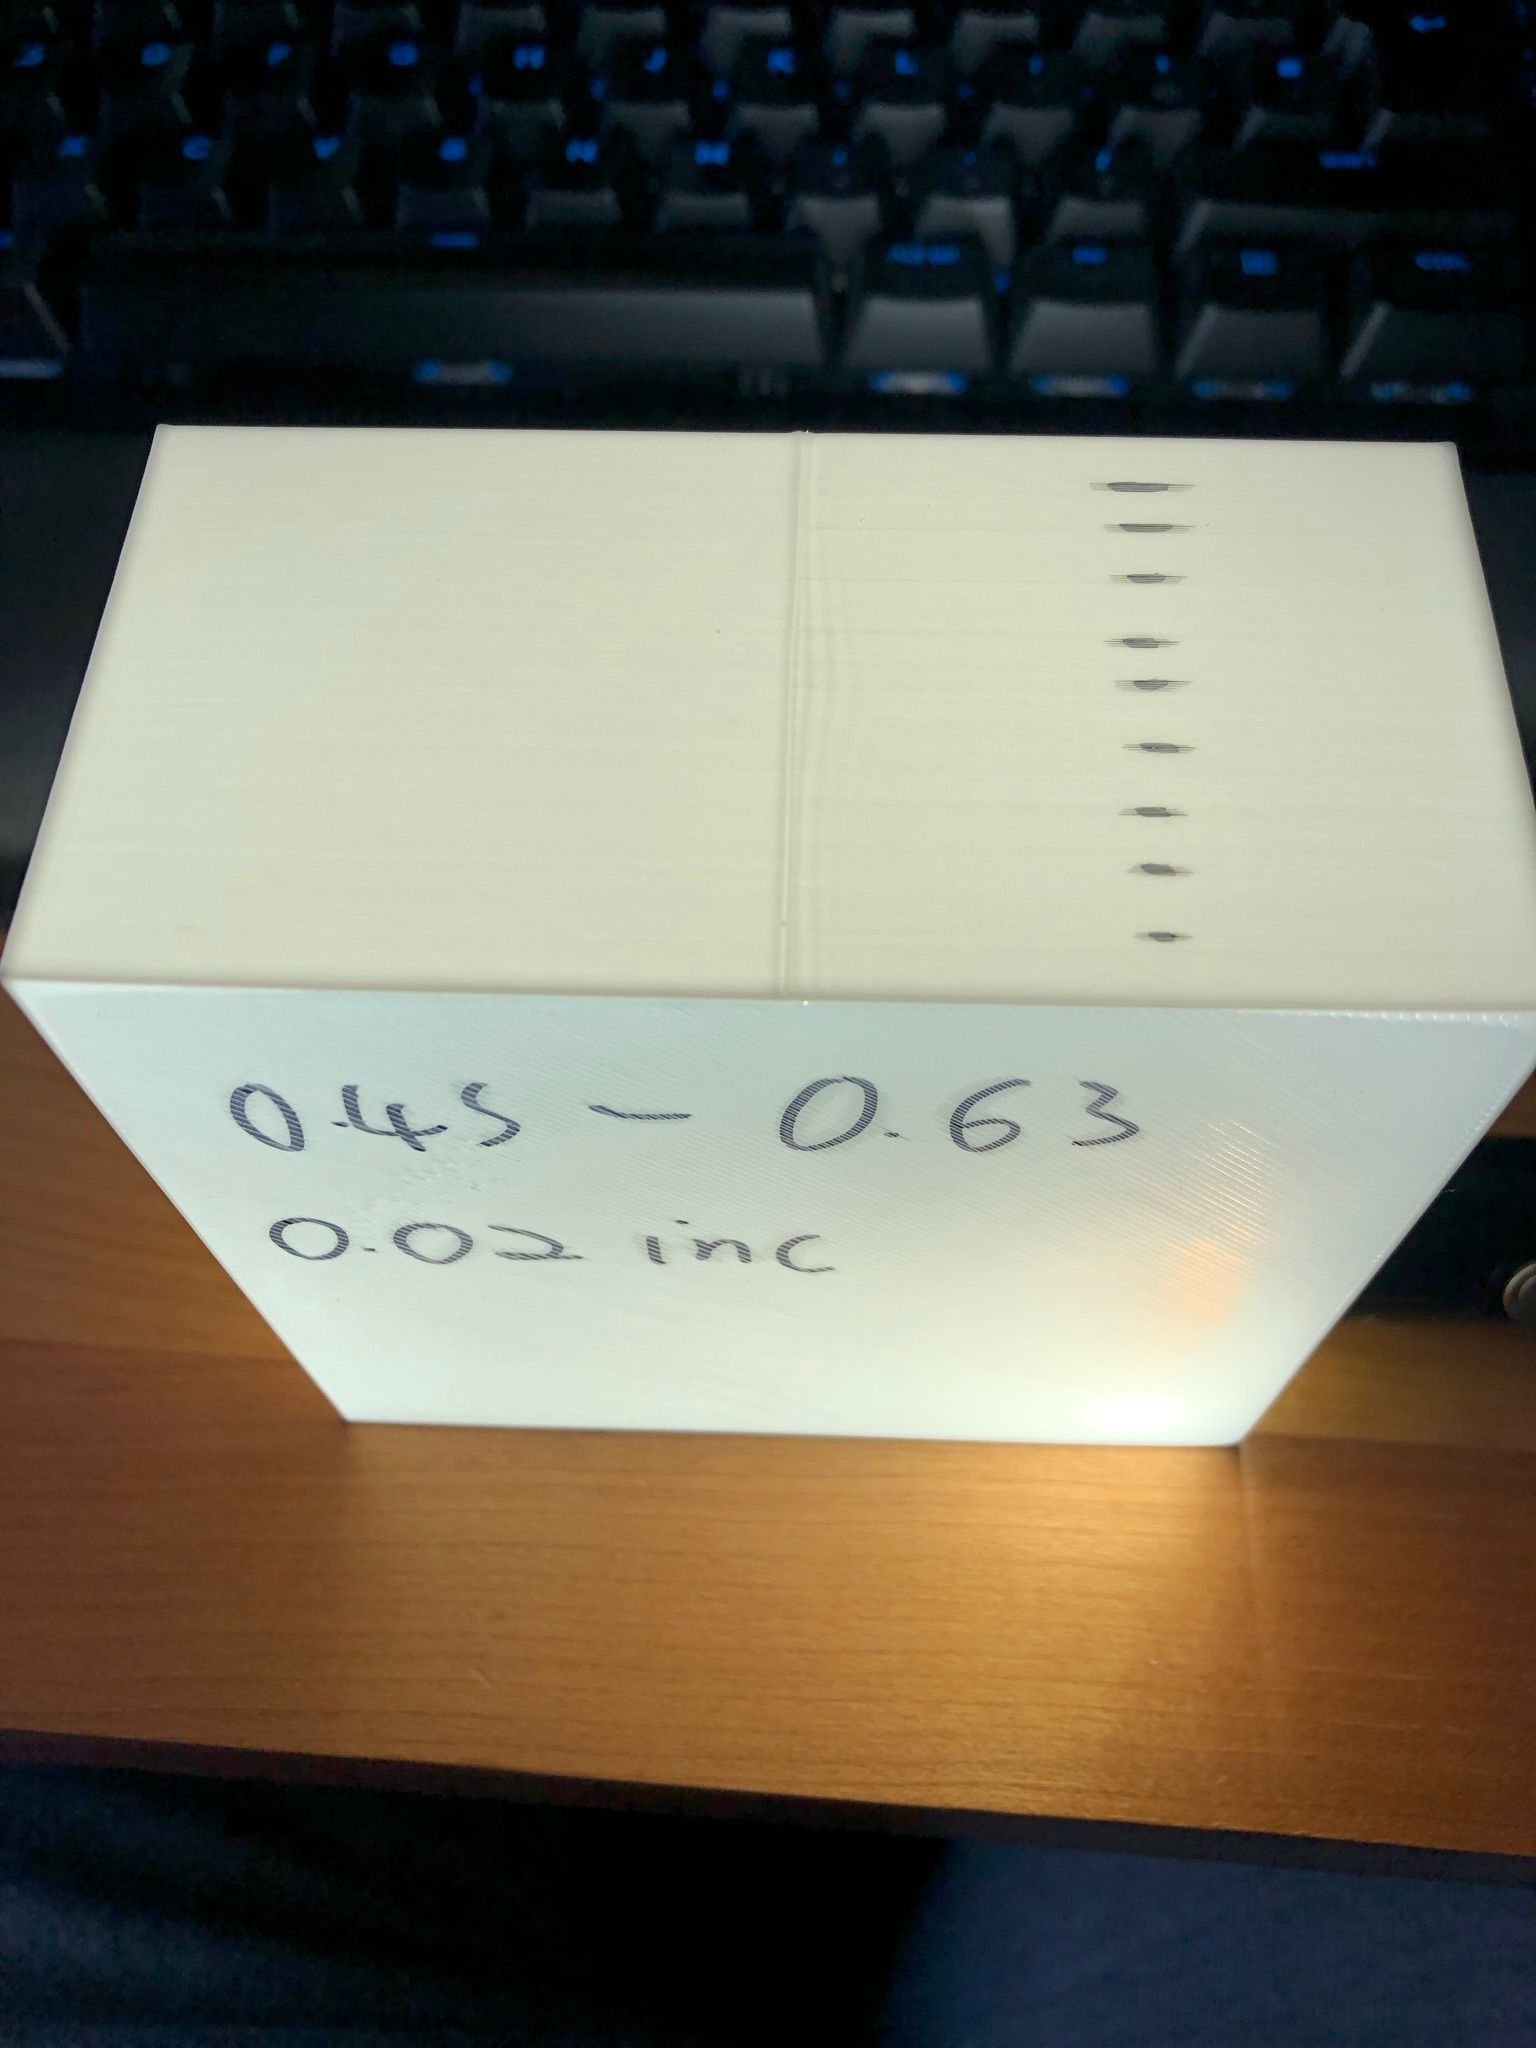
      Worth a shot, so i have halved my XYZ (delta) jerk speed from 900 to 450 and did another box test

      IMG_8044.JPEG

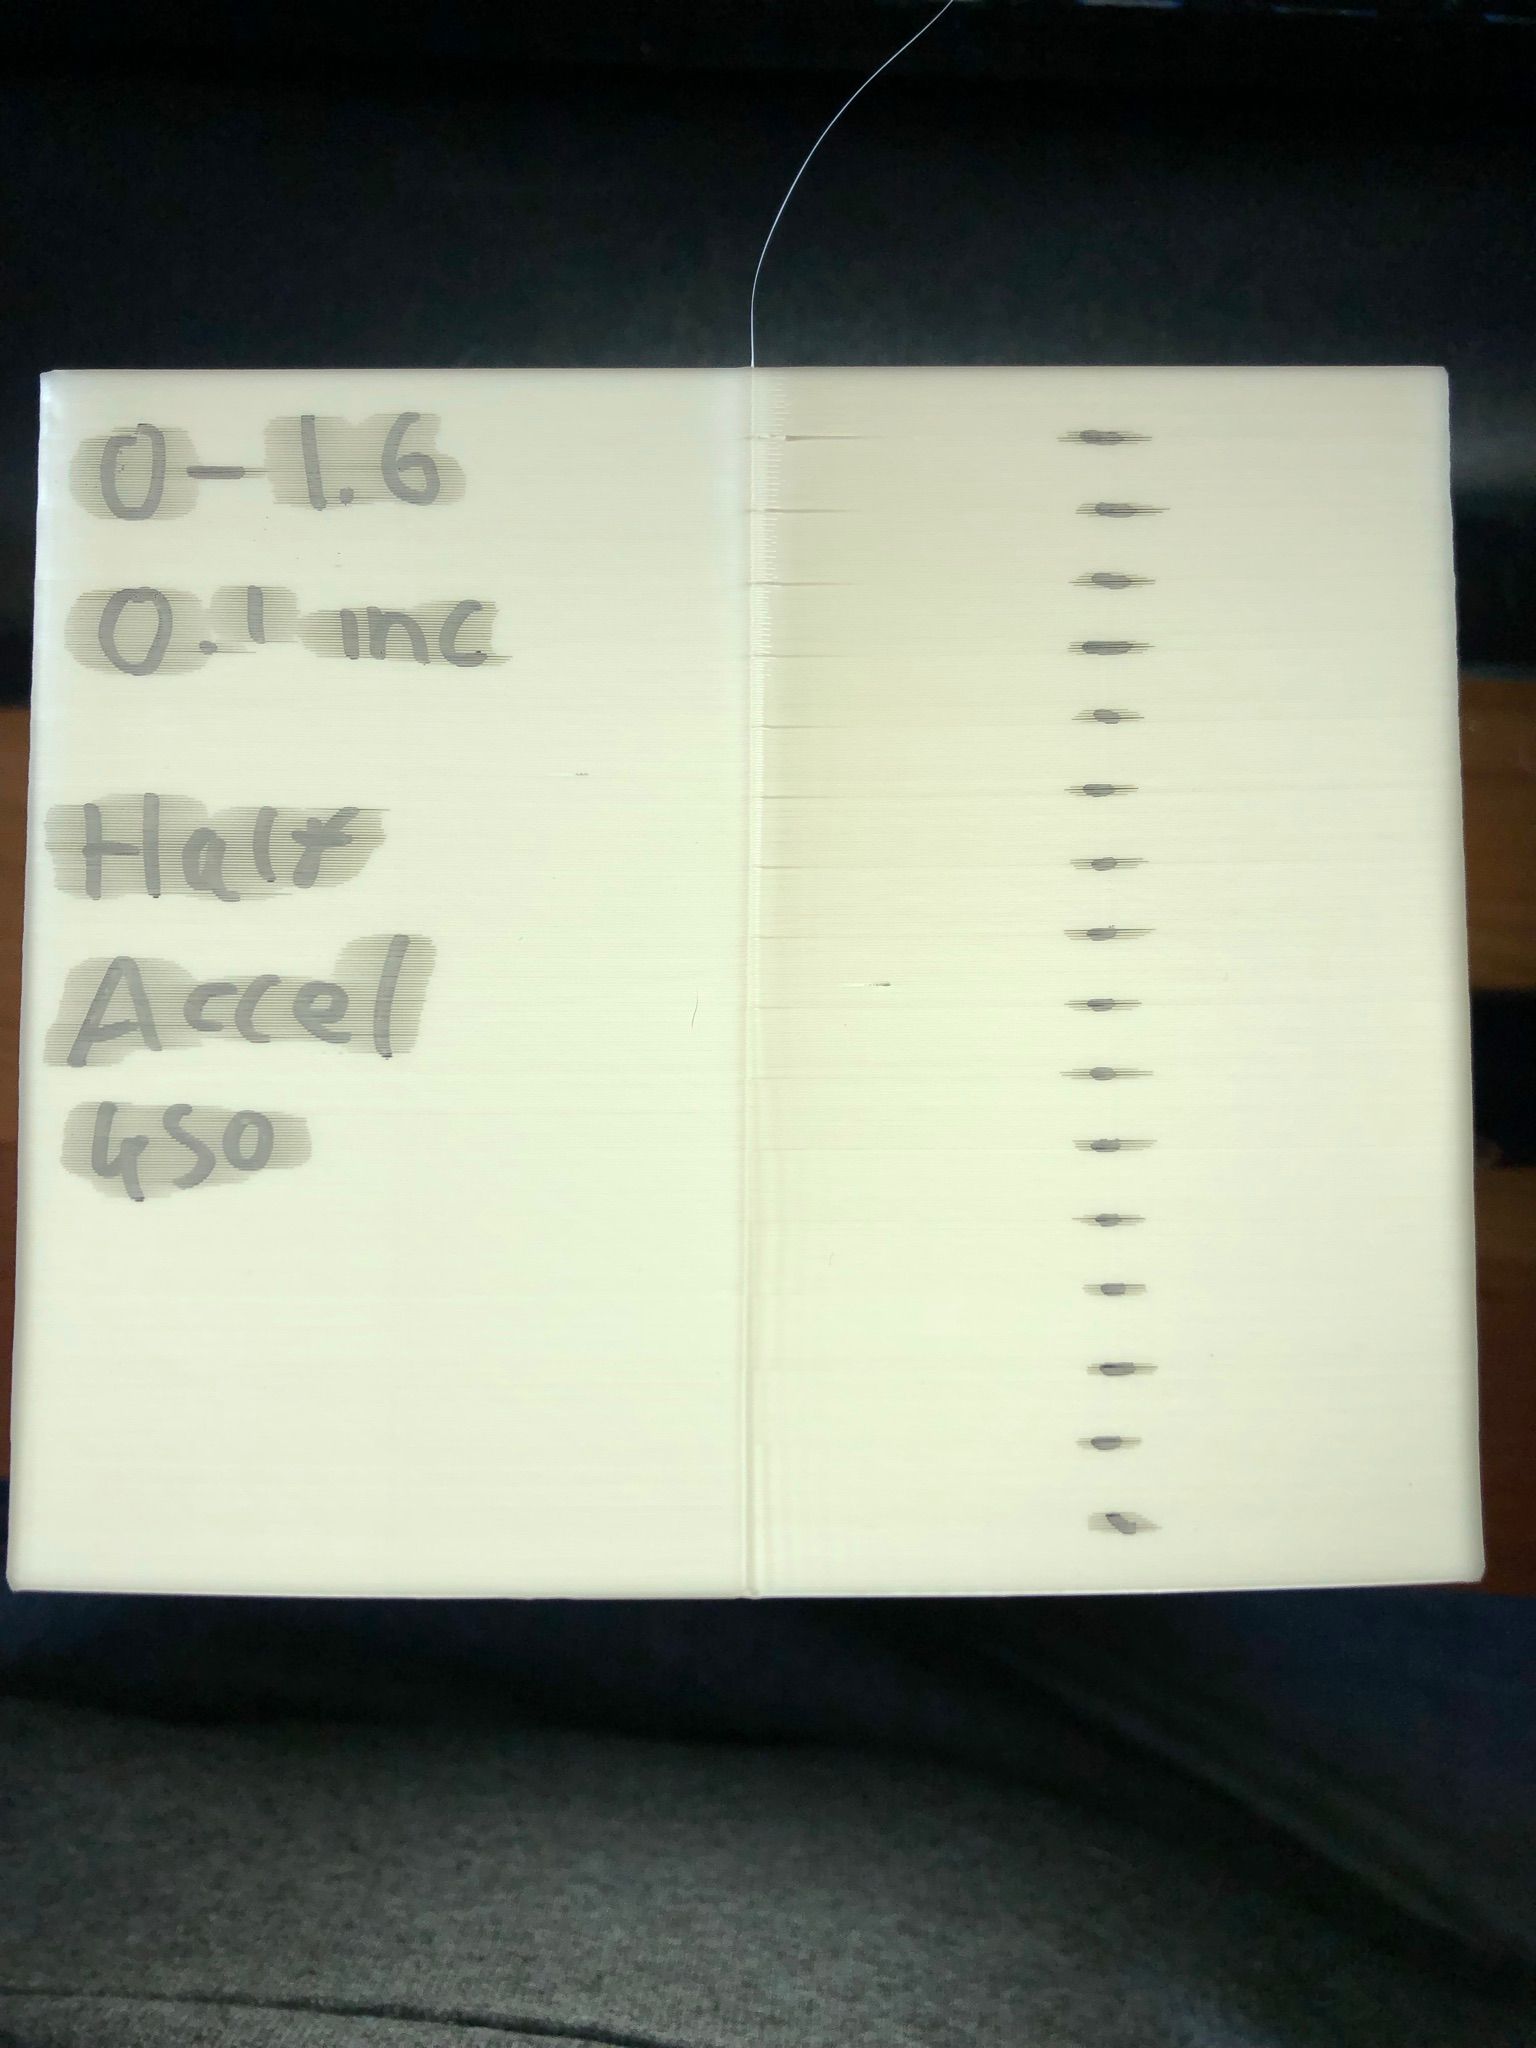
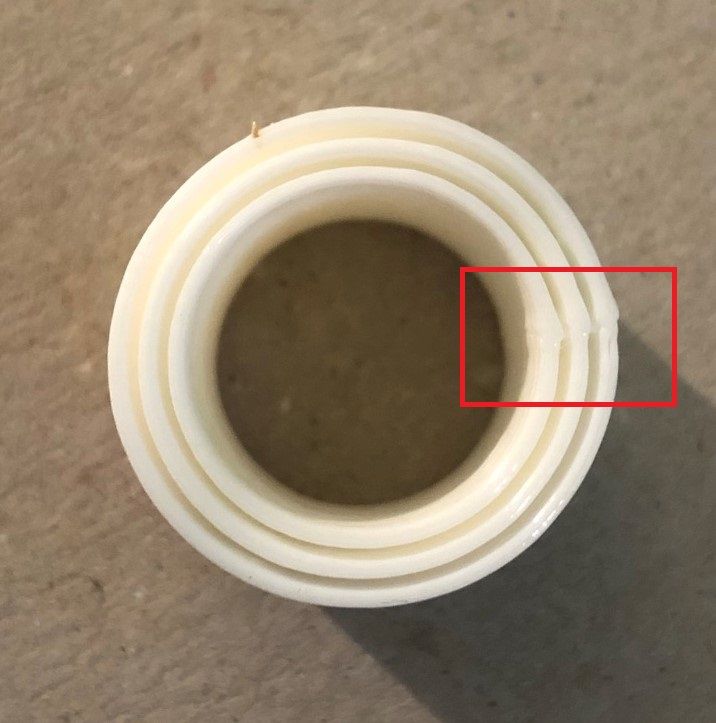
      This looks quite encouraging somewhere between 0.3 - 0.6

      On all of the pictures, the black mark shows when the PA value was changed.

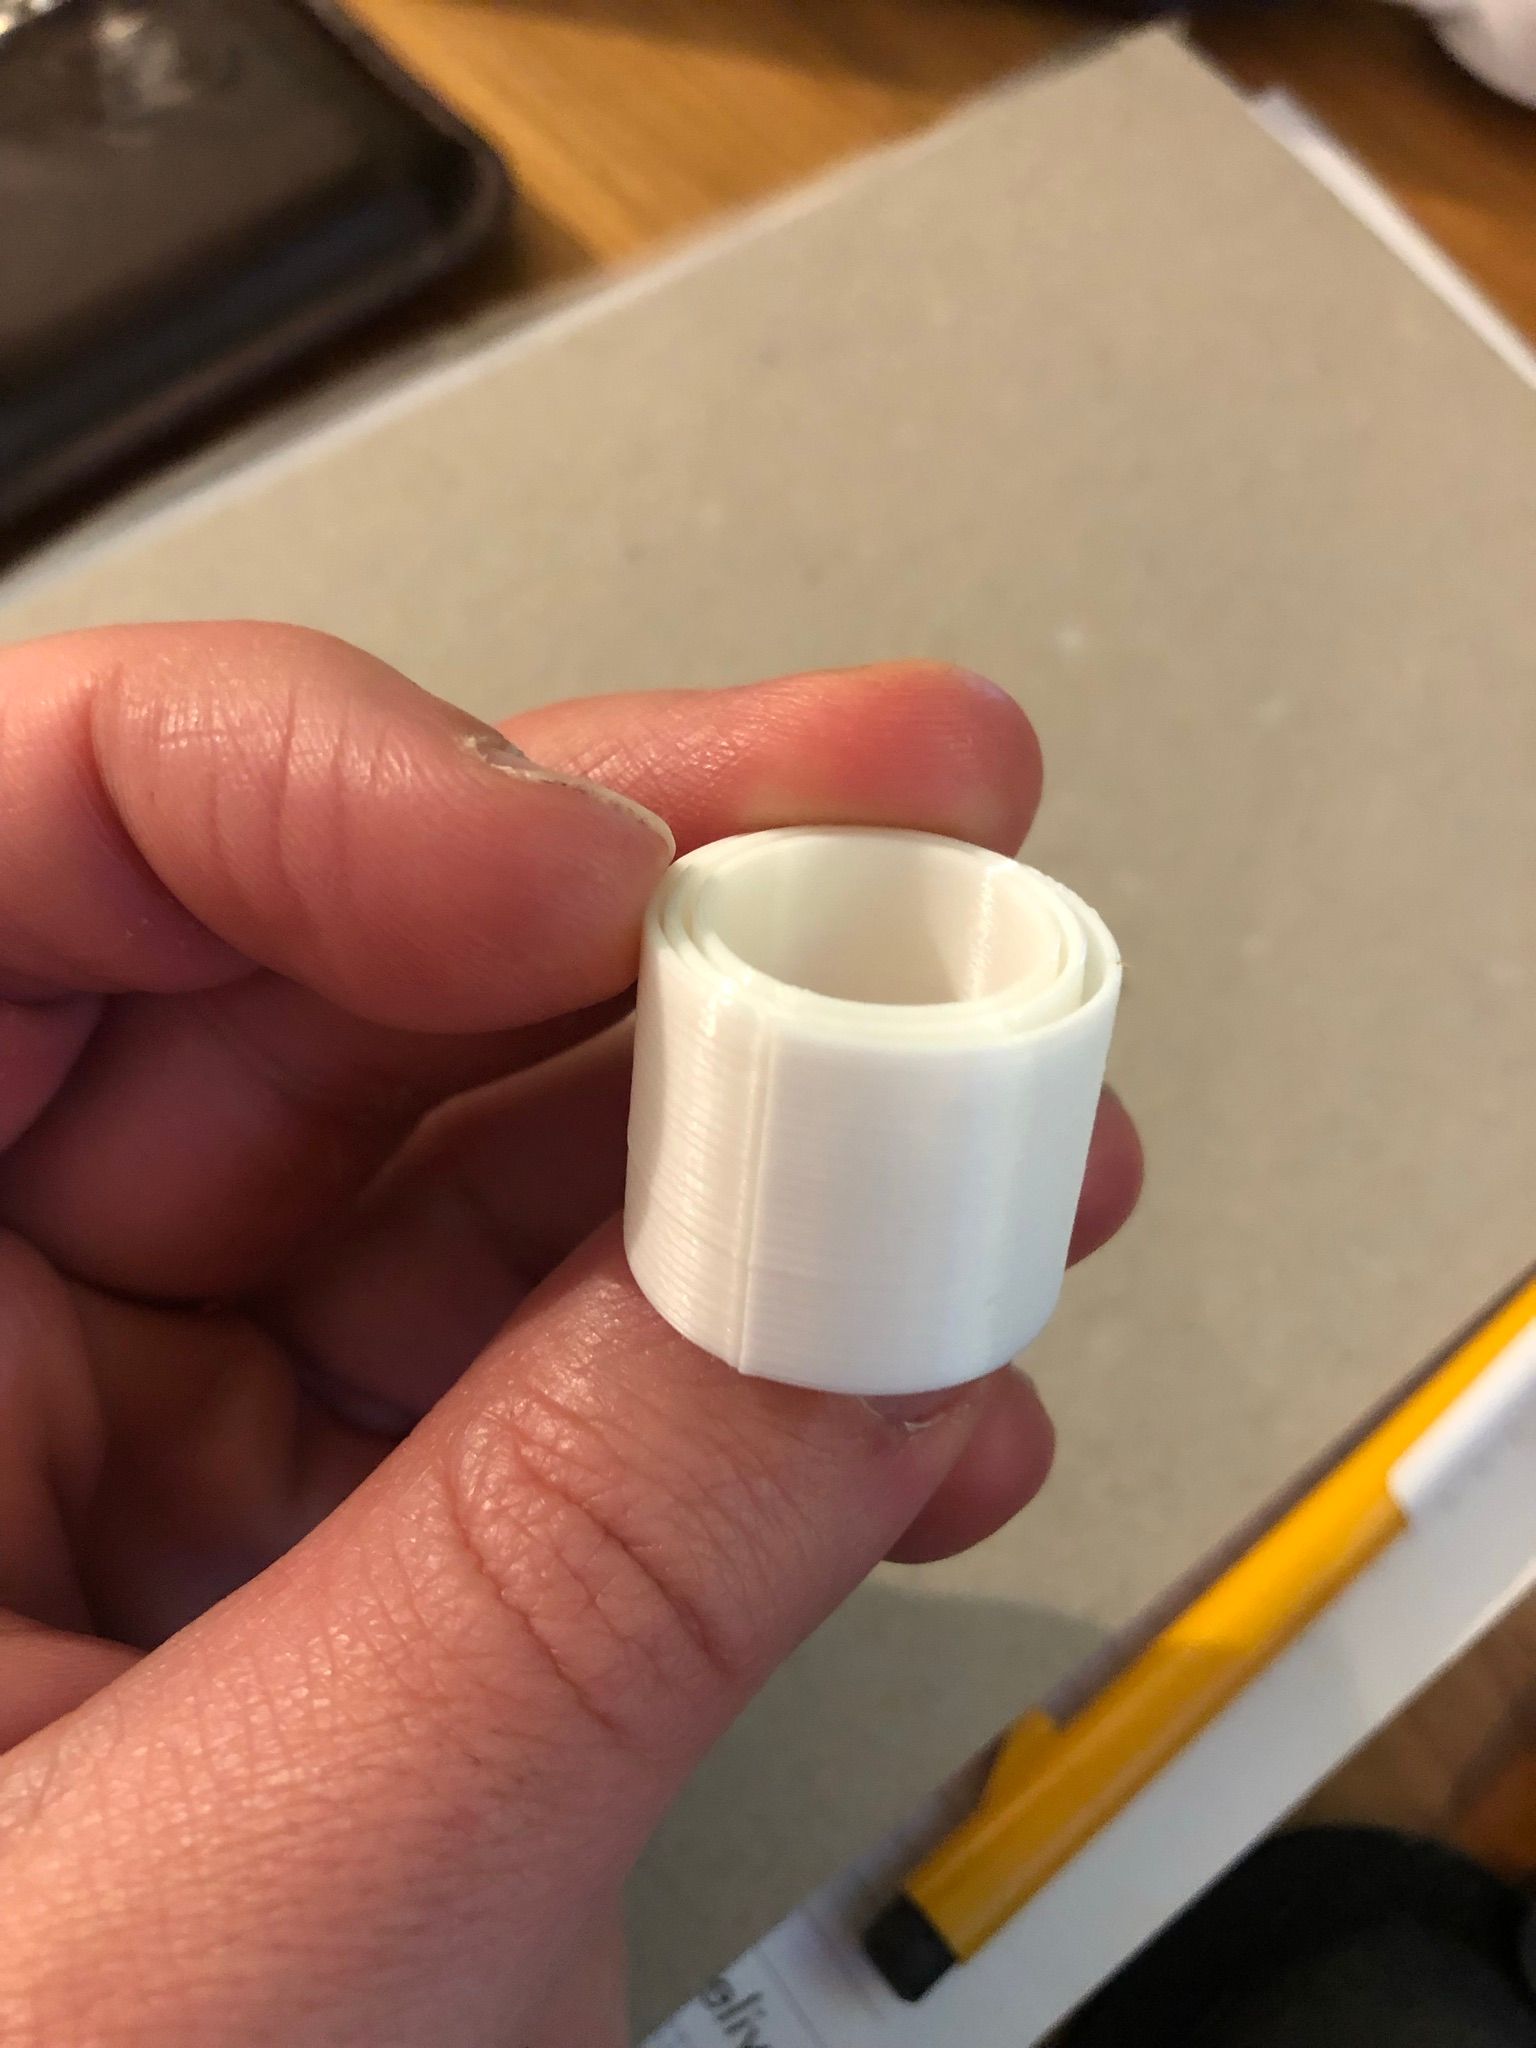
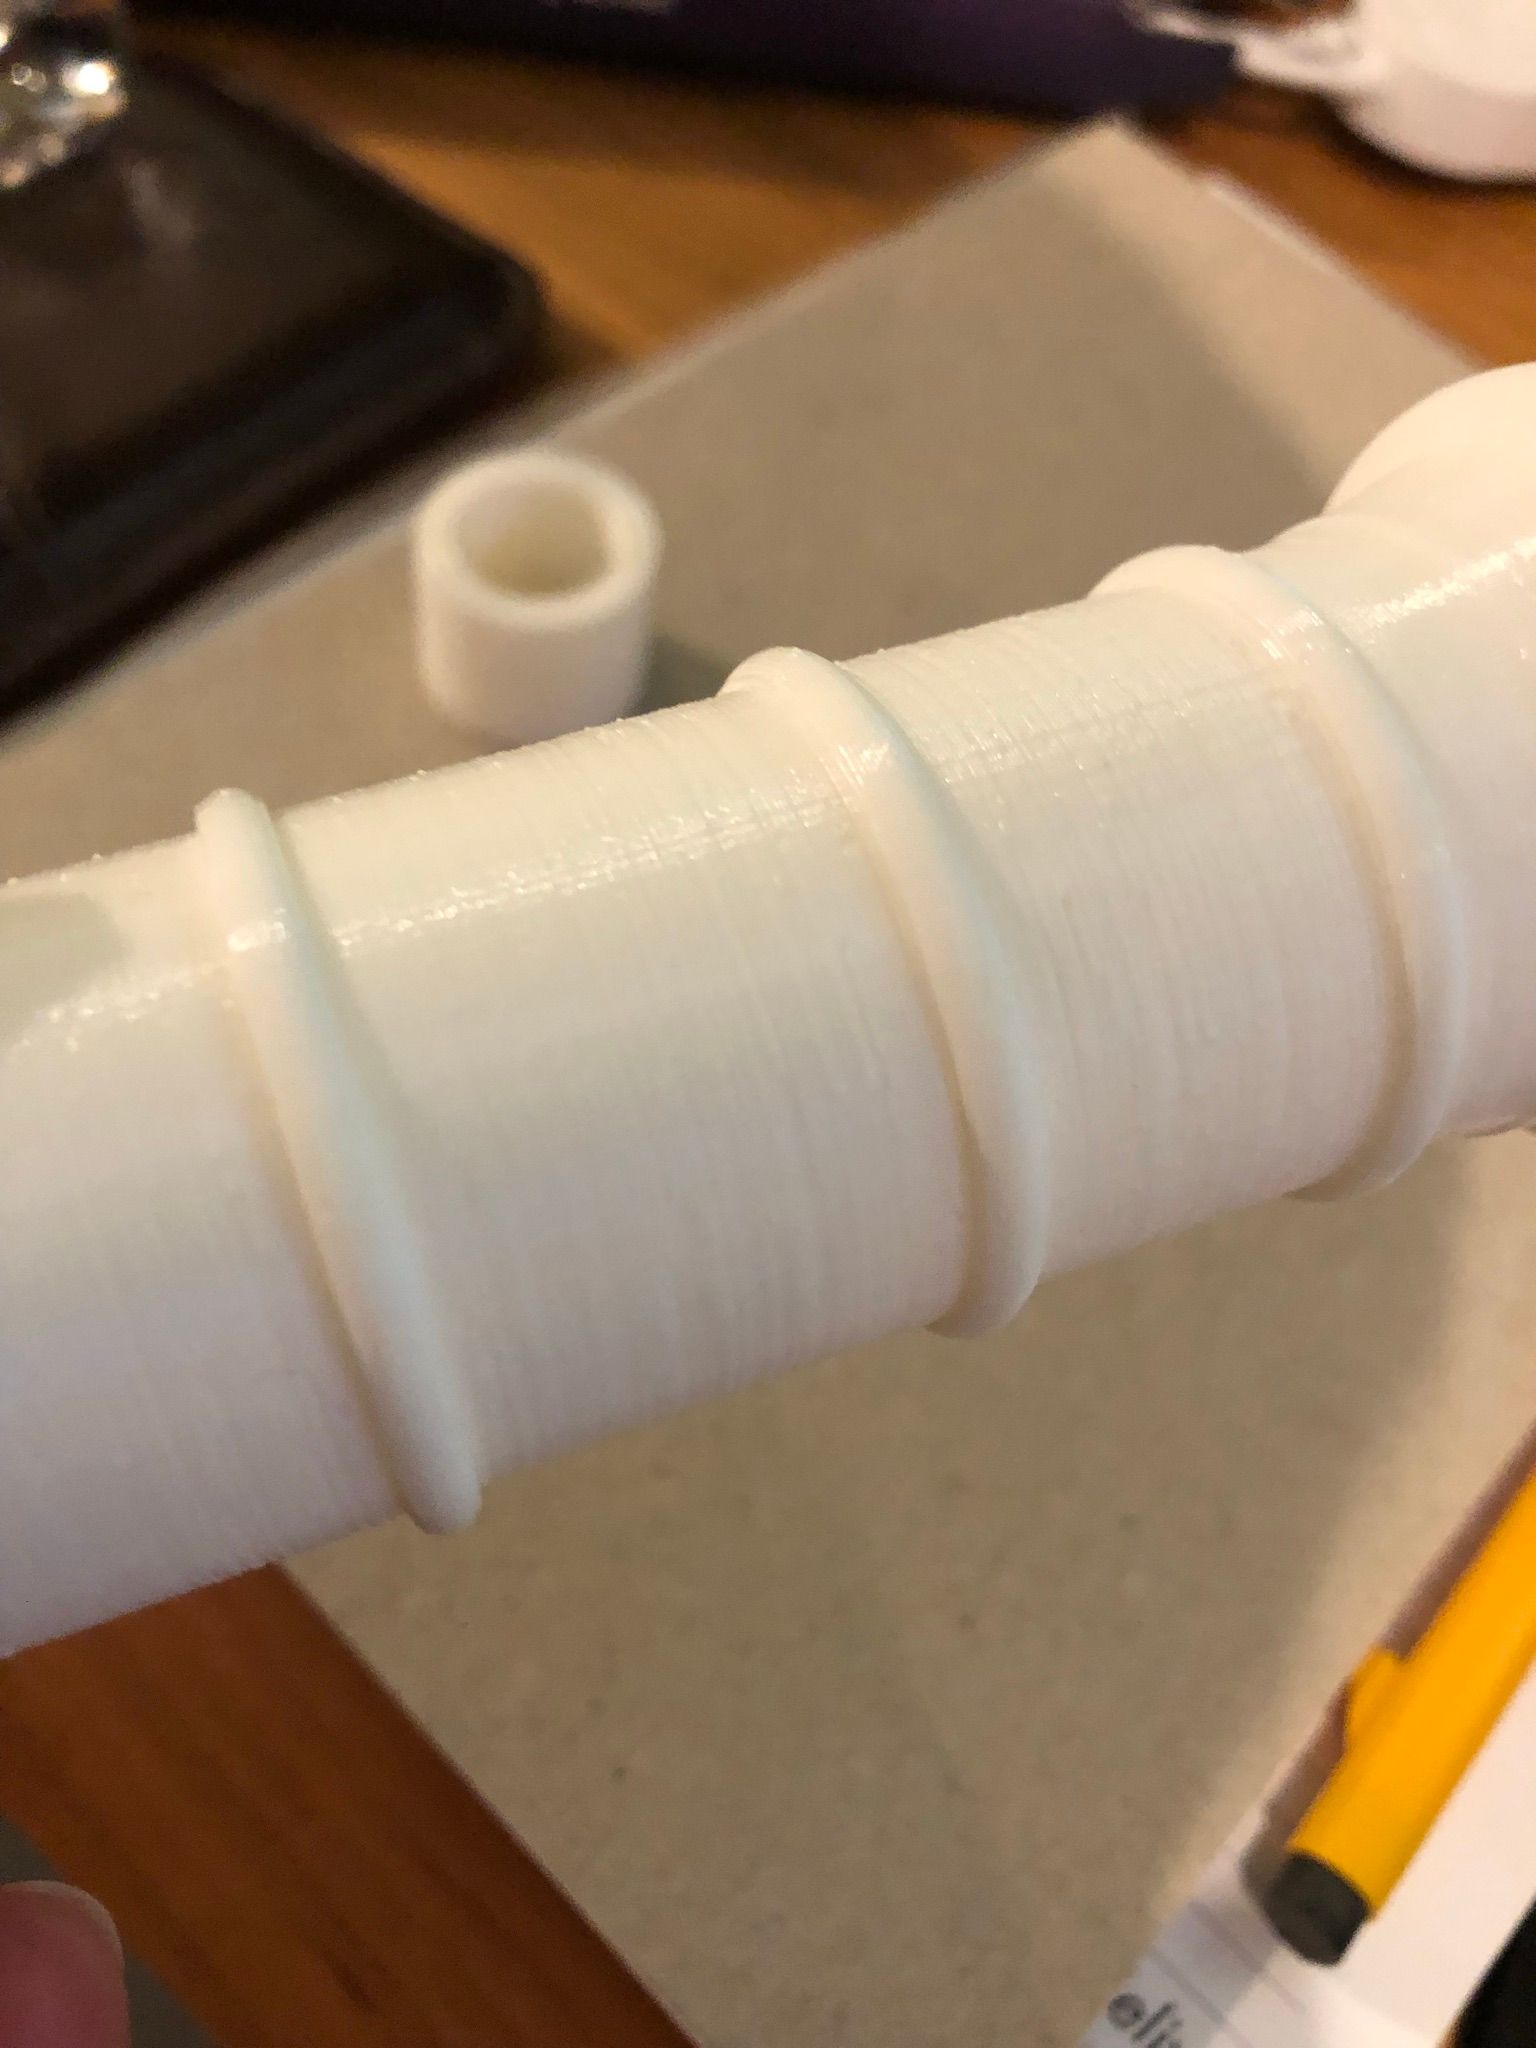
      I am currently running the same test but with a 30mm cylinder to see if they compare to how the box prints or if it is different.

      My bowden tubes are tight in the clips. I haven't yet checked about the backlash but I think in the tests I have done that could have been canceled out. Will check anyway once i stop the next print.

      M201 X5000 Y5000 Z5000 E10000		; Set accelerations (mm/s^2) Used to be 1500
      M203 X18000 Y18000 Z18000 E20000	; Set maximum speeds (mm/min)
      M566 X900 Y900 Z900 E1000 P1		; Set maximum instantaneous speed changes (mm/min)
      
      M207 S3.0 F5000 T3600 Z0
      

      My current settings. The last picture is using 450 for XYZ jerk values.

      posted in Tuning and tweaking
      buzzbyundefined
      buzzby
    • RE: Trying to remove blobs, what order to change things

      @engikeneer
      Thanks for your time and suggestions. I've been experimenting with increasing the extruder acceleration and it certainly hasn't hurt. The extruder is a little bit louder but no skipping. I haven't been seeing much of a difference in how the seam is done.

      Thank you for the link. I hadn't seen the box method before. I tried it out and what is odd is that I really don't see too much difference at all. The picture is from 0.4 to 0.7 in 0.05 increments every 5mm. Maybe 0.6 is around the best but the seam and corners are pretty much the same.

      IMG_8027.jpeg

      Made me think that my other accelerations were maybe a bit slow so I have upped them from 1500 to 5000. Maybe a very small difference in quality in a positive way but nothing amazing.

      My thinking now is that the retraction speed must be the majority of what is causing the problem. Need to try some more experiments with that but still feels like i am missing something else.

      Need to do the box test again with all my new settings.

      For reference here are my new settings

      M201 X5000 Y5000 Z5000 E10000		; Set accelerations (mm/s^2) Used to be 1500
      M203 X18000 Y18000 Z18000 E20000	; Set maximum speeds (mm/min)
      M566 X900 Y900 Z900 E1000 P1		; Set maximum instantaneous speed changes (mm/min)
      
      M572 D0 S0.64 					
      M207 S3.0 F5000 T3600 Z0
      
      posted in Tuning and tweaking
      buzzbyundefined
      buzzby
    • RE: Trying to remove blobs, what order to change things

      @engikeneer
      I will try out the jerk policy to see what difference that might make. I have doubled my XYZ accel and no obvious difference. My machine is a delta, just incase that helps or hinders.

      I wonder if my extruder accel just needs to be much higher than the max speed.

      I am running the K factor test for marlin Here, modified to work for duet but to see how my PA changes. It seems to float around 0.5 to 0.7 which little difference between if any value between these 2 numbers is used.

      When you talk about Slicer speed do you mean the different speed settings for different features? Are you suggesting making them all the same for testing?

      IMG_7997_2.jpeg
      The above shows my problem. At the start / end of a move I get extra filament. It means that these 3 tube pieces get fused together.

      The only way i have found any sucess so far is to use slicer retraction so that I can use wipe AND I set the seam to be random so that 2 walls don't stop and start at the same point. This bodge doesn't even work that well. I'd like the slicer to keep the seam in the same place for a better finish

      IMG_7999.JPEG
      Hopefully this highlights how the seam ends up.

      IMG_8001.JPEG
      Shows how the "blobs" end up on the outside of a print. This is with the seam set to random

      Any additional thoughts would be very welcome.

      posted in Tuning and tweaking
      buzzbyundefined
      buzzby
    • RE: Trying to remove blobs, what order to change things

      @rjenkinsgb Slicer (prusa) is using firmware retract. Confirmed by checking for G10 and G11 in the output. I've tried playing with the pressure advance value from 0.1 to 1. I can find a setting where it is less terrible but not anything that gets me the results I can see others getting. That why i think it has to be some other sort of speed setting that is messing me up.

      posted in Tuning and tweaking
      buzzbyundefined
      buzzby
    • Trying to remove blobs, what order to change things

      Hi Everyone,

      For the longest time my prints have blobs at the end of a move. So, I get a ridge in the print where the seam is placed. I am once again trying to print the sword model and the new accuracy test from maker’s muse. It is the blobs that ruin the print and I really want to get this solved. I feel I am missing something fundamental in my understanding

      My printer is a Kossel mini, duet 2, titan extruder with about 30cm Bowden connected to an all metal E3D V6. 12v

      I have been reading all I can find on how to tune my extruder and was getting some small improvements changing the jerk and acceleration on the extruder but I still get blobs.
      The best change I made is to update the slicer to do a random seam but that isn’t the fix I am looking for.

      My main question is what order should I change settings in and should I be trying different accelerations and jerk settings on the XYZ moves as well or is it just about the extruder. I have only been changing extruder settings but seem to have hit a ceiling.

      My approach has been to up the acceleration, then play with jerk and then run the Pressure advance test and pick the best result.

      I was finding almost no difference when running a stringing test between 2.5 and 4mm retraction.
      Extrusion multiplier is good and extrusion width is accurate.

      I am using firmware retraction and pressure advance but feel I might be better using slicer retract so that I can use the wipe feature. This feels like the wrong answer

      Current settings are

      M566 X900 Y900 Z900 E2000
      M203 X18000 Y18000 Z18000 E3600
      M201 X1500 Y1500 Z1500 E3600
      
      M572 D0 S0.5 
      M207 S3 F3600 Z0
      

      Again, my main question is what order to I change things and what is a good print to use when changing on the fly so I can see results as they happen.

      Thanks

      posted in Tuning and tweaking
      buzzbyundefined
      buzzby
    • Confused over bed heater tuning

      Hi Everyone,

      I think I have managed to confuse myself over my bed heater. I thought it wasn't heating up as fast as it used to and that maybe i changed a setting or something is wrong. Having checked all the wiring I'm pretty sure I was just imagining an issue that doesn't;t exist. In the process, I have gone round and round on what I need to do in the config for the bed.

      I have a 220v silicone bed via an SSR and this is what config i have

      M305 P0 T100000 B3950 C0 R4700
      M143 H0 S120

      I reset my config-override and did a tune but that put it into PWM mode. Which I understand is just pointless when running an SSR.

      So my questions are. Am I missing something from my config to force bang-bang (or leave it implied) and do i need to run an autotune?

      posted in Duet Hardware and wiring
      buzzbyundefined
      buzzby
    • RE: Trying to tune extruder. What might I be missing

      The journey continues,

      Redid the heater tuning.

      I have redone the stringing test after flipping Cura to use firmware tuning. Current setting is

      M207 S2 F3600 Z0.075

      Then I pushed the pressure advance. I ended up at 0.7. Any higher and the wall quality suffers and get streaking

      M572 D0 S0.7

      I once again then descend into madness trying to print this sword test print model the above dont make the print work but it is better.

      I have tried using coasting in cura as 0.128, 0.192, 0.256 and 0.512.
      None of these produce a print that separates so have stuck with 0.512.

      Tried adjusting the coasting speed but could see no difference at all.

      Tried lowering the overall print speed from 60 to 50, 40, 30, 20 all produce the same results.

      I am not sure what might be next other than starting to increase the values on the X Y Z Acceleration and jerk.

      Any more suggestions?

      Here is a full config.g dump

      ; Configuration file for Duet WiFi (firmware version 1.20 or newer)
      ; executed by the firmware on start-up
      ;
      ; generated by RepRapFirmware Configuration Tool on Sun Jan 14 2018 17:24:59 GMT+0000 (GMT Standard Time)
      
      ; General preferences
      M111 S0                                   ; Debugging off
      G21                                       ; Work in millimetres
      G90                                       ; Send absolute coordinates...
      M83                                       ; ...but relative extruder moves
      M555 P1 				; Set firmware compatibility to look like RepRapFirmare
      ; Automatic saving after power loss is not enabled
      
      M665 L245 R110 H190 B80 X0 Y0 Z0
      M666 X0 Y0 Z0 A0 B0
      M208 Z0 S1                                ; Set minimum Z
      ;M579 X0.984 Y0.984	; X Y Corrections
      
      ; Endstops
      M574 X2 Y2 Z2 S0                          ; Set active low endstops
      
      M558 P8 I1 R0.9 A30 F200 T4000 S0.03 X0 Y0 Z-0.1 H3
      G31 X0 Y0 Z-0.05 P250
      
      ;https://www.duet3d.com/forum/thread.php?id=2769
      ;https://duet3d.dozuki.com/Wiki/Gcode#Section_G31_Set_or_Report_Current_Probe_status
      ;The Z value is the Z height when the probe is triggered. Not an offset.
      
      M557 R80 S20                              	; Define mesh grid
      
      M572 D0 S0.7 					; pressure advance
      M207 S2 F3600 Z0.075				; Retract Settings for G10/11
      
      ; Drives
      M569 P0 S1                                ; Drive 0 goes forward
      M569 P1 S1                                ; Drive 1 goes forward
      M569 P2 S1                                ; Drive 2 goes forward
      M569 P3 S1                                ; Drive 3 goes forward
      M92 X100 Y100 Z100 E398           	  ; Set steps per mm
      ;M350 X64 Y64 Z64 E64                    ; Configure microstepping without interpolation
      M350 X16 Y16 Z16 E16 I1                   ; Configure microstepping without interpolation
      
      M566 X900 Y900 Z900 E3000              ; Set maximum instantaneous speed changes (mm/min) was 1200
      M203 X18000 Y18000 Z18000 E3000           ; Set maximum speeds (mm/min) was 18000
      M201 X1500 Y1500 Z1500 E3000              ; Set accelerations (mm/s^2) was 1000
      M906 X1600 Y1600 Z1600 E1300 I10           ; Set motor currents (mA) and motor idle factor in per cent
      M84 S30                                   ; Set idle timeout
      
      ; Heaters
      M301 H0 S1.00 P10 I0.1 D200 T0.4 W180 B30 ; Use PID on bed heater (may require further tuning)
      M305 P0 T100000 B3950 C0 R4700            ; Set thermistor + ADC parameters for heater 0
      M143 H0 S120                              ; Set temperature limit for heater 0 to 120C
      M305 P1 T100000 B4725 C7.06e-8 R4700      ; Set thermistor + ADC parameters for heater 1
      M143 H1 S280                              ; Set temperature limit for heater 1 to 280C
      
      ; Tools
      M563 P0 D0 H1                             ; Define tool 0
      G10 P0 X0 Y0 Z0                           ; Set tool 0 axis offsets
      G10 P0 R0 S0                              ; Set initial tool 0 active and standby temperatures to 0C
      
      ; Network
      M550 PMicroMake D1                        ; Set machine name
      M552 S1                                   ; Enable network
      M586 P0 S1                                ; Enable HTTP
      M586 P1 S0                                ; Disable FTP
      M586 P2 S0                                ; Disable Telnet
      
      ; Fans
      M106 P0 S0 I0 F500 H-1                  ; Set fan 0 value, PWM signal inversion and frequency. Thermostatic control is turned off
      M106 P1 S1 I0 F500 H1 T45                  ; Set fan 1 value, PWM signal inversion and frequency. Thermostatic control is turned on
      M106 P2 S1 I0 F500 H T45                  ; Set fan 2 value, PWM signal inversion and frequency. Thermostatic control is turned on
      
      ; Custom settings are not configured
      M501
      
      posted in Tuning and tweaking
      buzzbyundefined
      buzzby
    • RE: Trying to tune extruder. What might I be missing

      @Veti said in Trying to tune extruder. What might I be missing:

      if its a original e3d its a semitec 104-gt2. the configurator has those values if you click on the beta value.

      How to I find the beta values in the configurator. Or more simple (for me) what would the M305 look like for an E3D V6

      This ?
      M305 P0 T100000 B4725 C7.06e-8 R4700

      posted in Tuning and tweaking
      buzzbyundefined
      buzzby
    • RE: Trying to tune extruder. What might I be missing

      @georgepaul using a 0.15 layer hight with an initial of 0.2. I am NOT retracting at layer change but do have retraction turned on.

      posted in Tuning and tweaking
      buzzbyundefined
      buzzby
    • RE: Trying to tune extruder. What might I be missing

      @Veti How would i find the correct value. Both the bed and hotend report the same temp when cold and it seems to match with the expected room temp.

      posted in Tuning and tweaking
      buzzbyundefined
      buzzby
    • RE: Trying to tune extruder. What might I be missing

      This is my original config.g before I started playing around. I have noticed if i use lower acc and jerk the extruder is a lot quieter, which would be good but will give your idea a try.

      Bowden is about 30cm long

      ; Configuration file for Duet WiFi (firmware version 1.20 or newer)
      ; executed by the firmware on start-up
      ;
      ; generated by RepRapFirmware Configuration Tool on Sun Jan 14 2018 17:24:59 GMT+0000 (GMT Standard Time)

      ; General preferences
      M111 S0 ; Debugging off
      G21 ; Work in millimetres
      G90 ; Send absolute coordinates...
      M83 ; ...but relative extruder moves
      M555 P1 ; Set firmware compatibility to look like RepRapFirmare
      ; Automatic saving after power loss is not enabled

      M665 L245 R110 H190 B80 X0 Y0 Z0
      M666 X0 Y0 Z0 A0 B0
      M208 Z0 S1 ; Set minimum Z
      ;M579 X0.984 Y0.984 ; X Y Corrections

      ; Endstops
      M574 X2 Y2 Z2 S0 ; Set active low endstops

      M558 P8 I1 R0.9 A30 F200 T4000 S0.03 X0 Y0 Z-0.1 H3
      G31 X0 Y0 Z-0.05 P250

      ;https://www.duet3d.com/forum/thread.php?id=2769
      ;https://duet3d.dozuki.com/Wiki/Gcode#Section_G31_Set_or_Report_Current_Probe_status
      ;The Z value is the Z height when the probe is triggered. Not an offset.

      M557 R80 S20 ; Define mesh grid

      M572 D0 S0.1 ; pressure advance

      ; Drives
      M569 P0 S1 ; Drive 0 goes forward
      M569 P1 S1 ; Drive 1 goes forward
      M569 P2 S1 ; Drive 2 goes forward
      M569 P3 S1 ; Drive 3 goes forward
      M92 X100 Y100 Z100 E398 ; Set steps per mm
      ;M350 X64 Y64 Z64 E64 ; Configure microstepping without interpolation
      M350 X16 Y16 Z16 E16 I1 ; Configure microstepping without interpolation

      M566 X900 Y900 Z900 E3000 ; Set maximum instantaneous speed changes (mm/min) was 1200
      M203 X18000 Y18000 Z18000 E3000 ; Set maximum speeds (mm/min) was 18000
      M201 X1500 Y1500 Z1500 E1500 ; Set accelerations (mm/s^2) was 1000
      M906 X1600 Y1600 Z1600 E1300 I10 ; Set motor currents (mA) and motor idle factor in per cent
      M84 S30 ; Set idle timeout

      ; Heaters
      M301 H0 S1.00 P10 I0.1 D200 T0.4 W180 B30 ; Use PID on bed heater (may require further tuning)
      M305 P0 T100000 B4138 C0 R4700 ; Set thermistor + ADC parameters for heater 0
      M143 H0 S120 ; Set temperature limit for heater 0 to 120C
      M305 P1 T100000 B4138 C0 R4700 ; Set thermistor + ADC parameters for heater 1
      M143 H1 S280 ; Set temperature limit for heater 1 to 280C

      ; Tools
      M563 P0 D0 H1 ; Define tool 0
      G10 P0 X0 Y0 Z0 ; Set tool 0 axis offsets
      G10 P0 R0 S0 ; Set initial tool 0 active and standby temperatures to 0C

      ; Network
      M550 PMicroMake D1 ; Set machine name
      M552 S1 ; Enable network
      ;M587 S"DOG NET" P"bu33l1ghtyear" ; Configure access point. You can delete this line once connected
      M586 P0 S1 ; Enable HTTP
      M586 P1 S0 ; Disable FTP
      M586 P2 S0 ; Disable Telnet

      ; Fans
      M106 P0 S0 I0 F500 H-1 ; Set fan 0 value, PWM signal inversion and frequency. Thermostatic control is turned off
      M106 P1 S1 I0 F500 H1 T45 ; Set fan 1 value, PWM signal inversion and frequency. Thermostatic control is turned on
      M106 P2 S1 I0 F500 H T45 ; Set fan 2 value, PWM signal inversion and frequency. Thermostatic control is turned on

      ; Custom settings are not configured
      M501

      posted in Tuning and tweaking
      buzzbyundefined
      buzzby
    • RE: Trying to tune extruder. What might I be missing

      For some reason, I cannot upload any images so here is a pic of my printer and the prints I have been churning out
      Pictures

      posted in Tuning and tweaking
      buzzbyundefined
      buzzby
    • Trying to tune extruder. What might I be missing

      Hi Everyone,

      You may have seen me ask a couple of questions on the Facebook groups but for this type of question, I think this forum is better.
      Let me see how short and clear I can make this.

      I am trying to print this Sword. Specifically, I am trying to print the test print.

      For some reason, I have always suffered when printing parts like this as I get huge blobs at the end of the move leaving blobs.

      I believe my extruder speed, accel and jerk speed were set extremely high. Creating very high pressure. At least that is what I think is happening.

      I am using a E3D Titan with a E3D V6 all metal 0.4mm. Bowden trying to print PLA

      I am using Cura 4.4 as my slicer. Previous versions of Cura were producing same effects.

      I believe all of the following items will help me successfully print this model

      • Line width (for the test model seems that 0.45 is best as this removes gaps between walls)
      • Retraction (1.8 @ 50mms but have tried 6.5 @30ms)
      • Coasting (would like to avoid if possible)
      • Extruder acceleration (Really not sure what is best. Have tried 1000, 3000)
      • Extruder jerk (have tried 40, 250, 600)
      • Pressure advance (0.1 seems to have little effect 0.5 and 0.6 seem close to helping)
        *Outer wall wipe (default is 0.1. Doesn't appear to make much difference)

      my Z Seam is all in line

      I'm really not sure what starting values I should work with and then what order I can start to increase what in order to get the best results. I know the model can be printed and I have to believe it can be printed on my setup

      Here are my test prints. You can see the blobs at the wall start-stop points

      posted in Tuning and tweaking
      buzzbyundefined
      buzzby
    • RE: Think I have just blown the board. ft Orion Peizo

      @corezair
      I don't have an SMD station. Just looking at the price of one, it is probably prohibitive to try and repair. Although I might try with a normal soldering iron.

      Not sure if anyone on here would be interested in trying to repair it.
      This board is over a year old so suspect no warranty.

      posted in General Discussion
      buzzbyundefined
      buzzby
    • RE: Think I have just blown the board. ft Orion Peizo

      @corezair said in Think I have just blown the board. ft Orion Peizo:

      ESP8266 12E

      Thanks, Checking the pins the thing is shorted. I get continuity alarm across the 3.3 and ground.

      Could i try and swap out with a replacement one. They look pretty cheap to buy and I am ok at soldering. Should it work "as is" or would i somehow have to program the wifi thing before adding it back to the duet. Might be a fruitless task as something else on the 3.3 rail might have gone but could be good solder practice.

      posted in General Discussion
      buzzbyundefined
      buzzby
    • RE: Think I have just blown the board. ft Orion Peizo

      The board will no longer connect over USB. Not sure if it is the board or my machine. Have switched USB ports but nothing.

      The WiFi module is quite hot while running. Is that normal or could that be broken as well.

      posted in General Discussion
      buzzbyundefined
      buzzby
    • RE: Think I have just blown the board. ft Orion Peizo

      Meant to say does this mean the board might still be good.

      posted in General Discussion
      buzzbyundefined
      buzzby
    • RE: Think I have just blown the board. ft Orion Peizo

      @dc42 0_1562520534187_2019-07-07 18.19.23.png

      Shame on me. Never even thought to try booting the card without the card in. Card is not recognized in windows. And if i plug in USB i get the following lights and the card connects to the computer. Although i am not able to use YAT to connect to it as it says something else already has the connections. Might be something I am doing.

      I don't have a spare card so will order one. Can I just put in a blank card or do i need to apply an image?

      Do you think this means the card might still be good?

      posted in General Discussion
      buzzbyundefined
      buzzby
    • RE: Think I have just blown the board. ft Orion Peizo

      @moriquendi The plug was 100% the correct way as it was powered and i could see it triggering. (Blue light coming on and red going off)

      Still not sure what could have caused the short as i have no exposed wires. Have checked all cables for continuity and to see if they short anywhere but no luck.

      posted in General Discussion
      buzzbyundefined
      buzzby
    • RE: Think I have just blown the board. ft Orion Peizo

      Tried connecting over USB. The 5v light comes on but no comunication via YAT and the device is not shown on my computer.

      Also the micro Sd card holder got very hot. Not sure if that helps in anyway.

      posted in General Discussion
      buzzbyundefined
      buzzby