Duet3D Logo Duet3D
    • Tags
    • Documentation
    • Order
    • Register
    • Login
    1. Home
    2. chas2706
    • Profile
    • Following 0
    • Followers 0
    • Topics 29
    • Posts 300
    • Best 24
    • Controversial 0
    • Groups 0

    chas2706

    @chas2706

    36
    Reputation
    28
    Profile views
    300
    Posts
    0
    Followers
    0
    Following
    Joined Last Online

    chas2706 Unfollow Follow

    Best posts made by chas2706

    • Slicer on SBC

      Hi Folks.

      Just thought you may be interested in my setup.
      I have Duet3 with SBC but I followed the instructions to install DSF on Rasbian so I could use the extra features and programs.

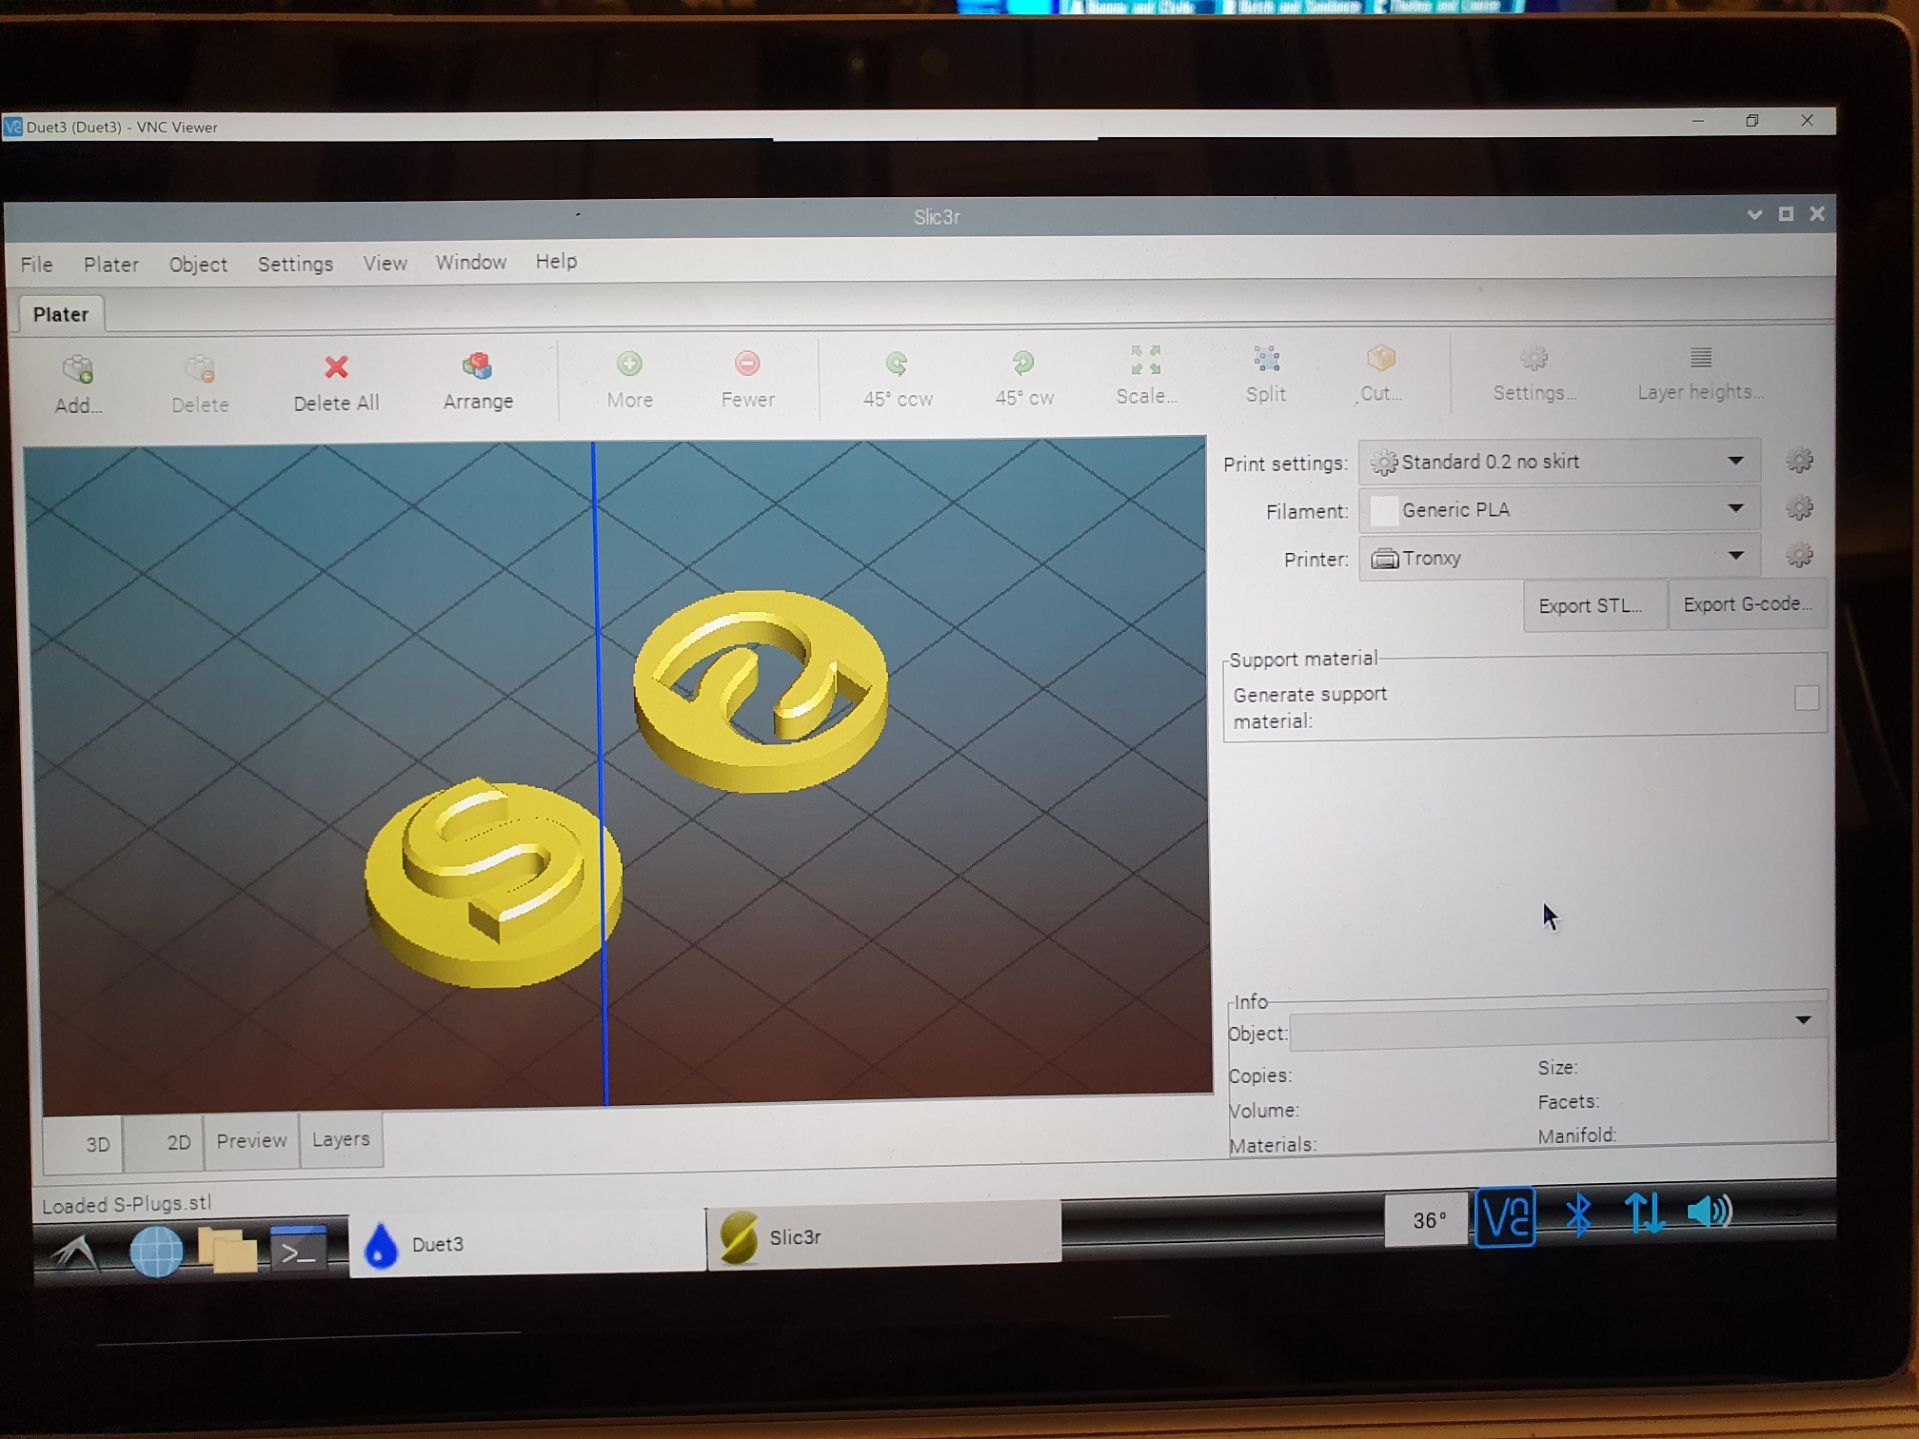
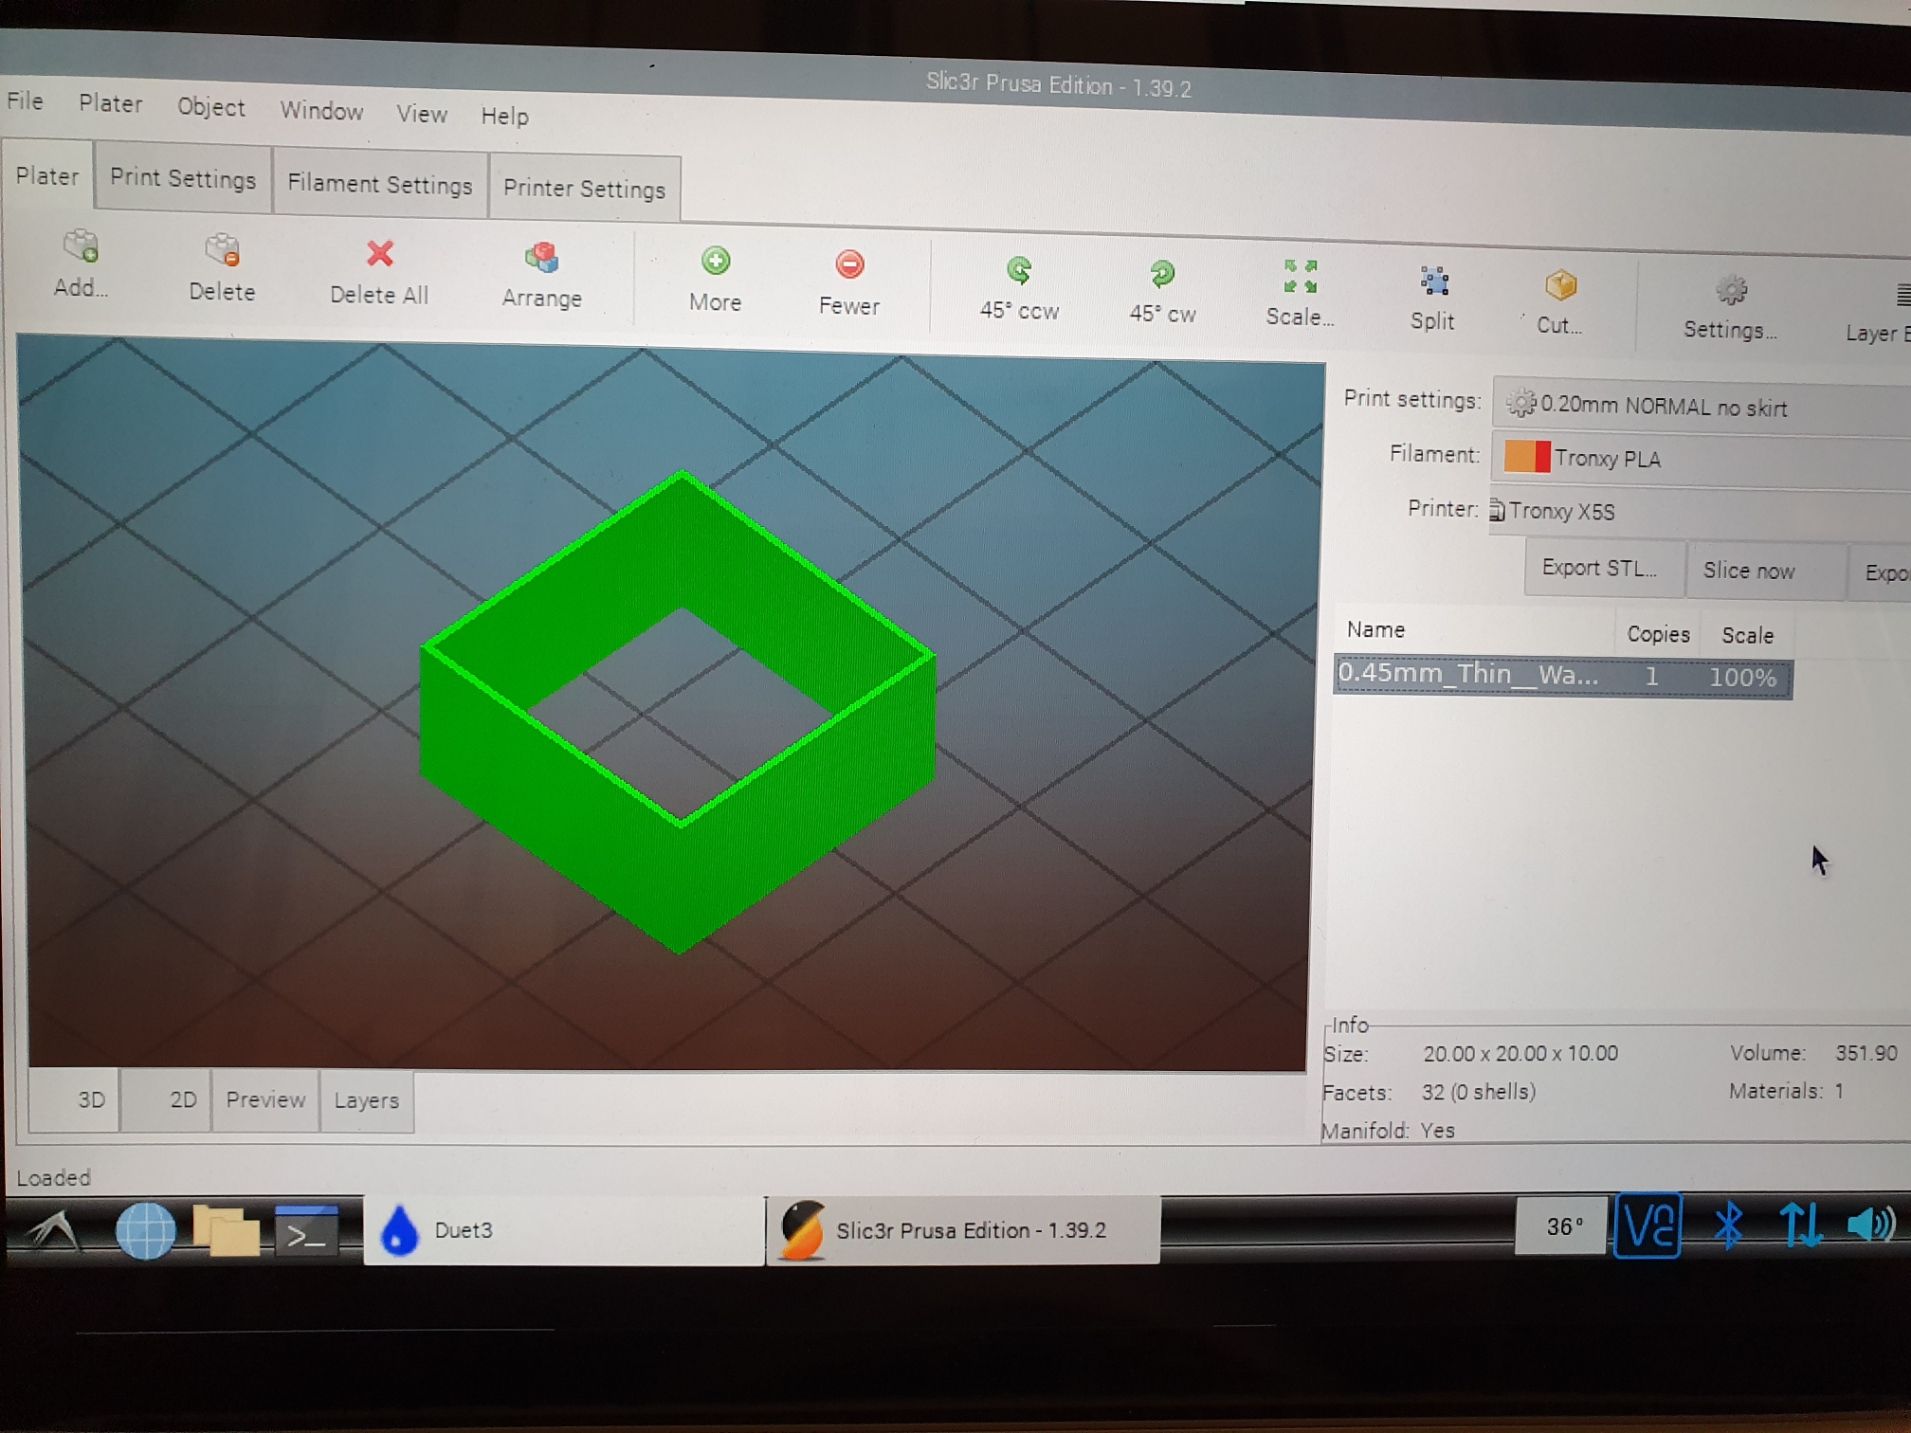
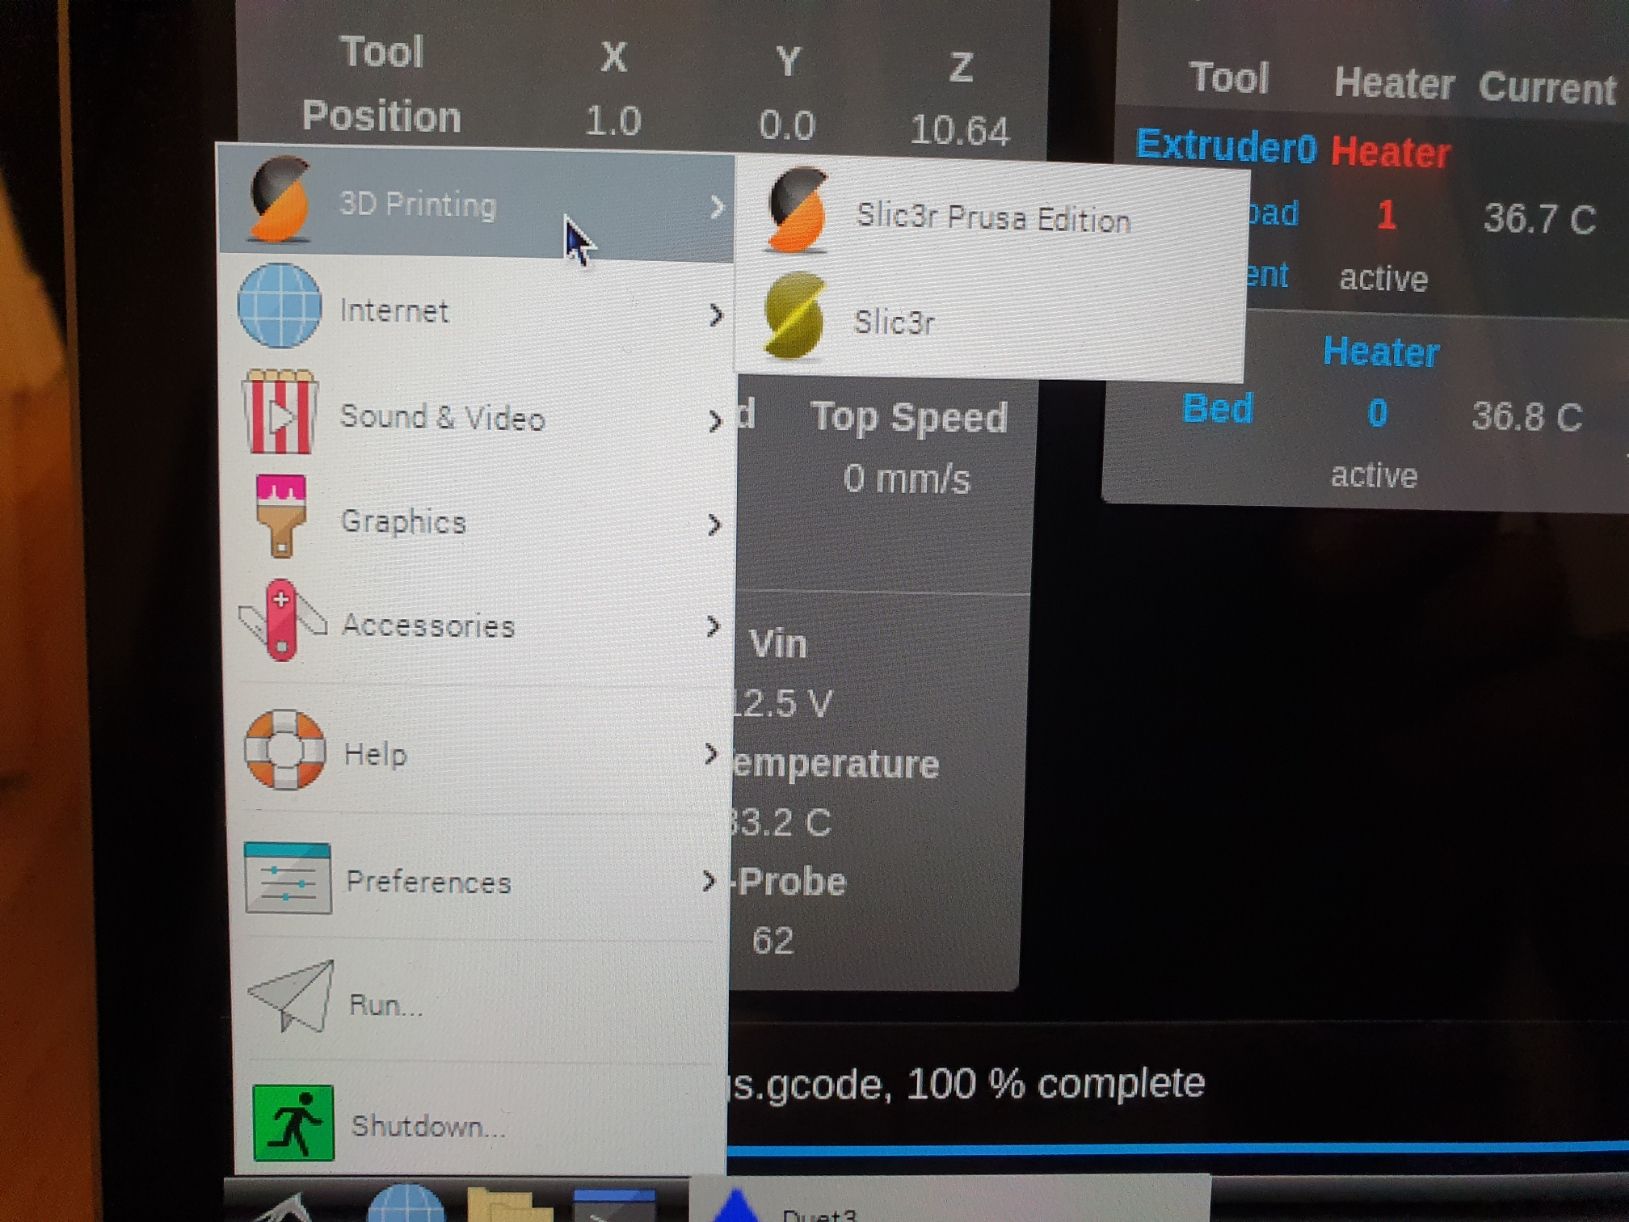
      I installed Slic3r and Slicer Prusa Edition on the SBC and am very happy to find that they both work great.
      Here's some photos:

      Slic3r.jpg

      Slic3r Prusa Edition.jpg

      Application Menu.jpg

      The stl's slice and produce the gcode as expected and they print just fine.

      I also have the option to connect a Bluetooth mouse and have an on-board keyboard.

      posted in My Duet controlled machine
      chas2706undefined
      chas2706
    • My Duet Experiences

      I have 3 printers, all of them (until recently) running on duet boards and all until recently producing unacceptable quality prints.
      One of the printers is a VCore Pro that cost me £1200 without the electronics. Another is a Tronxy X5S that has had many
      hardware upgrades and a considerable amount of money spent on it.

      Both of these printers run on Duet3 boards in SBC mode and are both on the current "stable" firmware.
      TBH both printers are far from producing "stable" prints and like others recently on this forum, I am now tired of trying to
      find solutions. In my opinion the SBC integration is just a novelty that highlights and adds to all current issues with the
      firmware. With SBC attached you get the added bonus of intermittent disconnections of DWC or DCS or your print stops in mid flight without explanation.

      Putting these issues aside, I am still left with disappointing print quality. It seems to me that ringing, round corners and
      general poor quality is inherent. I feel I have tried everything to reduce the ringing and other faults but no setting makes
      any difference for me whatsoever.

      The Tronxy X5S used to produce acceptable prints until I "upgraded" it with a Duet3 with SBC!
      It puts me straight off these days when I fire up any of the two SBC connected printers and be greeted with the well known
      phrase "could not connect to DCS".

      I am not seeking answers here because been there done that, tried this, tried that, sick of it!

      My 3rd printer which is a mere £250 Ender3 pro dropped in print quality from the day that I "upgraded" the electronics to a Duet 2 ethernet about 18 months ago, but initially I put it down to tweaking of the settings etc but never got the quality prints I would expect.

      I have now found a simple and cheap solution for the Ender3 Pro. The machine is both silent in motion and the print quality
      is second to none.
      The answer is to rip out the Duet board and replace it with a Creality 4.2.7 32bit silent board for the mere cost of £32!

      I know some people on this forum may not be happy with my personal findings and don't want to hear any of it but what really
      annoys me is that last year I was all excited about setting up my new 500x500x500 VCore Pro it being of good build quality
      with its quality linear rails, high quality belts, bearings etc but 12 months on I am no further to producing anything like good
      quality prints on it and there must be hundreds of forum users that have been told to "check your hardware" before blaming the firmware when questioning bad print quality.

      Now, my cheap Ender3 Pro is the big winner, the downside being having a mere 230x230 print surface.
      You simply upload a print to the sd card, press print and then just wait for your high quality print to finish. Works every time!
      No more abandoning of prints because the Z height has somehow changed from last time or the SBC communication failed etc, etc.

      posted in General Discussion
      chas2706undefined
      chas2706
    • RE: DUET3 any pin to detect poweroff and aid Zbraking?

      I have a large heavy printbed that had the same problems with dropping unlevel at power off.
      Here's how I overcome it:

      I grabbed a stepper brake design from thingyverse and modified it for use with a solenoid.
      Here is the final result:

      Z Brake.jpg

      I have these on all 3 Z steppers and they are controlled by a cheap arduino nano.
      The nano is used as an interface to be able to control the braking exactly how I want.
      It looks for a brake control signal that I set up on the Duet 3 board.

      By default the brakes are on. When the printer is powered up one of the first commands in config.g is to enable the Z motors. This locks their positions and therefore is now safe to release the brakes without causing any Z movement.
      The only downside is that for complete control I have to use my own board reset, e-stop and shutdown macros but this is not a real problem for me.

      Visually, I no longer see any Z drop but to be safe after every power up I do one quick bed level
      which before the upgrade would have not been enough to level the bed accurately.
      Now, I see no bed drop and the bed is guaranteed level within seconds of power up.

      Here is what is required:

      In config.g:

      ; Z brake control
      M17 Z ; enable Z motors to hold bed position before brake is released

      ; set up servo brake signal on out5
      M950 P5 C"io5.out"
      M42 P5 S255 ; brake off

      My Macros:

      E-Stop:
      M42 P5 S0 ; brake on
      G4 P500 ; wait 500 milli seconds
      M112

      Reset:
      M42 P5 S0 ; brake on
      G4 P500 ; wait 500 milli seconds
      M999

      shutdown:
      ; macro to shutdown printer after hot end has cooled down
      ; carry out some checks first

      G10 S0 R0 ; Set active and standby temps to zero to ensure nothing is on standby
      M140 S0 ; heated bed heater off

      ; only shutdown if extruder temperature is below 70

          while true
             if sensors.analog[1].lastReading > 70            ; if hot end temperature is 70 or above then cool down
              M291 P{"Hot end temperature too high, cooling in progress!" } R"Power Management" S1 T0
              ;break                                          ; if not true, go to next command
          
             if sensors.analog[1].lastReading < 68 
              M291 P{"Hot end temperature < 68, shutting down now" } R"Power Management" S0 T4
               M42 P5 S0   ; apply Z brakes
                G4 S2		; wait 2 seconds
                 M81                                              ; atx power off
      

      Arduino code:
      #include <Servo.h>

      //Define duet output pin
      #define inPin 12

      #define PUSHED HIGH // look for active high

      byte lastState;
      unsigned long startMillis; // time variable
      Servo servo1;
      Servo servo2;
      Servo servo3;

      void setup()
      {
      servo1.attach(3); // servo 1
      servo2.attach(4); // servo 2
      servo3.attach(5); // servo 3
      pinMode(inPin, INPUT_PULLUP);
      //keep brake on at power up (brake arm is at 90 degrees when in off position!)
      servo1.write(0); // brake on
      servo2.write(0);
      servo3.write(0);
      delay(10000); // delay for duet initialisation
      servo1.write(100); // brake off
      servo2.write(100);
      servo3.write(100);
      delay(10000);

      }
      // duet in control from here onwards
      void loop()
      {
      byte thisState = digitalRead(inPin);

      //look for changed state?
      if (lastState != thisState)
      {
      //update to the new state
      lastState = thisState;
      //record time
      startMillis = millis();
      }
      //check for changed state
      // if (lastState == PUSHED) {

      // inPin state must have changed for >= 2 seconds to eliminate false triggers
      if (lastState == PUSHED && millis() - startMillis >= 2000UL)
      {
      servo1.write(100); // brake off if input high
      servo2.write(100);
      servo3.write(100);
      delay(1000);
      }
      else
      {
      servo1.write(0); // brake on if input low
      servo2.write(0);
      servo3.write(0);
      delay(1000);
      }

      }

      posted in Duet Hardware and wiring
      chas2706undefined
      chas2706
    • RE: half-assed web UI update put printer down. Need help!

      Question... How do you expect to get help after you abuse everyone and everything?

      posted in Duet Web Control
      chas2706undefined
      chas2706
    • RE: half-assed web UI update put printer down. Need help!

      Your attitude stinks, you don't deserve any help. I don't care what you think of me. I don't care about your "business". I just hope you treat your "customers" with respect. I'm done with this thread>

      posted in Duet Web Control
      chas2706undefined
      chas2706
    • RE: DuetWifi clones and support

      Initially I purchased a clone duet wifi for £100. I suffered with it for nearly 12 months, putting up with real bad connection issues and random sd card reader failures.

      I then went on to purchase a genuine Duet Ethernet and had no issues whatsoever.
      The professional quality, warranty and after sales service that comes with the genuine boards has now inspired me to purchase a Duet 3.

      I am unwrapping it tomorrow as an xmas present from my wife!

      posted in General Discussion
      chas2706undefined
      chas2706
    • RE: Invitation to share your conditional GCode scripts

      @dc42 Is there a time frame when the DSF will be updated so us Duet3 + SBC users can take advantage?

      posted in Gcode meta commands
      chas2706undefined
      chas2706
    • RE: Tronxy X5ST 500 configure to Duet Wifi 2

      Paul, your homez.g should look something like this:
      ; homez.g
      ; called to home the Z axis
      ;
      ; generated by RepRapFirmware Configuration Tool v2 on Sat Nov 10 2018 14:56:37 GMT+0000 (GMT Standard Time)
      ; Use the probe offset

      G91 ; relative positioning
      G1 S2 Z5 F100 ; lift Z relative to current position
      G90 ; back to absolute positioning
      G1 X160 Y160 F4000 ; Go to centre of bed

      ; Probe
      M558 A1 F350 ; Set single probing at faster feed rate
      G30 ; Do a single probe to home our Z axis
      M558 A10 F100 ; Set triple probing at slower feed rate
      G30 ; Probe again to get a more accurate position and set Z to trigger height

      The G30 command above is using the probe to home Z. You need to adjust your homeall.g as well by replacing the section where Z is homed with the above gcode.

      posted in Duet Hardware and wiring
      chas2706undefined
      chas2706
    • RE: Duet webcam

      @frank26080115 Im using a raspberry pi running motioneyeos which boots up as a standalone camera surveillance operating system. You can view live streams, record video ,time lapse etc. The beauty with this one is that there is no operating system running in the background.

      posted in General Discussion
      chas2706undefined
      chas2706
    • RE: half-assed web UI update put printer down. Need help!

      I think you need to calm down and look up the term "candidate release". You were not forced to upload it. It is there for testing by us if we choose. Let me know if you selling your duet board on the cheap!
      P.S. Have you forgotten your anger management pills?

      posted in Duet Web Control
      chas2706undefined
      chas2706

    Latest posts made by chas2706

    • RE: DUET3 any pin to detect poweroff and aid Zbraking?

      I have a large heavy printbed that had the same problems with dropping unlevel at power off.
      Here's how I overcome it:

      I grabbed a stepper brake design from thingyverse and modified it for use with a solenoid.
      Here is the final result:

      Z Brake.jpg

      I have these on all 3 Z steppers and they are controlled by a cheap arduino nano.
      The nano is used as an interface to be able to control the braking exactly how I want.
      It looks for a brake control signal that I set up on the Duet 3 board.

      By default the brakes are on. When the printer is powered up one of the first commands in config.g is to enable the Z motors. This locks their positions and therefore is now safe to release the brakes without causing any Z movement.
      The only downside is that for complete control I have to use my own board reset, e-stop and shutdown macros but this is not a real problem for me.

      Visually, I no longer see any Z drop but to be safe after every power up I do one quick bed level
      which before the upgrade would have not been enough to level the bed accurately.
      Now, I see no bed drop and the bed is guaranteed level within seconds of power up.

      Here is what is required:

      In config.g:

      ; Z brake control
      M17 Z ; enable Z motors to hold bed position before brake is released

      ; set up servo brake signal on out5
      M950 P5 C"io5.out"
      M42 P5 S255 ; brake off

      My Macros:

      E-Stop:
      M42 P5 S0 ; brake on
      G4 P500 ; wait 500 milli seconds
      M112

      Reset:
      M42 P5 S0 ; brake on
      G4 P500 ; wait 500 milli seconds
      M999

      shutdown:
      ; macro to shutdown printer after hot end has cooled down
      ; carry out some checks first

      G10 S0 R0 ; Set active and standby temps to zero to ensure nothing is on standby
      M140 S0 ; heated bed heater off

      ; only shutdown if extruder temperature is below 70

          while true
             if sensors.analog[1].lastReading > 70            ; if hot end temperature is 70 or above then cool down
              M291 P{"Hot end temperature too high, cooling in progress!" } R"Power Management" S1 T0
              ;break                                          ; if not true, go to next command
          
             if sensors.analog[1].lastReading < 68 
              M291 P{"Hot end temperature < 68, shutting down now" } R"Power Management" S0 T4
               M42 P5 S0   ; apply Z brakes
                G4 S2		; wait 2 seconds
                 M81                                              ; atx power off
      

      Arduino code:
      #include <Servo.h>

      //Define duet output pin
      #define inPin 12

      #define PUSHED HIGH // look for active high

      byte lastState;
      unsigned long startMillis; // time variable
      Servo servo1;
      Servo servo2;
      Servo servo3;

      void setup()
      {
      servo1.attach(3); // servo 1
      servo2.attach(4); // servo 2
      servo3.attach(5); // servo 3
      pinMode(inPin, INPUT_PULLUP);
      //keep brake on at power up (brake arm is at 90 degrees when in off position!)
      servo1.write(0); // brake on
      servo2.write(0);
      servo3.write(0);
      delay(10000); // delay for duet initialisation
      servo1.write(100); // brake off
      servo2.write(100);
      servo3.write(100);
      delay(10000);

      }
      // duet in control from here onwards
      void loop()
      {
      byte thisState = digitalRead(inPin);

      //look for changed state?
      if (lastState != thisState)
      {
      //update to the new state
      lastState = thisState;
      //record time
      startMillis = millis();
      }
      //check for changed state
      // if (lastState == PUSHED) {

      // inPin state must have changed for >= 2 seconds to eliminate false triggers
      if (lastState == PUSHED && millis() - startMillis >= 2000UL)
      {
      servo1.write(100); // brake off if input high
      servo2.write(100);
      servo3.write(100);
      delay(1000);
      }
      else
      {
      servo1.write(0); // brake on if input low
      servo2.write(0);
      servo3.write(0);
      delay(1000);
      }

      }

      posted in Duet Hardware and wiring
      chas2706undefined
      chas2706
    • RE: Daft Question?

      @droftarts said in Daft Question?:

      @chas2706 I've updated https://duet3d.dozuki.com/Wiki/SD_Card#Section_Creating_the_file_structure and https://duet3d.dozuki.com/Wiki/Firmware_Overview#Section_SD_card_structure.
      Also, the Configuration Tool has been updated and does now create a /firmware folder if you select '3.3 or later' as your firmware version on the 'General' page. Otherwise firmware files are put in /sys. But note that you don't need the firmware files on the SD card to run (the firmware is already flashed to the Duet processor), only to update.
      Ian

      Thanks for looking into this and updating.
      I was changing form SBC mode to Standalone and came across these.

      posted in General Discussion
      chas2706undefined
      chas2706
    • Daft Question?

      Why isn't there a "Downloads" section on the main web site that gives you the option to download the latest "stable" or "unstable" versions of the firmware for the individual Duet boards and configurations rather than all of them exposed in one location for you to work out the ones that you need?.
      Currently, you have to spend loads of time researching to identify the files that you require for your particular board or configuration.
      Also, the newer releases require that the firmware files be placed in a folder called " firmware" , but if you use the RRF Configurator it does not create that folder? It didn't for me anyway!
      So if I upgrade to RRF 3.3x, it will fail!


      Phaedrux MODERATOR 21 Aug 2021, 07:14
      @gbusy24 said in Updating from 3.0 to 3.3 gone wrong:

      Error: M997: File 0:/firmware/DuetWiFiServer.bin not found

      Place it in the firmware folder on the SD card as that is where it's going to be looking in 3.3.


      To me it just looks a mess and I am posting this because I am having difficulties changing from SBC mode to Standalone Mode.
      Also, why isn't the sd card structure updated in the "Documentation" section to reflect this change?
      Sorry to sound so negative but see my previous posts concerning RRF+SBC.

      posted in General Discussion
      chas2706undefined
      chas2706
    • RE: Problem with z-probe offset

      Sorry to hijack this thread but would just like to get something off my chest.
      Ive had problems with both my corexy printers regarding Z height and first layer issues since upgrading from RRF3.1.1. Both printers have SBC. They both now running on RRF3.2.2 and neither are capable of printing anything from scratch without my intervention. Each time I have to adjust babystepping to get the first layer height correct.
      Example: In config.g one printer has Z offset G31 X-30 Y-5 Z2.72 which was found by doing correct process to find Z height. On attempting to print, Z is too high. If I lower Z by 0.28 using on the fly babystepping the first layer is spot on. Before next print I change G31 in config.g to G31 X-30 Y-5 Z3.0 so as to equal the difference with babystep. On next print Z is too low and babystepping back up by 0.28 corrects this!!!!
      Just in case I'm doing something wrong I then change config to G31 X-30 Y-5 Z2.44 (minus 0.28). This time the print too low by 0.28!!!
      Both printers have similar issue and neither printer has any other G31 command in any other piece of gcode or macro.
      I have only one functional printer which is old faithful ender 3 pro which in my opinion prints every time because there's no Z probe present, everything is set up manually, no SBC attached and therefore much simpler.
      Ever since RRF3 firmware versions have been available I've had issues and still have issues with SBC not always connecting to DCS, when booted up, sometimes config.g not been processed so DWC shows no extruders, no heaters, no fans etc...
      It was months and months ago that i first reported an issue that any gcode command that I enter into the console in DWC has to be clicked on twice before DWC responds, I find that this issue is STILL present and has now even expanded to include the emergency stop icon on DWC. So at one point my head crashed into the bed because the emergency stop does not always work first time!!!
      Lastly, I fail to understand how on both printers with SBC attached i often encounter "network failed, no network connection" showing on SBC's DWC but im somehow happily connected to DWC via laptop!!
      I spent £1500 on my last printer but the best and most reliable prints come from my simple £250 Ender 3.
      R

      posted in Tuning and tweaking
      chas2706undefined
      chas2706
    • My Duet Experiences

      I have 3 printers, all of them (until recently) running on duet boards and all until recently producing unacceptable quality prints.
      One of the printers is a VCore Pro that cost me £1200 without the electronics. Another is a Tronxy X5S that has had many
      hardware upgrades and a considerable amount of money spent on it.

      Both of these printers run on Duet3 boards in SBC mode and are both on the current "stable" firmware.
      TBH both printers are far from producing "stable" prints and like others recently on this forum, I am now tired of trying to
      find solutions. In my opinion the SBC integration is just a novelty that highlights and adds to all current issues with the
      firmware. With SBC attached you get the added bonus of intermittent disconnections of DWC or DCS or your print stops in mid flight without explanation.

      Putting these issues aside, I am still left with disappointing print quality. It seems to me that ringing, round corners and
      general poor quality is inherent. I feel I have tried everything to reduce the ringing and other faults but no setting makes
      any difference for me whatsoever.

      The Tronxy X5S used to produce acceptable prints until I "upgraded" it with a Duet3 with SBC!
      It puts me straight off these days when I fire up any of the two SBC connected printers and be greeted with the well known
      phrase "could not connect to DCS".

      I am not seeking answers here because been there done that, tried this, tried that, sick of it!

      My 3rd printer which is a mere £250 Ender3 pro dropped in print quality from the day that I "upgraded" the electronics to a Duet 2 ethernet about 18 months ago, but initially I put it down to tweaking of the settings etc but never got the quality prints I would expect.

      I have now found a simple and cheap solution for the Ender3 Pro. The machine is both silent in motion and the print quality
      is second to none.
      The answer is to rip out the Duet board and replace it with a Creality 4.2.7 32bit silent board for the mere cost of £32!

      I know some people on this forum may not be happy with my personal findings and don't want to hear any of it but what really
      annoys me is that last year I was all excited about setting up my new 500x500x500 VCore Pro it being of good build quality
      with its quality linear rails, high quality belts, bearings etc but 12 months on I am no further to producing anything like good
      quality prints on it and there must be hundreds of forum users that have been told to "check your hardware" before blaming the firmware when questioning bad print quality.

      Now, my cheap Ender3 Pro is the big winner, the downside being having a mere 230x230 print surface.
      You simply upload a print to the sd card, press print and then just wait for your high quality print to finish. Works every time!
      No more abandoning of prints because the Z height has somehow changed from last time or the SBC communication failed etc, etc.

      posted in General Discussion
      chas2706undefined
      chas2706
    • RE: Problem with z-probe offset

      Sorry to hijack this thread but would just like to get something off my chest.
      Ive had problems with both my corexy printers regarding Z height and first layer issues since upgrading from RRF3.1.1. Both printers have SBC. They both now running on RRF3.2.2 and neither are capable of printing anything from scratch without my intervention. Each time I have to adjust babystepping to get the first layer height correct.
      Example: In config.g one printer has Z offset G31 X-30 Y-5 Z2.72 which was found by doing correct process to find Z height. On attempting to print, Z is too high. If I lower Z by 0.28 using on the fly babystepping the first layer is spot on. Before next print I change G31 in config.g to G31 X-30 Y-5 Z3.0 so as to equal the difference with babystep. On next print Z is too low and babystepping back up by 0.28 corrects this!!!!
      Just in case I'm doing something wrong I then change config to G31 X-30 Y-5 Z2.44 (minus 0.28). This time the print too low by 0.28!!!
      Both printers have similar issue and neither printer has any other G31 command in any other piece of gcode or macro.
      I have only one functional printer which is old faithful ender 3 pro which in my opinion prints every time because there's no Z probe present, everything is set up manually, no SBC attached and therefore much simpler.
      Ever since RRF3 firmware versions have been available I've had issues and still have issues with SBC not always connecting to DCS, when booted up, sometimes config.g not been processed so DWC shows no extruders, no heaters, no fans etc...
      It was months and months ago that i first reported an issue that any gcode command that I enter into the console in DWC has to be clicked on twice before DWC responds, I find that this issue is STILL present and has now even expanded to include the emergency stop icon on DWC. So at one point my head crashed into the bed because the emergency stop does not always work first time!!!
      Lastly, I fail to understand how on both printers with SBC attached i often encounter "network failed, no network connection" showing on SBC's DWC but im somehow happily connected to DWC via laptop!!
      I spent £1500 on my last printer but the best and most reliable prints come from my simple £250 Ender 3.
      Rant over, feel better now!

      posted in Tuning and tweaking
      chas2706undefined
      chas2706
    • RE: Duet3 -> SBC wiring (without the ribbon cable)

      @bearer said in Duet3 -> SBC wiring (without the ribbon cable):

      which pin used for ground shouldn't matter, I used pin 20 along with the 5 signal lines and pin 6 & 9 along with the 5V for power. (i guess in theory more ground lines are more better from a signal integrity point of view but never had any issues with the SPI speed used at the time)

      Maybe I'm just unlucky but tried to use my own cable a number of times and got random disconnections between SBC and Duet.
      Have tried incorporating two ground connections instead of just pin 20 and also made a lead a short as possible.
      The reason for using my own cable was that I needed some free gpio pins on the pi.
      Back on the ribbon cable now without any problems and got access to the gpio pins by cutting back the appropriate cables on the ribbon.

      posted in Duet Hardware and wiring
      chas2706undefined
      chas2706
    • RE: Z calibration issues

      The single probe check just contains:

      G30 S-1 ;Probe the bed at the current XY position. When the probe is triggered, do not adjust the Z coordinate.
      G1 Z5

      Looking through the documentation again I found I did not have a M574 Z1 S2 ; configure Z-probe endstop for low end on Z

      in my config.g for endstops

      Now if I do multiple single probe checks the results are consistent so I will re-calibrate Z and see if the problem has gone away.

      In the meantime thanks for your help.

      posted in General Discussion
      chas2706undefined
      chas2706
    • RE: Z calibration issues

      Sorry about the late reply.

      Yes, after bed levelling I home the probe in the center of the bed.

      It is DC42's ir probe.

      Are there improvements regarding probing etc in RRF3.2 beta 4?

      Cheers.

      posted in General Discussion
      chas2706undefined
      chas2706
    • Z calibration issues

      I have 3 printers all running on Duets and all run ok except for my last build which is a Ratrig Vcore Pro. It's the only printer running on RRF3.2 beta 3.2.
      On this printer I just cannot get a stable bed height. Every time i set Z, if i am lucky i can get the first print to work but there after Z is not at the correct height. The variation is only very small but small enough to disallow anything sticking to the bed. I can then adjust the height with baby stepping but even then, the Z height changes for the next print.
      I have studied my config.g and other settings until i am blue in the face and cant find the answer why.

      Here's my config.g:
      ; Configuration file for Duet 3 (firmware version 3.1.1)
      ; executed by the firmware on start-up
      ;
      ; Modified config for Ratrig Vcore with single extruder 23/08/2020

      ; ###General preferences###
      M42 P8 S255 ; Power up relay
      M555 P0 ; Set Reprap-style output
      G21 ; Set dimensions to millimetres
      G90 ; send absolute coordinates...
      M83 ; ...but relative extruder moves

      ;###Network###
      M550 P"V-Core Pro" ; set printer name
      M669 K1 ; select CoreXY mode

      ; ###Drives###
      M569 P0.0 S1 ; X physical drive 0.0 goes forwards
      M569 P0.1 S1 ; Y physical drive 0.1 goes forwards
      M569 P0.2 S0 ; Z0 physical drive 0.2 goes backwards
      M569 P0.3 S0 ; Z1 physical drive 0.3 goes backwards
      M569 P0.4 S0 ; Z2 physical drive 0.4 goes backwards
      M569 P0.5 S0 ; E0 physical drive 0.5 goes backwards

      ; ###Set drive mapping###
      ; For tripple Z make sure drive 2 is left hand Z and 3 is right hand, 4 at back
      M584 X0.0 Y0.1 Z0.2:0.3:0.4 E0.5 ; Drive mapping for single extruder
      ;M92 X80.00 Y80.00 Z400.00 E136 ; set steps per mm (clone titan = 425)
      ;M92 X80.00 Y80.00 Z400.00 E424 ; set steps per mm for volcano 0.8
      M92 X80.00 Y80.00 Z400.00 E466 ; set steps per mm for volcano 0.4
      M350 X16 Y16 Z16 E16 I1 ; configure microstepping with interpolation

      ; ###Accelerations, speed and jerk###
      M98 P"print_settings/default_speed.g"
      ;M98 P"print_settings/E3_Fast.g"
      ;M98 P"print_settings/E3_T1.g"
      ;M98 P"print_settings/E3_T2.g"
      ;M98 P"print_settings/E_T3.g"

      M906 X1000 Y1000 Z1000 E1000 I30 ; set motor currents (mA) and motor idle factor in per cent
      ; V-Core steppers are 1.68 amp so 80% = 1.32amp
      M84 S30 ; Set idle timeout

      ; ###Leadscrew positions###

      ;M671 X-35:535:245 Y116:116:560 S6.0 ; The measurement is taken from X=0, Y=0. Therefore X will be negative, Y positive
      M671 X-35:535:245 Y92:92:560 S6.0 ; The measurement is taken from X=0, Y=0. Therefore X will be negative, Y positive

      ; ###Mesh Grid###
      ; The following M557 commands are not needed if you are using a bed.g file to perform bed compensation
      ;*** Adjust the XY coordinates in the following M557 commands to suit your build and the position of the Z probe
      M557 X20:480 Y20:480 S100 ; Define small mesh grid - 25 points
      ;M557 X10:480 Y20:480 S50 ; Define large mesh grid - 50 points

      ; ###Axis Limits###
      ;M208 X495 Y485 Z500 ; set axis maxima
      M208 X492 Y495 Z500 ; set axis maxima
      M208 X-6 Y0 Z0 S1 ; Set axis minima (adjust to make X=0 and Y=0 the edges of the bed)

      ; ###Endstops###
      M574 X1 S1 P"!io0.in" ; configure active-low endstop for low end on X via pin io0.in with internal pull-up
      M574 Y1 S1 P"!io1.in" ; configure active-low endstop for low end on Y via pin io1.in with internal pull-up

      ; ###Z-Probe###
      M558 P8 C"io2.in" H5 A2 F120 T3000 ; Z probe is type 8 in RRF3
      ; G31: the P is the reported Z value when triggered. X,Y are offset coordinates. Z is trigger height, you can decrease value if nozzle is too close
      ; or increase if too far away.
      ;G31 P500 X0 Y-25 Z1.80 ; set Z probe trigger value, offset and trigger height 2.07
      G31 P50 X-22 Y0 Z2.32 ; set Z probe trigger value, offset and trigger height 2.07 ########changed P500 to P50

      ; ###Push buttons###
      ; create e-stop microswitch
      M950 J3 C"!io3.in" ; Input 3 uses io2 pin, inverted
      M581 P3 S1 T0 R0 ; configure enstop as e-stop

      ; filament unload button
      ;M950 J4 C"!io4.in" ; Input 4 uses io4 pin, inverted
      ;M581 P4 S1 T2 R0 ; configure button for filament unload

      ; filament load button
      ;M950 J5 C"!io5.in" ; Input 5 uses io5 pin, inverted
      ;M581 P5 S1 T3 R0 ; configure push button for filament load

      ; M581 P"!io6.in" T0 C0 ; configure active-low endstop to perform an e-stop (on panel)
      ; e-stop button
      ;M950 P6 C"!io6.in" ; Input 6 uses io6 pin, inverted
      ;M581 P6 S1 T0 R0 ; configure push button for e-stop

      ; bed levelling button
      M950 P7 C"io7.out" ; Input 7 uses io7 pin, inverted
      ;M581 P7 S1 T4 R0 ; configure push button for Bed Levelling

      ; shutdown switch
      M950 P8 C"io8.out" ; Creates output on io8 to use as alternative power off switch

      ; Filament Run Out Sensor
      ;M591 D0 P1 C4 S1 ; Code requires conversion Filament runout Sensor for Extruder E0 P1 = signal HIGH.

      ;Magnetic Filament Sensor
      ;M591 P3 C"e0_stop" S1 ; filament monitor connected to E0_stop

      ; ###Bed thermistor/heater###
      M308 S0 P"temp0" Y"thermistor" T100000 B4138 ; bed thermistor
      M950 H0 C"out0" Q100 T0 ; bed heater H = heater no. C = output Q = PWM frequencyT = temperature sensor no. defined above.
      M143 H0 S120 ; set temperature limit for bed heater 0 to 120C
      M140 H0 ; map heated bed to heater 0
      M143 H0 P0 S105 A2 ; switch off bed heater temporarily if it exceeds 105°C
      M143 H0 P1 S110 A0 ; raise a heater fault if it exceeds 110C

      ; ###Extruder thermister/heater###
      ; H Heater number to monitor (default 1 which is normally the first hot end)
      ; S Maximum permitted temperature
      ; P Heater monitor number, default 0
      ; T Sensor number used to monitor the heater. It default to the sensor that controls the heater (as was specified in the M05o command when the heater was created).
      ; A Action to trigger (0: Generate heater fault [default] 1: Switch off permanently 2: Switch off temporarily)1
      ; C Condition for temperature event (0: Temperature too high [default] 1: Temperature too low, -1: Monitor is disabled)

      M308 S1 P"temp1" Y"thermistor" T100000 B4138 C7.06e-8 ; extruder thermistor
      M950 H1 C"out1" T1 ; ext heater H = heater no. C = output T = temperature sensor no. defined above.
      M143 H1 S280 ; set temperature limit for extruder heater 1 to 250C
      M143 H1 P0 S290 A2 ; switch off extruder heater temporarily if it exceeds 250°C
      M143 H1 P1 S285 A0 ; raise a heater fault if it exceeds 255C

      ;###CPU Temperature Calibration###
      M912 P0 S1

      ; ###Fans###
      M950 F0 C"out7" Q100 ; create fan 0 on pin out7 and set its frequency (parts fan)
      M106 P0 S0 H-1 C"Part Cooling" ; set fan 0 value. Thermostatic control is turned off
      M950 F1 C"out8" Q100 ; create fan 1 on pin out8 and set its frequency (ext fan)
      M106 P1 S0 H1 T45:65 C"Extruder" ; set fan 1 value. Turns on at 45 degrees and full speed at 65 or over
      M950 F4 C"out5" Q100 ; create fan 2 on pin out5 (bed cooling)
      M106 P4 S0 H-1 C"Bed Cooling" ; set fan 2 value. Thermostatic control is off

      ;###Hardware temperature control###
      ;CPU fan
      M950 F2 C"out9" ; create fan 2 (CPU fan)
      M308 S3 Y"mcutemp" A"MCU" ; set up a virtual sensor for cpu fan
      M106 P2 T35 H3 ; set fan 2 value. Fan comes on when cpu temp is above 35 degrees (Cool the pi as well!)
      M308 S4 P"drivers" Y"drivers" A"TMC" ; Create sensor for drivers

      ;###Led Lighting###
      M950 F3 C"out4" Q500 ; create a fan 3 output to use for led lighting control on pin out4
      M106 P3 S0 ; set output default to off

      ; ###Extruder setup###
      M563 P0 S"Extruder0" D0 H1 F0 ; define tool 0
      G10 P0 X0 Y0 ; set tool 0 axis offsets
      G10 P0 R0 S0 ; set initial tool 0 active and standby temperatures to 0C

      ;### FW Retract ###
      M207 S0.5 F3000 Z0 ; max recommended retraction for V6 is 2mm (plus take in account length of bowden tube)

      ; ###Custom settings###
      ;M593 F50 ; anti-Ringing
      ;M572 D0 S0.800 ; Pressure advance = 0.8
      M42 P8 S255 ; Power up relay
      T0 ; select first tool
      M501 ; read parameters in config.overide
      M98 P"/macros/Bed Levelling/lead_screw_level.g" ; perform bed levelling if ok'd on startup and then activate the mesh grid

      homing files:
      ; homex.g
      ; called to home the X axis
      ;
      ; generated by RepRapFirmware Configuration Tool v2.1.1 on Mon Nov 04 2019 16:21:57 GMT+0000 (Greenwich Mean Time)
      G91 ; relative positioning
      M913 X70 Y70 Z80 ; reduce the motor current
      G1 H2 Z5 F6000 ; lift Z relative to current position
      G1 H1 X-600 F2800 ; move quickly to X axis endstop and stop there (first pass)
      G1 H0 X5 F6000 ; go back a few mm
      G1 H1 X-600 F360 ; move slowly to X axis endstop once more (second pass)
      G1 H2 Z-5 F6000 ; lower Z again
      G90 ; absolute positioning
      M913 X100 Y100 Z100 ; reset motor currents
      ; homey.g
      ; called to home the Y axis
      ;
      ; generated by RepRapFirmware Configuration Tool v2.1.1 on Mon Nov 04 2019 16:21:57 GMT+0000 (Greenwich Mean Time)
      G91 ; relative positioning
      M913 X70 Y70 Z80 ; reduce the motor current
      G1 H2 Z5 F6000 ; lift Z relative to current position
      G1 H1 Y-600 F2800 ; move quickly to Y axis endstop and stop there (first pass)
      G1 H0 Y5 F6000 ; go back a few mm
      G1 H1 Y-600 F360 ; move slowly to Y axis endstop once more (second pass)
      G1 H2 Z-5 F6000 ; lower Z again
      G90 ; absolute positioning
      M913 X100 Y100 Z100 ; reset motor currents

      ; homez.g
      ; called to home the Z axis
      ;
      ; generated by RepRapFirmware Configuration Tool v2.1.1 on Mon Nov 04 2019 16:21:57 GMT+0000 (Greenwich Mean Time)

      G91 ; Relative positioning
      G1 H2 Z5 F6000 ; lift Z relative to current position
      G90 ; absolute positioning
      G1 X245 Y247.5 F4000 ; Go to centre of bed

      ; Probe
      M558 A1 F350 ; Set single probing at faster feed rate F350
      G30 ; Do a single probe to home our Z axis
      M558 A10 F100 ; Set triple probing at slower feed rate
      G30 ; Probe again to get a more accurate position and set Z to trigger height

      M913 X100 Y100 Z100 ; reset motor currents

      set Z macro:
      ; My macro to set Z probe height

      M291 P"Bed compensation and height map will be deleted. Ok or Cancel?" R"WARNING" S3 T0; Click OK or Cancel.
      M561 ; cancel any existing bed compensation
      G29 S2 ; Clear bed height map

      M291 P"Checking for homed axis!" S0 T2 ; Display on DWC
      ; If the printer hasn't been homed, home it
      if !move.axes[0].homed || !move.axes[1].homed || !move.axes[2].homed
      G28

      M291 P"Heat the bed and extruder, home X and Y then find Z" R"WARNING" S0 T3
      G1 X245 Y247.5 F4000 ; Go to centre of bed
      M208 S1 Z-5 ; Allow Z moves down to Z=-5mm.
      T0 ; Activate extruder
      M190 S60 ; Heat bed to 60 and wait
      M109 S190 ; Heat nozzle to 190 and wait

      ; Reset Z=0
      G31 Z0
      M564 S0 ; temporarily disable axis limits

      ; Move Z down to find Z=0
      M291 P"Jog the Z axis until the nozzle grips a peice of paper and click OK" R"Move Z" Z1 S2
      M291 P"Click OK to set Z=0" R"Setting Z=0" S2
      G92 Z0 ; Set Z to 0

      M291 P"Z is now set, starting multi-probing" R"Done Z" S0 T5

      ; Get trigger heights
      M291 P"Trigger height will now be measured 10 times. Heights will be found in gcode console" R"ZProbe Trigger Height Calibration" S0 T5

      ; G30 S-1 10 times
      ;

      ; 1
      G1 Z5
      G30 S-1

      ; 2
      G1 Z5
      G30 S-1

      ; 3
      G1 Z5
      G30 S-1

      ; 4
      G1 Z5
      G30 S-1

      ; 5
      G1 Z5
      G30 S-1

      ; 6
      G1 Z5
      G30 S-1

      ; 7
      G1 Z5
      G30 S-1

      ; 8
      G1 Z5
      G30 S-1

      ; 9
      G1 Z5
      G30 S-1

      ; 10
      G1 Z5
      G30 S-1

      M291 P"Probing finished. All heaters off, homing all axis. Check log for trigger heights and enter into config.g" S0 T5

      ; Turn off heaters
      ;
      M104 S0 ; Set nozzle to 0 and release
      M140 S0 ; Set bed to 0 and release
      G28 ; Home Z

      Strange thing is here is a typical result from set Z macro:
      Results from 10x calibration.png

      BUT here are results from 10 separate G30 S-1 commands:
      single Z probe.png

      Can anyone help?
      Thanks in advance.
      posted in General Discussion
      chas2706undefined
      chas2706