Duet3D Logo Duet3D
    • Tags
    • Documentation
    • Order
    • Register
    • Login
    1. Home
    2. garis
    3. Best
    • Profile
    • Following 1
    • Followers 0
    • Topics 5
    • Posts 46
    • Best 5
    • Controversial 0
    • Groups 0

    Best posts made by garis

    • My Hypercube Evolution CoreXY variant

      0_1556400153803_garis_1.jpg
      18 months to get this far. It first worked about 12 months ago but another 12 months to do some surgery to it, and build a second one that is smaller with a single Z screw. Change to E3D volcano, Zesty Nimble, Duet and full redesign of X carriage assembly.

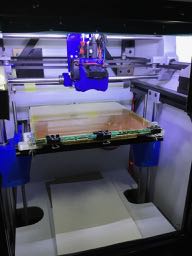
      So a fairly basic configuration with print volume of 250 mm cube.

      Key features are:
      1 the configuration of the dual Z rods rather than 4 rods on the normal Hypercube and they are 16 mm. Y rods are 12 mm and X are hollow 10mm.
      2 the X rods were changed from 45 to 90 mm vertical spacing
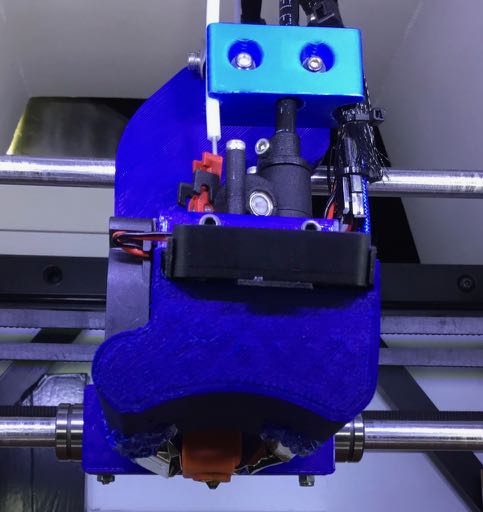
      3 Zesty Nimble with tusk part cooling (hand rolled aluminium) requiring a bit of refinement.
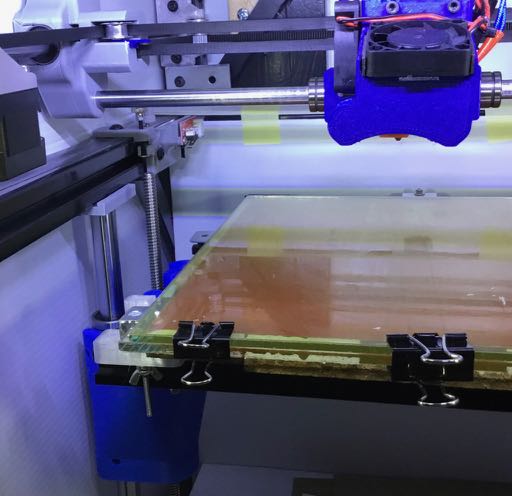
      4 Dual 4mm glass beds, 1 fixed & heated and multiple removable print beds, on 3 levelling screws on a 2020 aluminium frame.

      Power supply and Duet mounted on the back.

      It is mechanically quite accurate requiring no compensation or bed compensation, and at this stage just a Z mechanical Endstop and occasional Babystep variations.

      0_1556400891037_garis_2.jpg

      0_1556400918047_garis_3.jpg

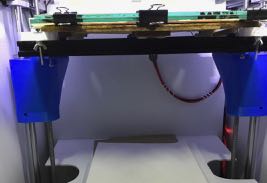
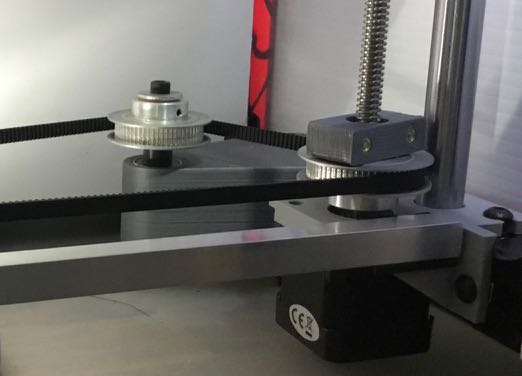
      The Z belt arrangement for keeping screws synchronised when power off.
      0_1556400944303_garis_4.jpg

      0_1556400960634_garis_5.jpg

      X carriage with 3 10mm bearings, 2 on the lower rod and 1 on the top, with the carriage (not shown) having a bit of complexity to allow in-situ tuning of the bearing separation and alignment with X rods to avoid binding. 2 40mm fans
      0_1556400975903_garis_6.jpg

      posted in My Duet controlled machine
      garisundefined
      garis
    • RE: DueUI 1.1.0 is released!

      Thanks for this. Attached is a screenshot of my first draft of a single page version for a 22 in monitor. This is the shot from a windows 10 machine that has moved the elements around a bit compared to the active version. (Both in Firefox). The "production" version is running on another PC running Arch Linux with xampp with 2 virtual servers - one for each of my 2 printers.

      I have an idea to also have a minimalist version running on the Duet using an Android Tablet as the client. As long as this doesn't overload the Duet as I also will need the DWC running in the background for other functions.

      I have included 2 baby stepping sections which I thought to be useful for me. I wrote 2 widgets added to dueui_widgets.js. The stepping widget works (wonderful for a person that knows no javascript) but the widget for displaying the babystep "position" requires your assistance (see next post). ie display "M290 " z output.

      The issues:
      ... The sense endstops widget doesn't work and this is of course critical.
      ... The Extruder temp control won't turn the heater off.
      ... I haven't yet worked out how to style the heater widget as the temperatures are very close to the up/down arrows.
      ... How do I style the console log to have a larger default height?

      So far I haven't used it other than preliminary testing until the sense endstop is fixed.

      0_1562724991175_dueui_1.png

      posted in DueUI
      garisundefined
      garis
    • RE: Pressure advance calibration

      I have a comprehensive gcode generator - a python script that applies various 'for' loops over user specified geometry (polygons).

      It should, hopefully, be useful to others. It includes 20 different routines including many for retraction, jerk and acceleration for XY and E, pressure advance etc.

      0_1547084142867_IMG_1042.jpg

      This image (of translucent PETG 0.6mm nozzle) shows an example with 2 Mcodes incremented in nested 3 x 3 test bands delineated by wider layers, within which a 3rd Mcode is also varied. Each tower can be a different shape and can be printed at different speeds.

      This example: 3 polygons - 2 squares and a pentagon, each with 2 sides having grooves to mimic the XY test cubes. Configurable from triangles to circles with and without grooves, and number of walls.

      I have been using it successfully for a few weeks and now doing a final check. I will post it here shortly when I have cleaned it up a bit for others (and me) to use.

      Now that the structure of the script is working, any combinations of any Mcode can be readily added by request, or the user.

      I guess there is an interest in including linear advance? I might do that and delay the posting to this forum.
      Question, as I don't yet use linear advance: What is the likely range of parameters for me to start with in order to minimise wild first tests?

      Other priorities? maybe wait till you see it. A day or so.

      posted in Tuning and tweaking
      garisundefined
      garis
    • RE: My Hypercube Evolution CoreXY variant

      @phaedrux Quite well !! Part of the lengthy build process was lots of redesigning in Fusion360 (every part from the Hypercube Thingiverse site I redesigned so that took time) and of course this X carriage is almost a complete new design for the Nimble and tusk part cooling feature and for the 90m rod spacing etc etc.

      The original build was all PLA because I could not successfully use PETG. Now most parts including all critical parts are in PETG with modest print quality. I got there by writing a python script that allows me to optimise 3 Mcodes at 3 different speed and progressively iterate through lots of combinations, which was particularly important because of the Zesty Nimble's sensitivity to acceleration and jerk and because I am using a 0.6 nozzle in a volcano. So now having done many test prints I am "just" able to print PETG. The nimble jerk is 50% higher than recommended and the acceleration is also quite a bit higher. Also dc42 pointed me to driving the zesty stepper at max amps to overcome jerk inertia even though little torque is required otherwise. I will run some more combinations through my python script at some stage.

      The volcano also is ok except that at full flow say 20mm3/sec I seem to get too much temperature gradient between the sensor and the filament with the temperature struggling to stay stable. The auto tune Mcode doesn't allow for the heat loss at high filament flow rates. I've fiddled with manual adjustment HE heater settings but have not yet got a good set of parameters. For example if I try to manually test a higher temperature on the fly, say raise the temperature a few degrees, it will not heat sufficiently fast and the Duet will shut down with a heater failure. (its all 24V and all genuine E3D)

      The remaining challenge, unsolved, is how to print top layers in PETG. I don't need much infill for strength but it appears I need 33% just to minimise the sag of the first top layer. Also the speed is lowish at 45 otherwise the extrusion bulges a lot as it bridges the infill. Otherwise I can print PETG on perimeters at 70 to 80. Cura did not work for me but the latest KISSlicer alpha with rounded infill seems the best.

      The other printer is a single Z screw cantilevered bed X150mm x Y200 with identical upper features except as the X is so short the 8mm X rods are light and so the whole moving mass is close to the lightest possible. Even just using 3 small 8mm linear bearings for weight and reduced friction and potential for binding. The last photo has the two 10mm bearings visible on the lower rod on the bigger printer.

      Now I have both printers fully working as of yesterday, I can put my mind to further improvements to my limited knowledge of PETG and perhaps make something useful.

      posted in My Duet controlled machine
      garisundefined
      garis
    • RE: A good process to tune jerk?

      If you understand basic python this script might help you. I posted an earlier version some years ago.

      It creates test towers and then test ranges of Mcode from definable start / end / increments.

      In essence it can test up to 3 nested for loops of M Code on 3 polygon towers each separately defined (from triangles to near circles eg for jerk !!), each tower at different speeds. Start / end layer locations are definable to control travel paths. (and to change viewing angle during print).

      Sides can have 1 or 2 vertical grooves (configurable), and sides can be omitted.

      A scan through the code will show more details and parameters.

      Wide layers are printing for see where each code is changed, to supplement lots of M117 messages during printing.

      I have no skill in creating a user friendly input screen so use the d_settings file that is imported and overrides relevant data in the main script file. Nor do I have skill in automatically creating the location of the output gcode so that needs to be manually set at about line 1008.

      Most combinations are possible.

      mcopt_p06_2.py d_settings.py

      posted in Tuning and tweaking
      garisundefined
      garis