New Large Format IDEX Printer Project
-
Some mechanical updates (and lessons learned)! When this thread was posted, the X-U axis was on its second major revision. The initial design placed the steppers, belts, and idlers on the backside of the axis.
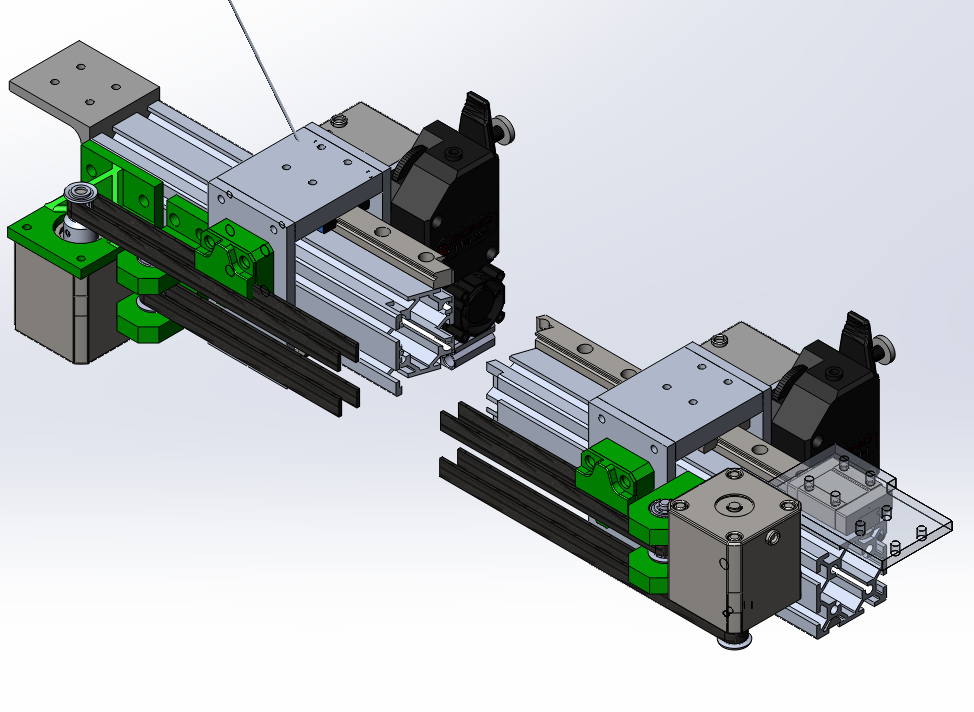
On the 'low' side of the axis, a third ML12 block was used to join this axis to the Y-axis guide blocks and belt, with the intent to mitigate alignment or expansion issues. The issue with this X-U axis design was that the print area was limited because of the space occupied by the stepper motors and idlers.The second iteration placed the steppers, belts, and idlers on top of the axis.
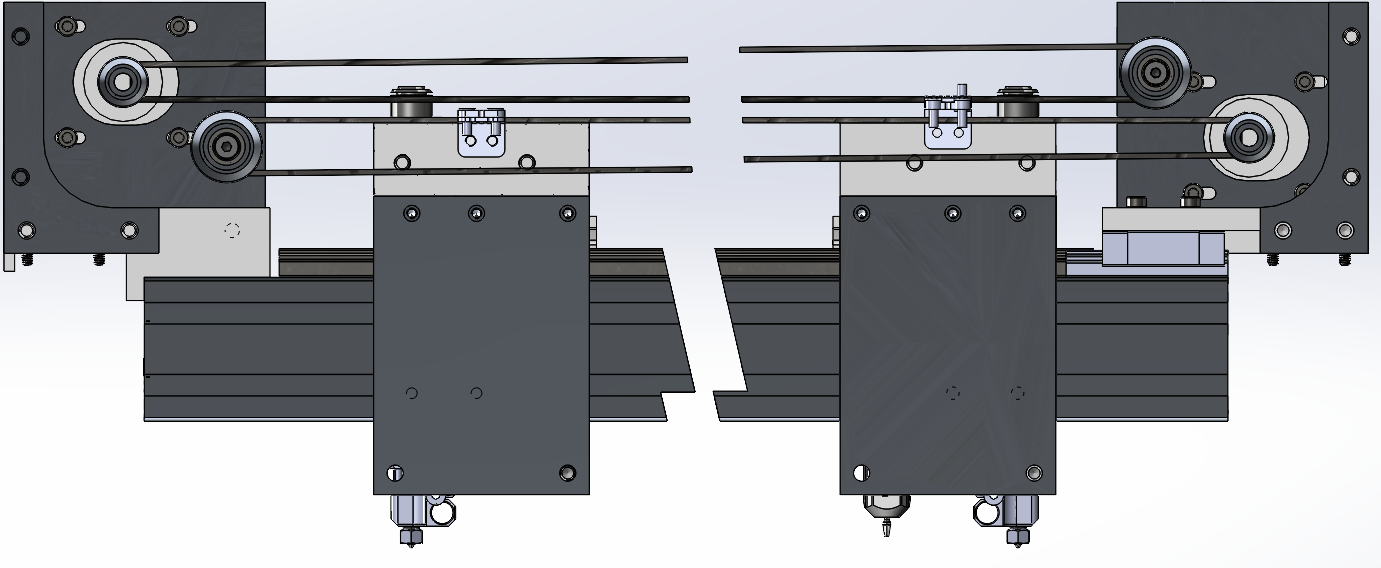
Previously the idlers were supported on both ends via a rotary shaft and two ball bearings, however the change in belt routing necessitated a change in how the idlers were mounted.
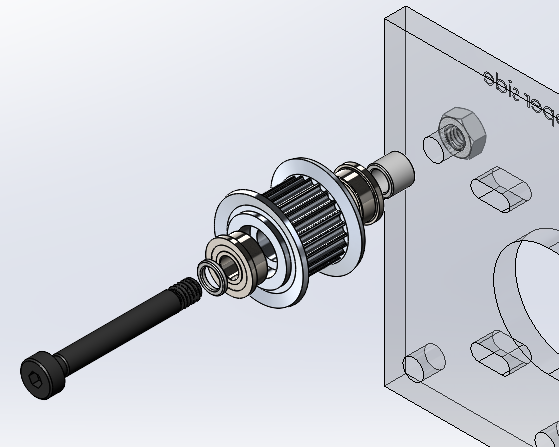
Misumi configurable shoulder bolt, washers, idler, with flanged bearings. The problem here is that I had selected a 4mm shoulder diameter, and had the option to either select an M3 or M4 thread at the end - I opted to go with M4, and thus sized the through-hole in the plate to that diameter. When tightening the stackup, I compress the bearings, idlers, etc to the plate instead of just the threaded portion of the bolt to the plate (below left, area in red can be tightened).
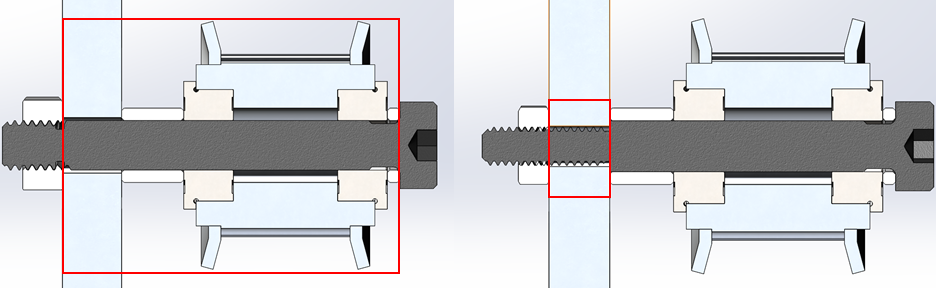
Had I gone with an M3 thread with the 4mm shoulder diameter (above right) the shoulder would have been tightened to the plate (via the hex nut or even a tapped hole), with the shoulder length specified to be equivalent to the washer, bearing, and idler stackup. As it is now I have to be mindful when tightening this section.Interesting design note, in order to match the bearing size, shoulder diameter, and idler counterbore, I needed to select (I believe) a minimum of a 24 tooth pulley. I designed the stepper mounting plates such that the belt segments the hotend carriages clamp to are parallel to the gantry.

With the new X-U stepper and idler locations, I was able to center the 550mm length rail, however this required a short linear guide to be installed on the low side of the axis. Of course, with the stepper motor plate on the low side now mounted to a linear guide, I'm now tensioning the belts against a sliding surface... yes ultimately that side is mounted to a fixed surface (Y-axis guide), any misalignment would result in varying belt tension as the gantry travels up/down the Y-axis.
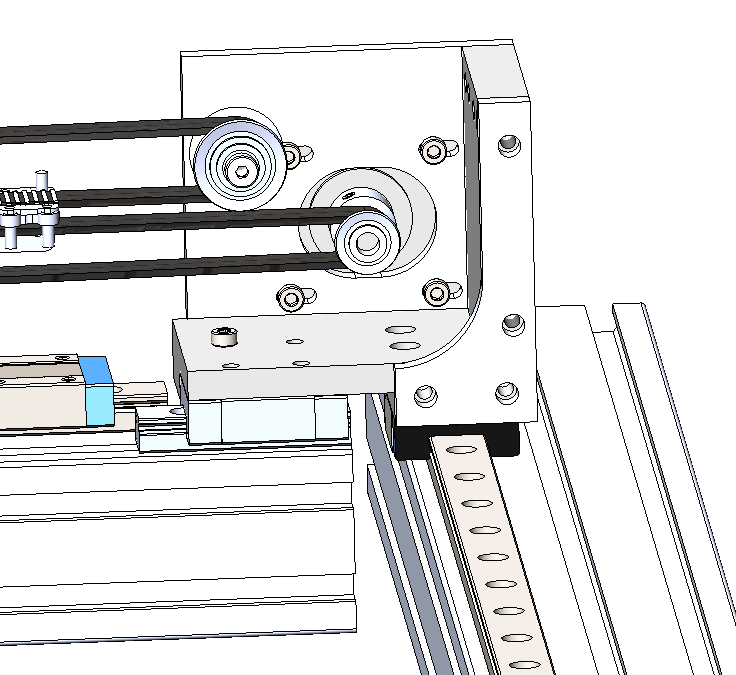
I recently removed this short guide and have seen no ill effects, however the impact of thermal expansion cannot be discounted and should be investigated further.Some other neat stuff, build chamber is nearly completely enclosed, with the localized build envelope temperature stabilizing at 68°C with the print bed at 120°C. Some work is still needed on that front.
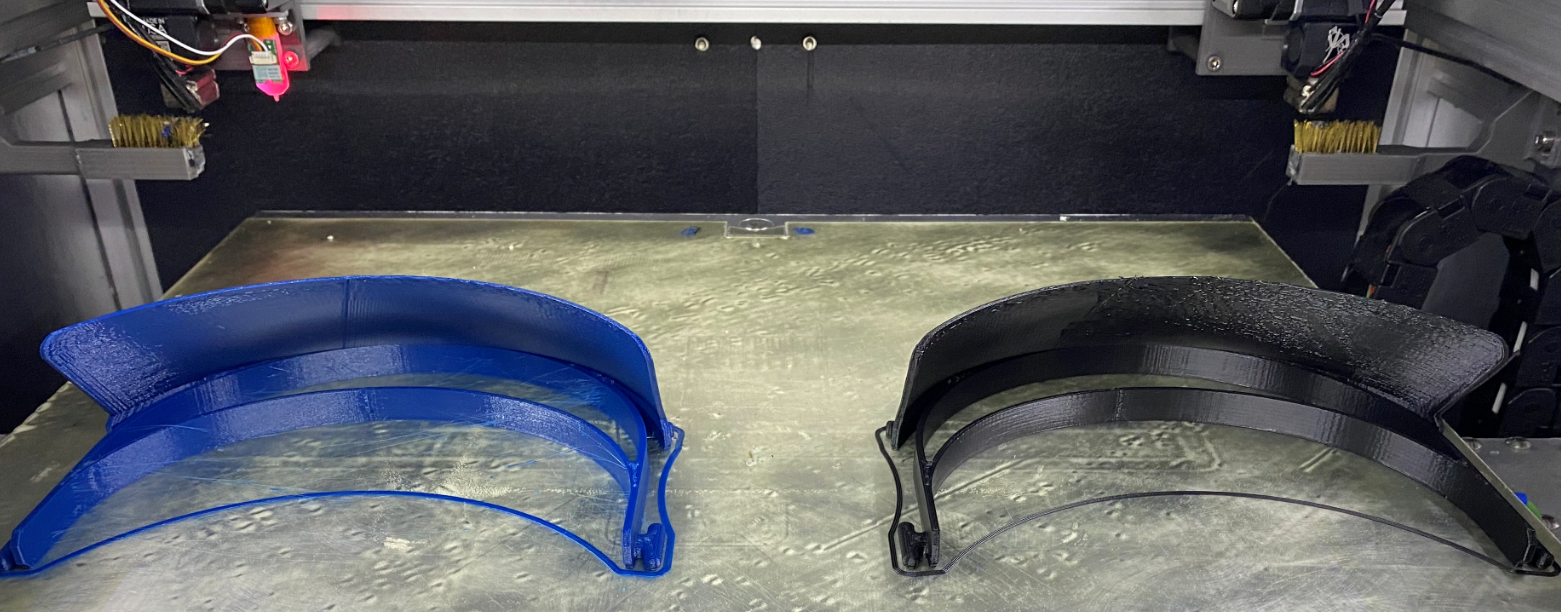
Just yesterday I setup the tool needed for duplication printing - not the prettiest ABS prints (steep overhang, high print temperature, and no print cooling fans
 ) but it worked well! Some goofy movements at the start and end, which I attribute to my tool change files, but overall pretty easy.
https://www.youtube.com/watch?v=5FNhITS6L6I&feature=youtu.be
An issue I am having is with the filament tubes and cable assemblies for each hotend bending and pressing down on the X and U belts. Somewhat self inflicted with the limited clearance above the hotend carriages, but still working through this issue. -
@sebkritikel said in New Large Format IDEX Printer Project:
e pr
Thank you for sharing your design and lessons learned. Great design - looks very solid to me.
-
@sebkritikel, that's a very impressive design.
You have two brushes on the sides, are they used to clean the heads? Do they work well? (I may need something like that to occasionally cleaning the head when printing PETG).
I think I recognize the power supply you are using. Does the fan turns on every minute or two and makes loud noise? I switched to this one which is fan-less https://www.amazon.com/gp/product/B07GPDRV7V
-
@Yeti-WST said in New Large Format IDEX Printer Project:
@sebkritikel said in New Large Format IDEX Printer Project:
e pr
Thank you for sharing your design and lessons learned. Great design - looks very solid to me.
Thank you! The list of lessons learned keeps growing the more I work on it

@zapta said in New Large Format IDEX Printer Project:
@sebkritikel, that's a very impressive design.
You have two brushes on the sides, are they used to clean the heads? Do they work well? (I may need something like that to occasionally cleaning the head when printing PETG).
I think I recognize the power supply you are using. Does the fan turns on every minute or two and makes loud noise? I switched to this one which is fan-less https://www.amazon.com/gp/product/B07GPDRV7V
Thank you!
The two brushes do work quite well - just cheap Harbor Freight brass detail brushes with the handle trimmed off. I typically purge the nozzles behind them, and then have a simple X and U tool cleaning macro that I can call from the PanelDue/web interface. These macros are also called in my tool change files. The key with the brass brushes is having the nozzles run over them in a zig-zag pattern at decent speed, rather than approaching and exiting the brush in a straight line. If I have a bit of crud built up on the nozzle and execute a cleaning macro, I can often hear the plastic flying off the brush as the brass wires whip back into position after the nozzle flies through them haha
G1 S2 X-260 Y235 F15000 ; brush home
G1 X-253 Y205.5 F15000
G1 Y225.5 F15000
G1 X-260 Y205.5 F15000
G1 S2 X-260 Y235 F15000 ; brush home
https://www.youtube.com/watch?v=YsUtwHki46w
Ideally it would also be good to have a silicone wiper in addition to the brush, similar to the Stratasys tip wipe solution.
Re: power supply - yup, have a MEAN WELL RSP-500-24, fan comes on periodically (and is definitely loud), although I'm not bothered by it. I was looking at the fan-less model, but oped for the RSP as it had a few more features I was thinking about using (remote sense and on-off control).
-
@sebkritikel, the brushing in the video looks cool. Do you do it also during prints (e.g. every X layers)?
since you mentioned Stratesys I searched and found this patent https://patentimages.storage.googleapis.com/08/47/1b/42d482f76e4ad3/US7744364.pdf . Do you know if those stratasys brushes are available somewhere? Might be easier just to buy a few.
Edit: found this https://www.ebay.com/p/17007045322?iid=223634555307&thm=1000
-
@sebkritikel said in New Large Format IDEX Printer Project:
Some mechanical updates (and lessons learned)! When this thread was posted, the X-U axis was on its second major revision. The initial design placed the steppers, belts, and idlers on the backside of the axis.
On the 'low' side of the axis, a third ML12 block was used to join this axis to the Y-axis guide blocks and belt, with the intent to mitigate alignment or expansion issues. The issue with this X-U axis design was that the print area was limited because of the space occupied by the stepper motors and idlers.The second iteration placed the steppers, belts, and idlers on top of the axis.
Previously the idlers were supported on both ends via a rotary shaft and two ball bearings, however the change in belt routing necessitated a change in how the idlers were mounted.
Misumi configurable shoulder bolt, washers, idler, with flanged bearings. The problem here is that I had selected a 4mm shoulder diameter, and had the option to either select an M3 or M4 thread at the end - I opted to go with M4, and thus sized the through-hole in the plate to that diameter. When tightening the stackup, I compress the bearings, idlers, etc to the plate instead of just the threaded portion of the bolt to the plate (below left, area in red can be tightened).
Had I gone with an M3 thread with the 4mm shoulder diameter (above right) the shoulder would have been tightened to the plate (via the hex nut or even a tapped hole), with the shoulder length specified to be equivalent to the washer, bearing, and idler stackup. As it is now I have to be mindful when tightening this section.Interesting design note, in order to match the bearing size, shoulder diameter, and idler counterbore, I needed to select (I believe) a minimum of a 24 tooth pulley. I designed the stepper mounting plates such that the belt segments the hotend carriages clamp to are parallel to the gantry.
With the new X-U stepper and idler locations, I was able to center the 550mm length rail, however this required a short linear guide to be installed on the low side of the axis. Of course, with the stepper motor plate on the low side now mounted to a linear guide, I'm now tensioning the belts against a sliding surface... yes ultimately that side is mounted to a fixed surface (Y-axis guide), any misalignment would result in varying belt tension as the gantry travels up/down the Y-axis.
I recently removed this short guide and have seen no ill effects, however the impact of thermal expansion cannot be discounted and should be investigated further.Some other neat stuff, build chamber is nearly completely enclosed, with the localized build envelope temperature stabilizing at 68°C with the print bed at 120°C. Some work is still needed on that front.
Just yesterday I setup the tool needed for duplication printing - not the prettiest ABS prints (steep overhang, high print temperature, and no print cooling fans
) but it worked well! Some goofy movements at the start and end, which I attribute to my tool change files, but overall pretty easy.
https://www.youtube.com/watch?v=5FNhITS6L6I&feature=youtu.be
An issue I am having is with the filament tubes and cable assemblies for each hotend bending and pressing down on the X and U belts. Somewhat self inflicted with the limited clearance above the hotend carriages, but still working through this issue.I was concern about too clearance as well for my idex I am building. Do you feed your filament from within the machine or from outside? If outside, do u have the filament above or below the printer?
-
@zapta said in New Large Format IDEX Printer Project:
@sebkritikel, the brushing in the video looks cool. Do you do it also during prints (e.g. every X layers)?
since you mentioned Stratesys I searched and found this patent https://patentimages.storage.googleapis.com/08/47/1b/42d482f76e4ad3/US7744364.pdf . Do you know if those stratasys brushes are available somewhere? Might be easier just to buy a few.
Edit: found this https://www.ebay.com/p/17007045322?iid=223634555307&thm=1000
Glad you found that listing on ebay, some of the other places I looked (Stratasys resellers, etc) are selling them around $45 each!
@tekstyle said in New Large Format IDEX Printer Project:
I was concern about too clearance as well for my idex I am building. Do you feed your filament from within the machine or from outside? If outside, do u have the filament above or below the printer?
I'm feeding the filament from outside the machine - I have extremely long guide tubes from the exterior of the machine to the direct drive extruders on each hotend. As it is now I have to hand feed filament from the spools through the tubes until it reaches the drive gears. I should build a cart/stand for the printer, could put filament storage underneath... more additions haha
-
@sebkritikel said in New Large Format IDEX Printer Project:
Glad you found that listing on ebay, some of the other places I looked (Stratasys resellers, etc) are selling them around $45 each!
I need to figure out where to install the brush on by HEVO printer. Your printer is IDEX and thus designed that the heads can move out of the bed area. On my single head printer, the frame is 'optimized' such that the nozzle can access the entire bed area but not beyond.
I think it will make a difference when with long PETG prints since there are little 'crumbs' that accumulate on the nozzle.
-
@zapta said in New Large Format IDEX Printer Project:
@sebkritikel said in New Large Format IDEX Printer Project:
Glad you found that listing on ebay, some of the other places I looked (Stratasys resellers, etc) are selling them around $45 each!
I need to figure out where to install the brush on by HEVO printer. Your printer is IDEX and thus designed that the heads can move out of the bed area. On my single head printer, the frame is 'optimized' such that the nozzle can access the entire bed area but not beyond.
I think it will make a difference when with long PETG prints since there are little 'crumbs' that accumulate on the nozzle.
Not sure if you have an unused driver on your duet (or an unused stepper laying around) but I've seen examples where the cleaning brush is attached to a motor and moved out of the way after cleaning the nozzle (rotating/retracting arm, etc).
Regarding how often I clean the nozzles - typically only after a purge/prime, so start of prints, after pauses, or between tool selections. If I'm running a multi material print (support, or a the second nozzle printing the infill, etc) it will clean the active nozzle every time there would be a tool switch, so typically every layer.
-
Beautiful work! What is your timeframe for insulation and an active heater? Are you going to try to run a retracting heat barrier at the top of the machine?
-
@lael said in New Large Format IDEX Printer Project:
Beautiful work! What is your timeframe for insulation and an active heater? Are you going to try to run a retracting heat barrier at the top of the machine?
Thank you!
I've been internally struggling with the active heater - as is the DC side is powered by a 500W power supply, with the bed heater sitting at 1000W on the AC. I'm worried that when adding in the fin strip heater I have that I'll be pushing the limits of an electrical outlet/breaker, but it would be nice to have the flexibility for additional/faster) heating. Right now with the bed at 120°C I see the build volume temperature stabilizing at about 68°C, and of course at higher bed temperatures the chamber temperature increases. Even at those temperatures the printer isn't fully enclosed yet! I'm missing insulation altogether on the top edge of the printer by the Y-axis stepper, and for the most part anything that is insulated on that side is thinly insulated at this time (when compared to the thick sides or top). On the sides and top the insulation is two .5inch layers of PIR foam (so one inch), and then one inch of open-cell polyethylene (at least I think its polyethylene and not polyurethane) foam. Some parts of the back are insulated with just a half inch layer of PIR foam.
I wanted to implement a thermal barrier like bellows, but because I've been developing and learning as I go (this is my first printer design and build) I might not have space for it with how much clearance I have between the Z-axis, frame, and print heads.
Once I finish enclosing the printer AND without a thermal barrier, I definitely think I'll need to investigate a venting solution to keep the temperature around 72-75°C to keep things safe for the stepper motors (assuming that the bed at 120°C will yield an enclosed chamber temperature of 72-75°C)
-
@sebkritikel said in New Large Format IDEX Printer Project:
I've been internally struggling with the active heater - as is the DC side is powered by a 500W power supply, with the bed heater sitting at 1000W on the AC. I'm worried that when adding in the fin strip heater I have that I'll be pushing the limits of an electrical outlet/breaker
What's the limit for an outlet in your country? Here in UK it's a little over 3kW, which would leave plenty for a chamber heater.
Duet WiFi hardware designer and firmware engineer
Please do not ask me for Duet support via PM or email, use the forum
http://www.escher3d.com, https://miscsolutions.wordpress.com -
@dc42 said in New Large Format IDEX Printer Project:
@sebkritikel said in New Large Format IDEX Printer Project:
I've been internally struggling with the active heater - as is the DC side is powered by a 500W power supply, with the bed heater sitting at 1000W on the AC. I'm worried that when adding in the fin strip heater I have that I'll be pushing the limits of an electrical outlet/breaker
What's the limit for an outlet in your country? Here in UK it's a little over 3kW, which would leave plenty for a chamber heater.
I'm based in the US, so typically rated for 15 or 20amps, and looking at my breaker box that room is on a 15amp breaker - 1800W. Sitting at 12.5 amps now. I'm not using all 500W on the DC side (some back of the napkin math puts me at 350W) so I could run the heater in a limited capacity off that, but I would certainly need to investigate it further.
While you're here, I'm curious if you could provide some insight into goofy "Tool 2" (duplication) start of print movement.
https://www.youtube.com/watch?v=9kUz8KFMRlY&feature=youtu.beRelative files:
; tfree2.g
; called when tool 2 is freed
M83 ; relative extruder movement
G91 ; relative axis movement
G1 Z3 F1200 ; up 3mm
G90 ; absolute axis movement
G1 S2 X-210 F18000 ; park the X carriage at -210mm
G1 S2 U217 F18000 ; park the U carriage at 217mm
G1 S2 X-260 F6000 ; park the X carriage at -260mm
G1 S2 U267 F6000 ; park the U carriage at 267mm
; tpost2.g ; called after tool 2 has been selected M116 P2 ; wait for tool 2 heaters to reach operating temperature G1 E4 F900 ; extrude 4mm M98 P"/macros/X_Tool_Clean1.g" M98 P"/macros/U_Tool_Clean1.g"; X_Tool_Clean1.g M83 ; relative extruder movement G90 G1 S2 X-260 Y235 F15000 ; brush home G1 X-253 Y205.5 F15000 G1 Y225.5 F15000 G1 X-260 Y205.5 F15000 G1 S2 X-260 Y235 F15000 ; brush home; U_Tool_Clean1.g M83 ; relative extruder movement G90 G1 S2 U267 Y235 F15000 ; brush home G1 U260 Y205.5 F15000 G1 Y225.5 F15000 G1 U267 Y205.5 F15000 G1 S2 U267 Y235 F15000 ; brush homeExample start of GCODE
; Generated with Cura_SteamEngine mb-master-20200321
T2 ; Called before "start gcode" lines
M190 S120; Called before "start gcode" lines
M104 S285; Called before "start gcode" lines
M109 S285; Called before "start gcode" lines
M82 ; Called before "start gcode" lines
G28 ;Home, first line of "start gcode"
T2; call T2 again after bed probing (deselects all active tools)
G1 Z15.0 F6000
;Prime the extruder
G92 E0
G1 F200 E10
G92 E0
The first X and U moves are not normally seen (including the extraordinarily slow movement back to the X homing switch). After homing (G28) and T2 is called again, I can see the X_Tool_Clean1.g macro executing, but during the first move the U axis moves to its offset position via G10. X_Tool_Clean1.g completes, but U_Tool_Clean1.g doesn't execute, or at least not correctly (both print heads bounce around). Z-axis moves down per start of print file, and then both extruders prime, although not over the last positions in the macros.
-
Some exciting updates! I've done a good chunk of work on the assembly recently, which can be seen in the Google Drive here. Included with that is a much more detailed bill of materials which features sourcing information.
Updates of note:
- Added ~590mm length of angled aluminum to run on top of the X and U belt runs. I was having issues with the PTFE tube and wiring harnesses resting on the belts as the carriages moved around. This is really more of a patch, as the root cause is the fact my enclosure is too short, forcing the tubing and wiring downwards.

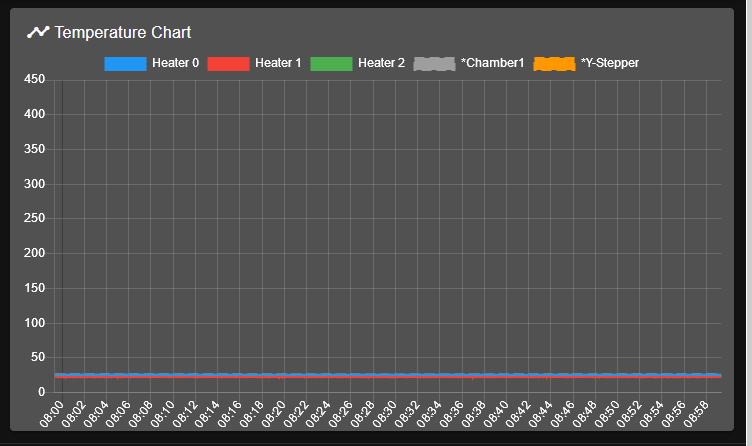
- Finally fully enclosed the printer - I was only missing a few section in the rear previously, but those are now filled in. During the first print where I was monitoring the chamber temperature the chamber easily rose to 70°C within the first 30 minutes. At that point I got spooked, and dropped the bed temperature down to 100°C, trying to keep it at or below 70°C. I found that I could keep it between 69-70°C with the bed at 96°C. For reference, I typically keep the bed at 120°C, and with those back sections open, max out at 66-68°C
In some other, not so exciting updates, I experienced my first heater fault (x-axis) and jam (u-axis) in the same print, roughly around the same time. Prior to this print, I reworked the X and U PTFE and wiring routes, fitting them both in the nylon webbing (previously I cable tied the filament tubes to the wiring harnesses). Before the modifications I had a thermistor attached to (and the hanging some) the X wiring harness, and used this to measure the chamber temperature. Worked well, as it was always a little above the actual X carriage, but mostly centered on the build plate. Started the roughly five hour, dual extrusion print (sans chamber thermistor), and halfway through I fitted the last few pieces of insulation in the back. Probably not the smartest idea I've had...
I came back to the printer some time later, thinking the print was done. Saw that the support filament had stopped extruding a few layers prior to the print being suspended due to a heater fault on the other extruder. Opened up the web interface, but the fault in question had occurred outside of the 10minute window available for the temperature plots. Fault was similar to "Temperature excursion exceeded 15.0C". I'm confident in thinking that the jam was related to the chamber temperature - build plate was at 120°C, and I wasn't monitoring the chamber temperature, but I can't safely assume the temperature fault was due to the unknown increased chamber temperature - I don't have the greatest strain relief setup on the hotend carriages, and on inspection it appeared that there was quite a bit of tension on the thermistor connector at the hotend.
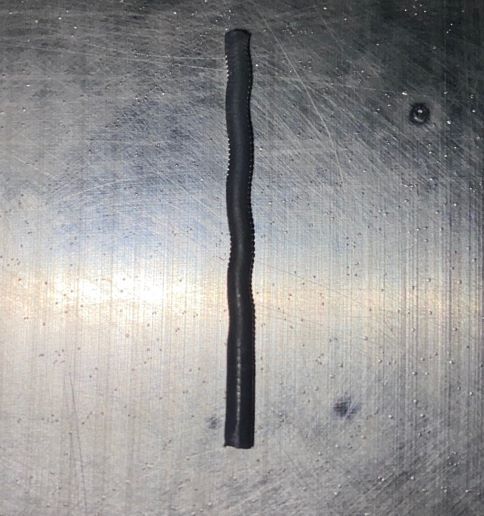
Part of the jam in question - the length between the hotend and the BMG drive gears.I was able to easily upload a modified DWC version where I increased the plot range to 1 hour, should help in case I miss some other fault in the future.
- Added ~590mm length of angled aluminum to run on top of the X and U belt runs. I was having issues with the PTFE tube and wiring harnesses resting on the belts as the carriages moved around. This is really more of a patch, as the root cause is the fact my enclosure is too short, forcing the tubing and wiring downwards.
-
@sebkritikel Amazing printer and thank you for sharing and taking us along through the design and commissioning.
Saw the image of the filament in your last post and wanted to share something that I’ve run into with using a mosquito in an enclosure. Not sure if it directly applies but it might.
I’ve found that the stock mosquito fan doesn’t provide enough airflow to properly cool the cold side of the heat break when the environment temperature increases. This Increases the cold side temp of the hotend and causes the filament to soften, buckle and jams the hotend. Ultimately I went to a 40mm fan and reversed the airflow to draw air across the heat break. This has dramatically reduced the hotend jams. Might be something to look into.
-
@sebkritikel said in New Large Format IDEX Printer Project:
While you're here, I'm curious if you could provide some insight into goofy "Tool 2" (duplication) start of print movement.
If that's still an issue with the latest 3.01-RC11 firmware, please start a separate thread about it.
-
@mwolter said in New Large Format IDEX Printer Project:
@sebkritikel Amazing printer and thank you for sharing and taking us along through the design and commissioning.
Saw the image of the filament in your last post and wanted to share something that I’ve run into with using a mosquito in an enclosure. Not sure if it directly applies but it might.
I’ve found that the stock mosquito fan doesn’t provide enough airflow to properly cool the cold side of the heat break when the environment temperature increases. This Increases the cold side temp of the hotend and causes the filament to soften, buckle and jams the hotend. Ultimately I went to a 40mm fan and reversed the airflow to draw air across the heat break. This has dramatically reduced the hotend jams. Might be something to look into.
Thank you! With the chamber fully enclosed now, I will definitely be monitoring the extruder performance much more closely. I feel that ABS, HIPS, nylon, and other similar filaments are much more tolerant of a smaller temperature gradient in the heat break, especially when compared to PLA. If I continue having issues I'll definitely look into different cooling solutions. What made you decide on reversing the direction of the airflow across the heatbreak?
@dc42 said in New Large Format IDEX Printer Project:
@sebkritikel said in New Large Format IDEX Printer Project:
While you're here, I'm curious if you could provide some insight into goofy "Tool 2" (duplication) start of print movement.
If that's still an issue with the latest 3.01-RC11 firmware, please start a separate thread about it.
Not related to 3.01-RC11 at this time (still on 2.05.1). I think it is somewhat user error, created my T2 macros and toolchange files without really thinking about it. If/when I update, and if I have issues, I will create a separate thread.
-
I recently made the switch from 2.05.1 to 3.01-RC11. I followed the procedure outlined below to maintain my 2.05.1 config in case I needed to swap back.
-
I created a "2" and a "3" folder under /sys/
-
I moved all relevant 2.05.1 files under the "2" folder (tpost, tpre, heightmaps, etc)
-
I copied all 2.05.1 files I may want to use in RRF3 to the "3" folder
-
I made a new config.g for RRF3 offline, and then uploaded it to the "3" folder
-
I created/modified the original config.g under /sys/ to include the M505 command
-
I upgraded to RRF 3.01-RC11 following the proper procedure
-
Once upgraded, I changed the M505 in /sys/config.g to be "M505 P"3"" pointing to the new RRF3 config.g, while the original 2.05.1 is in the /sys/2 folder
-
Tested the new config (obviously found some issues with the new config I wrote up
Some headaches I worked through:
Creating the new config lines for the BLTouch was a bit of work. I have the BLTouch plugged into the Duex PWM1 connector, so my working configuration lines are
M574 Z1 S2				;probe, new line
M558 P9 C"^zprobe.in" H5 F200 A8 R0.75 T6000 S.02                   ; set Z probe type to bltouch and the dive height + speeds
M950 S0 C"duex.pwm1"
One of my mistakes was using "!duex.pwm1" instead of "duex.pwm1".
I got burned by the recent tool change scripts executing despite axes not being homed - I inserted conditional gcode into tpre files to home each axis if they are not homed.
; tpre0.g
; called before tool 0 is selected
; If the printer hasn't been homed, home it
if !move.axes[0].homed || !move.axes[1].homed || !move.axes[2].homed || !move.axes[3].homed
  G28
I manged to work out my T2 (duplicate) tool macro issues (seen a few posts up).
-
In my homeall.g, I used to call "T-1 P0" prior to homing the bed with the BLTouch - this is because Cura would inject a tool number into a generated gcode file prior to Cura start gcode. I ran into issues where I wanted to start a print with T1, but the bed homing was run with the probe at the T0 home position. The twist is, that in homeall.g I first home the X, Y, and U axes PRIOR to calling T-1 P0. This caused the slow X carriage crawl to the X endstop in the earlier video. Moving T-1 P0 to the start of the homeall.g file fixed this issue.
-
The tpost2.g file linked to two macros that are used to wipe the nozzles on the cleaning brushes. The goofy back and forth movement was caused by not using the H2 parameter during these G1 moves. I created a new T2_Tool_Clean1.g macro that cleans both X and U at the same time, using the H2 parameter.
A couple more items to work out with Cura, but much better!
https://www.youtube.com/watch?v=QpGq3R-Gm_c&feature=youtu.be -
-
I was aiming for a short video... well time is relative haha
https://youtu.be/z_CbTmiBqswIn a few other threads I've documented my woes of attempting to "merge" expected print behavior on the build plate during IDEX Duplication or Mirror modes to what is seen in the Cura preview, but I think I've not got a solution that works fairly well, and does not require excessive user input.
Prereqs:
- Change duplication/mirror tool G10s from
G10 P2 X50 Y0 U-50 S0 R0 ; set tool offsets and temperatures for tool 2to
G10 P2 X0 Y0 U-100 S0 R0 ; set tool offsets and temperatures for tool 2The offset applies only to U, rather than both X and U. @dc42 this differs from what you typically recommend (not that that is wrong, this is just different!)
2. Create a real print profile in Cura
https://github.com/Ultimaker/Cura/wiki/Adding-new-machine-profiles-to-Cura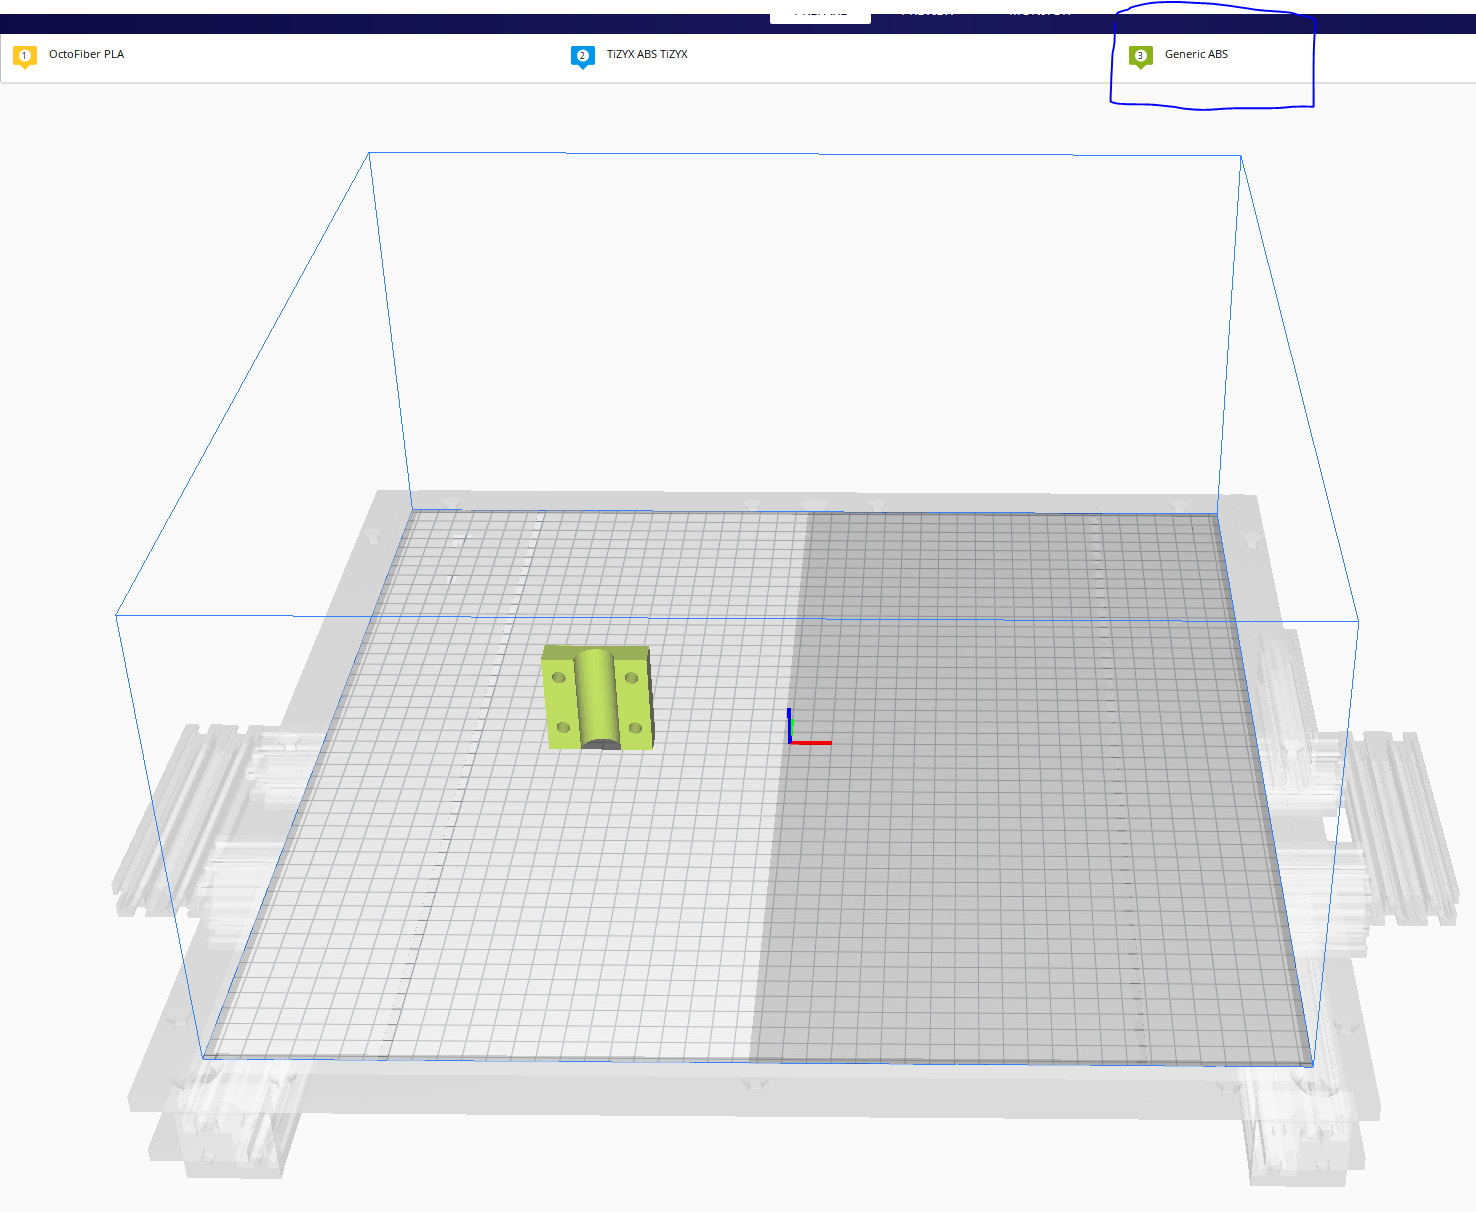
The key is to create a 3rd extruder in Cura for the printer - or more - naturally for T2 in RRF. In the printer .def.json, include:
"machine_disallowed_areas": { "value": "[ [ [0, -237.5], [0, 237.5], [225, 237.5], [225, -237.5] ] ] if len(extruderValues('extruder_nr')) > 2 else []"}When a duplication or mirror print is desired, the workflow is
- Activate the third (or, fourth extruder for T3)
- Load in the model
- Right click the model, select the third Cura extruder as the extruder to use.
- Ensure things like build plate extruder use the 3rd extruder.
The way this works is if two or less Cura extruders are active (does not matter which extruder is selected...) the entire build plate is available. If the number of extruders active is greater than two (again, not what is selected) machine_disallowed_areas kicks in to split the build plate.
Reading material:
https://github.com/Ultimaker/Cura/issues/7486
https://github.com/Ghostkeeper/SettingsGuide/blob/master/resources/articles/machine_settings/machine_start_gcode.md
https://github.com/Ultimaker/Cura/issues/7395
https://github.com/Ultimaker/Cura/issues/6383
https://github.com/eugr/Flashforge-for-Cura/blob/master/resources/definitions/creator_pro.def.json
https://github.com/Ultimaker/Cura/issues/6859
https://github.com/Ultimaker/Cura/issues/8379closed Cura Inserts Tool Change Before Start Gcode #7486
closed Option to disable Tx command from start code, etc #7395
closed CURA 4.4 - 4.6.1 IDEX 1st layer unwanted x0 y0 #6859
closed Initial T0 unneeded and a pain for IDEX owners #8379
-
Hey!
I started an inquiry to you about you're impressive machine, but instead, threw the question out to everybody in a new, more recent post. I mentioned you and this post in the new thread, but I'll ask you directly here:How's your machine running? How fast can it print, as fast as a Voron 2.4? Most importantly, could it be modified to print two prints (250mm x 250mm) side by side?
Okay, that's it. Thanks for sharing your design. You rule!
Onward,
Chris


