Tuning a hugely overpowered heater
-
I am trying to get to work a 12V heating cartridge on a 24V system.
I know what you think: Why not just exchange it for a 12V thing.
The problem is my cableing. All 21 cables are running inside a tube. Exchanging one is a huuuge pain. So I must get this working.I tried PID tuning with reduced PWM.
M303 H1 S220 P0.3 has a nice and stable tuning cycle. During tuning, the temp curve never raises steeper than 45 deg. But if I now set the returned valuesM307 H1 R10.976 K0.652:0.000 D2.65 E1.35 S0.30 B0 V24.0
This overshoots from target 220.0°C to actual 241.5°C
And it rises at like 80° to the horizontal.Confusingly, decreasing S to 0.1 does not change this behavior at all.
The temperature always rises with a huge derivative. This is the above settings for S0.1: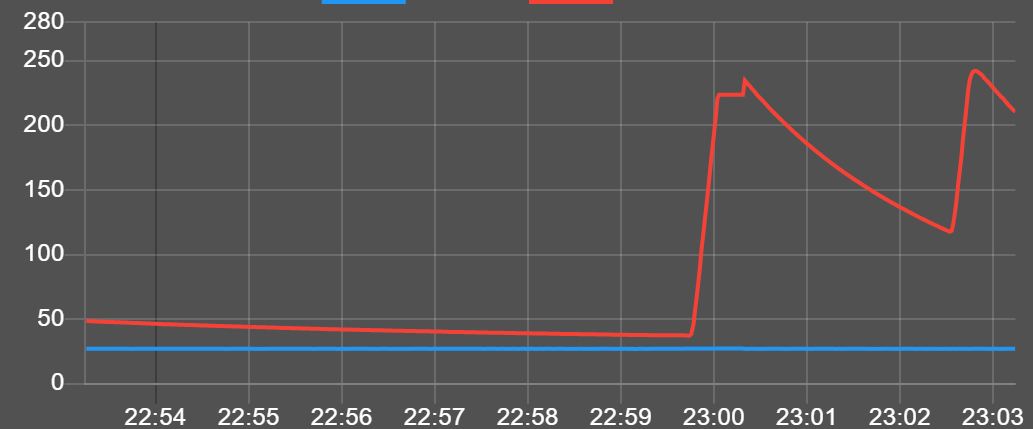
It is like the S parameter only kicks in for temperatures close to the set point, but in the beginning, it always uses Full PWM. And a 40W 12V heater cartridge produces 160W at 24V.
-
@tryptamine said in Tuning a hugely overpowered heater:
I am trying to get to work a 12V heating cartridge on a 24V system.
Stop now. Just don't.
@tryptamine said in Tuning a hugely overpowered heater:
Exchanging one is a huuuge pain. So I must get this working.
The pain of melting or burning your printer or worse will be greater.
-
I am trying to get to work a 12V heating cartridge on a 24V system.
I know what you think:You actually don't: I think you are crazy and risk your house.
So I must get this working.
No, you must deal with your cabling and install a 24V heater.
And a 40W 12V heater cartridge produces 160W at 24V.
That's a threatening fire hazard. Don't do this.
-
@phaedrux
I have been printing like this for months before I put my printer aside like 2 years ago.
I never leave it unattended, so it is not as dangerous as it looks.I already have a new cartridge laying around, and once I open the cabling again, I will exchange it.
For now, i need the printer to finish a university project and i have no time to undo the cabeling. This takes upwards of 1 day of work.


And I must print out new plastic parts before I can do it, as some will be unusable after disassembly.
I must get this to work at first.
Is there any constructive, solution-related stuff that could help me? -
If you're under a deadline I implore you to seek an extension under the grounds of safety.
@tryptamine said in Tuning a hugely overpowered heater:
Is there any constructive, solution-related stuff that could help me?
I promise you this is the most constructive solution.
-
Is there any constructive, solution-related stuff that could help me?
Yes: exchange your heater. Be sure that I won’t help you to set your house on fire.
-
@tryptamine I guess one alternative is to fit a suitably rated connector in the wiring so you can swap the heater without changing the cable. E3d use Molex microfits on their high precision heaters I think.
Or just run some separate wiring back to the main board if it is just for a temporary measure to get a single print out.
Don't play with fire though...
-
@tryptamine I'm not going to tell you how incredibly stupid and dangerous this is - others have already done that. In addition to the fire hazard, your heater will draw nearly 7 amps which is above the maximum rating of any Duet board. If you want a quick, temporary fix, fit the new 24V cartridge and run the wires to the board by another route. Cable tie them to your existing trunking or whatever it takes. Then print the parts you need, then sort out the wiring properly.
-
@tryptamine said in Tuning a hugely overpowered heater:
As others have already said, I implore you to take the time to replace the heater cartridge. It's a specifically-stated warning in the documentation; see https://docs.duet3d.com/User_manual/Connecting_hardware/Heaters_extruders
That said, you say you are using this M307, but the S0.30 doesn't seem to take effect?
M307 H1 R10.976 K0.652:0.000 D2.65 E1.35 S0.30 B0 V24.0
Send
M307 H1to check that the PWM is set to 0.3. Please post your hardware and firmware version (send M115 and post response), and ideally your config.g too.Ian
Bed-slinger - Mini5+ WiFi/1LC | RRP Fisher v1 - D2 WiFi | Polargraph - D2 WiFi | TronXY X5S - 6HC/Roto | CNC router - 6HC | Tractus3D T1250 - D2 Eth
-
@droftarts said in Tuning a hugely overpowered heater:
M307 H1
M307 H1Heater 1: heating rate 2.430, cooling rate 0.560, dead time 5.50, max PWM 1.00, mode PID, calibrated at 0.0V
Predicted max temperature rise 296°C
PID parameters: heating P13.4 I0.470 D51.4, steady P13.4 I0.937 D51.4Heater 1 is indeed not running at PWM 0.3 but at 1.0 - why so?
; Configuration file for Duet WiFi (firmware version 3.3) ; executed by the firmware on start-up ; ; generated by RepRapFirmware Configuration Tool v3.3.12 on Mon Aug 08 2022 21:36:25 GMT+0200 (Mitteleuropäische Sommerzeit) ; General preferences M575 P1 S1 B57600 ; enable support for PanelDue G90 ; send absolute coordinates... M83 ; ...but relative extruder moves M550 P"HCEvo" ; set printer name M669 K1 ; select CoreXY mode M569 P0 S1 ; physical drive 0 goes forwards M569 P1 S1 ; physical drive 1 goes forwards M569 P2 S1 ; physical drive 2 goes forwards M569 P3 S0 ; physical drive 3 goes forwards M584 X0 Y1 Z2:4 E3 ; set drive mapping M350 X16 Y16 Z16 E16 I1 ; configure microstepping with interpolation M92 X160.00 Y160.00 Z400.00 E420.00 ; set steps per mm M566 X900.00 Y900.00 Z60.00 E1200.00 ; set maximum instantaneous speed changes (mm/min) M203 X18000.00 Y18000.00 Z1000.00 E18000.00 ; set maximum speeds (mm/min) M201 X1200.00 Y1200.00 Z20.00 E2000.00 ; set accelerations (mm/s^2) M906 X1000 Y1000 Z800 E1000 I30 ; set motor currents (mA) and motor idle factor in per cent M84 S30 ; Set idle timeout ; Axis Limits M208 X0 Y0 Z0 S1 ; set axis minima M208 X345 Y305 Z290 S0 ; set axis maxima ; Endstops M574 X2 S1 P"xstop" ; configure switch-type (e.g. microswitch) endstop for high end on X via pin xstop M574 Y2 S1 P"ystop" ; configure switch-type (e.g. microswitch) endstop for high end on Y via pin ystop M574 Z1 S2 ; configure Z-probe endstop for low end on Z ; Z-Probe M950 S0 C"exp.heater3" ; create servo pin 0 for BLTouch M558 P9 C"^zprobe.in" H5 F120 T12000 ; set Z probe type to bltouch and the dive height + speeds G31 P500 X28 Y9 Z1 ; set Z probe trigger value, offset and trigger height M557 X70:370 Y15:314 P4 ; define mesh grid ; Heaters M308 S0 P"e1temp" Y"thermistor" T105526 B4138 ; configure sensor 0 as thermistor on pin e1temp (bedtemp BROKEN) M950 H0 C"bedheat" T0 ; create bed heater output on bedheat and map it to sensor 0 ;M307 H1 A1123.6 C133.0 D3.5 S0.40 V23.9 B0 M307 H1 R10.976 K0.652:0.000 D2.65 E1.35 S0.10 B0 V24.0 M140 H0 ; map heated bed to heater 0 M143 H0 S120 ; set temperature limit for heater 0 to 120C M308 S1 P"e0temp" Y"thermistor" T103901 B4138 ; configure sensor 1 as thermistor on pin e0temp M950 H1 C"e0heat" T1 ; create nozzle heater output on e0heat and map it to sensor 1 M143 H1 S280 ; set temperature limit for heater 1 to 280C ;M301 H0 P131.9 I1.423 D566.0 ; Fans M950 F0 C"fan0" Q500 ; create fan 0 on pin fan0 and set its frequency M106 P0 S0 H-1 ; set fan 0 value. Thermostatic control is turned off M950 F1 C"fan1" Q500 ; create fan 1 on pin fan1 and set its frequency M106 P1 S1 H1 T120 ; set fan 1 value. Thermostatic control is turned on ; Tools M563 P0 D0 H1 F0 ; define tool 0 G10 P0 X0 Y0 Z0 ; set tool 0 axis offsets G10 P0 R0 S0 ; set initial tool 0 active and standby temperatures to 0C ; Custom settings are not defined ; Miscellaneous M911 S10 R11 P"M913 X0 Y0 G91 M83 G1 Z3 E-5 F1000" ; set voltage thresholds and actions to run on power loss -
@tryptamine I've tried your M307 command on my Duet 3 Mini 5+ on RRF 3.4.2rc1, and PWM responds correctly. You can, of course, send the command directly to set M307.
M307 H1 R10.976 K0.652:0.000 D2.65 E1.35 S0.10 B0 V24.0
M307 H1
Heater 1: heating rate 10.976, cooling rate 0.652, dead time 2.65, max PWM 0.10, mode PID, calibrated at 24.0V
Predicted max temperature rise 809°C
PID parameters: heating P6.1 I0.289 D11.4, steady P6.1 I0.718 D11.4
Also, the command in your config.g
M307 H1 R10.976 K0.652:0.000 D2.65 E1.35 S0.10 B0 V24.0doesn't match the output from M307 H1:Heater 1: heating rate 2.430, cooling rate 0.560, dead time 5.50, max PWM 1.00, mode PID, calibrated at 0.0V
R=heating rate, K= cooling rate, D=deadtime, S= max PWM. The numbers set by M307 don't match the numbers reported by M307 H1. I think this is happening because of the order of the Gcode commands that define the nozzle heater. The M307 H1 command is after you have set up the bed heater, but before you create the nozzle heater. The order should be M308 (define temperature sensor), M950 (define heater output), then M307 (or M301) to set the heater parameters. So change the order of your heater section to:
; Heaters
M308 S0 P"e1temp" Y"thermistor" T105526 B4138      ; configure sensor 0 as thermistor on pin e1temp (bedtemp BROKEN)
M950 H0 C"bedheat" T0                              ; create bed heater output on bedheat and map it to sensor 0
M140 H0                                            ; map heated bed to heater 0
M143 H0 S120                                       ; set temperature limit for heater 0 to 120C

M308 S1 P"e0temp" Y"thermistor" T103901 B4138      ; configure sensor 1 as thermistor on pin e0temp
M950 H1 C"e0heat" T1                               ; create nozzle heater output on e0heat and map it to sensor 1
M143 H1 S280                                       ; set temperature limit for heater 1 to 280C
M307 H1 R10.976 K0.652:0.000 D2.65 E1.35 S0.10 B0 V24.0
It also looks like you haven't tuned your bed.
Once again, I urge you to replace the 12V heater cartridge as soon as possible; you are relying on the firmware to protect against thermal runaway, and the 12V heater cartridge has the capacity to do some very serious damage!
Ian
Bed-slinger - Mini5+ WiFi/1LC | RRP Fisher v1 - D2 WiFi | Polargraph - D2 WiFi | TronXY X5S - 6HC/Roto | CNC router - 6HC | Tractus3D T1250 - D2 Eth
-
I am puzzled as to what wiring has to do with all of this. You have an end device that is wrong - replace the damn end device!
As was pointed out, the heater will draw more current than the Duet can supply. In addition, it would be interesting to find out what gauge of wire was used because it likely is insufficient for the current draw. It is also nicely insulated to retain the heat in a fat cable bundle!
Not only is your Duet going to die from drawing too much current, not only are you going to burn down your house with the heater cartridge, you will also burn down your house because of melting wires.
I can't believe that this whole idea is still being talked about ..... -
@jens55 That is why I want to limit PWM.
If I send a PWM of 0.25, neither the board nor the wires will be overpowered.Stop trying to explain electronics to me, I did not ask for it.
-
@droftarts Thank you so much for this qualified answer.
You were the only person here really helping me out.I tried to fix a GCode issue and not to get moral advice from everyone.
And I find it condescending from all the others to put themselves in a position where they feel like they have the right to judge about me and give me commands i just have to follow.We are all on eye level here. If you want to recommend something, do it like droftarts.
Give your recommendations, but do not impose them, and do not treat me as I am an idiot.A smoker asks you for a lighter.
You can give a lighter or not.
You can give the lighter and tell them smoking is bad for them (which they probably know already)But nobody in his right mind would not give a lighter and instead call them an idiot for smoking and start an argument about how stupid his decisions are.
"Oh you TRY to quit? Fucking quit now already! It is dangerous! You are stupid!"You do the exact same thing only in another domain, and feel totally fine with it. Why so?
-
@tryptamine said in Tuning a hugely overpowered heater:
@jens55 That is why I want to limit PWM.
If I send a PWM of 0.25, neither the board nor the wires will be overpowered.Stop trying to explain electronics to me, I did not ask for it.
At the risk of encountering your wrath, we do need to explain PWM to you because I can assure you that the board and and wires will be overpowered regardless of what PWM value you use. PWM does not limit the current, it only varies the amount of time that current flows. i.e. the width of the pulse (which is the "P" in "PWM"). But it does not limit the amplitude of the pulse so you'll still be drawing nearly 7 Amps from a board that is only deigned to take 6 Amps.
-
@tryptamine also please bear in mind that a 12V heater run from 24V is running at four times (not twice) its intended power. So if it gets stuck on at full power, it will almost certainly melt the heater block. Then it will be free tom the hot end and may contact wiring, plastic or other flammable materials.
I can't see any reason why the S parameter in your M307 command would not be honoured. Please run M307 H1 from the console and check whether it reports the correct PWM limit.
PS - I just tried sending M308 H1 S0.1 and then heating the hot end on one of my printers. As expected, it heated slowly and could no longer reach the required temperature. So the M308 S parameter works for me.
-
@tryptamine said in Tuning a hugely overpowered heater:
do not treat me as I am an idiot.
Calling it as I see it .....
I am done with this subject.
-
@tryptamine Has re-ordering the config.g, by putting the
M307 H1 ...after theM950 H1 ..., fixed the PWM issue?Ian
Bed-slinger - Mini5+ WiFi/1LC | RRP Fisher v1 - D2 WiFi | Polargraph - D2 WiFi | TronXY X5S - 6HC/Roto | CNC router - 6HC | Tractus3D T1250 - D2 Eth
-
@droftarts could you explain why the M950 before the M307 changes and what it does or is not just the ordering and would this apply to a chamber>
-
@rexx all heaters need a temperature sensor, so M308 is defined first. The M950 effectively defines the heater, and relates it to the temperature sensor that allows control of it. Before M950, the heater doesn’t exist, so an M307 earlier than M950 that references the same heater applies settings to a non-existent heater. I believe when heaters are defined without M307, they are configured with the defaults for a hot end heater. If you then define the heater as a bed with M140 or chamber M141, these should come next, and I think alter the heater settings to defaults for each. Then set temperature limits with M143. Lastly, set the actual heater parameters you want with M307. This is the order the configuration tool sets, too.
Ian
Bed-slinger - Mini5+ WiFi/1LC | RRP Fisher v1 - D2 WiFi | Polargraph - D2 WiFi | TronXY X5S - 6HC/Roto | CNC router - 6HC | Tractus3D T1250 - D2 Eth