Deckingman's new printer
-
Part 3 is live now for anyone interested. https://youtu.be/xbRH71qxtik
It covers my design for mounting the print head in such a way that the nozzle can be used for homing Z (something that I've been doing very successfully for a few years). The advantages being that there is no probe to deploy, no offsets, and no hysteresis on the switch part.
I was remiss in not mentioning the fact that the nozzle does have to be heated to soften any blobs of plastic which may have formed (but probing with a hot nozzle is no bad thing as it will negate any thermal expansion effects).
-
@deckingman Interesting way of homing Z!
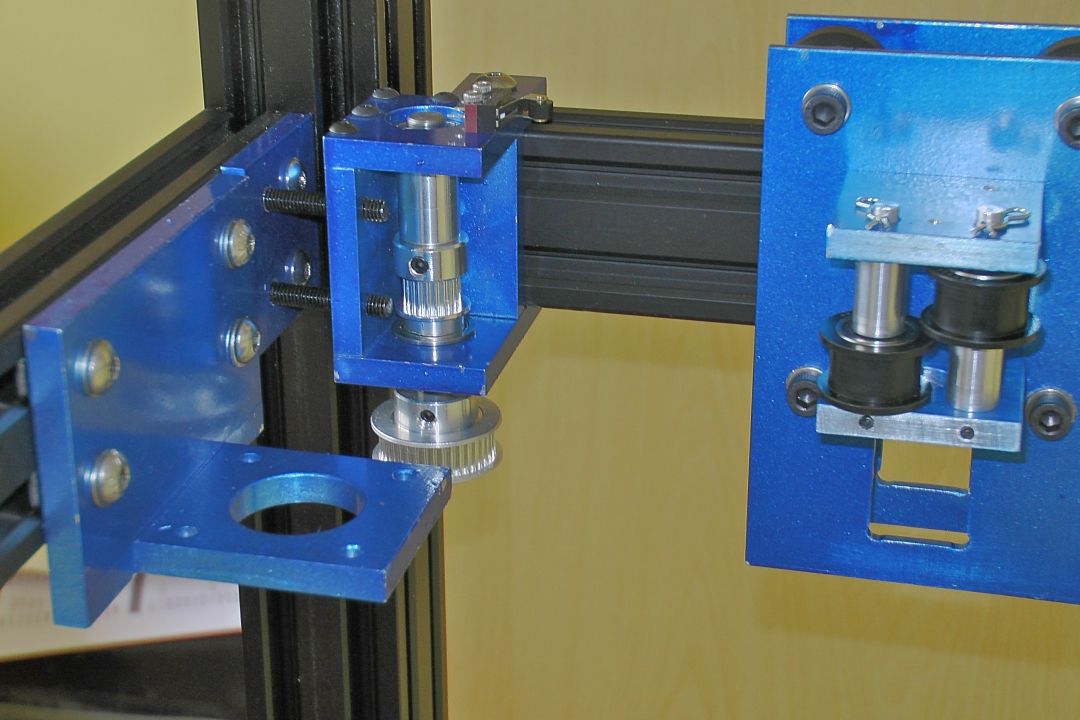
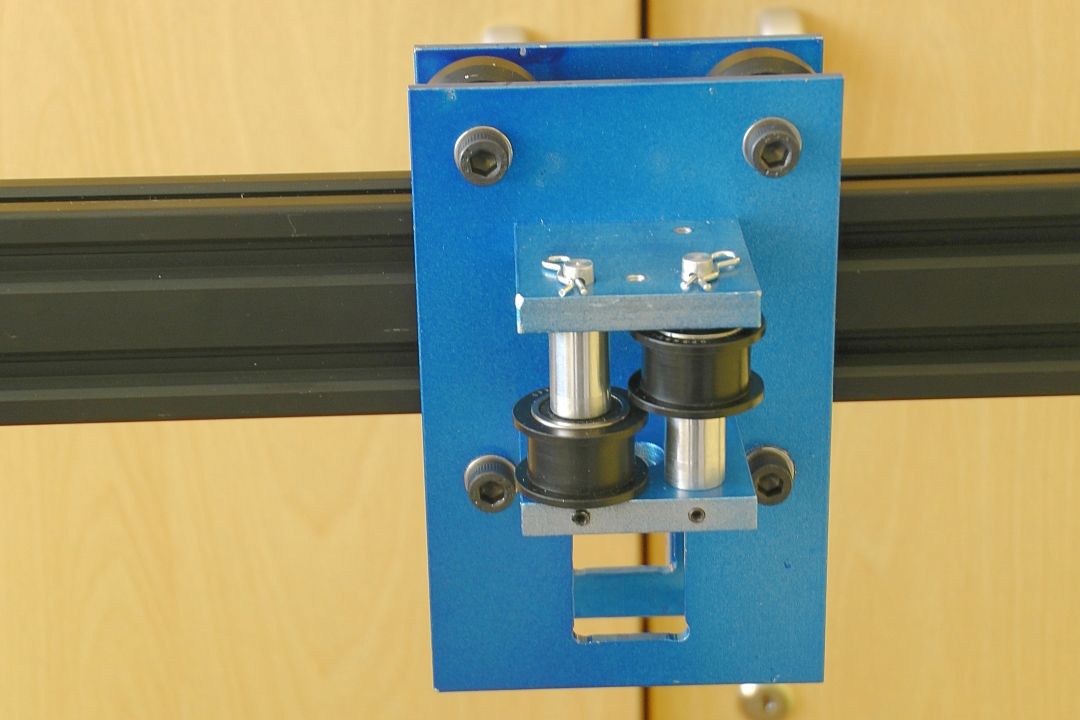
I have an issue with the way you clamp the hinge part using two wavy washers. The spring forces of these washers will eliminate each other when you put one washer on either side, right? IMHO it would be better to use one wavy washer pushing the LGX mount against a teflon or POM washer.The other thing is the way you mount the V-rollers. I'd use the 4 bolts holding the roller to form a 'box', but you use some extra plates to connect front- and backplate, which seems overengineered to me.
I must admit, I didn't watch the whole videos but scrolled forward to the images, so I might have missed the part where you explained how you deal with the overengineered stuff...maybe use wavy washers between roller and backplate, too?
-
@o_lampe I appreciate your input but unless you watch the video in full, you will reach the wrong conclusions.
There is almost no movement of the "hinge" - well about a fraction of a micron or whatever it takes for the brass screw to break contact with the brass plate. So the two wavy washers will prevent any movement in the X direction, just as the two spring loaded plungers that I use now do. It's a proven design - all I'm doing to eliminate any X movement is to use wavy washers instead of spring loaded plungers. I could use a plain washer one side and a wavy washer the other but that would halve the clamping force but it might be easier to fit. I'll see how it goes when I come to assemble it.
The "extra plates" as you call them have nothing to do with connecting the front and back plates together and is not "over engineering". That would be totally unnecessary. The plates are there solely to proved the slots which keep the belts on the centre line of the X axis, and also to provide a mounting position for the miniature microswitches that make the X axis end stops. They are only 4mm thick and are fixed to both front and back carriage plates so that they do not distort when the belts are tensioned. Instead of a 4mm thick slotted plate, I could have use short thicker plate, half the width of the gantry and fixed to just the front plate, but then belt tension would be applying a twisting force to that plate which is why I elected to fix it to both front and back plates.
-
Part 4 is live now if anyone is interested https://youtu.be/xm0OMHVaiB8
On the theme of this printer being as "all metal" as possible, I've made most of the aluminium parts that I'll need.
-
I'm up to Part 6 now and have made a start on the actual build if anyone is interested https://youtu.be/th-wwZF8akw.
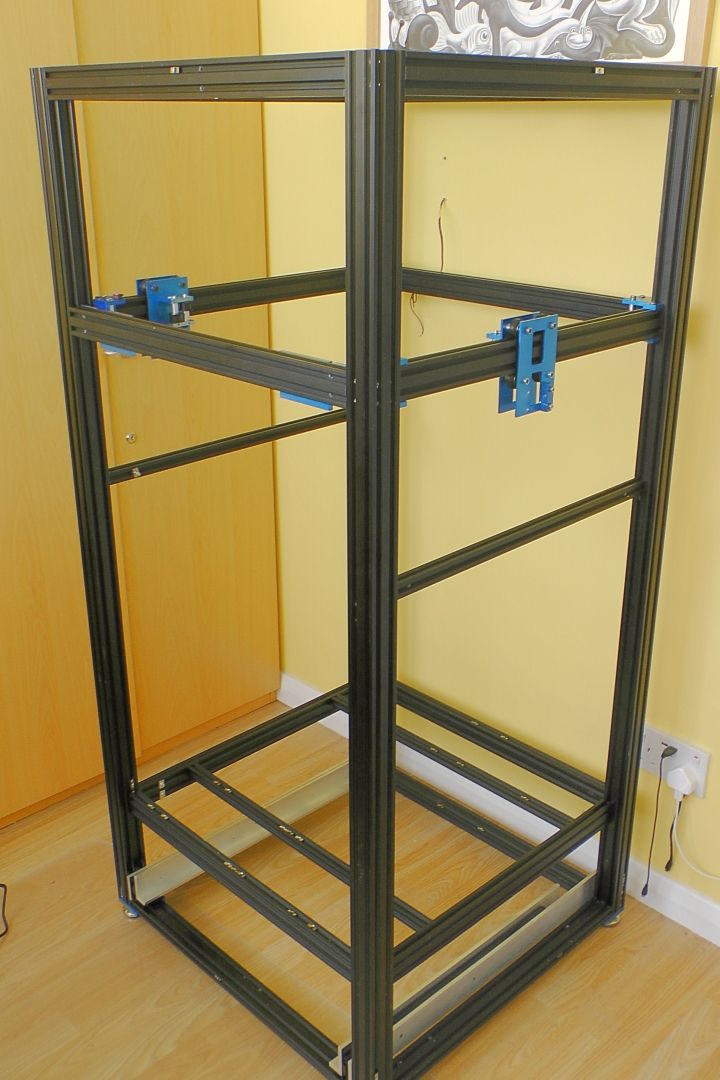
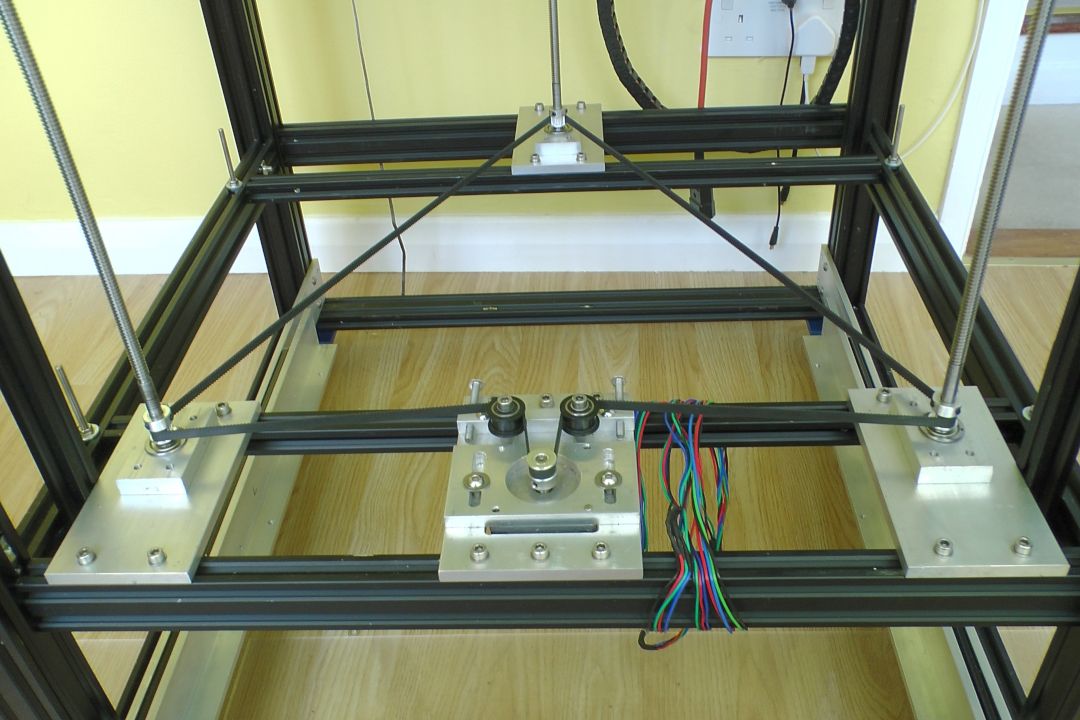
If the video is of no interest, here are some pics
-
Impressive !!!
-
@deckingman Looks quite massive!
Here in germany the openbuild extrusion costs a lot more than standard extrusion. Therefor I'd have only use the v-slot where needed.
But in the UK it might be different, I guess. -
@o_lampe said in Deckingman's new printer:
@deckingman Looks quite massive!
My Wife .......... "I thought you said it was going to be smaller than the old one"
Me ..................."It is. The power supplies will be in a drawer underneath instead of sticking out the back, and there will only be one filament spool which will sit on the top rather than hang off this side".
My Wife ........."That's obviously some meaning of the term "smaller" that I wasn't aware of........".
I didn't tell her that the frame is now 640mm x 620mm rather than 600mm x 600mm.
") The overall height is about 1400mm rather than 1800mm (but I didn't mention that because there could be 2 or 3 Kg roll of filament added to the top).
The overall height is about 1400mm rather than 1800mm (but I didn't mention that because there could be 2 or 3 Kg roll of filament added to the top).Here in germany the openbuild extrusion costs a lot more than standard extrusion. Therefor I'd have only use the v-slot where needed.
But in the UK it might be different, I guess.Most of the extrusion came from the old printer so it's all "upcycled". The only extrusion I bought new was four 4040 legs which cost me £118. But I wanted them anodised black to match the rest and cut to length (1350mm). Here in the UK, if you want extrusion cut to length and black anodised, there isn't much difference in price. I bought them from a UK supplier called "Ooznest" which I use a lot and who offer free next working day delivery for orders over £100.
"Tee" nuts, open build wheels, spacers and pulleys were all "upcycled" too as well as all the bolts and fixings, so they haven't cost me anything. I did have to buy some aluminium stock to make the gantry plates, idler mounts, motor mounts, belt tensioners etc. But I've "upcycled" the lead screws and their associated plates as well as the Z motor mount, the Z axis guides and the complete bed assembly (not shown in the pictures). I have plenty of motors as well as a Duet main board and the kind people at Duet donated a tool board. I also have the PSUs and DC UPS but I had to buy some new back up batteries. The big expense was the Bondtech LGX Ace extruder + Slice Engineering Mosquito combo. They did give me a small discount but that was wiped out by having to pay 20% UK VAT when it came into the country plus UPS charged me another £13 for them to take that VAT and pass it on to the government. If I'd bought a Chinese clone, there are no UK import fees which pi**es me off greatly but that's another story....
-
My Wife .......... "I thought you said it was going to be smaller than the old one"
Me ..................."It is. The power supplies will be in a drawer underneath instead of sticking out the back, and there will only be one filament spool which will sit on the top rather than hang off this side".
My Wife ........."That's obviously some meaning of the term "smaller" that I wasn't aware of........".
ROFL .... I can so here this conversation in my mind !!
UPS charged me another £13 for them to take that VAT and pass it on to the government. If I'd bought a Chinese clone, there are no UK import fees which pi**es me off greatly but that's another story....
Count yourself lucky - over here, UPS would be MUCH more brutal.
-
Just uploaded part 7 - https://youtu.be/XLLdK7Bu464
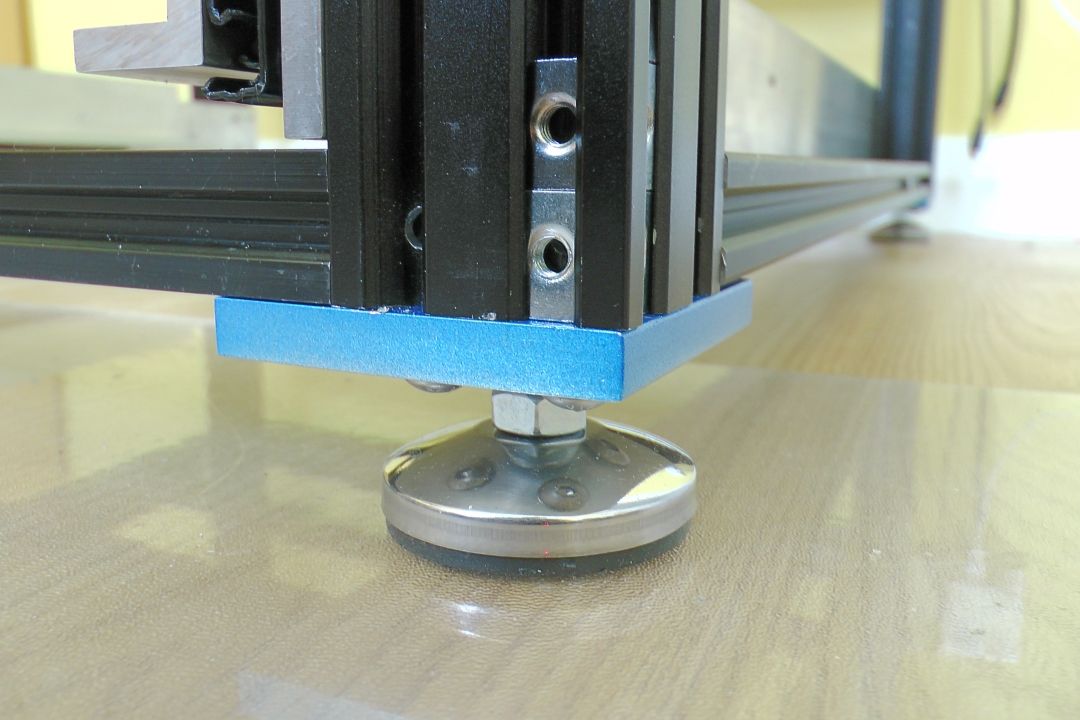
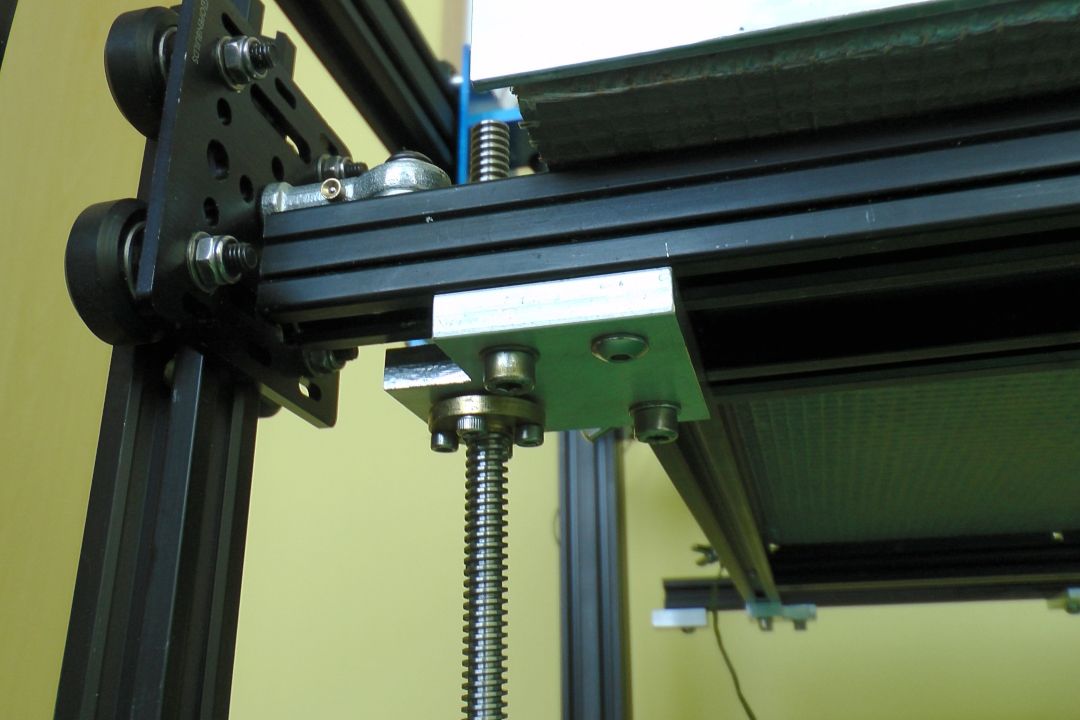
In this video, I explain how a (retired) mechanical engineer gets the build plate level and "tram" such that no compensation of any sort (mesh or otherwise) is needed, nor any further adjustments unless the machine is disassembled.
Here are a few more pics if watching YT videos isn't "your thing".


-
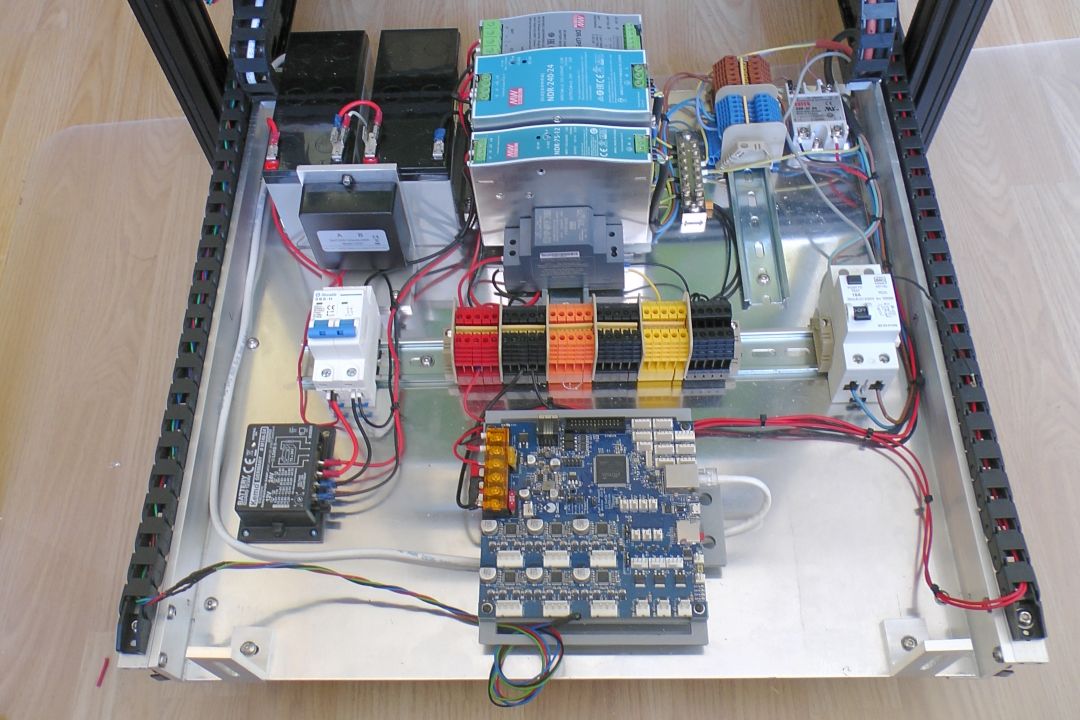
Part 8 is out now. It's mostly just about me installing the various electronics bits and pieces including the DC UPS and batteries in my pull out drawer. https://youtu.be/74u2AluoZgo
Probably boring stuff for members of this forum but there is a bit about keeping the two series connected back-up batteries equalised and protecting them from over-discharging which might be of interest.
Here is a quick picture of the installation so far.
-
This post is deleted! -
awesome build. i'm always interested in the electronics, specifically what type of DIN mounted contactors and components people use. i see the 24v and 12v power supply. but hard to see the details on other components.
-
@RogerPodacter What details would you like to know that aren't clear from the pictures in the YT video? I only mentioned the new parts I bought as everything else is carried over from my old build which I have previously documented. I'm happy to provide more info if you tell me what you want to know.
-
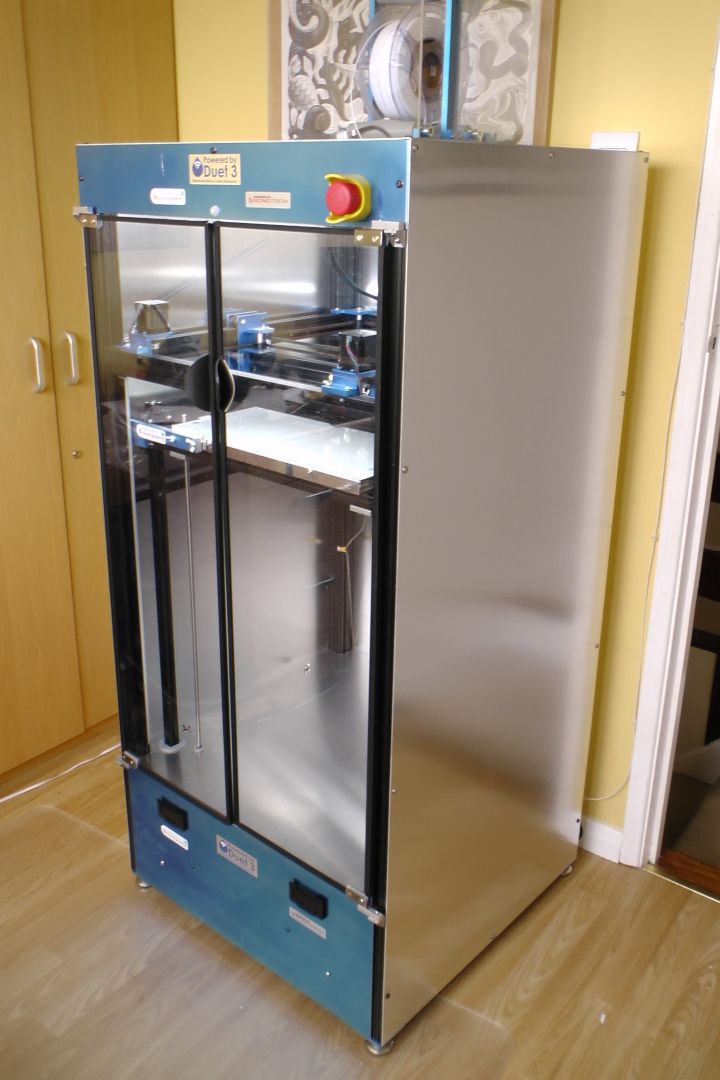
It's nearly finished.
-
@deckingman very professional looking
-
-
@jens55 said in Deckingman's new printer:
OMG !!!! A thing of beauty!
Thank you kind sir!. The panels certainly give it the Wife Acceptance Factor. They are just 1.5mm aluminium which was the cheapest thing I could find that wouldn't look too bad. They do rattle a bit though, so I've ordered some self adhesive "ant-rattle" tape (essentially a sort of adhesive backed foam strip about 1.5mm thick). I'll take the panels off, stick that tape around the frame, then bolt them back on. I've also ordered some sound deadening material - the sort of stuff used on motor homes and vans, so I'll stick that to the inside of the panels too.
I've documented the build on my YT channel. If you haven't already been following along, here is a link to the playlist https://www.youtube.com/playlist?list=PLMt2DqJCk4V95a5sZzkpzvL-vM4G_JMxI
There will be more pics in part 13 which I'll upload when I've finished putting it all together.
-
@deckingman
Flasher than a rat with a gold tooth!
-
This looks amazing. Well thought out and neat.
I'm very interested in your electronics/wiring, as I'm just about to start my mod's to my Tronxy X5SA pro (corexy).
Your DC Distrubution panel. Are each sections all connected with a busbar or something, ie the 5 x Red 24v terminals all connected together?
Can you remember what these terminals blocks are (make and model)?
Dizzwold.