Control for “Maslow” style cnc
-
@CNCModeller Polar (or Polargraph) Drawbots have been doing this for some time: https://www.google.com/search?q=polar+drawbot
As @o_lampe says, the Hangprinter kinematics should be able to do this (yet to be proved). Alternatively, there's a number of Github projects that you could copy the kinematics from, and add it to RRF.Let us know how you get on!
Ian
Bed-slinger - Mini5+ WiFi/1LC | RRP Fisher v1 - D2 WiFi | Polargraph - D2 WiFi | TronXY X5S - 6HC/Roto | CNC router - 6HC | Tractus3D T1250 - D2 Eth
-
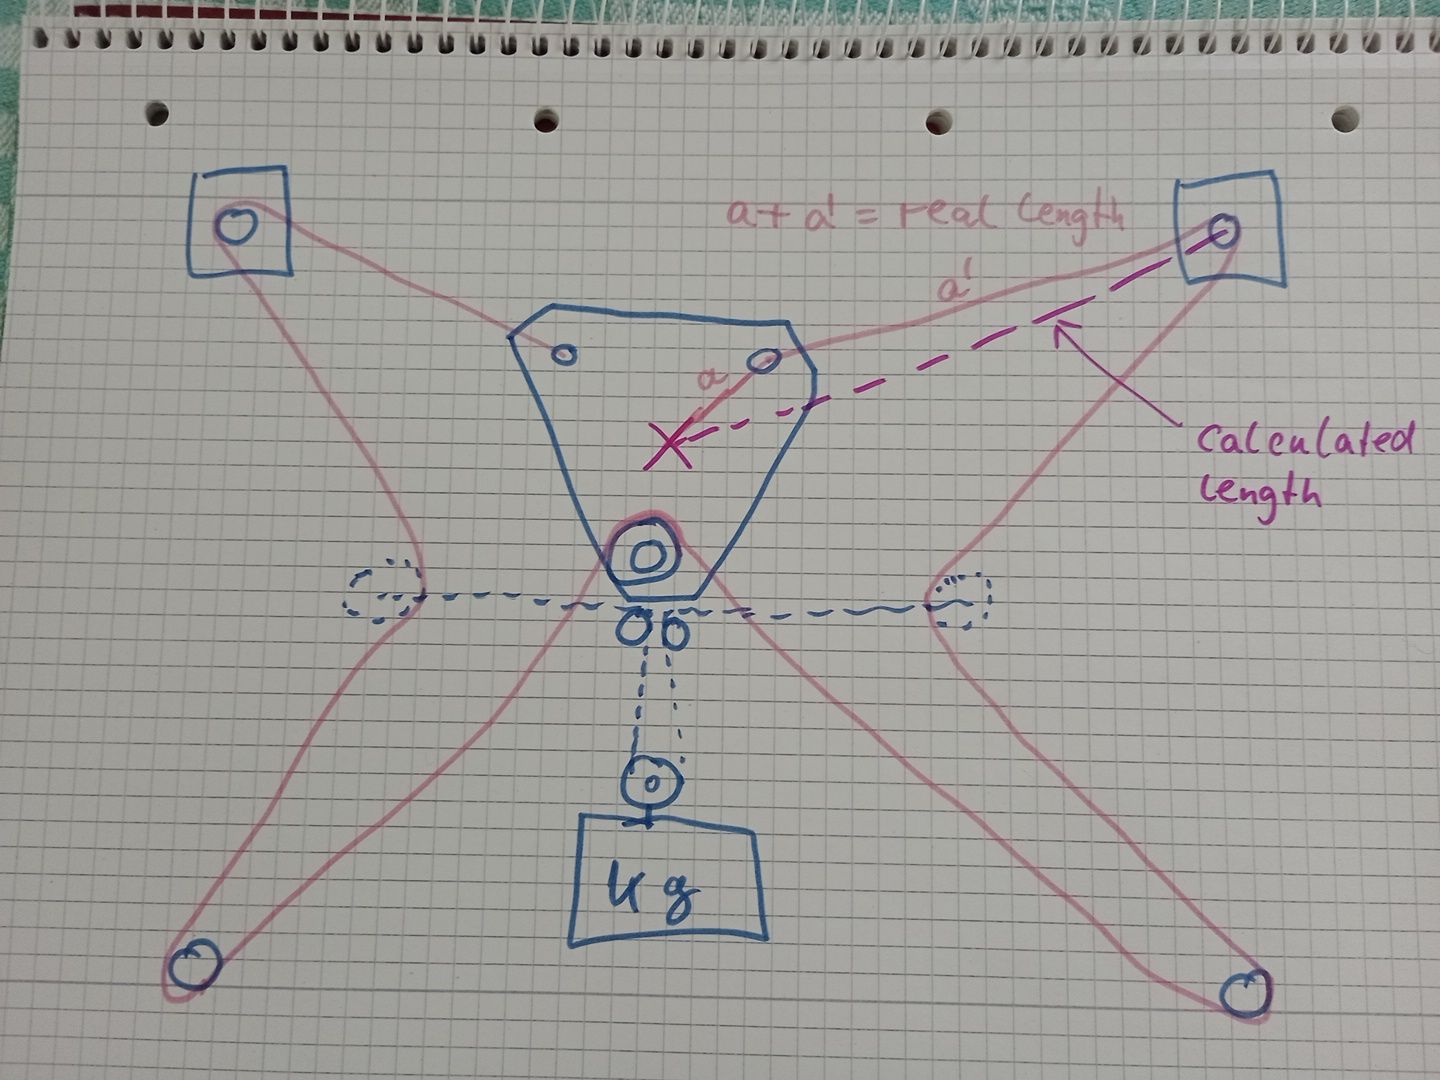
I've drawn another sketch which only needs one belt by using a idler on the bottom of the effector.
That way I can also reduce the amount of belt-length correction by 50%.I was wondering if RRF kinematic handles the difference between calculated and real length (caused by varying angles between fix points and center of effector)? Or is this the reason, why some builders report slacking lines or overtight lines?
-
@droftarts that’s interesting, I’m really only wanting to make custom shipping crates from sheets of plywoo. I could just use a large plotter to mark out the cuts and then a jigsaw, obviously being able to do the cutting is a bonus but it wouldn’t be something that’s used every day.
Polar Duet3 Mini + 1HCL
https://youtube.com/playlist?list=PLWjZVEdMv1BY82izahK45qKh-hp3NFkix
Wanhao D4S: Duet2
https://forum.duet3d.com/post/296755
K40 Laser, Duet2
https://forum.duet3d.com/post/312082
Wanhao D5S
https://www.youtube.com/CNCModellerUK -
@o_lampe I like the idea definitely something worth thinking about.
-
@CNCModeller said in Control for “Maslow” style cnc:
a large plotter to mark out the cuts
That'll be much more accurate I guess, but the pen would need a bit of downforce to write. Maybe a small vacuum hose on the effector? Or an airbrush instead of a pen? That way you can also put your Logo on the crates or a "Fragile" sign...
A diode laser would probably work too, but the lines would be very fine. -
@CNCModeller said in Control for “Maslow” style cnc:
I could just use a large plotter
Something like the open source Makelangelo would work: https://www.marginallyclever.com/products/makelangelo-5-huge/
It runs on Marlin, so I'd think it would be transportable to Duet: https://www.marginallyclever.com/2021/10/friday-facts-4-how-to-marlin-polargraph/
A very old blog post about the kinematics https://www.marginallyclever.com/2012/02/drawbot-overview/
His software looks pretty fully-featured for making wall art, too.Alternatively https://www.instructables.com/Polargraph-Wall-Draw-Bot-2023/ has a link to GRBL-Polargraph fork.
I'm pretty keen to make one of these, too, in case you hadn't realised... Somehow just need to find the time to see if the Hangprinter kinematics will work, or if we need to lift the Polargraph kinematics from Marlin or GRBL.
It would be cool to mount a low power diode laser on something like this to cut custom cardboard packaging, too.
Ian
Bed-slinger - Mini5+ WiFi/1LC | RRP Fisher v1 - D2 WiFi | Polargraph - D2 WiFi | TronXY X5S - 6HC/Roto | CNC router - 6HC | Tractus3D T1250 - D2 Eth
-
@droftarts I started building a test-rig, but without steppers. Just to proove my belt-length correction theory. It's still a lot to compensate, I think I might use a torque-mode BLDC instead of the weight. (simpleFOC driven, since it can be completely independent from RRF)
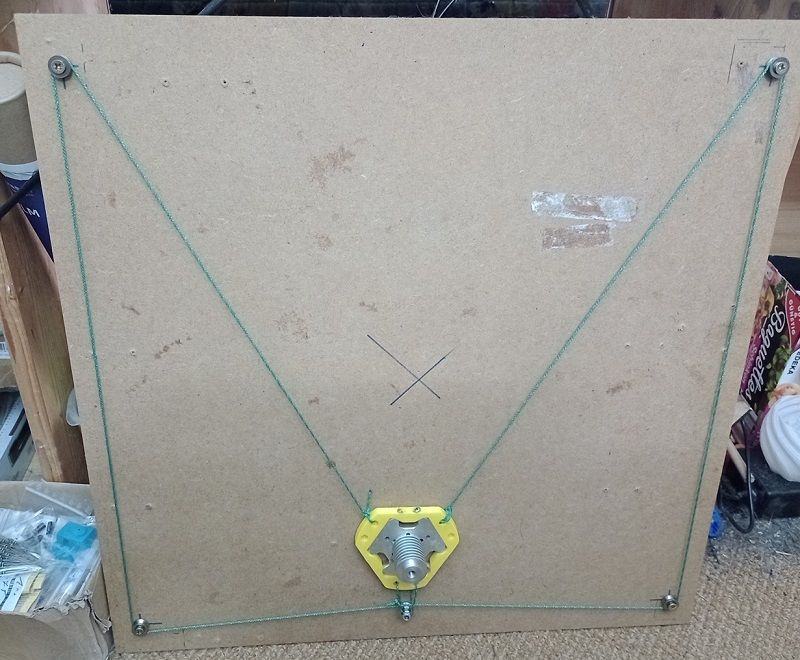
PS: The effector was the first thing I found when looking for a triangle shaped thing. I might make a supercheap sandtable instead.
-
@o_lampe Nice. Did it work?! I think what you have nearly made is a CoreXY! The nice thing about the Polarbots is that they only need two pivot points, at the motor. Yours needs a full frame, so it may as well be a CoreXY, perhaps more like https://corexy.com/botofthecloth/index.html
What I've noticed from most of the polarbots I've looked at is that there is a linkage for each belt around the centre of the effector, so that it's always a straight line between motor and 'pen' (or spindle). The Makelangelo and Maslow does this, in different ways. More complicated physically, but less computation within the kinematics.
Ian
Bed-slinger - Mini5+ WiFi/1LC | RRP Fisher v1 - D2 WiFi | Polargraph - D2 WiFi | TronXY X5S - 6HC/Roto | CNC router - 6HC | Tractus3D T1250 - D2 Eth
-
@droftarts Opposite to a CoreXY I don't need linear guides or a crossbeam. The motion is similar, but there's no linear correlation between A+B motors.
Until the weekend I'll have a stepper driven rig. Then I can post a video. -
@o_lampe I just realised the Maslow4 is quite different. The Maslow 1 and 2 (no idea what happened to Maslow 3) were polarbots, with a belt/chain from each top corner, but the Maslow 4 is more like a 2D quad-tower delta, and probably much closer to Hangprinter than previous versions. Again, the Hangprinter kinematics might do this, too.
Ian
Bed-slinger - Mini5+ WiFi/1LC | RRP Fisher v1 - D2 WiFi | Polargraph - D2 WiFi | TronXY X5S - 6HC/Roto | CNC router - 6HC | Tractus3D T1250 - D2 Eth
-
@droftarts Maybe the Maslow_3 was a flop and that's why they again had to kickstart their next project? They even pulled the "Ukraine" card to gain more money.
IMHO the Maslow_4 isn't a good design, using brushed DC motors and expensive ODrive controllers.there is a linkage for each belt around the centre of the effector, so that it's always a straight line between motor and 'pen'
I think I figured out how to trick RRF to do the correct calculations without rotating belt links. It's similar to Delta-kinematics, where we have to measure rod length andhorizontal distancebetween towers and effector.
I just have to measure the horizontal distance from motorshaft (minus pulley radius) to the fixed link on the effector. Will add it in my next picture for reference.PS: I like the
BotofTheClothidea with it's strap-on corners. For a plotter or laser it might be good enough: Just buy a 8' x 6' plywood sheet and clamp the motors and idlers directly. No need for a permanent frame which only occupies workspace 99% of the time. -
@o_lampe said in Control for “Maslow” style cnc:
PS: I like the
BotofTheClothidea with its strap-on corners. For a plotter or laser it might be good enough: Just buy a 8' x 6' plywood sheet and clamp the motors and idlers directly. No need for a permanent frame which only occupies workspace 99% of the time.I had exactly the sam thought, personally the idea of having all of the moving parts in the plotter carriage with just a fixed anchor point at the corner of the 8x6 sheet would be ideal. Literally just put a screw in each corner and attach the belts, calibrate, and you’re r away. Ideally everything would retract into the plotter carriage for storage.
I also like the idea of a diode laser to mark out for manual cuts and labelling.
I could even see a larger version being used to layout where you put holes for steelwork or walls etc on a building concrete slab during construction.
All interesting stuff…
-
I added steppers and a central tightening winch. The idea of the hidden weight is not too good, because it would almost move the same as if it was connected directly to the effector.
This way it won't work with the strap-on corner idea, unless you are willing to drill 3 holes in the 8x6 everytime.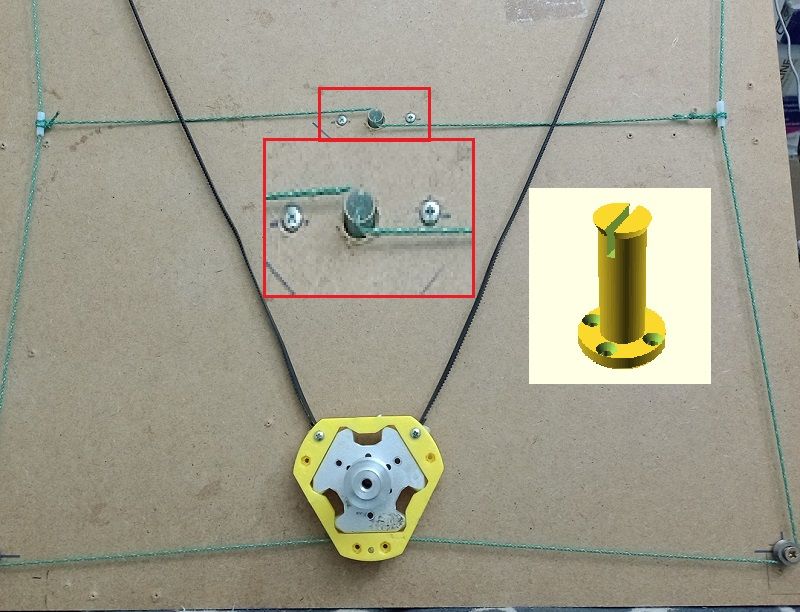
-
I tried my luck and modified config for a 2D hangprinter.
It seems RRF3.4.6 already has the latest version of HP-kinematics. It is oddly specific regarding spool diameter and all.m98 p"config.g" Error: Wrong number of values after '''D''', expected 3 Q:Buildup fac 0.0070 R:Spool r 75.00, 75.00, 75.00, 75.00 U:Mech Adv 2, 2, 2, 4 O:Lines/spool 1, 1, 1, 1 L:Motor gear teeth 20, 20, 20, 20 H:Spool gear teeth 255, 255, 255, 255 J:Full steps/rev 25, 25, 25, 25 HTTP is enabled on port 80 FTP is disabled TELNET is disabled -
@o_lampe What are the commands you are using to define it? I'd imagine that the C and D motors don't really matter in M669. Are the other values set in firmware? That might rather limit the usefulness of the Hangprinter kinematics.
Ian
Bed-slinger - Mini5+ WiFi/1LC | RRP Fisher v1 - D2 WiFi | Polargraph - D2 WiFi | TronXY X5S - 6HC/Roto | CNC router - 6HC | Tractus3D T1250 - D2 Eth
-
@droftarts I figured, I could use any two of the ABC motor to define a 2D plane. So I took the BC motors, because they already defined the left and right corner. (A motor is the front/center motor)
Here's the basic config.g, but I don't know how to match XY with ABCD or how to define a tool for a plotter; Configuration file for Duet WiFi (firmware version 3) ; ; General preferences G90 ; send absolute coordinates... M83 ; ...but relative extruder moves M550 P"Hangprinter_2D" ; set printer name M669 K6 A0.0:220.0:0.0 B-220.0:220.0:0.0 C220.0:220.0:0.0 D2000.0 P100.0 Q0.0 R1 M666 X0 Y0 Z0 ; put your endstop adjustments here, or let auto calibration find them ; Network M552 S1 ; enable network M586 P0 S1 ; enable HTTP M586 P1 S0 ; disable FTP M586 P2 S0 ; disable Telnet ; Drives M569 P0 S0 ; physical drive 0 goes forwards M569 P1 S0 ; physical drive 1 goes forwards M569 P2 S0 ; physical drive 2 goes forwards M569 P3 S0 ; physical drive 3 goes forwards M584 A0 B1 C2 D3 ; set drive mapping M350 A16 B16 C16 D16 I1 ; configure microstepping with interpolation M92 A200.00 B200.00 C200.00 D0 ; set steps per mm M566 A900.00 B900.00 C900.00 D1200 ; set maximum instantaneous speed changes (mm/min) M203 A24000.00 B24000.00 C24000.00 D4800 ; set maximum speeds (mm/min) M201 A4000.00 B4000.00 C4000.00 D1000 ; set accelerations (mm/s^2) M906 A200 B400 C400 D200 I70 ; set motor currents (mA) and motor idle factor in per cent M84 S10 ; Set idle timeout ; Axis Limits M208 X-100:100 Y-100:100 Z0:10 ; Tools M563 P0 ; define tool 0 G10 P0 X0 Y0 Z0 ; set tool 0 axis offsets M911 S20 R22 P"M913 X0 Y0 G91 M83 G1 Z3 E-5 F1000" ; set voltage thresholds and actions to run on power loss T0 ; select first tool//edit OK, I guess I found the reason for one of the errormessages: "D" on has one parameter in my config, but needs three....
YES, that solved most of it, although I still don't know, if I have to map AB drives to XY axes? I guess it should be done automatically by the kinematic model? -
@o_lampe Looks like our Hangprinter documentation needs updating; there's a whole bunch of parameters not covered on the wiki page here https://docs.duet3d.com/User_manual/Machine_configuration/Configuration_Hangprinter
Looks like you can define Q, R, U, O, L, H and J: https://github.com/Duet3D/RepRapFirmware/blob/47435151e110f373fc80721a2c265e38b8ec5e3b/src/Movement/Kinematics/HangprinterKinematics.cpp#L203
So it's coming up with sensible numbers for those as well, I guess. There's a reasonable amount of comments in HangprinterKinematics.cpp to hopefully work out what is going on!Ian
Bed-slinger - Mini5+ WiFi/1LC | RRP Fisher v1 - D2 WiFi | Polargraph - D2 WiFi | TronXY X5S - 6HC/Roto | CNC router - 6HC | Tractus3D T1250 - D2 Eth
-
@o_lampe Also note that, as of RRF 3.5.0-beta4, Hangprinter support is removed from Duet 2 WiFi/Ethernet builds. RRF 3.4.6 is fine, though. Just in case you decide to update!
https://github.com/Duet3D/RepRapFirmware/wiki/Changelog-RRF-3.x-Beta#reprapfirmware-350-beta4[Duet 2] Hangprinter kinematics are no longer supported in the standard build of Duet2CombinedFirmware because of lack of flash memory space
Ian
-
@droftarts I have made some progress and got motion in the right directions. But tightening the belts and adding some gravity needs a propper balance of forces. I played with the L&H values and Q&R as well, but didn't see a difference.
@CNCModeller How about window cleaning on skyscrapers? The strap-on corners will fit almost anywhere.
-
I played a bit more with the HP-kinematics, but there are some weird things I couldn't work out yet:
- No matter what I set as steps/mm, it always moves 1/3 of the requested length (XYZABCD, tried all)
- I can't move past X0. Positive X-moves are straight, but lower than X0, it starts to make a curve
- although I only have ABCD axes in the kinematic model, I have to set motor currents for XYZ??
Not very promissing.
I really don't want to dig out an old RAMPS controller and bite my teeth out, configuring Marlin