RepRapFirmware 3.6.0-alpha.2 for Duet main boards available
-
@Notepad thanks. Serial ports were not working in alpha2+2. I have replaced those binaries with alpha2+3 ones, still at https://www.dropbox.com/scl/fo/9wo03jbngipb1fxrsff5s/AGD0hZnFbBpBtA0ZLSDUNBE?rlkey=r5kv33ud8fgg2an38n6k68qp8&dl=0.
PS - hiccups did increase with microstepping, from 8 (0.24ms) at x16 to 14385 (443.83ms) at x64. Looks like the CPU is not really fast enough to caclulate the step times at x64.
Duet WiFi hardware designer and firmware engineer
Please do not ask me for Duet support via PM or email, use the forum
http://www.escher3d.com, https://miscsolutions.wordpress.com -
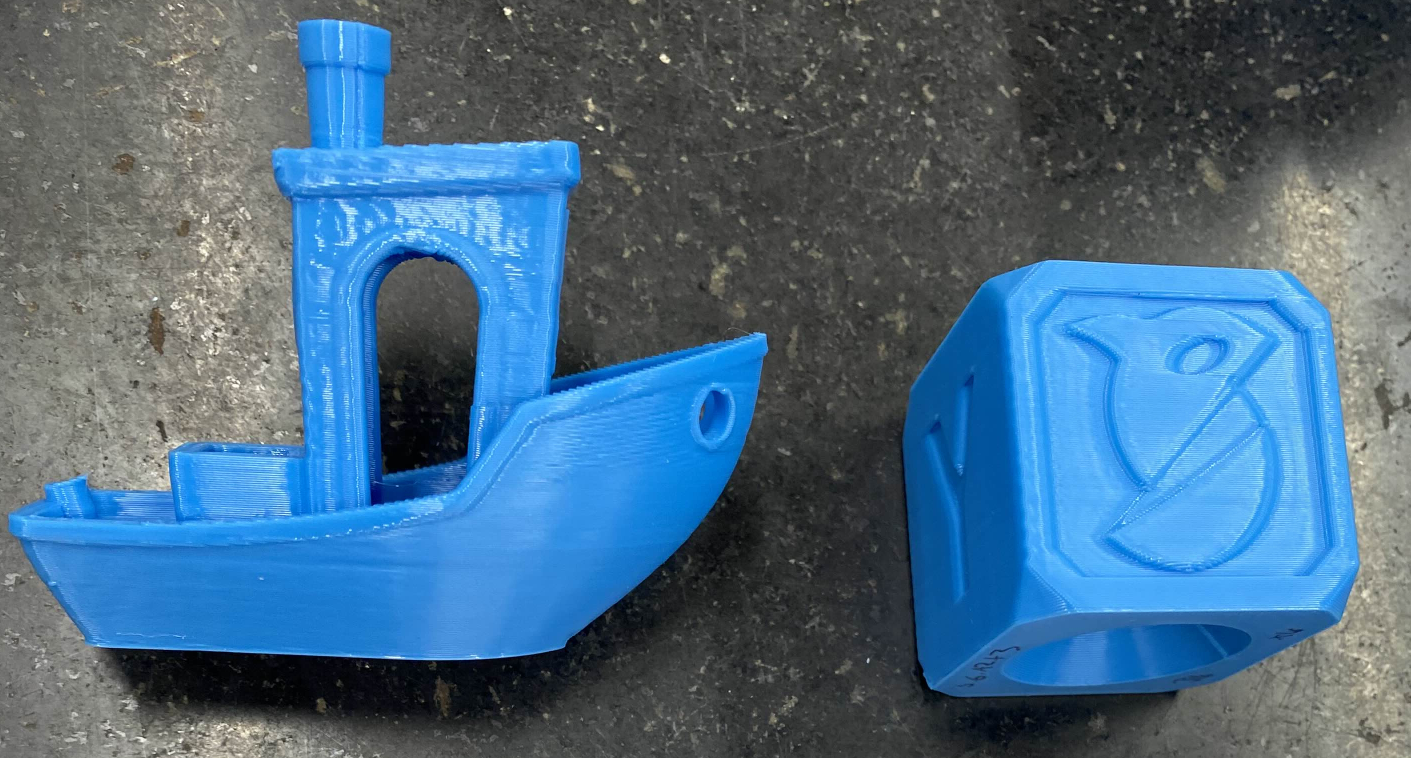
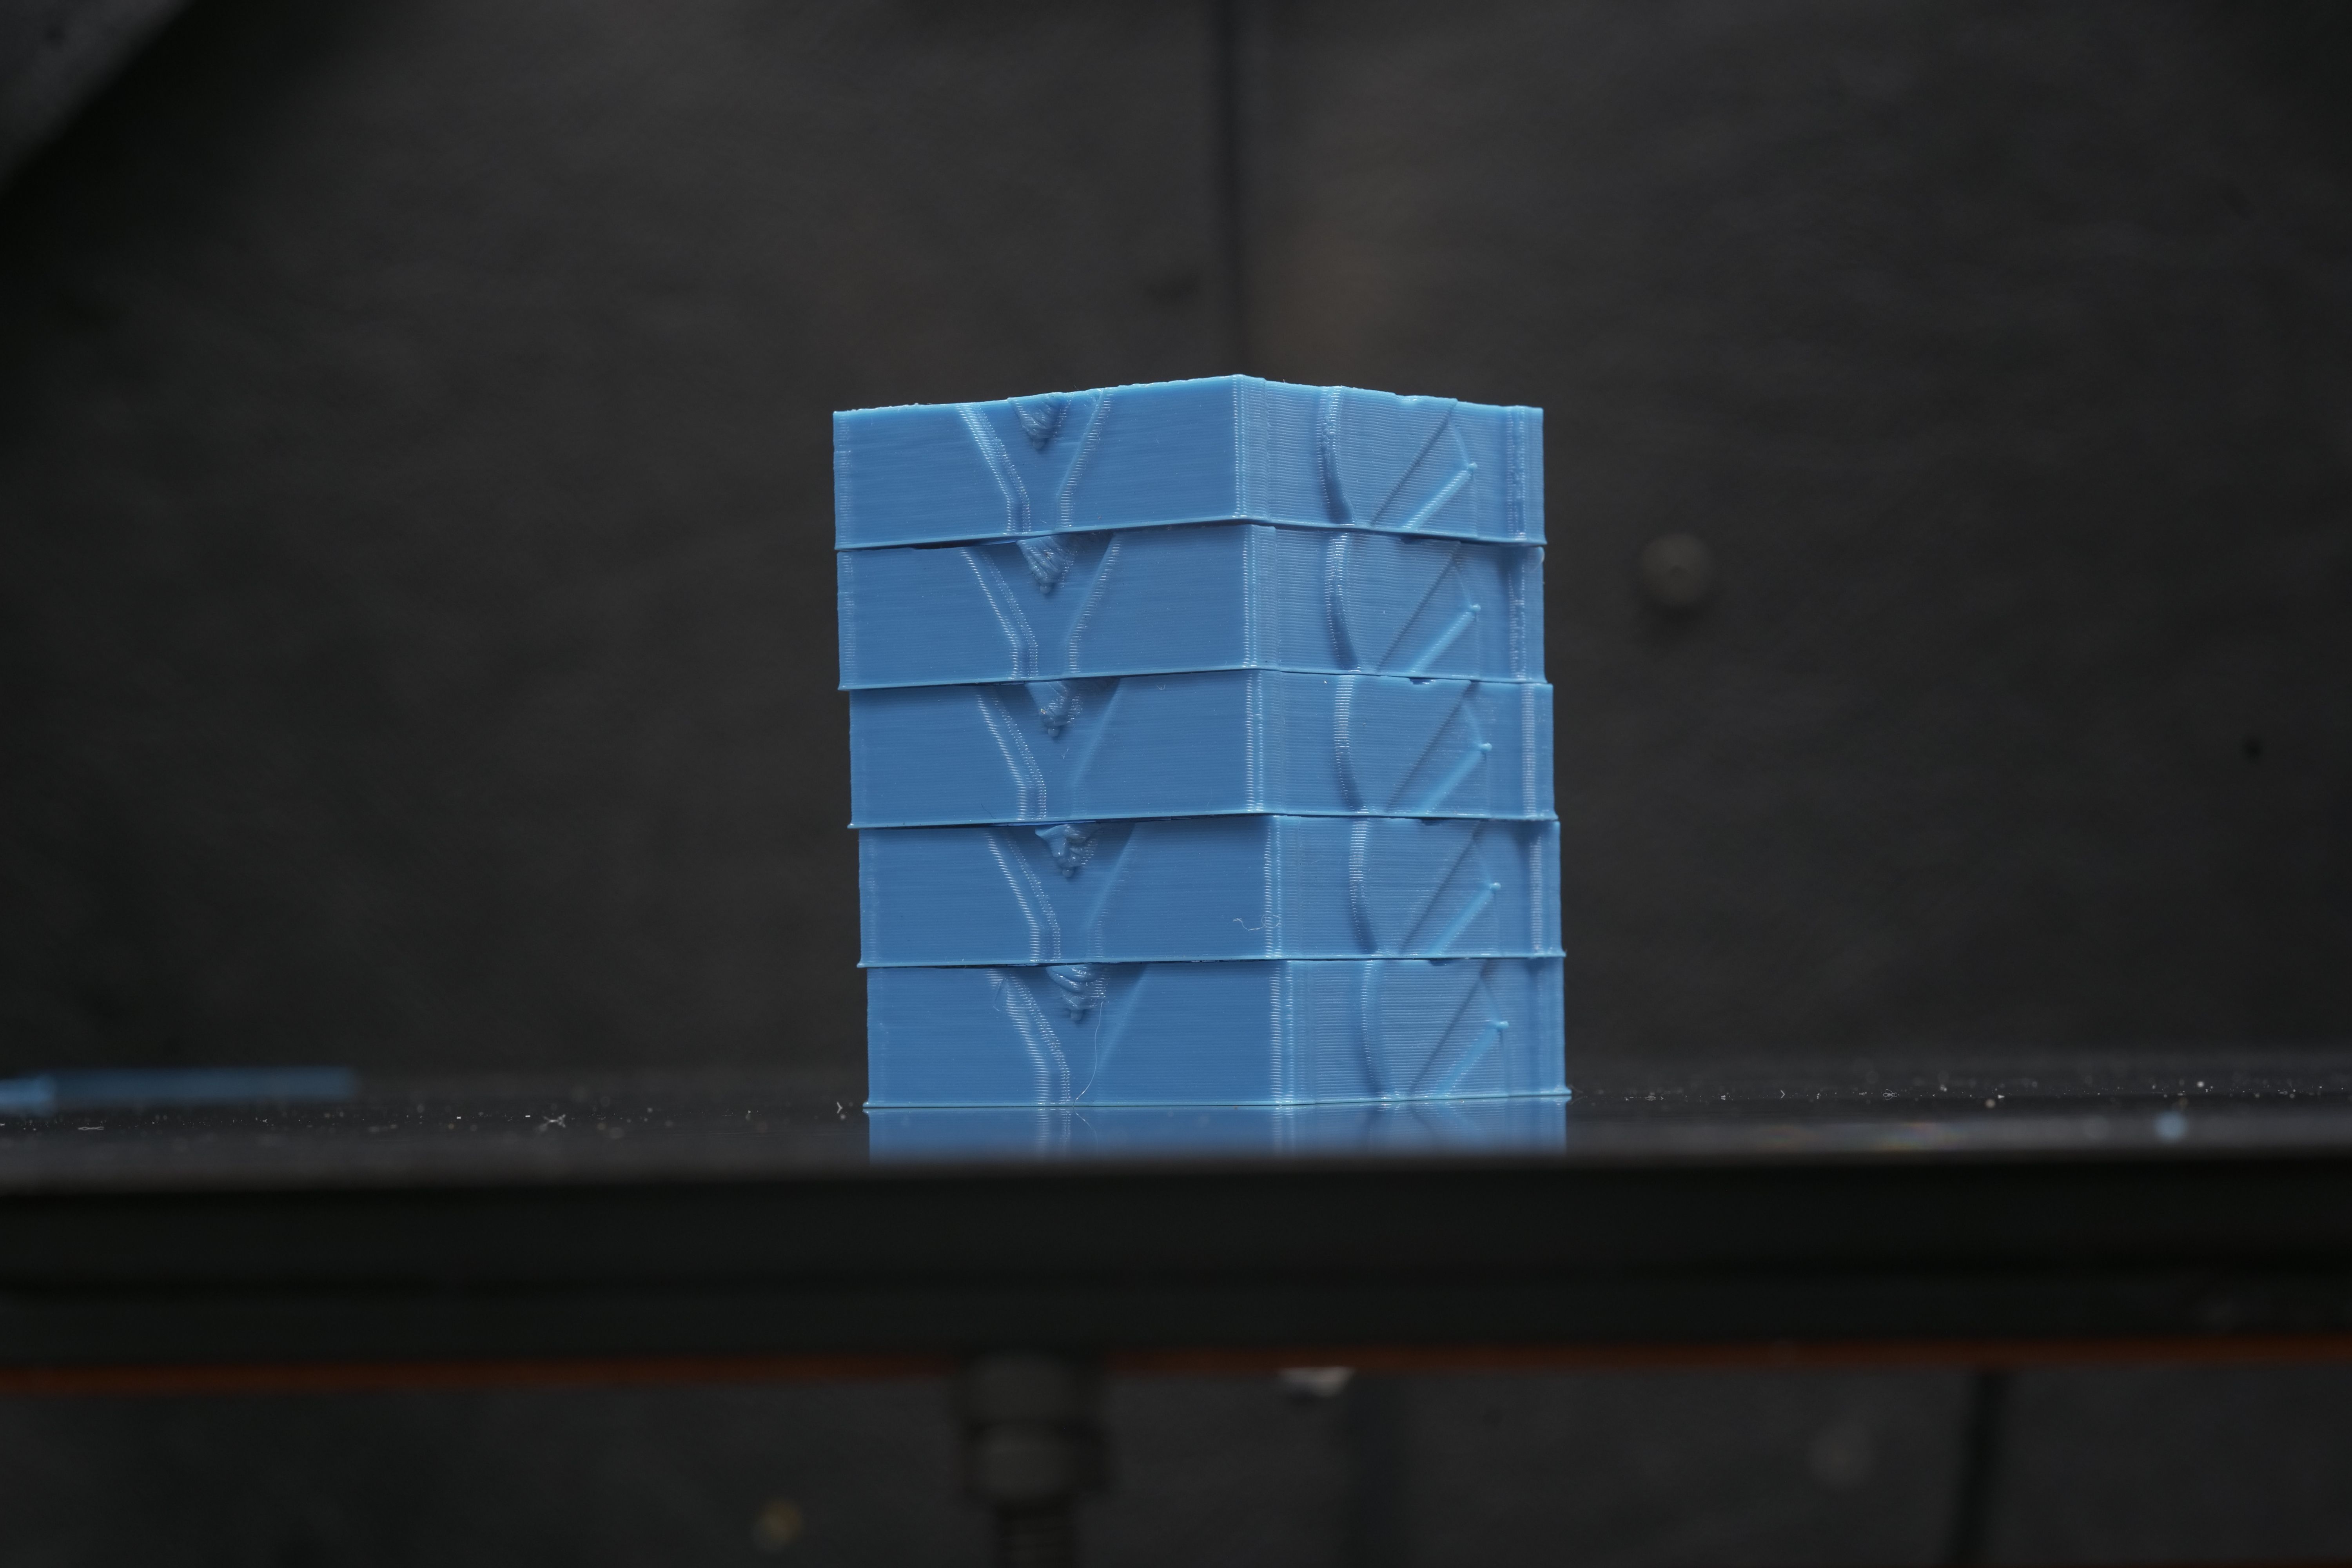
Just finished the test on 3.6.0-a2+2, and it's a visible improvement over 3.5.2 in terms of ringing when accelerating, BUT it's been introduced some artifacts during deceleration that kind of looks like underextrusion.
I've tried taking some pictures to show off what i'm talking about, the upper testprint is with 3.6.0-a2+2:


Edit:
This is being done with the following setup:Hardware:
- Duet 3 Mini 5+ v1.02.
- 1LC v1.2a - as toolboard for the extruder/hotend.
- Revo mini hotend with 0.4mm highflow nozzle.
- LGX-lite extruder:
FW/print settings:
-
Outer wall speed: 120mm/s.
-
Inner wall speed: 200mm/s.
-
Outer wall acceleration: 3000mm/s2.
-
Inner wall acceleration: 3000mm/s2.
-
Outer wall jerk: 7mm/s.
-
Inner wall jerk: 7mm/s.
-
Pressure advance: 0.045mm.
-
Retraction: 0.45mm.
-
Inner wall flow approx: 12.9mm3.
-
Outer wall flow apporx: 7.7mm3.
-
2 walls.
-
0% infill.
-
0 top layers.
On a little sidenote, I also noticed that the printer does a tiny "pause" or waits after each probe move, before when it did mesh leveling etc. it was much more "snappy" and things went faster. Now it takes some sweet time between probes. I've seen you've done several commits to remidy some probe related stuff during development so i suspect you're well aware of this allready but I just wanted to mention it.
-
@Exerqtor Ive noticed my pressure advance seems to be more effective in 3.6.A2x. I have yet to do a PA calibration step yet to see how its been affected. It might be your value has changed.
Also when it comes to retraction/deretraction/PA, it might be worth just noting what extruder & nozzle setup you have + speeds, as well as what flowrate the behaviour is noticed at.
For me my prints are normally at 26mm^3/s out of a max flow of 32mm^3/s on a print with 5000mm/c^2Accel and 10jerk -
@Notepad
Added in printer & print info in the post above😊
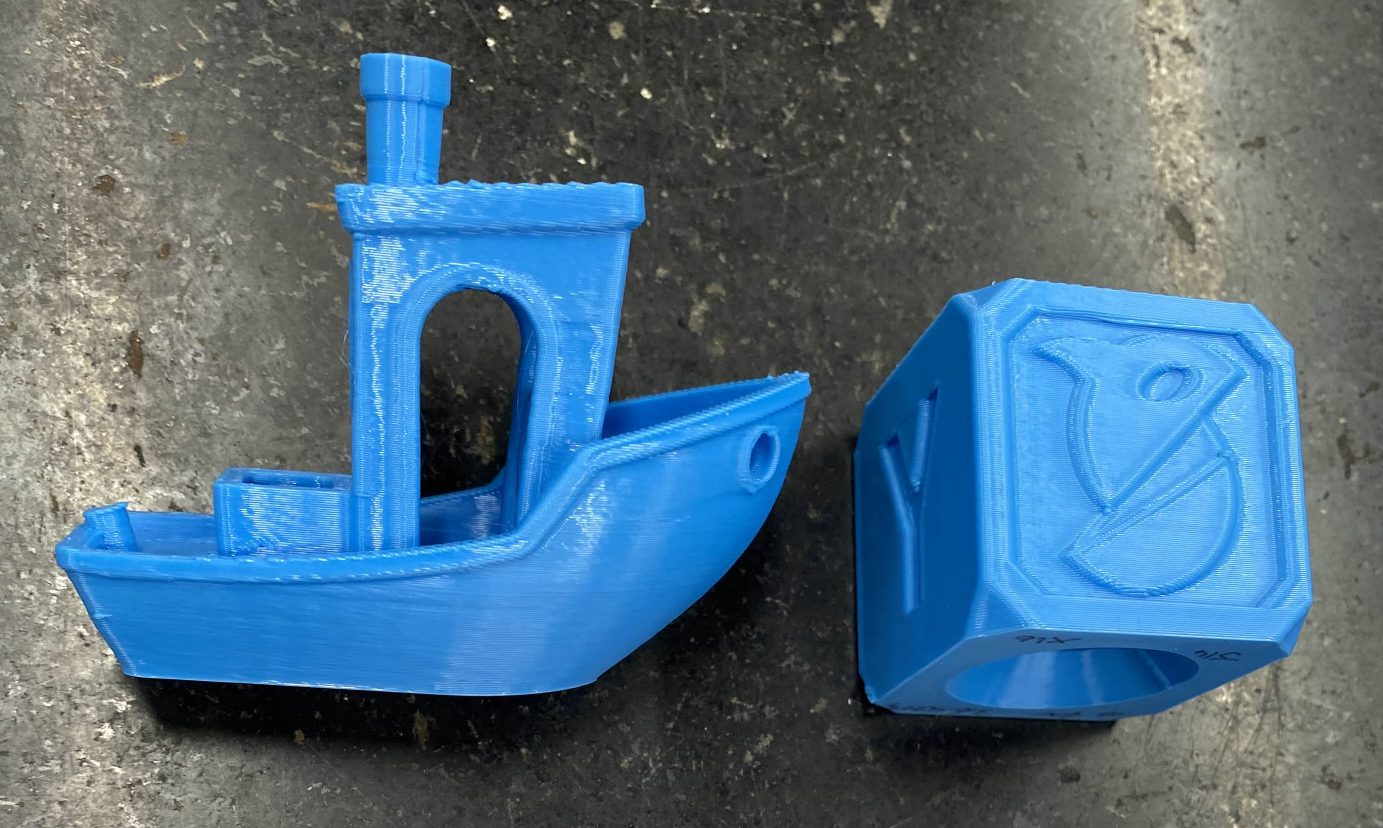
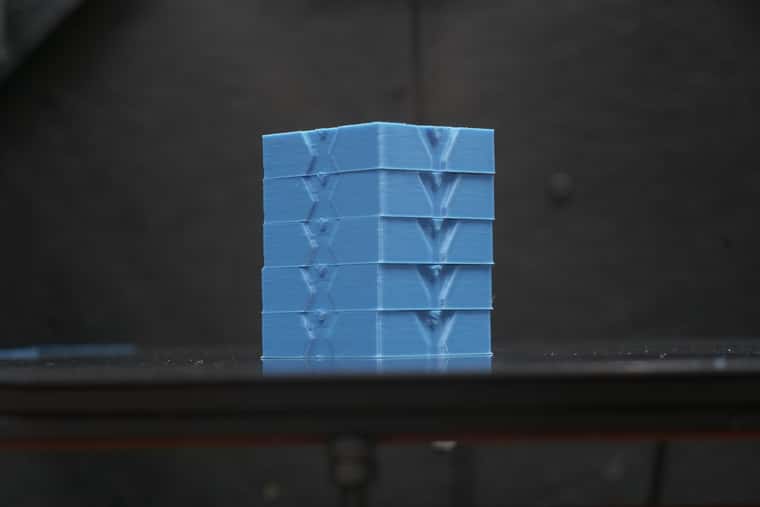
Did a new print with the exact same g-code & settings, just with PA disabled, and it sure did remove the underextrusion i was seeing (top is 3.6.0-a2+2 with PA off, bottom is 3.6.0-a2+3 with 0.045mm PA):


I'll try to crank up some acceleration and jerk later today and see how that plays out.
But I must say that the delay after a probe move is somewhat annoying lmao.
-
New tranche of tests completed,
The first and most important is the new baseline for 3.6.A2+3
Duet 2 3.6.a2+3 no arc weld x16microsteps.txt
This completed without any issues, the output benchy is identical to A2+2 and the motor chirping is none existent (no chirping detected in A2+2 either). Thankfully the PanelDue is now functional so I can confirm the changes to the serial output has worked with no complications.Further testing to no ones surprise shows x256 and x128 microstepping failed to complete, and failed in the same code 3 error as in A2+0
Duet 2 3.6.a2+3 no arc weld x128microsteps.txt
Duet 2 3.6.a2+3 no arc weld x256microsteps.txt
The motors sounded awful during this, and the prints failed within 10 layers of starting.Interestingly, in A2+2 I was able to get a successful print out of x128 microstepping, which was not possible in A2+3. I wonder if the fixed serial connection put extra load onto the MCU and caused it to fail.
As I have confirmed that between A2+2 and A2+3 at x16 microsteps with interpolation are pretty much identical, I have resliced the test print file to increase accelerations from 5k->10k, and jerk values 10->14. The goal is to put as much strain on the MCU as possible to try and find any failure cases.
If the test print was made back in 3.5.2, this print would look absolutely awful and highly risk layer shifts. With A2+3 the print was basically flawless with an average print speed of 220mm/s. The motors also sounded slightly quieter when compared to 3.5.2, though I expect this is because of the smoother transitions in corners not exciting the frame instead of directly being motor noise.
Duet 2 3.6.a2+3 no arc weld x16microsteps 10kaccel14Jerk.txtThe last test I have completed is the same increased speeds as before, however with pressure advance disabled. I wanted to remove any possibility that PA could be slowing the machines XY movements down, and at the same time I can test if PA is doing anything (spoiler, it is working)
Duet 2 3.6.a2+3 no arc weld x16microsteps 10kaccel14Jerk noPA.txtBoth these higher speed / more aggressive prints performed flawlessly. there was no weird noises, and as you can see with the photos, Pressure advance seems to be working effectively.
My next test will be focused on finding a new PA value, as my gut feeling is PA has become more effective, thus my original PA value of 0.022 can be reduced.
After this I intend to focus on 16x microstepping and using alternative input shaping methods and cancelation frequencies to see if specific values (i.e ultra low frequencies with complex shapers) might cause issues.Interestingly I have not noticed any z-probe hanging akin to @Exerqtor has mentioned, the behaviour of my bed and gantry levelling using an inductive probe feels identical to normal.
-
After a quick investigation on PA, it does appear to be much more effective. Key word is 'appears'. Due to the new input shaper causing cornering artefacts (which from now on I will reference as smoothing) this aids in reducing the amount of pressure advance required. More on this later.
The main thing I have tested in this batch is the behaviour of the different input shapers available. I did so by cutting down the original print file into a smaller 10mm slice so the parts can be printed quicker. The slice was chosen to be at the bottom of the original file as this is where most print errors occurred, which coincides with the most amount of long arcing movements. Print speeds and aggression stayed the same.
Duet 2 3.6.a2+3 16xmicro 10kA 14J MZV 51hz.txt
Duet 2 3.6.a2+3 16xmicro 10kA 14J EI3 51hz.txt
Duet 2 3.6.a2+3 16xmicro 10kA 14J EI2 51hz.txt
Duet 2 3.6.a2+3 16xmicro 10kA 14J zvddd 51hz.txt
Duet 2 3.6.a2+3 16xmicro 10kA 14J zvd 51hz.txtOver all, the prints performed exactly as expected, and all passed without any issues.
There was one print which did get a Code 3 error, and the main difference was I changed the input shaper type mid printer (after the first layer). This might be an edge case senario but it is interesting that the only time I manually change the input shaper type mid print via inserting custom gcode in the slicer, is the one time it fails. It is also interesting that it didnt fail instantly, it was able to process about 5 seconds more of the print job before the print failed on one of the curved sections.
Duet 2 3.6.a2+3 16xmicro 10kA 14J MZV 51hz fail.txtAfter this initial fail, I decided on updating the config.g itself and restarting the mainboard to be the best course of action.
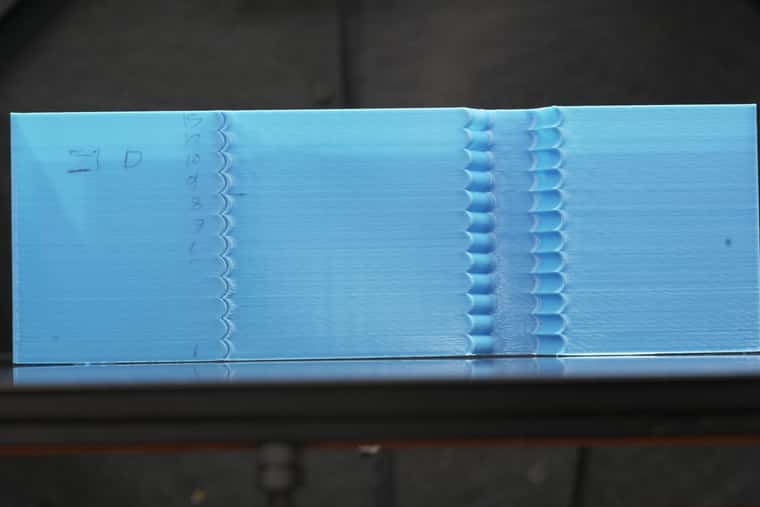
Stacking the print jobs from previous, gives a great example of the input shaper aggression against the amount of smoothing which the input shaper applies.
In order from top to bottom:
MZV, ZVD, ZVDDD, EI2, EI3


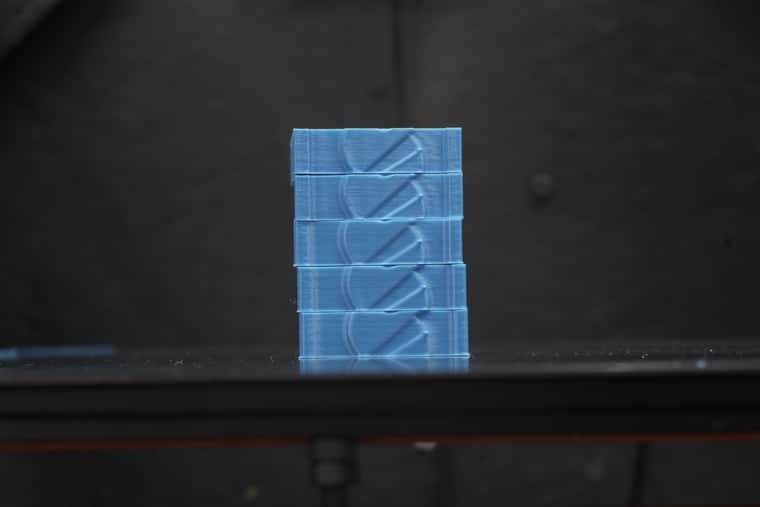
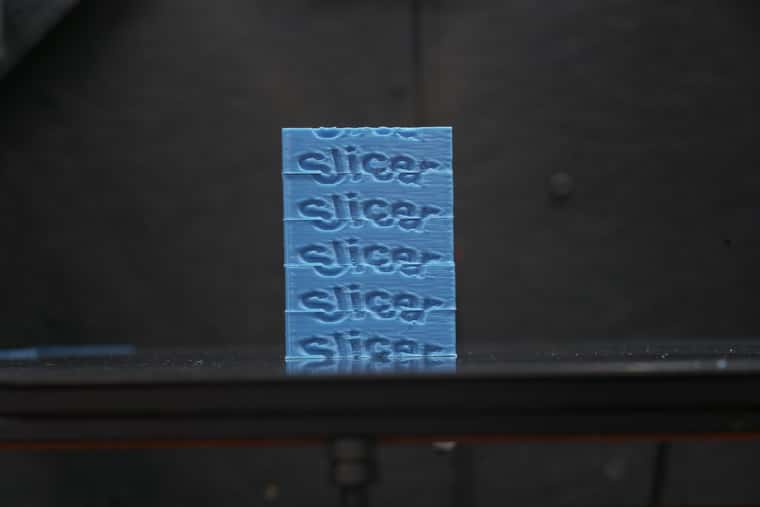
The effect of the smoothing is very noticableon the benchy's rear text and the orca slicer logo.
This also leads me to the conclusion that pressure advance should be calibrated to the type of input shaper used, as more aggressive input shapers require lower values of PA for the same clarity.I personally use EI2 as my go to shaper of choice. and at 51hz I was able to lower my PA value from 0.0225 to 0.0085, which in-turn also sped up my overall print speeds without sacrificing any quality.
One final test I completed (no pictures sadly) is using MZV on an extremely low frequency which would normally never be used in actual machines, in hopes to overload the MSU.
The output print quality was decent, however showed massive amount of smoothing almost 10x worse than EI3 in the previous tests.
This leads me to the conclusion that the input shaper should only be used on frequencies above 40hz, and the lower the frequency you go, the simpler the input shaper should be used. I.E dont use EI3 over MZV at 30Hz.
Duet 2 3.6.a2+3 16xmicro 10kA 14J MZV 20hz.txt
I am starting to run out of things to test on my dedicated test machine, so I have selected a handful(8) of print farm machines which i have deployed 3.6.A2+3 on to. So far the output has been a marked improvement in print quality. No known errors or issues has appeared yet.
Any advice on specific areas I should focus my testing onto would be much appreciated. if not my next batch will be all the input shaper types at very low and very high frequencies.
-
@Notepad https://forum.duet3d.com/assets/uploads/files/1721499165580-p1086721.jpg
In this picture you can see the uppermost layers show a bit of meltdown on the Ei2 Y-part.
I blame it on very short layer time and the filament got too hot?
Wouldn't printing at too high temp also explain the smoothing? -
@o_lampe AH, I probably should have mentioned, in the Y section at the top, I use pliers to grip the printed model to pull it off my bed. Im too lazy to take the PEI off or let it cool down so when I grip it causes those indentations.
-
I've done some more testing and tuning as well, both PA, Acceleration & Jerk has gotten some adjustments. This new approach to input shapiny is REALLY a huge improvement!
I'll upload some pictures once i get home, but i at least was able to shave down PA to 0.0075s from 0.0450s ,acceleration to 3000mm/s2 from 2500mm/s2 & upped the jerk to 7mm/s (
i can't remember the Jerk values so i'll update those with the pics later). I also turned up the printspeed with 50mm/s across the board.Here is the "PA-tower" results with a range from 0-0.05s, before i had to run 0.045s PA to get the same result as I get with 0.0072s now.


The printer sounds happier, and the surface quality in the prints is better than ever. Gread job @dc42 & and others who contributed!
😁 -
I have also tested the firmware and am very satisfied with the improved quality. I haven’t been able to make any fine adjustments yet, but I have increased the speed by 50mm/s as well.
-
Small behaviour test. Acceleration vs smoothing amount.
As a follow on from the PA test, PA should be dialed in once a set aggressiveness is chosen. A printer that is more aggressive with higher jerk and acceleration will require less PA as there is less of an impulse of pressure inside the nozzle as the printer changes directions and speeds.
One of the risks of higher aggression accelerations and jerk values is the amount of smoothing the input shaper applies can lead to lower tolerances, which is especially noticeable in corners intending to be sharp.
Using an IS profile like MZV and ZVD, these appear to have the least amount of aggression based smoothing.
Im not sure how the forum will handle the compression of these pictures (originally 9k photos). The test prints increase in acceleration in the thousands based on the number for that section. 1->10, 12, and 15. In ZVD the printer started to show some ringing artefacts at 8k acceleration mark, but even up to the 15k mark, there didnt appear to be any gap forming in the half moon segments. The over extrusion caused by no PA being enabled did show that at higher accelerations that less PA will be required.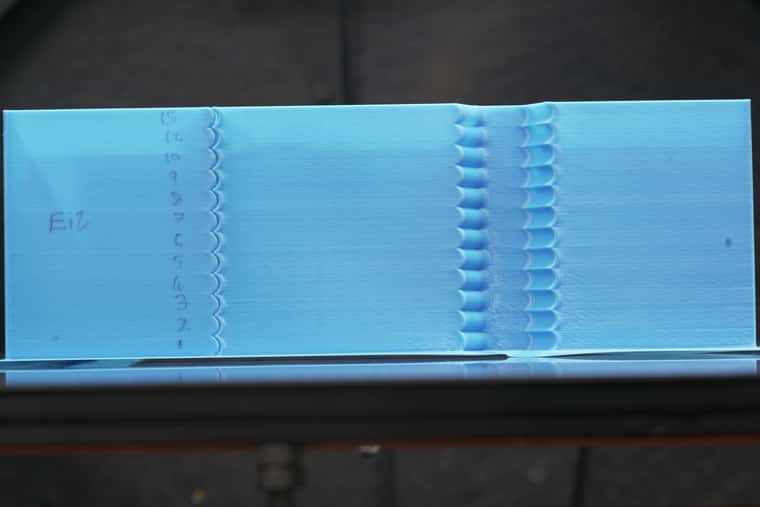
For the EI2 test, it is immediately obvious that the amount of over extrusion due to the lack of PA is greatly reduced, this is probably due to the printer being more aggressive with the smoothing of the geometry causing the over extrusion amount to be mitigated and thus hidden.
While the printed part shows no sign of ringing, what does become visible after the 8k acceleration point is the half moon segments do start to separate and thus the tolerance quality of the part does deviate from the intended shape.
( I have rewritten this section 4 times already as it just reads like word soup, so bear with me)
This does open up a new choice for printer setting optimisations in terms of optimisation methodology.
I personally require very accurate tolerancing, so my current print profiles were optimised to produce accurate parts with FW3.5.2.
With 3.6.A2+3 and the improvement of the input shaper, I am able to increase my accelerations and jerk values whilst maintaining the same tolerance level.
Accel 3400 -> 6800
Jerk 8 ->12
PA 0.0225 -> 0.0085It is important to note that the previous settings on 3.5.2 was also the hard maximum as any more and the printer risks layer shifting. This risk seems completely bypassed in 3.6.A2+3 as the printer can handle the higher aggression with ease.
I can also push the printer even faster if I throw perfect tolerances out of the window. I have been able to test accelerations up to 16,000 and Jerk values up to 16mm/s.
This means for prints of a more artistic nature that do not require high engineering level tolerancing even higher speeds are available.
Of the 8 machines currently deployed with 3.6.A2+3 none have had any failures or show any signs of input shaping oddities. One printers extruder behaviour does sound weird when pausing however it almost appears like the bug with 3.5.2 (where insertion of filament after retracting in a pause being doubled) might be the cause. This bug behaviour has not been tested in this version specifically so take it with a grain of salt.
Edit, Tested the same with jerk values from 5->30, Same behaviour of smoothing when the print gets more agressive, and less PA is required. a good value for me at 8000accel seems to be 10jerk to maintain detail
-
Today i managed to do a print that the new inputshaping couldn't help!
I printed a model with some 0.4mm debossed 7mm tall text on sides of the model the text was "HALDEN PK" (with the "PLAY" font if anyone want to try and it's rinting pretty bad between "N P" and after the "K".
I'll take some pictutes and post this evening!
Here is the results:


Print settings:
- Outer wall acceleration : 3000mm/s2.
- Inner wall acceleration: 5000mm/s2.
- Outer & inner wall jerk: 7mm/s.
- Outer wall speed: 120mm/s.
- Inner wall speed: 200mm/s.
- Pressure advance: 0.0072s.
Tbh. the artifacts look more pressure advance related than input shaping. But anyways i guess it's something worth having a look at.
-
@Exerqtor Which IS algo did you use and does it look better with rrf 3.5.x?
-
@o_lampe said in RepRapFirmware 3.6.0-alpha.2 for Duet main boards available:
@Exerqtor Which IS algo did you use and does it look better with rrf 3.5.x?
It's using ZVD and a 40.5Hz center frequency, forgot to mention that. I haven't tried reverting to 3.5 tbh!
-
@Exerqtor those artefacts don't looks like ringing to me. They may or may not be related to PA as you suggest. I suggest you try printing that piece of the print with IS and/or PA disabled, to see what effect it has on those artefacts.
Duet WiFi hardware designer and firmware engineer
Please do not ask me for Duet support via PM or email, use the forum
http://www.escher3d.com, https://miscsolutions.wordpress.com -
@dc42 I'll try without PA first and see how that fairs
☺️ -
@Exerqtor You should definitely retune PA with the new IS implementation, if you haven't.
Ian
Bed-slinger - Mini5+ WiFi/1LC | RRP Fisher v1 - D2 WiFi | Polargraph - D2 WiFi | TronXY X5S - 6HC/Roto | CNC router - 6HC | Tractus3D T1250 - D2 Eth
-
I have tested the new version and I have to say it really is a huge improvement. For me, it's the best and most important update so far. My printer is heavy and has quite a high mass that is being moved. Now I can increase the acceleration and jerk with higher print speeds and a much better surface as a result. The printer used to make a lot of noise, especially when changing direction quickly (contours of figures etc.), which is no longer the case. In short, my printer now finally prints the way I always imagined it would, in terms of speed, noise and quality. Thank you for the release and the work involved.
-
@droftarts said in RepRapFirmware 3.6.0-alpha.2 for Duet main boards available:
@Exerqtor You should definitely retune PA with the new IS implementation, if you haven't.
Ian
Oh i have
😅Went from 0.045 too 0.0072 lol -
I just tried this on the delta that I have and during calibration, the effector is crashing into the bed. After reverting back to 3.5.2, calibration works fine.
Here is a video of the crash.
Here is config.g
; Setup some global variables
global power_fail_retract = 2   ;  Retract 2mm when power fails

; Communication and general
M550 P"BigDelta"				        ; Machine name and Netbios name (can be anything you like)
M551 Preprap                        	; Machine password (used for FTP)
M552 S1					                ; Enable WiFi. Disabled for setup and testing. Enable once set up on your network.

; Enable telnet
M586 S1 P2

; Debugging
M111 S0                                 ; Debug off
M929 P"eventlog.txt" S1                 ; Start logging to file eventlog.txt

M555 P2                           	    ; Set output to look like Marlin
G21                                 	; Work in millimetres
G90                                	    ; Send absolute coordinates...
M83                                 	; ...but relative extruder moves

; Axis and motor configuration
M569 P0 S0				; Drive 0 goes backwards
M569 P1 S0				; Drive 1 goes backwards
M569 P2 S0				; Drive 2 goes backwards
M569 P3 S0				; Drive 3 goes backwards

; Assign extruder drive
M584 E3


; Set homing switch config
M574 X2 S1 P"!xstop"        ; Set homing switch configuration on S1 = high-end, active-low
M574 Y2 S1 P"!ystop"        ; Set homing switch configuration on S1 = high-end, active-low
M574 Z2 S1 P"!zstop"        ; Set homing switch configuration on S1 = high-end, active-low

; Set it as a linear delta
M669 K3

; Setup paneldue 5i
M575 P1 S1 B57600

M665 R215.062 L395.317:395.475:395.433 B160 H374.050		; set delta radius, diagonal rod length, printable radius and homed height
M666 X0 Y0 Z0				; put your endstop adjustments here, or let auto calibration find them
M350 X16 Y16 Z16 E16 I1    	; Set 16x microstepping with interpolation
M92 X200 Y200 Z200			; Set axis steps/mm

M906 X1400 Y1400 Z1400 E1400 I60	; Set motor currents (mA) and increase idle current to 60%
M84 S60                             ; Set idle timeout
M201 X12000 Y12000 Z2000 E10000        ; Accelerations (mm/s^2)
M203 X30000 Y30000 Z5000 E3600		; Maximum speeds (mm/min)
;M566 X900 Y900 Z300 E3600 P1		; Maximum instant speed changes mm/minute
M566 X300 Y300 Z300 E450 P1         ; Maximum instant speed changes mm/minute
M204 P6000 T6000                    ; Set acceleration for print and travel moves

; Configure Input shaping
M593 P"zvdd" F45

; Thermistors
M308 S0 P"bed_temp" Y"thermistor" T100000 B3950 R4700 H30 L0	; Put your own H and/or L values here to set the bed thermistor ADC correction
M308 S1 P"e0_temp" Y"thermistor" T100000 B3950 R4700 H30 L0	; 100K NTC
;M308 S1 P"e0_temp" Y"thermistor" T100000 B4658 C6.5338987554e-08 ; 104-NT Aliexpress thermistor

M950 H0 C"bed_heat" T0      ; Set up H0 as the bed heater using T0 as the sensor
M950 H1 C"e0_heat" T1       ; Set up H1 as the extruder heater using T1 as the sensor
M140 H0                     ; Map H0 as the bed heater

; Set temperature excursion warnings
M570 H0 P20
M570 H1 P20

M308 S3 Y"mcu-temp" A"MCU" ; configure sensor 3 as thermistor on pin e1temp for left stepper
M308 S4	Y"drivers"  A"Drivers"  ; configure sensor 4 as temperature warning and overheat flags on the TMC2660 on Duet
M912 P0 S-3.5               ; Calibrate MCU temp

; Fan definitions
M950 F0 C"fan0"
M950 F1 C"fan1"
M950 F2 C"fan2"

; Thermostatic fan on 1 for cooling the hotend
M106 P1 T50 H1
; Thermostatic fan on 2 for cooling the board
M106 P2 H3:4 L.3 X1 B0.3 T35:70 ; set fan 2 value

; Tool definitions
M563 P0 D0 H1                       	; Define tool 0
G10 P0 S0 R0                        	; Set tool 0 operating and standby temperatures
;M92 E1392								; Based on https://www.thingiverse.com/thing:1359717; 2023/01/06
M92 E1077.1646                          ; This is the new value for the hobb-goblin extruder.  03/07/2023
;M92 E319.2005                           ; Set extruder steps per mm.  This is for the MK8 gear

; Z probe and compensation definition
M558 P8 C"^!zprobe.in" R0.4 H4 F1200 T6000 A5 S0.01	; Z probe is a piezo sensor
G31 X0 Y0 Z-0.08 P100			; Set the zprobe height and threshold
M557 R150 S20				; Probe within a radius of 150mm and mesh spacing of 20
M376 H5                     ; Taper off bed compensation after 5mm

; Configure power failure and resume
M911 S21.0 R23.0 P"G91 M83 G1 Z3 E{-global.power_fail_retract} F1000" ; Relative movement and extrusion.  Move head up and retract 2mm filament.

M208 S1 Z-0.5				; set minimum Z
T0					        ; select first hot end

M501					    ; Load any config overrides
Here is bed.g:
M561						; clear any bed transform, otherwise homing may be at the wrong height
M290 R0 S0			; Remove any baby stepping

; bed.g file for RepRapFirmware, generated by Escher3D calculator
; 16 points, 4 factors, probing radius: 150, probe offset (0, 0)

; If the printer hasn't been homed, home it
if !move.axes[0].homed || !move.axes[1].homed || !move.axes[2].homed
  G28

; Probe the bed and do auto calibration
G1 X0 Y0 Z10 F10000        ; go to just above the first probe point
while true
  if iterations = 5
    abort "Too many auto calibration attempts"

  G30 P0 X0.00 Y150.00 Z-99999 H0
  if result != 0
    continue
  G30 P1 X96.42 Y114.91 Z-99999 H0
  if result != 0
    continue
  G30 P2 X147.72 Y26.05 Z-99999 H0
  if result != 0
    continue
  G30 P3 X129.90 Y-75.00 Z-99999 H0
  if result != 0
    continue
  G30 P4 X51.30 Y-140.95 Z-99999 H0
  if result != 0
    continue
  G30 P5 X-51.30 Y-140.95 Z-99999 H0
  if result != 0
    continue
  G30 P6 X-129.90 Y-75.00 Z-99999 H0
  if result != 0
    continue
  G30 P7 X-147.72 Y26.05 Z-99999 H0
  if result != 0
    continue
  G30 P8 X-96.42 Y114.91 Z-99999 H0
  if result != 0
    continue
  G30 P9 X0.00 Y75.00 Z-99999 H0
  if result != 0
    continue
  G30 P10 X64.95 Y37.50 Z-99999 H0
  if result != 0
    continue
  G30 P11 X64.95 Y-37.50 Z-99999 H0
  if result != 0
    continue
  G30 P12 X0.00 Y-75.00 Z-99999 H0
  if result != 0
    continue
  G30 P13 X-64.95 Y-37.50 Z-99999 H0
  if result != 0
    continue
  G30 P14 X-64.95 Y37.50 Z-99999 H0
  if result != 0
    continue
  G30 P15 X0 Y0 Z-99999 S6
  if result != 0
    continue
  if move.calibration.initial.deviation <= 0.03
    break
  echo "Repeating calibration because deviation is too high (" ^ move.calibration.initial.deviation ^ "mm)"
; end loop
echo "Auto calibration successful, deviation", move.calibration.final.deviation ^ "mm"