Core XY movement issues
-
Here is my config.g file (or most of what I have left...I started over)
; Configuration file for Duet WiFi
; (firmware version 1.20 or newer)
; executed by the firmware on start-up
;
; generated by RepRapFirmware Configuration Tool on MODDED 7.12.18; General preferences
M111 S0 ;DEBUGGING OFF
G90 ; Send absolute coordinates...
M83 ; ...but relative extruder moves
M555 P2 ; Set firmware compatibility to look like MARLIN
M667 S1 ; Select CoreXY mode; Network
M550 PRJPRINT ; Set machine name
;M552 S1 ; Enable network
M552 S1 P192.168.1.99 ;SET IP ADDRESS
M553 P255.255.255.0 ;SET SUBNET MASK
M586 P0 S1 ; Enable HTTP
M586 P1 S0 ; Disable FTP
M586 P2 S0 ; Disable Telnet; Axis Limits
M208 X325 Y415 Z0 S0 ; Set axis maxima
M208 X0 Y0 Z-600 S1 ; Set axis minima; Drives M569: Set motor driver direction, enable polarity and step pulse timing Parameters
M569 P0 S1 ; Drive 0 goes FORWARDS Rnnn Driver enable polarity: 0 = active low, 1 = active high (default 0)
M569 P1 S1 ; Drive 1 goes forwards
M569 P2 S0 ; Drive 2 goes forwards
;M569 P3 S1 ; Drive 3 goes forwards
M350 X64 Y64 Z128 E16 I1 ; Configure microstepping with interpolation
;M92 X80 Y80 Z175 E420 ; Set steps per mm
;M92 Y320 Y320 Z1400 E420 ;mod to test 64 micro stepping
M92 X320 Y319 z1400 E420 ; to test to see if it corrects the speed of both motors
M566 X600 Y600 Z100 E120 ; Set maximum instantaneous speed changes (mm/min)
M203 X6000 Y6000 Z4000 E1200 ; Set maximum speeds (mm/min) CHANGED FROM 6000 TO 600 Z NO CHG
M201 X500 Y500 Z250 E250 ; Set accelerations (mm/s^2)
M906 X1500 Y1500 Z1500 E800 I40 ; Set motor currents (mA) and motor idle factor in per cent
M84 S30 ; Set idle timeout; Endstops
M574 Z1 S0 ; Set active low endstops
M574 X1 Y1 Z2 S0
;M574 X1 Y1 S3 ; Set endstops controlled by motor load detection; Z-Probe
;M558 P0 H5 F120 T6000 ; Set Z probe type to switch and the dive height + speeds
;G31 P600 X0 Y0 Z2.5 ; Set Z probe trigger value, offset and trigger heightM557 X15:327.9 Y15:391 S20 ; Define mesh grid
; Heaters
M140 H1 ; Remap heated bed to heater 1
M301 H1 P-1 ; Set heater 1 to bang-bang mode
M305 P0 X200 ; Configure thermocouple for heater 0
M143 H0 S120 ; Set temperature limit for heater 0 to 120C
M305 P1 X201 ; Configure thermocouple for heater 1
M143 H1 S280 ; Set temperature limit for heater 1 to 280C; Fans
M106 P0 S1 I0 F500 H1 T45 ; Set fan 0 value, PWM signal inversion and frequency. Thermostatic control is turned on
M106 P1 S1 I0 F500 H1 T45 ; Set fan 1 value, PWM signal inversion and frequency. Thermostatic control is turned on
M106 P2 S1 I0 F500 H1 T45 ; Set fan 2 value, PWM signal inversion and frequency. Thermostatic control is turned on; Tools
M563 P0 D0 H0 ; Define tool 0
G10 P0 X0 Y0 Z0 ; Set tool 0 axis offsets
G10 P0 R0 S0 ; Set initial tool 0 active and standby temperatures to 0C; Automatic power saving
M911 S10 R11 P"M913 X0 Y0 G91 M83 G1 Z3 E-5 F1000" ; Set voltage thresholds and actions to run on power loss; Custom settings are not configured
-
You can not have M92 X different from Y... It will then move wrong Please set those the same and then do the tests
Valkyrie DIY High Temp 3D Printer
R&D - Engineering Designer - Viking 3D Printers
https://vkingprinter.com/ -
@deckingman
No I didn't try swapping the steppers . I bought the steppers new from a local supplier for another job. I stripped them off the previous application to use them on the printer. I have others. I will check out how to swap the motor to another driver.. maybe that will work thanks!
rj -
@pro3d
Thanks for the reply. I did have them set at being equal. After rebuilding it and making sure that I was parallel and the X was 90 degrees to the Y. I had exactly the same issue as before. If I did the test, it show the correct movement. When I did G90 x100, it would move about 3 mm as well. Which tells me that one motor is Not moving at the same speed as the other. It stopped when I changed the M92 . I am pretty confident that mechanically I am correct. That leaves an issue with the Duet card.
rj -
@fxxtoo First sorry, I meant M92, not G92. I meant resetting to same settings for both steppers.
The test I propose is to check the steppers and controllers themself, described in the commissioning part. Belt movement is measuring the stepper moves exactly. Looking at X and Y movements can have several reasons if they are not correct.
I had a new idea: your steppers are set to 1.5 A. Please check your steppers if they are types to have 2 A max current or more. If your steppers have less, this can lead to problems.
-
@joergs5
The steppers nema 23 and are 1.8 amps per phase. I am thinking of how to measure the belt movement. I am taking the motors off to measure the pulley, just in case. I am hoping it is something simple. Thanks!
RJ -
@fxxtoo I thought about the pulleys slipping. This depends on the tension you have on the belts.
1.5 A seems to be ok for 1.8 steppers. There is some valuable information in
https://duet3d.dozuki.com/Wiki/Choosing_and_connecting_stepper_motors
Nema23 has more torque than 17er, so you might not notice the slip.You can file into the shaft, but I prefer nondestructive means like loctite 221.
-
I think you should up your accel a little. 500 is very low - I dont know if it will help but you could try 1000 as I see you have 10 in jerk
Valkyrie DIY High Temp 3D Printer
R&D - Engineering Designer - Viking 3D Printers
https://vkingprinter.com/ -
@pro3d
Thanks! I have been trying to figure this belt, timing or driver issue out and haven't got into the finer tweaks yet. I will try that.
rj -
IMO, higher acceleration is likely to make things worse. Start slow, get everything working, then increase speed and acceleration in small steps.
-
Try this. Do a longish move in X, say 100 mm and measure the Y distance and direction. Then swap the A and B motors (the ones that do X and Y). Repeat the X move. If the movement in Y changes direction, then it's an issue with the motor. At least that will eliminate one variable.
-
@deckingman
Excellent I will try that. I was just starting to pull the Duet board out. Wiil try that right after lunch. and Post the results.
Do you mean remap the motors or physically swap the motors?
Thanks!
RJ -
@fxxtoo I would think to physically swap them.
-
@phaedrux
Thanks. I just did that. Same thing. ARRGG!
RJ -
@fxxtoo at least you know it doesn't follow the motor, so the motors are ok.
-
@deckingman
just finished swapping the steppers. I left the M92 the same. Before I swapped the motors, I did a G1 x250, the head did not move in the Y. I just did a I did a G1 x250 and Y did not move. So the same as before.
RJ -
@phaedrux
Thanks. At least that is some progress.
RJ -
I looked at
https://forum.duet3d.com/topic/4958/y-axis-moves-when-only-x-is-commanded/10
again, where you made some pictures of your printer.I wondered whether the linear X guide is connected stable enough (I mean the linear guide in the middle, connected to hotend). I had a problem at my own CoreXY printer that moving by hand was ok on one side, but not at the other. It blocked totally because the connection bends a bit and the one linear guide blocks.
In your picture the one side is connected by a screw, on the other by a linear mgn guide which is very good to level temperature effects. But the disctance between linear guide and aluminium cage seems to be different at both sides and the linear guide alone seems to be too little support (one or two screws on one side). The difference at the mgn side seems to be less than the other side. On the mgn side the belts are not in the middle in respect to the cage.
The difference leads to different Y positions at the both sides and leads to become stuck because the pulleys have different positions.
-
At this side
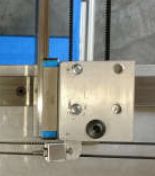
the left belt side is very strange. It seems to go around a shaft and so a nonlinear movement is introduced.
-
@fxxtoo I don't think it has anything to do with your printer's problem, but what @JoergS5 is pointing out is that the X axis bearing block at the P2 pulley assembly appears to be thicker than the spacer at the end of the X axis rail at the P1 pulley assembly. When I built my printer, I made the spacer to match the thickness of the bearing block. That keeps the P1 and P2 pulleys at exactly the same Y position when the rails are square.
It shouldn't make any difference as long as you ensure that the X and Y guide rails are square when you tension the belts. In other words, don't use the pulley position along Y to determine if it's square, use the guide rails as the reference.
@JoergS5 The left side belt comes off the pulley in the block and goes directly to the extruder carriage. You're seeing parallax - there's no shaft- the top of the pulley assembly has 4 tool access holes for screwing the assembly to the Y axis bearing block..