Build Log: Fun King 3D FK-1 3D Printer
-
Hello everyone! I am Glenn from Fun King 3D and a few months ago I decided to design and build my own 3D Printer from the ground up.
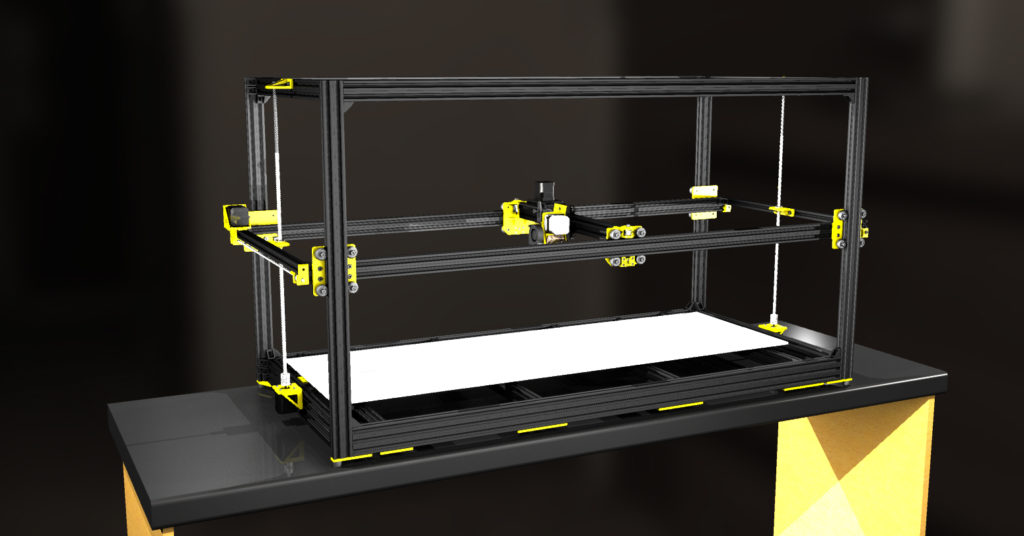
This printer will have a 400x1200X475mm build volume and will feature a Duet Ethernet/PanelDue, Bondtech Extruder, E3D V6 Hotend, and all printed parts will be done in IC3D PETG that was custom colored for us. (Available from their website for purchase.)
Quick Note: I intentionally did not research other printers/ways to do what I have done here. I have had a few people give me advice to go look at this and that. I am always open to suggestions, ideas, criticism, etc.. but please note that I am not looking to build this like someone else's design. This is for the purpose of educating myself and my son, as well as trying to do things outside the box. I just feel it is in my best interest to not copy current designs in the hopes of stumbling upon something new, better, different, etc.. Again, I am not saying that I don't want input. I have had some great input from people. I just want it to be known that I am not looking to (intentionally) copy any current designs. (I hope this paragraph does not make me sound like a jerk! That is not my intentions.)
With that said, there is information available on our website at:
https://www.funking3d.com/FK-1And a teaser trailer video available at:
https://youtu.be/YxHpcLYmU1IA huge THANK YOU to the following companies for working with us on this! In no particular order:
Duet3D
IC3D Printers
E3D
BondtechAbout Us: Fun King 3D is a joint venture between a father and a son to learn and teach things about 3D Printing and Electronics Projects. Fun King 3D is not a business. We are here to have fun and learn something new every day. You can find us most places @funking3d and twitter is our main place of contact.
If you have questions or comments, let it rip. We love to have dialog with other people in the 3D Printing community!
Thanks for the space.
-
Space reserved for future expansion.
-
You've definitely got the start of a very original looking printer design. Really look forward to seeing where you take it. A stationary bed is definitely a good call for one so massive. Kudos for trying to stay outside the box on design decisions. It can be so easy to get trapped by the ideas of the past.
-
Hello,
Looking at the design the main problem you will have is keeping the frame ridged over these distances.
My take on how to improve it.. Use corexy on the moving frame to minimize the moving mass. Also, use 4 lift screws to raise it. The Duet can use a BL-Touch to level the frame with the stationary bed using the 4 steppers to minimize twist. If you use this approach then you also only need 2 bearings to keep the moving frame square to the stationary frame rather than the 4 shown. Less likely to bind because it is not over constrained. The two in opposite corners would be ideal.
Depending on your budget, linear rails will be more accurate and the interior space can be enclosed and heated.
FWIW.
Looks like a cool project. Make dinosaur bones!
Cheers,
Mark Napier
-
Also, on my printer I have problems with the open box frame. Even with gussets and angle brackets everywhere I can bolt them on there is still a vibration that is noticeable. Only solution I see is to bolt on exterior panels to stiffen the frame. For this one you might consider some method of cross bracing.
Have Fun!
-
One way you may consider to add cross bracing is guy wires on the exterior corners providing tension and pulling the frame members together.
I would also think that reducing the moving mass of the print head as much as possible would keep the vibrations and ringing down. Bowden rather than direct drive to eliminate the stepper and heavy bondtech extruder weight.
Corexy may be more appropriate for that as well since it efficiently gangs two motors together versus single motors moving larger seperate loads. Directional speed of travel moves would be more consistent as well versus Cartesian I would think. The belts would also help keep the cross member rigid and parallel.
-
Just wanted to say -- absolutely love your design here. I imagine it being great for printing cosplay pieces. Would you be willing to share an estimate of your materials cost? Great Job!
-
Thank you for the input. I have not concentrated on design for making the frame rigid as I want to have the frame built for testing. But your suggestions are good.
As for the CoreXY, the premise is understood and if I need it as a plan B that is where I will likely go. Again, the point of this was to try to be different. To think outside the box in the hopes of stumbling upon something great.
")
I will absolutely share the cost when I know. The issue currently is that during the prototyping stage, more money is spent than needed as I test things. My best guess is $1500 at this point. The aluminum for the frame was $330 alone.
The whole project is being sourced so that others will be able to build one eventually.
Thanks all!
-
@Fun-King-3D That's great man.... i'm guessing the cost of your rail system was probably not the cheapest. I really, really think I want to build this printer or a similar hbot.
-
Nice Project! Good idea to involve your son, that is what I'm also doing. We are planning to build a larger delta and our goal is to think outside the box and design everything in 3D and also manufacture parts by ourself and not use any printed parts. We are not trying to build the cheapest printer. Accuracy and rigidity is priority.
-
Very nice design!!! But as an engineer and designer myself I must ask: WHY 1200mm of Y?
 Is there any specific needs and projects you and your dad need such huge length? How do you plan to coupe with warping?
Thanks!
-
Looks like it could be fun. (Pun very much intended). As someone that can't look at any printer without wanting to tinker, I see some things I would want to change.
Obviously such a large printer is going to have to be built with some compromises without cost getting insane. Otherwise we end up with a $500,000 milling machine.
One of those compromises may be printing primarily with a large diameter nozzle, and tall layer heights. I would rule out printing with a .4mm nozzle. (Might work ok within a smaller portion of the bed), unless it turns out to be rigid enough. Tall layer heights could be more forgiving here.
I think the Cartesian arrangement is fine. Core XY can be less moving mass, but it is frequently built in a way that it really isn't. With large nozzles appropriate for large format printing you may end up printing slower anyway.
I figure you are already aware of this. Joining the extrusions with blind screw method here would be best. The corner brackets won't do much (Don't ask me how I know this).
As mentioned earlier. I would go with either 3 or 4 lead screws on the Z axis. 3 is preferable if it works, but I would probably do 4. At this point you probably don't have to worry much about weight with 4 z motors.
This design relies a lot on the 20x40 extrusions being perfectly straight with minimal deflection. So maybe this isn't a concern, deflection is acceptable and the extrusions you got are really straight. But this is something I would test.
I would consider going with a 20x60 extrusion on the long axis. More costly option would be to add a linear guides to that. A possible budget oriented solution if the current design is just not working would be to add a second narrower extrusion on the inside of each side with holes drilled regularly along its length for adjustment. This would be kind of tedious to get adjusted but it could work.
It will be fun to see this progress.
-
@brunofporto The 1200mm came from the fact the bed material comes 48" wide (1200mm) and it makes the bed larger than the gCreate big which is what caused this project to start. The Big has a 42" wide bed so I had to one up Gordon from gCreate. LOL!
We want to print things like skateboard decks, street signs, etc.. It is really more of a Fun thing. Hmm Fun King Fun Thing. LOL! (I am the Dad BTW.)
As for warping, where exactly are you thinking the issue will be? In the print or in the bed? (This is a legit question.) The bed will be made of Mic-6 Cast Aluminum Tool Plate which is cast in a way to resist warping even when heated. It will also have 8 mounting point to the frame. The entire service will be heated with a 120V silicone heater.
-
@emily said in Build Log: Fun King 3D FK-1 3D Printer:
Looks like it could be fun. (Pun very much intended). As someone that can't look at any printer without wanting to tinker, I see some things I would want to change.
Honestly, I had to finally just put my foot down and call it good. There are still things I will change, but if I did not just stop this thing would be in the design phase forever!
Obviously such a large printer is going to have to be built with some compromises without cost getting insane. Otherwise we end up with a $500,000 milling machine.
One of those compromises may be printing primarily with a large diameter nozzle, and tall layer heights. I would rule out printing with a .4mm nozzle. (Might work ok within a smaller portion of the bed), unless it turns out to be rigid enough. Tall layer heights could be more forgiving here.
I have plans to start with a .4 as that is what is already on the hotend and what I run on all of my other printers, but I also have plans to play with other sizes in the future. I want to be able to print larger objects quicker, so the larger diameter is a must. The hotend will be swappable, so I am also planning a 3mm option.
I figure you are already aware of this. Joining the extrusions with blind screw method here would be best. The corner brackets won't do much (Don't ask me how I know this).
All connections with the Openbuilds v-slot will be blind screwed as well as adding the brackets. I built an AM8 from the Anet A8 and it is only bracketed. While it is fairly rigid, I plan to disassemble it and blind screw it as well. (One day. It prints really well and I hate to mess with it. LOL!)
As mentioned earlier. I would go with either 3 or 4 lead screws on the Z axis. 3 is preferable if it works, but I would probably do 4. At this point you probably don't have to worry much about weight with 4 z motors.
I have looked into this and have a couple ideas for options.
Out of curiosity, why would you think it would need more than the 2? (What is the concern?) I won't tell you my thoughts yet, I would like to hear yours to see if we are on the same page.
This design relies a lot on the 20x40 extrusions being perfectly straight with minimal deflection. So maybe this isn't a concern, deflection is acceptable and the extrusions you got are really straight. But this is something I would test.
I would consider going with a 20x60 extrusion on the long axis. More costly option would be to add a linear guides to that. A possible budget oriented solution if the current design is just not working would be to add a second narrower extrusion on the inside of each side with holes drilled regularly along its length for adjustment. This would be kind of tedious to get adjusted but it could work.
The bottom "box" is 2060 which I did to allow the additional fastener to the uprights. (It also allows me 20mm under the cross members that the bed attaches too to allow wires and such to pass.) I did a few (very non scientific) tests and with the length it is running the deflection "shouldn't" be an issue. LOL! 2020 had too much deflection though.
It will be fun to see this progress.
It has been fun to this point for sure and is now getting really exciting.
Thank you for this post. These are all great points.
-
Just a quick update as to the progress:
My DuetWIFI and PanelDue have arrived. I have also received my BondTech extruder and BLTouch sensor.

These, of course, are some major players in the build.
Last night I took the time to cut all of the aluminum v slot (openbuilds.com) and brought them back to the studio. If you have never cut aluminum, I will tell you that it creates a massive amount of "glitter" and I will be cleaning my shop of it for months to come. LOL!

(This photo was before I cut it to square the ends.)Here it all is cut and waiting to be tapped.

So, now I start to assemble the frame! It is going to take longer than I want as I need to film the entire process for our YouTube channel, but it will be worth it!
Stay tuned!
-
Frame is built and the movement on this thing is incredibly smooth!
I could not upload the gif here due to size, so if you would like to see it, then you can check out this tweet:
https://twitter.com/FunKing3d/status/1033090700122968064There has been a couple of the printed parts that I needed to address due to clearance issues, but things are really coming together.
The last of my stepper motors have arrived and now I am just waiting on the power supply and a few pieces of hardware.
I will start setting up and testing the electronics very soon.
-
So just another quick update. Sometimes I forget that the public has not seen the latest progress as I have been recording stuff, but have not edited/released it yet.
The entire frame is built. Next comes belts and motors to begin to get ready to make stuff move.
But the crowning jewel so far is the extruder assembly.

There is so many beautiful parts making up the extruder on this printer and I look forward to seeing what my DuetWifi will do with it.
-
Well last night the printer finally moved under it's own power!!!! (video link below.)
I am going to admit something here... I am pretty stubborn and set in my ways. Most of the time I blame it on my OCD, but that is not always true. LOL! When I first thought about the Duet board, I told myself it would be fine and I would just hook a Raspberry Pi to it and use Octoprint just like the rest of my printers. But after playing with it last night, I love the interface! It is amazing to me that there is a console with keyboard on there! (Now I need to figure out how to tweet from there. LOL!
This has been an epic journey so far and it is only going to get better!
I have a little bit of cable management to do and then I will get the bed installed. After that, it will be time to lay down some plastic!
Thanks for following along so far!
Here is the link to the stream last night where it finally powered up and moved: https://youtu.be/9YczLdAs_zw (Motion is around 8 minutes in.)
Again, HUGE THANK YOU to
Duet3D
IC3D Printers
E3D
Bondtech
Antclabs
OpenBuilds
Kuntry3D
Scott McLellan
Uncle Ron
All of the other friends of the channel who donated and supportedAnd very importantly, my wife for dealing with all of this!
-
@fun-king-3d Congratulations on not letting out the blue smoke! It looks like it was a really fun project. I hope to be able to do something similar with my own son some day. I can only imagine what 3D printing technology will be like 8 years or so from now when he'll be old enough to enjoy it. Can't wait to see your first print.
-
I want to give a HUGE shout out to our latest sponsor to join the FK-1 project... Printed Solid has stepped up to supply a PEI sheet! But not just a PEI sheet, a custom laser cut 16"x48" (Just slightly larger than 400x1200mm!) Thank You Printed Solid!