Core-XY based on Rat Rig V-Core and Duet 2 Ethernet
-
Here a couple more links to Thingiverse with my bed spring mount and the strain relieve for the bed heater wires (Fusion 360 links included).
https://www.thingiverse.com/thing:3636671
https://www.thingiverse.com/thing:3636679Also a box for the PSU I use till I have my mains AC bed heater.
https://a360.co/2VL0WOC
Consider these quick and dirty designs, I am all about functional, not "nice looking".
Have FuN!
Jan -
@scachi I have read that people dislike running the teeth on plain idler. I can imagine on a very small diameter idler that could be an issue but the idlers in the V-Core are pretty big actually. Once I get printing I shall be on the lookout for issues I guess.
Jan
Regards Jan
--
My Printers:
#1 Prusa i3 MK3 kit all stock (Retired)
#2 Rat Rig V-Core Core-XY (Almost finished but fully usable)My Experiments:
https://www.thingiverse.com/snoozer17/designs -
@snoozer
Yes, I guess it would be fine. I finished building the printer today. Runs smooth during a short test without printing. I am waiting for some 24v parts to arrive before I can start printing/the real fun. -
@scachi what is your plan regarding the print surface and bed ? Will you use the aluminium plate that came with it ? Wil you use a z-probe and if yes what kind ?
Jan
Regards Jan
--
My Printers:
#1 Prusa i3 MK3 kit all stock (Retired)
#2 Rat Rig V-Core Core-XY (Almost finished but fully usable)My Experiments:
https://www.thingiverse.com/snoozer17/designs -
@snoozer Thank you for sharing your models, I will print your "Bed Heater Strain Relieve" as a real print test then.
I have a thick and heavy (2kg) aluminium bed from my old printer that I am using now on this one. It has a magnetic sheet / switch plate system attached. I use some thin sheet of gfk as a print surface. Worked fine on my old printer.
For the Z probe I am using some more parts from my old printer, a precision piezo (screw mount version), my x carriage:
https://www.thingiverse.com/thing:3637202 -
I have the temporary PSU mounted to the frame now. It is actually not bad so far, the fan is temp controlled and even with the bed heating for hours it only gets hand warm and the fan is pretty quiet.
The macro is also done now to move all axis out of the way quick for easy access to the print bed. Using a Z max endstop for that.
Here is the content of my macro
; Move-Clear.g
; Move axis out of the way to get maximum possible room for access to print
;
M574 Z2 S1          ; Set active high endstops at the HIGH end of X
G91                 ; Relative positioning
G1 S1 Z+320 F2000   ; Move bed down until the endstop is triggered (1st pass)
G1 Z-3 F2000        ; go back a few mm
G1 X250 Y270 F30000 ; Move the hotend out of the way but leave Z-probe above bed
G1 S1 Z+20 F100     ; move bed down until the endstop is triggered (2nd pass)
G92 Z305            ; set Z position to axis maximum
M574 Z1 S2          ; Set endstops controlled by probe
G90                 ; absolute positioning
I am not clear how I can show code here in this forum as fixed width text.......
Thanks @phaedrux, fixed that now.
Jan
Regards Jan
--
My Printers:
#1 Prusa i3 MK3 kit all stock (Retired)
#2 Rat Rig V-Core Core-XY (Almost finished but fully usable)My Experiments:
https://www.thingiverse.com/snoozer17/designs -
@snoozer said in Core-XY based on Rat Rig V-Core and Duet 2 Ethernet:
I am not clear how I can show code here in this forum as fixed width text.......
-
@phaedrux Thanks for that !!!
-
This cheap sh** spring steel bed is killing me. Its warped and so flimsy that it wont lay flat. The magnets I have are not strong enough to hold it down through the aluminium bed. I was impressed with the trigger height difference, never thought it made such a difference. The aluminium bed alone was 0.38 mm with the steel sheet its 1.78 mm.
Jan
Regards Jan
--
My Printers:
#1 Prusa i3 MK3 kit all stock (Retired)
#2 Rat Rig V-Core Core-XY (Almost finished but fully usable)My Experiments:
https://www.thingiverse.com/snoozer17/designs -
@snoozer
Your springs mounted to adjust the bed will cause it to bend too as it isn't located at a good position. The screw should better be inside of the spring I think.My aluminium bed is 8mm thick
-
@scachi, this is a temp setup only. The springs cause minimal deflection, its the spring steel sheet having issues. The proper bed I get will be somewhere between 6-8mm and the bolts will pass through the springs then on a 3-point mount. Once my piezo probe has arrived I will try glass and also keep looking for a PEI coated proper spring steel sheet.
PS: Just tried printing now....... I am not getting anywhere with this sheet. I'd say I repurpose that as spatula or what ever...... I check if I can somehow use the Prusa sheet, that's at least in shape.
-
Got my VERY first layers down now. Took me some time to finally acknowledge the the low cost Spring Steel Sheet was a waste of money. Its way to thin and wont lay flat at all. So I have used the PEI surface from the Prusa and clamped it down in a crude way.
I now have a trigger height of 2.12 mm. I was surprised by that. Here is how I figured that out.
I heated the bed to 65 degree.
M564 S0 ;Disable limitsThen I jogged the bed to just clamp a piece of paper under the nozzle
G92 Z0 ;Set Z=0
G1 Z10 ;Move Z away a bit
G30 S-1 ;Lower Z till probe triggersThe Z reading I would use in the config.g, homex.g and homeall.g as trigger height. Then I ran Auto Bed Compensation and the print after.
Here a short clip of the machine printing:
And here the result without ANY tuning done at all, just as it came out 1st time.

I have to look into another matter now with an Ethernet Switch, done what I wanted to do for today. I am looking into fine tuning tomorrow and also figure out a part cooling fan mount.
Jan
-
I have tried for a number of hours now to get it level as much as I can. The curve in the middle is just a combination of the Prusa sheet and the non presence of magnets I suppose.

The auto compensation works real well, the 1st layers now look better and better. Still have no part fan, only had 12V fans around and apparently a buck converter is a bad idea on the PWM output. Have a couple of 24V on order now.
I am well happy so far how this turned out. Really well made Kit the V-Core and Duet 2 is a delight so far.
Jan
-
The buck converter supplied a 12v input to the vfan pin which powers the fans. The duet switches PWM on the negative side.
-
To late now, I have 24V fans ordered now from Radionics, they will arrive at work before I am back home here on Thursday. Cant do anything till then anyway, at work for the duration. But thanks for the tip, much appreciated.
Jan
-
@deckingman, I ask you cause you seem to have a lot of knowledge when it comes to practical mechanical engineering. I am still not all that clear how I go about fixing glass and flex plate surfaces to a aluminium print bed. I have settled for 340x340 in size but thickness I am not yet clear. Given is a rather large bed I would almost think 15mm but is that realistic to get heated ? For a glass plate I think I would have 4 holes on the sides with knurled M6 or M5 bolts to clamp down an aluminium angle to hold it down. For spring steel I was thinking to make a pattern of holes, example a 5.5mm hole and a M3 thread in the center to have round countersunk magnets bolted to the plate BUT flush with the surface or even 0.5mm below. Do you think the stainless M3 bolts for the magnets and the magnets as such would cause warping of the aluminium plate when heated due to different expansion of aluminium and stainless bolts ? Would the hole pattern itself cause significant warping when heating ?
Its a lot f questions, but given the price and work involved I'd rather get this right the 1st time. I am even thinking of sending a CAD file to a factory, Weerg for example can make such a plate for approx 450 Eur including all the magnet pattern (25 holes and center holes with M3 thread etc.).
Jan
Regards Jan
--
My Printers:
#1 Prusa i3 MK3 kit all stock (Retired)
#2 Rat Rig V-Core Core-XY (Almost finished but fully usable)My Experiments:
https://www.thingiverse.com/snoozer17/designs -
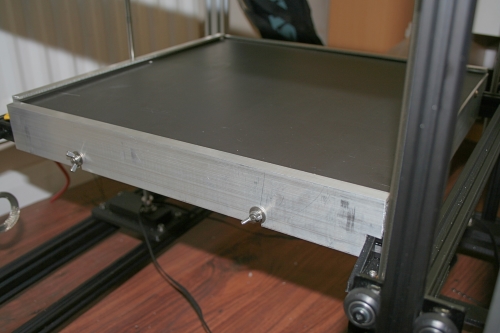
@snoozer My preference is to have removable build surfaces. Mostly because it allows me to slide one out as soon as a print is finished, then slide another one in so that I can start printing again without waiting for the bed to cool down and heat right up again. For my 400mm x 400mm bed I use 10mm thick aluminium tooling plate but in hind site, 8mm thick would have been sufficient and would warm up faster. On top of that, I use 6mm float glass (un-toughened). I choose glass because it's flat (as long as you don't get it toughened) and relatively cheap. 6mm thick is surprisingly difficult to break. I use 3D lac on the glass because it "just works". I can lay the first layer down at normal print speed - generally 90mm/sec but have managed 300mm/sec and I've never seen anyone lay a first layer down at anything like that speed using any other print surface. Oh and it allows me to print things like this on end https://www.youtube.com/watch?v=vG1WqijJ634&t=63s
To hold the glass in place, I use a couple of thumb bolts with washers that screw into Tee nuts in the bed frame. Then I use some aluminium angle from front to back, with a couple of vertical slots that line up with the thumb bolts. I cut the aluminium angle down along it's length to form just a small lip where it holds the glass. I just press down on the aluminium angle and tighten the thumb bolts to hold the glass in place. To release the glass, I simply slacken the bolts an slide it out forwards. Here is a picture of the side view (without glass). The aluminium build plate was painted matt black because I used to have an IR probe (but hat doesn't play nicely with 3D Lac).
I have no experience of using sprint steel (have no need of it), so can't comment on how best to fix it.
HTH
-
I'm doing the same on a smaller scale 150x150mm; but magnets seems to be stuck in customs so can't say much about how it'll work.
Since aluminium spread the heat quite well I had enough space between my heating traces to embed 3x3 grid of 6x20 pockets from the underside and still have a perfectly uniform temperature on top (measured with thermal camera and masking tape)
For the glass I'm hoping to use magnets as well, use diamond annular cutters or hole saws to make a series of overlapping cuts to make up a shallow pocket to embed something for the magnets to attract to. Waiting to try out the steel first before I start messing with the glass
Havent decided on registration yet, pins, edge, just the magnets, idk,
-
@deckingman Thanks for that explanation. You told me before about the float glass and why you use that. It would be what I would try to use as well. I have room on the top of the print bed on this printer. The bed would be wider than the actual print surface which I also will have removable. I would have Z shaped aluminium profiles along both sides to hold down the glass or 4 clamping arms, not sure yet. That depends also on how I do the enclosure and how accessible it will be then. On the rear end I also have some room on top where I would put two dowels to line up the surface so its forced in an accurate position every time. I have done a bed design yesterday evening with 25 holes for magnets and M3 threads, mounting, gap for thermistor close to the surface etc in Fusion 360 to check a price with Weerg....... yea..... not really, I was slightly unrealistic with my preliminary pricing. It would be almost 600 Euro for a single bed on my dimensions.
I get the tooling plate of cast aluminium machined to size 0.1mm tolerance, that should be OK. That was about 80-90 GBP in 15mm I think, have to check 10mm. There was a couple of other suppliers which state no tolerance, they are cheaper but I rather not chance that.
The flex plate is a different drama, I am almost tempted to give up on that for now at least. I can not find anything trustworthy re spring steel in the right dimensions and thickness and it is always with PEI sticker, not powder coated except one Crowdfunding thing that was unsuccessful. If I come back to that idea I can still rethink magnets in the bed and add them later. My reason behind Spring Steel is only because I know it from the Prusa, But you and many other people are very successful with glass, so its must be just a matter of getting used to it. From a surface quality point of view glass must be better anyway and my Prusa print surface does have cracks in places which shows on the bottom side of a print.
I have read you posts re proper mechanical design for a bed that has 0.1mm height difference on the entire surface in a different thread. That is exactly my thinking. Auto Bed Leveling is great but good mechanical build is better in my view. So that's what I am aiming for. How did you mount your tooling plate to the printer ? how do you adjust it to be level in relation to your nozzle ? Re color, I will use a piezo probe, the color will not matter for me.
@bearer, you add magnets from the underside, do I understand that correct ? How much aluminium do you have left between the magnets and your print surface ? I have tried magnets under my original V-Core 3mm plate with the Prusa surface on top and found it did not work for me. My approach would have been to have magnets from the top to avoid having aluminium between the magnets and the surface. The other worry I had was the different expansion with heat and how that would have an impact on the flatness of the aluminium print bed. I understand you don't yet have the magnets so I guess you dont yet have an answer to the latter ?
Re metal inserts in glass, that would worry me even more. I will take a similar path as deckingman did, clamping down the sides and having dowels at the rear end for exact positioning. Plus that way having multiple glass plates to swap is just easier cause of less customisation.
Thank you both for your input. I really value that you share your experience !!
Have FuN!
JanRegards Jan
--
My Printers:
#1 Prusa i3 MK3 kit all stock (Retired)
#2 Rat Rig V-Core Core-XY (Almost finished but fully usable)My Experiments:
https://www.thingiverse.com/snoozer17/designs -
@snoozer said in Core-XY based on Rat Rig V-Core and Duet 2 Ethernet:
How much aluminium do you have left between the magnets and your print surface ?
Only tested around 0.7mm stock left, with random magnets i had on hand; still waiting for the good ones - but seems to let flux through and I can go thinner if needed. Primarily want to keep the top free of adhesives in case I at some point want to glue something directly on, and subsequently use solvents to remove the adhesive again. As far as glass goes, its still on the thinking stage, but wold be convenient to use the same method for everything. As far as differential expansion goes, i didn't measure expansion, but temp was very uniform as far as I could measure with the thermal cam.